Update (April 27, 2015)
Guess what — this article’s out of date. If you want the latest version of the code for programming constrained text fields in iOS with improved features, point your browser at the revised article, How to program an iOS text field that takes only numeric input or specific characters with a maximum length. It even comes with a sample app that you can download!
The original article
One of my favorite ways to get a deeper understanding of programming in a given language or for a given platform is to pick up a highly-rated book for that language or platform and go through all the example tutorials and exercises, no matter how simple they seem. Although I often end up covering ground that I’ve gone over so many times before, I usually find that one or both of the following happen:
- I end up learning something I didn’t know before, even in subject areas where I consider myself well-versed, or
- I decide to see if I can improve the implementation or add a new feature, and in the process, learn about a feature new to me or figure out a new way to use a feature I’m already familiar with.
 I got Apress’ Beginning iPhone Development with Swift for less than half price during their recent Cyber Monday sale, and I’ve been working through its tutorials during the holiday downtime. It’s a revision of a book released in late March 2014, Beginning iOS 7 Development (which I also own), updated to cover both a language and OS version whose first betas were released in June and whose 1.0 versions were made available in September. Given that the book was released in mid-November, they updated it in a hurry, which means that the book contains a few errors and oversights. In spite of this, I still recommend the book because:
- The book is pretty much a straight “port” of an excellent book, Beginning iOS7 Development, for Swift and iOS 8, and
- where some may see only errors and oversights, I also see learning opportunities.
The oversight
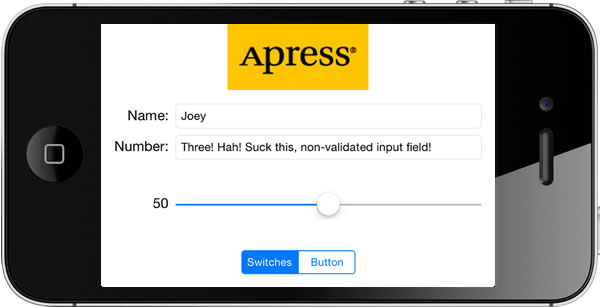
In chapter 4 of Beginning iPhone Development with Swift, whose title is More User Interface Fun, the exercise is to build an app that features a number of commonly-used user interface controls. The app you build starts with a couple of labels and text fields laid out so that they look like this:

The user is supposed to be able to type in any kind of character into the Name text field, and only numeric characters into the Number field. The exercise in the chapter walks you through the process of setting the Keyboard Type of the Number field to Number Pad using the Storyboard and the Attributes Inspector:
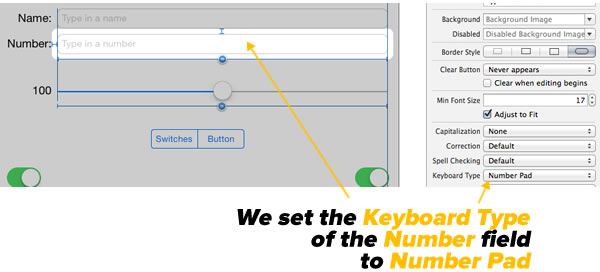
While doing this goes a long way to preventing non-numeric input, it isn’t enough. On the iPhone, the Number Pad keyboard allows only digits to be entered…
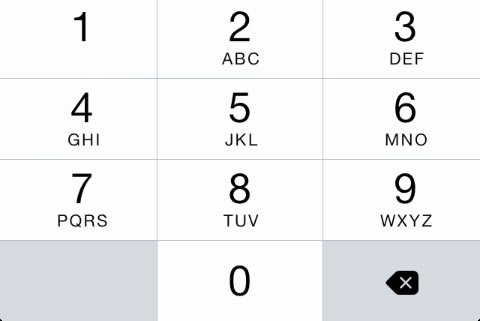
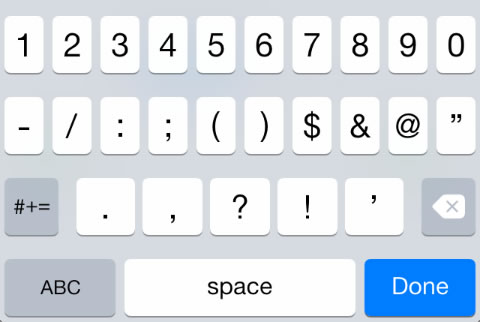
…which works just fine if the user needs to enter positive whole numbers. If you want the user to enter negative numbers or use a decimal point, you’ll need to use the Numbers and Punctation keyboard, which features some additional characters. Here’s what it looks like on the iPhone:
On the iPad, choosing either the Number Pad or Numbers and Punctuation keyboard gives you the same thing. It looks like this:
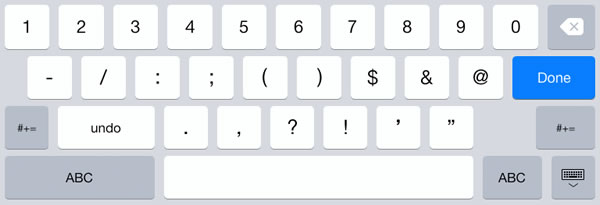
These keyboards make it possible to enter some decidedly non-numeric input into the Number field.

If that weren’t enough, there’s also cut/copy and paste to contend with. The user can easily type an alphabetical string into the Name field, copy or cut it, and then paste it into the Number field. Clearly, you need to take more active measures if you want to ensure that a field meant for numeric input gets only numeric input.
Beginning iPhone Development with Swift points the way to a solution, but stops short. Here’s what the book says on page 110:
Tip If you really want to stop the user typing anything other than numbers into a text field, you can do so by creating a class that implements the
textView(_, shouldChangeTextInRange:, replacementText:)method of theUITextViewDelegateprotocol and making it the text view’s delegate. The details are not too complex, but beyond the scope of this book.
This is wrong for two reasons:
- I don’t think that disallowing unwanted characters from being input into a text field, which I think is a pretty basic UI feature in this day and age, is beyond the scope of the book, and
- the method that should be used is part of the
UITextFieldDelegateprotocol, not theUITextViewDelegateprotocol. As I said earlier, they rushed the production of this book.
In this article, I’m going to correct this oversight and show you how to do the following in iOS 8 and Swift:
- Intercept the user’s input as s/he types or pastes into a text field
- Allow only a specified set of characters to be entered into a given text field
- Limit the number of characters that can be entered into a given text field
- Confirm that the value entered into a text field is numeric
Intercepting the user’s input as s/he types or pastes into a text field
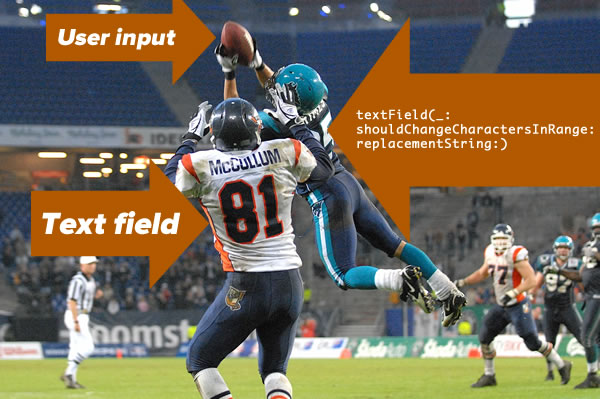
Creative Commons photo by Torsten Bolten, AFpix.de. Click the photo to see the source.
Beginning iPhone Development with Swift was right: the way to really control what the user can enter into a text field is to implement this method in the UITextFieldDelegate protocol:
func textField(textField: UITextField,
               shouldChangeCharactersInRange range: NSRange,
               replacementString string: String)
     -> Bool {
  // code goes here
}
This method, called textField(_:shouldChangeCharactersInRange:replacementString:), is automatically called in view controllers that conform to the UITextFieldDelegate protocol whenever the user adds a new character to a text field or deletes an existing one. It gives you three parameters to work with:
textField:The text field whose contents are being changedrange:The range of characters to be replacedstring:The replacement string
If we want to accept the changes that the user made to the text field as-is, we have this method return true. If we don’t want to accept the changes, or if we want to alter them, we have this method return false.
In order to implement this method, we need to make the view controller conform to the UITextFieldDelegate protocol. We do this by adding UITextFieldDelegate the view controller’s declaration. In this example, the view controller is simply named ViewController, so we’ll added UITextFieldDelegate to its declaration like so:
class ViewController: UIViewController, UITextFieldDelegate {

  // The rest of the class' code goes here

}
In this example, the text field that we want to make “numbers only” is named numberField. We need to specify its delegate — the class containing the UITextFieldDelegate protocol methods that will be called whenever changes are made to its contents. We’ll specify that the view controller should be the delegate, and we’ll do it in the viewDidLoad() method:
override func viewDidLoad() {
  super.viewDidLoad()

  numberField.delegate = self
}
Allowing only a specified set of characters to be entered into a given text field
Now that we have the view controller properly set up as a delegate for calls from the numberField text field whenever changes are made to its content, it’s time to implement textField(_:shouldChangeCharactersInRange:replacementString:). We want to implement it in such a way that the only characters that can be entered or pasted into numberField are the digits 0 through 9 and the . and – characters.
Here’s the code:
func textField(textField: UITextField, shouldChangeCharactersInRange range: NSRange, replacementString string: String) -> Bool {
  var result = true

  if textField == numberField {
    if count(string) > 0 {
      let disallowedCharacterSet = NSCharacterSet(charactersInString: "0123456789.-").invertedSet
      let replacementStringIsLegal = string.rangeOfCharacterFromSet(disallowedCharacterSet) == nil
      result = replacementStringIsLegal
    }
  }

  return result
}
The method starts off with the assumption that the user’s input is legal, and then applies the test to see if that’s actually the case. It then checks to see that the text field whose contents changed is numberField, the field whose content we want to restrict to numeric values. Next, it sees if the replacement string contains at least one character; if it doesn’t, there’s no point testing its content.
The method makes use of an NSCharacterSet instance to define the set of characters that we don’t want to allow inside numberField. Since the set of disallowed characters is much larger than the set of characters we want to allow in numberField, we define the set by first creating an NSCharacterSet of allowed characters and use the invertedSet method.
Once we’ve defined a set of disallowed characters, we test the replacement string string to see if it contains any of them. If the replacement string string contains disallowed characters, string.rangeOfCharactersFromSet(disallowedCharacterSet) returns the range of the first disallowed character. If it doesn’t have any disallowed characters, it returns nil.
Limiting the number of characters that can be entered into a given text field
Now that we’ve restricted numberField to a small set of characters — the digits 0 through 9 and the . and – characters — let’s set a maximum number of characters that numberField can contain; let’s make it 6.
Here’s what our code looks like with this new constraint:
func textField(textField: UITextField, shouldChangeCharactersInRange range: NSRange, replacementString string: String) -> Bool {
  var result = true
  let prospectiveText = (textField.text as NSString).stringByReplacingCharactersInRange(range, withString: string)

  if textField == numberField {
    if count(string) > 0 {
      let disallowedCharacterSet = NSCharacterSet(charactersInString: "0123456789.-").invertedSet
      let replacementStringIsLegal = string.rangeOfCharacterFromSet(disallowedCharacterSet) == nil

      let resultingStringLengthIsLegal = count(prospectiveText) <= 6

      result = replacementStringIsLegal &&
               resultingStringLengthIsLegal
    }
  }
  return result
}
First we determine the prospective text — that is, what the text field would contain if we allow the user’s changes. We do this by using the stringByReplacingCharactersInRange:withString: method, which accepts a range of characters to be replaced, and the string to replace that range of characters.
Note that we have to cast textField.text into an NSString first; that’s because Swift’s String class’ stringByReplacingCharactersInRange:withString: method expects a range in Range<String.Index> format, and we’re working with a range specified as an NSRange. Good ol’ NSString‘s stringByReplacingCharactersInRange:withString: method takes its range as an NSRange.
Once we have the prospective text, we simply check its length. If it’s greater than 6, we have the method return false, which means that the text field simply won’t accept any more than 6 characters.
Confirming that the value entered into a text field is numeric
Let’s add one more constraint to our text field: let’s make sure that only proper numeric values can be entered into the text field. Even though we’ve restricted the user to entering the digits 0 through 9 and the . and – characters, it’s still possible to enter non-numeric values such as:
- 1.2.3 (more than one decimal point), and
- 4-5 (placing the unary minus anywhere other than at the start of the number).
Let’s add some code to disallow such entries:
func textField(textField: UITextField, shouldChangeCharactersInRange range: NSRange, replacementString string: String) -> Bool {
  var result = true
  let prospectiveText = (textField.text as NSString).stringByReplacingCharactersInRange(range, withString: string)

  if textField == numberField {
    if count(string) > 0 {
      let disallowedCharacterSet = NSCharacterSet(charactersInString: "0123456789.-").invertedSet
      let replacementStringIsLegal = string.rangeOfCharacterFromSet(disallowedCharacterSet) == nil

      let resultingStringLengthIsLegal = count(prospectiveText) <= 6

      let scanner = NSScanner(string: prospectiveText)
      let resultingTextIsNumeric = scanner.scanDecimal(nil) && scanner.atEnd

      result = replacementStringIsLegal &&
               resultingStringLengthIsLegal &&
               resultingTextIsNumeric
    }
  }
  return result
}
What powers this constraint is NSScanner, which is a great tool for parsing string data. We’re using two of its methods:
scanDecimal(_:), which returns true if the scanner finds a validNSDecimalrepresentation in the string, andatEnd, which returns true if the scanner has scanned the entirety of the string.
With the final code shown above, we’ve got a way to ensure that the user can enter only numeric values into a text field, and that those values no longer than a specified number of characters. Contrary to what was implied in Beginning iPhone Development with Swift, it wasn’t all that hard to do.
22 replies on “How to program an iOS text field that takes only numeric input with a maximum length [Updated]”
[…] As I wrote in an earlier article, I’ve been working my way through Apress’ Beginning iPhone Development with Swift, an iOS 8/Swift-flavored update of Beginning iOS 7 Development. The original book was released in March 2014, the iOS 8 and Swift betas came out that June, the GM versions came out in September, and the revised book was released in mid-November. In the eight-month span between the original book and the revision, the authors didn’t have much time to try out iOS 8 and Swift, never mind do the rewrite, and as a result, they ended up with a few errors in their text, as well as leaving out some useful material. […]
Greetings!!
Thank you for posting this article. I just bought the Kindle version of this book and was disappointed that they didn’t provide an example of this! Would be so kind as to share a simple example of how to define/code a Currency formatted text field for iOS using Swift? I’ve been searching for days and have been unable to find a complete example. I have found examples of how to define a number formatter using the currency style, but not how to link the formatter to the UI (or whatever the exact term is). I’m new to Swift and iOS (but not programming) and am having a very hard time putting all the bits and pieces together.
Could you possibly write a follow up post that expands on your example for how to restrict input to be only a valid decimal number, and then show how to format the entered string as a currency based on the current locale when the user tabs/exits the text field?
Your help would be very much appreciated!!
Regards,
Jim
This was a GREAT Article! Very concise and simple. I’m new to coding and new to Swift. This was perfect to add to my list of samples and tutorials for adding functionality to any app. I appreciate your taking the time to post.
Great article, thank you very much! Clear, to the point, and solves a very common problem.
Awesome post, but in my validation context, the user has to enter mm:ss for a countdown timer, there is no decimal so does that mean I can skip the last validation routine for decimals, thanks in advance
Thank you very much for writing this up. This is exactly what I have been looking for, saved me lots of time!
Why do you even need to use the char set implementation? Does isDecimal not properly parse it?
Jared: I check for disallowed characters so it’s not even possible to enter a character that isn’t 0 through 9 or the _ or . characters. However, limiting input to those characters doesn’t guarantee that what the user enters is a proper number. That’s what the call to
scanner:scanDecimalis for.Joey, I’m struggling a bit in the context of localization. If you one is running the app on German localization the decimal pad will show “,” instead of the dot. So far so good. Not a big issue, I can extend the code to allow the “,” too. However the scanner:scanDecimal call doesn’t seem to respect localization. This function still wants to get the “.”-notation? I solved this challenge by just replacing “,” with “.” but I’m not too happy with this approach, as I don’t want to “overrule” the user, I believe this is something a good developer should not even think about ;-).
However, I even seen any hints in the documentation pointing me to how localization might possibly apply to scanner:scanDecimal. Any thoughts? Regards, Jeannot
Jeannot: I’ve been working on that problem, and I have a solution! Watch for a new article in the next couple of days.
[…] little while back, I published an article titled How to program an iOS text field that takes only numeric input with a maximum length, which covered constraining text fields so that they accepted only values that evaluated to numeric […]
Great post!
I’m a newbie to swift and iOS dev generally and I was wondering how could I dynamicaly put a min and max value to a text field.
I want to input a range, so I have two text fields one for min and the other for max. But I would like to have a validation of some sort.
Appreciate if you could help me out. :)
Cheers!
Haris: Yes, I’ll be able to help you out. Watch for a post here on Global Nerdy early next week!
Joey, thanks for sharing! I made use of it in my code… see http://stackoverflow.com/questions/30138508/digit-input-in-a-text-field/30214770#30214770
Great code. BTW, countElements() has been changed to count() in the latest version of Swift.
Best article I found on the topic today. Thanks!
I suggest you don’t cast to NSString because this may create problems with Emoji and other Unicode chars during pasting. Instead, transform NSRange to Range:
GREAT post, thank for sharing
Amazing Baby…..
Wow, this tutorial helps me in my project! Thanks so much ;)
The code “count(string) > 0” doesn’t work. Couldn’t figure out why.
in swift2.0 use your_name_file_text.text!.characters.count
With Swift 2 try adjusting the following three lines:
first:
let prospectiveText = (textField.text as NSString).stringByReplacingCharactersInRange(range, withString: string)
to:
let prospectiveText = NSString(string: textField.text!).stringByReplacingCharactersInRange(range, withString: string)
next:
if count(string) > 0 {
to:
if string.characters.count > 0 {
next:
let resultingStringLengthIsLegal = count(prospectiveText) <= 6
let resultingStringLengthIsLegal = prospectiveText.characters.count <= 6
Works great!