 As I wrote in an earlier article, I’ve been working my way through Apress’ Beginning iPhone Development with Swift, an iOS 8/Swift-flavored update of Beginning iOS 7 Development. The original book was released in March 2014, the iOS 8 and Swift betas came out that June, the GM versions came out in September, and the revised book was released in mid-November. In the eight-month span between the original book and the revision, the authors didn’t have much time to try out iOS 8 and Swift, never mind do the rewrite, and as a result, they ended up with a few errors in their text, as well as leaving out some useful material.
I also wrote in that earlier article that in spite of these problems, I still think it’s a good book (as do some other people; it’s got 5 stars on Amazon as of this writing), and where some may see errors and oversights, I see opportunities.
Here’s another opportunity that came up…
The date picker exercise
Chapter 7 of Beginning iPhone Development with Swift, Tab Bars and Pickers, has you build a multi-view app where you use all kinds of “picker” controls. The first view you work on is one with a date picker; here’s a screen shot:
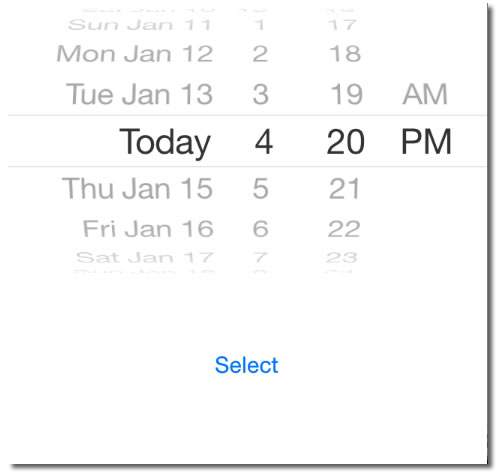
In this simple view, you use the picker to select a date, tap the Select button, and you’re presented with an alert that looks like this:
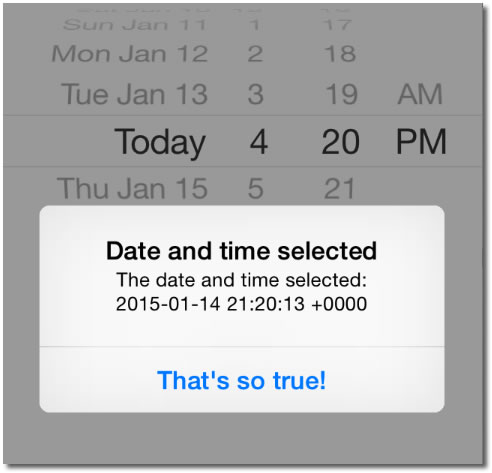
Note the format of the date displayed in the alert:
- It’s not formatted in the most readable way.
- It has too high a level of detail. The user didn’t enter the number of seconds or a time offset.
- I entered the time in my time zone (4:20 p.m., Eastern Standard Time, or GMT-5), but the alert is displaying the time for GMT.
Here’s what the book had to say about this:
Note
The date picker does not allow you to specify seconds or a time zone. The alert displays the time with seconds and in Greenwich Mean Time (GMT). We could have added some code to simplify the string displayed in the alert, but isn’t this chapter long enough already? If you’re interested in customizing the formatting of the date, take a look at theNSDateFormatterclass.
I’d much rather have the alert look like this…
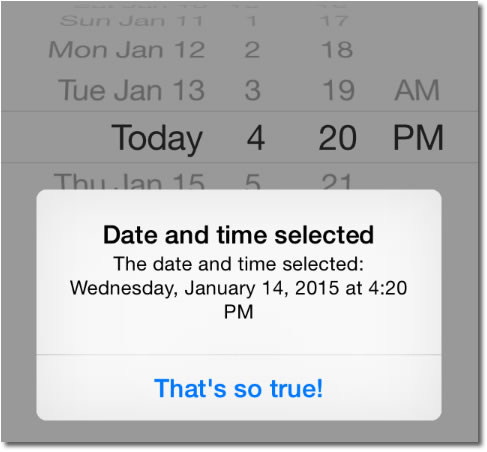
…but they’d left doing so as an exercise for the reader. Let’s go through this exercise, shall we?
The original code
Here’s what the view looks like in the Storyboard:
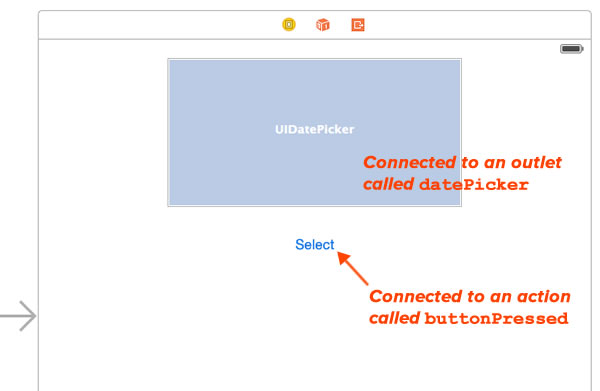
And here’s the code for buttonPressed in the corresponding view controller:
@IBAction func buttonPressed(sender: AnyObject) {
  let date = datePicker.date
  let message = "The date and time selected: \(date)"
  let alert = UIAlertController(
    title: "Date and time selected",
    message: message,
    preferredStyle: .Alert)
  let action = UIAlertAction(
    title: "That's so true!",
    style: .Default,
    handler: nil)

  alert.addAction(action)
  presentViewController(alert, animated: true, completion: nil)
}
In this code, we’re simply taking the value from the date picker’s date property and using its string representation in the string constant message. In iOS, dates are represented by instances of the NSDate class, which is all about representing a single point in time. While it has the date property for access the date stored within, it doesn’t have any members for formatting that date.
Enter NSDateFormatter
iOS has a number of formatter classes, whose job is to take data and convert it into a text representation, typically for the benefit of the user. These classes have names that end with the word Formatter and are subclasses of the abstract class NSFormatter. You can find out more about these classes in NSHipster’s excellent overview.
The book pointed us towards NSDateFormatter, a class that serves two purposes:
- Converting
NSDateobjects into string representations, and - Converting strings into
NSDateobjects.
NSDateFormatter has a class method called localizedStringFromDate that does what we want. Given the following:
- An
NSDateinstance, - A style specifying how we want the date part of the
NSDateinstance formatted, and - A style specifying how we want the time part of the
NSDateinstance formatted
…it returns a string representing the NSDate instance in the format we specified.
We specify the styles for the date and time using values from the NSDateFormatterStyle enum, which has the following values:
NoStyle: Unstyled.ShortStyle: Typically numeric-only, such as 1/14/15 and 4:20 PM.MediumStyle: A medium-length style, using abbreviations. Examples are Jan 14, 2015 and 4:20:00 PM.LongStyle: A longer style with full text. Examples are January 14, 2015 and 4:20:00 PM EST.FullStyle: Full style with complete details. Examples are Wednesday, January 14, 2015 and 4:20:00 PM Eastern Standard Time.
For our code, we’ll use FullStyle for the date and ShortStyle for the time. Here’s what the revised code looks like — the highlighted lines show the new or modified code:
@IBAction func buttonPressed(sender: AnyObject) {
  let date = datePicker.date
  let formattedDate = NSDateFormatter.localizedStringFromDate(
    date,
    dateStyle: .FullStyle,
    timeStyle: .ShortStyle)
  let message = "The date and time selected: \(formattedDate)"
  let alert = UIAlertController(
    title: "Date and time selected",
    message: message,
    preferredStyle: .Alert)
  let action = UIAlertAction(
    title: "That's so true!",
    style: .Default,
    handler: nil)

  alert.addAction(action)
  presentViewController(alert, animated: true, completion: nil)
}
This code gives us the date in a more user-friendly format.
This example scratches the surface of what’s possible with NSDateFormatter. You should take a look at Date Formatters, which is part of a larger section of their documentation called Data Formatting Guide.
 Related articles
How to work with dates and times in Swift, part one: An introduction of Cocoa’s date and time classes, and how they work together. This article covers UTC (Coordinated Universal Time), and the key classes: NSDate, NSCalendar, NSDateComponents.
How to work with dates and times in Swift, part two: Calculations with dates: Now that we’ve got the basics, it’s time to do some date arithmetic: comparing two dates to see which one is the earlier and later one, finding out how far apart two dates are, and adding and subtracting from dates.
How to work with dates and times in Swift, part three: Making date arithmetic more Swift-like: Cocoa’s date and time classes have an Objective-C heritage, which in the Swift context, feel kind of clunky. In this article, I look at ways — and by ways, I mean helper functions and class extensions — to make date calculations feel more like Swift.
How to work with dates and times in Swift, part four: A more Swift-like way to get the time interval between two dates: This quick article shows you how to make an operator overload that makes getting the time interval between two dates more like subtraction.

3 replies on “A very brief introduction to date formatting in Swift and iOS”
[…] A very brief introduction to date formatting in Swift and iOS: The oversight in a mostly-good book on Swift programming led me down the path of writing articles about dates and times in Swift, starting with this one, where I look at NSDateFormatter. […]
[…] A very brief introduction to date formatting in Swift and iOS: The oversight in a mostly-good book on Swift programming led me down the path of writing articles about dates and times in Swift, starting with this one, where I look atNSDateFormatter. […]
[…] A very brief introduction to date formatting in Swift and iOS: The oversight in a mostly-good book on Swift programming led me down the path of writing articles about dates and times in Swift, starting with this one, where I look atNSDateFormatter. […]