
At the end of the last article in this series, we had a weather app that looked like this:
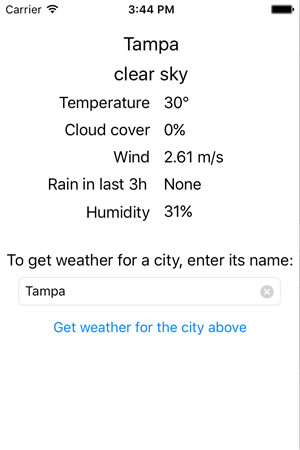
The user enters the name of a city, presses the Get weather for the city above button, and gets the current weather conditions shortly afterward.
In this article, we’re going to learn the basics of programming a feature that most iOS weather apps have: geolocation. We’ll build a simple geolocation app, and we’ll eventually give our weather app the ability to display weather information about the user’s current location without requiring the user to enter the name of that location.
To do this, we’ll make use of location services, which we’ll access through the Core Location framework, and the CLLocationManager and CLLocation classes in particular.
In case you missed the earlier installments in this series, here are part one, part two, and part three.
A slight detour: the GeoExample app
Our weather app already has a fair bit of stuff in it, so we’ll cover Core Location by starting with a simple new app that reports the latitude and longitude of the user’s current location. It’s pretty simple, and we’ll roll its code into our weather app in the end.
Open Xcode, create a new single view application for the iPhone, and give it the name GeoExample.
Setting up to ask the users’ permission to use their location in Info.plist
Each app that makes use of the user’s location need to ask the user for permission to do so. This permission is recorded on a per-app basis; a user can grant one app permission to use his/her location, and deny that permission to another app.
iOS users can grant two different kinds of permission to use their location:
- Permission to use the user’s location only when the app is in use (that is, when it’s the one shown on the screen).
- Permission to use the user’s location both when the app is in use and when it’s running in the background.
For this example app, as well as our weather app (when we add geolocation to it), we just want the user’s permission to use location services only when the app is in use.
iOS has a built-in facility for asking both kinds of permission with an alert view. To ask for the user’s permission to use location services only when the app is in use, we use the CLLocationManager instance method requestWhenInUseAuthorization(). When called, it causes an alert view like the one below to appear:
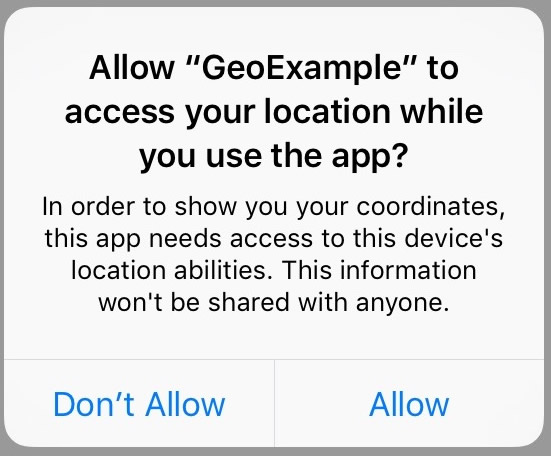
The title, Allow “GeoExample” to access your location while you use the app?, is automatically generated by iOS, which inserts the app’s name (GeoExample, in this case) into a preset string. You can’t change it.
However, the message below the title is customizable and set in the app’s Info.plist. The message we’ll use is: In order to show you your coordinates, this app needs access to this device’s location abilities. This information won’t be shared with anyone. This message is stored in Info.plist under the key NSLocationWhenInUseUsageDescription.
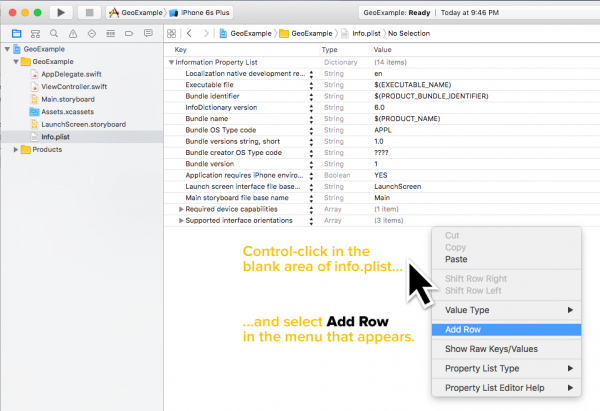
Let’s set that message right now. Open Info.plist (the project file that contains a number of settings for your app) and add a new row to it. If you’re not familiar with adding new rows to Info.plist, follow the instructions below:
- Control-click in the blank area of Info.plist located below its rows.
- A menu will appear. Select Add Row from that menu.
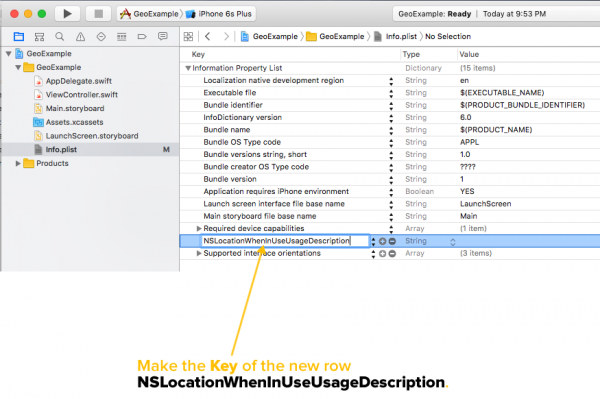
- In that newly-created row, change the contents of the Key column (the leftmost column) to
NSLocationWhenInUseUsageDescription. This specifies that the row will contain the message text for the alert view asking the user for permission to access his/her location while the app is in use.
- Now change the contents of the Value column (the rightmost column) to the message text that will go in the alert view: In order to show you your coordinates, this app needs access to this device’s location abilities. This information won’t be shared with anyone.
Next stop: Main.storyboard, to draw the user interface

Draw a button on the view, give it the title Get current location, and assign it a Touch Up Inside action with the name getCurrentLocationButtonPressed.
And finally, ViewController.swift for the code
Here’s the view controller code:
import UIKit
import CoreLocation

class ViewController: UIViewController,
                      CLLocationManagerDelegate
{

  let locationManager = CLLocationManager()


  override func viewDidLoad() {
    super.viewDidLoad()
    getLocation()
  }

  override func didReceiveMemoryWarning() {
    super.didReceiveMemoryWarning()
  }

  @IBAction func getCurrentLocationButtonPressed() {
    getLocation()
  }

  func getLocation() {
    guard CLLocationManager.locationServicesEnabled() else {
      print("Location services are disabled on your device. In order to use this app, go to " +
            "Settings → Privacy → Location Services and turn location services on.")
      return
    }

    let authStatus = CLLocationManager.authorizationStatus()
    guard authStatus == .AuthorizedWhenInUse else {
      switch authStatus {
        case .Denied, .Restricted:
          print("This app is not authorized to use your location. In order to use this app, " +
            "go to Settings → GeoExample → Location and select the \"While Using " +
            "the App\" setting.")

        case .NotDetermined:
          locationManager.requestWhenInUseAuthorization()

        default:
          print("Oops! Shouldn't have come this far.")
      }

      return
    }

    locationManager.delegate = self
    locationManager.desiredAccuracy = kCLLocationAccuracyBest
    locationManager.startUpdatingLocation()
  }


  // MARK: - CLLocationManagerDelegate methods

  // This is called if:
  // - the location manager is updating, and
  // - it was able to get the user's location.
  func locationManager(manager: CLLocationManager, didUpdateLocations locations: [CLLocation]) {
    let newLocation = locations.last!
    print(newLocation)
  }

  // This is called if:
  // - the location manager is updating, and
  // - it WASN'T able to get the user's location.
  func locationManager(manager: CLLocationManager, didFailWithError error: NSError) {
    print("Error: \(error)")
  }

}
The view controller code, explained
Near the beginning of the file, we have these lines:
import CoreLocation

class ViewController: UIViewController,
                      CLLocationManagerDelegate
import CoreLocation makes the Core Location library available to all code in the file.
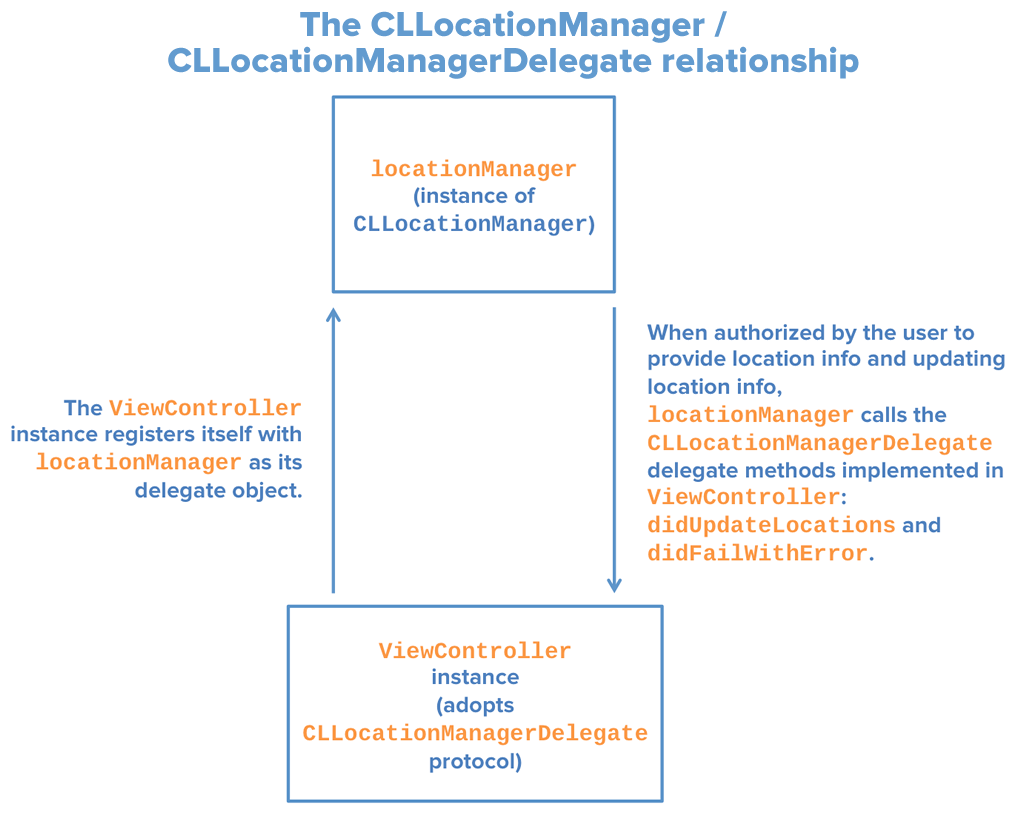
The class declaration line shows that the ViewController, like all view controllers, inherits from UIViewController, but also adopts the CLLocationManagerDelegate protocol. Adopting CLLocationManagerDelegate gives the view controller the ability to respond to all kinds of location and heading updates from a CLLocationManager instance.
Here’s a diagram showing the relationship between the CLLocationManager instance and the view controller:
Here’s the first line of the view controller class:
let locationManager = CLLocationManager()
It defines ViewController’s single property, locationManager, the instance of CLLocationManager that provides the location updates.
The next notable part of the view controller is the getLocation() method, which performs a series of checks, and if they pass, it tells the location Manager to start sending location events. It’s called when the view controller is loaded, and when the Get current location button is pressed:
func getLocation() {
  guard CLLocationManager.locationServicesEnabled() else {
    print("Location services are disabled on your device. In order to use this app, go to " +
          "Settings → Privacy → Location Services and turn location services on.")
    return
  }

  let authStatus = CLLocationManager.authorizationStatus()
  guard authStatus == .AuthorizedWhenInUse else {
    switch authStatus {
      case .Denied, .Restricted:
        print("This app is not authorized to use your location. In order to use this app, " +
          "go to Settings → GeoExample → Location and select the \"While Using " +
          "the App\" setting.")

      case .NotDetermined:
        locationManager.requestWhenInUseAuthorization()

      default:
        print("Oops! This case should never be reached.")
    }
    return
  }

  locationManager.delegate = self
  locationManager.desiredAccuracy = kCLLocationAccuracyBest
  locationManager.startUpdatingLocation()
}
Most of getLocation() is concerned with ruling out cases where we can’t get the user’s location. Only the last three lines of the method deal with getting location updates from locationManager; they’re preceded by a couple of “bouncers” in the form of guard statements to keep invalid cases out.
- The first
guardstatement allows control to pass to the next line if and only if location services are enabled for the device. If location services are disabled, the “Location services are disabled on your device” message is printed to the debug console, andgetLocation()is exited. - The second
guardstatement allows control to pass to the next line if and only if the app is authorized to use location services when it is in use (i.e., its authorization status is.AuthorizedWhenInUse). Aswitchstatement in theguardblock determines the specific reason why the app isn’t authorized:- If the app explicitly does not have permission to use location services (i.e., its authorization status is either
.Deniedor.Restricted), the “This app is not authorized to use your location” message is printed to the debug console. - If the app has not explicitly been given or denied permission to use location services (i.e., its authorization status is
.NotDetermined), the location manager’srequestWhenInUseAuthorization()method is called, which displays the alert asking the user if s/he wants to give the app permission to use location services. - The default case is the remaining authorization status,
.AuthorizedAlways. There’s no way to get to this point becauselocationManager.requestAlwaysAuthorization(), which presents the user with an alert asking to use location services when the app is in use or running in the background, doesn’t appear anywhere in the code. I include this case only because theswitchstatement requires that all cases to be covered.
- If the app explicitly does not have permission to use location services (i.e., its authorization status is either
If control made it past the first two guard statements, it means that locations services has been activated for the device and the user has given our app permission to use location services while the app is active. The following happens:
- It sets the view controller as the location manager’s delegate, which means that it can receive and respond to location and heading updates from the location manager.
- It requests the best possible location accuracy from the location manager, which can pinpoint your device’s coordinates within 5 meters (16.4 feet).
- It tells the location manager to start sending regular location updates, typically at a rate of once per second.
Once the location manager starts sending updates, it runs this loop until told to stop:
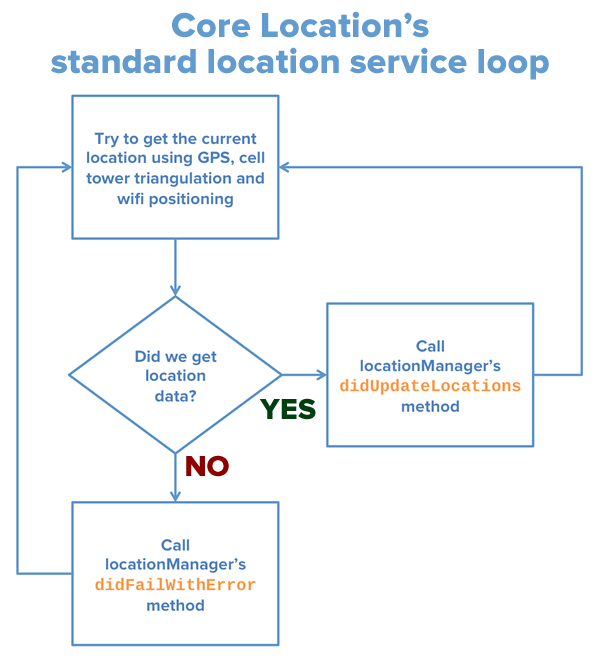
The loop is pretty simple:
- Try to get the current location, usually using some combination of GPS, cellular tower triangulation, and wifi positioning depending on the location accuracy setting.
- If location results were obtained, call the location manager’s delegate’s
locationManager(_:didUpdateLocations:)method, providing the location results as a parameter for the call. - If location results were not obtained, call the location manager’s delegate’s
locationManager(_:didFailWithError:)method, providing the error object as a parameter for the call. - Go back to the first step.
Here’s some sample output from my debug console when I ran the app on my iPhone:
<+28.06456694,-82.50014378> +/- 5.00m (speed 0.00 mps / course -1.00) @ 5/12/16, 10:33:13 PM Eastern Daylight Time

<+28.06456694,-82.50014378> +/- 5.00m (speed 0.00 mps / course -1.00) @ 5/12/16, 10:33:14 PM Eastern Daylight Time

<+28.06456694,-82.50014378> +/- 5.00m (speed 0.00 mps / course -1.00) @ 5/12/16, 10:33:15 PM Eastern Daylight Time

<+28.06456694,-82.50014378> +/- 5.00m (speed 0.00 mps / course -1.00) @ 5/12/16, 10:33:16 PM Eastern Daylight Time

<+28.06456694,-82.50014378> +/- 5.00m (speed 0.00 mps / course -1.00) @ 5/12/16, 10:33:17 PM Eastern Daylight Time

<+28.06456694,-82.50014378> +/- 5.00m (speed 0.00 mps / course -1.00) @ 5/12/16, 10:33:18 PM Eastern Daylight Time
With this, we’ve got the basics of iOS geolocation. In the next installment, we’ll add a few niceties to our geolocation code and add it to our weather app.
Download the project files
You can download the project files for this article (29KB zipped) here.

2 replies on “How to build an iOS weather app in Swift, part 4: Introducing geolocation”
[…] In the fourth article, we took a little detour from the weather app in order to introduce geolocation. We wrote a simple geolocation app that outputs the device’s coordinates to the debug console. […]
[…] Part 4: Introducing geolocation […]