Categories
Swift Kick

My “How to work with dates and times in Swift” articles (so far)

dates and times in swift

My articles on working with dates and times in Swift have steadily been getting more readers, so I thought I’d gather all the links to them in one place and make them easier to find. I’m also in the process of gathering the content of these articles and pulling them together into a date/time utility module, which I’ll post on GitHub. I’ll let you know when that happens!

In the meantime, my “How to work with dates and times in Swift” articles (so far):

A very brief introduction to date formatting in Swift and iOS: The oversight in a mostly-good book on Swift programming led me down the path of writing articles about dates and times in Swift, starting with this one, where I look at NSDateFormatter.

How to work with dates and times in Swift, part one: An introduction of Cocoa’s date and time classes, and how they work together. This article covers UTC (Coordinated Universal Time), and the key classes: NSDate, NSCalendar, NSDateComponents.

How to work with dates and times in Swift, part two: Calculations with dates: Now that we’ve got the basics, it’s time to do some date arithmetic: comparing two dates to see which one is the earlier and later one, finding out how far apart two dates are, and adding and subtracting from dates.

How to work with dates and times in Swift, part three: Making date arithmetic more Swift-like: Cocoa’s date and time classes have an Objective-C heritage, which in the Swift context, feel kind of clunky. In this article, I look at ways — and by ways, I mean helper functions and class extensions — to make date calculations feel more like Swift.

How to work with dates and times in Swift, part four: A more Swift-like way to get the time interval between two dates: This quick article shows you how to make an operator overload that makes getting the time interval between two dates more like subtraction.

Click the chart to see it at full size.

Categories
Swift Kick

How to work with dates and times in Swift, part four: A more Swift-like way to get the time interval between two dates [Updated for Swift 2]

date and time

Update, August 26, 2015: I’ve updated this article so that its code works with Swift 2. It compiles under the latest version of Xcode 7, beta 6.
swift kick

In previous installments in this series, we’ve covered:

In this installment, we’ll make getting the time interval between two dates — which normally involves a lot of typing — a little more Swift-like.

One common date arithmetic operation is to determine the interval between two given dates. This is usually a clunky two-step process based on NSCalendar‘s components method, which expects at least three parameters:

  • The time components you want the method to return, such as years, months, days, hours, minutes, and seconds. This is expressed by ORing together NSCalendarUnit values, and
  • the two dates, in NSDate form.

Let’s look at how it works. First, we’ll need a couple of dates. Create a new playground and put the following code into it:

// Playground - noun: a place where people can play

import UIKit

let userCalendar = NSCalendar.currentCalendar()

// Let's create some dates to work with
// ====================================

// It's 3:45:30 a.m., New Year's Day. Time to go home.
let goHomeYoureDrunkTimeComponents = NSDateComponents()
goHomeYoureDrunkTimeComponents.year = 2015
goHomeYoureDrunkTimeComponents.month = 1
goHomeYoureDrunkTimeComponents.day = 1
goHomeYoureDrunkTimeComponents.hour = 3
goHomeYoureDrunkTimeComponents.minute = 45
goHomeYoureDrunkTimeComponents.second = 30
let goHomeYoureDrunkTime = userCalendar.dateFromComponents(goHomeYoureDrunkTimeComponents)!

// Let's create an NSDate representing Bad Poetry Day (August 18)
// at 4:20:10 p.m.
let badPoetryDayComponents = NSDateComponents()
badPoetryDayComponents.year = 2015
badPoetryDayComponents.month = 8
badPoetryDayComponents.day = 18
badPoetryDayComponents.hour = 16
badPoetryDayComponents.minute = 20
badPoetryDayComponents.second = 10
let badPoetryDay = userCalendar.dateFromComponents(badPoetryDayComponents)!

In your playground’s sidebar, you should see the string representations of those dates:

  • goHomeYoureDrunkTime should display as something like January 1, 2015 at 3:45 a.m., and
  • badPoetryDay should display as something like August 18, 2015 at 4:20 p.m..

Let’s find out how many days, hours, minutes, and seconds there are between goHomeYoureDrunkTime and badPoetryDay with the following code:

// (Previous code goes here)

// How many days, hours, minutes, and seconds between
// goHomeYoureDrunkTime and badPoetryDay?
let dayHourMinuteSecond: NSCalendarUnit = [.Day,
                                           .Hour,
                                           .Minute,
                                           .Second]
let difference = NSCalendar.currentCalendar().components(
  dayHourMinuteSecond,
  fromDate: goHomeYoureDrunkTime,
  toDate: badPoetryDay,
  options: [])
difference.day     // 229
difference.hour    // 12
difference.minute  // 34
difference.second  // 40

You should see from difference that there are 229 days, 12 hours, 34 minutes, and 40 seconds between the two dates. We did a lot of typing to get this result, and there should be a nicer way to do it. How about this:

// (Previous code goes here)

// A date subtraction operation that returns an NSDateComponents
// instance specifying the days, hours, miniutes and seconds
// between two given NSDates
// =============================================================

func -(lhs: NSDate, rhs: NSDate) -> NSDateComponents
{
  let dayHourMinuteSecond: NSCalendarUnit = [.Day,
                                             .Hour,
                                             .Minute,
                                             .Second]
  return NSCalendar.currentCalendar().components(dayHourMinuteSecond,
    fromDate: rhs,
    toDate: lhs,
    options: [])
}

// Let's test it:
let diff = badPoetryDay - goHomeYoureDrunkTime
diff.day     // 229
diff.hour    // 12
diff.minute  // 34
diff.second  // 40

With this code, we’ve overloaded the - operator, so that when both its operands are NSDates, it returns an NSDateComponents instance specifying the days, hours, minutes, and seconds between the two. I could’ve coded it so that it also returned the time in terms of months and years, but the size of those units vary depending on the month and year, while days, hours, minutes, and seconds always represent the same amount of time.

dates and times in swift - smallRelated articles

A very brief introduction to date formatting in Swift and iOS: The oversight in a mostly-good book on Swift programming led me down the path of writing articles about dates and times in Swift, starting with this one, where I look atNSDateFormatter.

How to work with dates and times in Swift, part one: An introduction of Cocoa’s date and time classes, and how they work together. This article covers UTC (Coordinated Universal Time), and the key classes: NSDate, NSCalendar, NSDateComponents.

How to work with dates and times in Swift, part two: Calculations with dates: Now that we’ve got the basics, it’s time to do some date arithmetic: comparing two dates to see which one is the earlier and later one, finding out how far apart two dates are, and adding and subtracting from dates.

How to work with dates and times in Swift, part three: Making date arithmetic more Swift-like: Cocoa’s date and time classes have an Objective-C heritage, which in the Swift context, feel kind of clunky. In this article, I look at ways — and by ways, I mean helper functions and class extensions — to make date calculations feel more like Swift.

Categories
Swift Kick

How to work with dates and times in Swift, part three: Making date arithmetic more Swift-like [Updated for Swift 2]

date and time

Update, August 26, 2015: I’ve updated this article so that its code works with Swift 2. It compiles under the latest version of Xcode 7, beta 6.

swift kickSo far in this series, we’ve looked at:

So far, everything we’ve done has a distinctly un-Swift-like feel to it. That’s because Cocoa’s date and time classes were built with its original programming language, Objective-C, in mind. In this article, we’ll look at ways to make date calculations feel more “human” and Swift-like.

Make date comparisons more Swift-like

Let’s start with a new playground and some quick definitions:

  • A reference to the user’s calendar,
  • an NSDateFormatter and format string that makes it easy to define dates in a hurry,
  • and two dates:
    • Valentine’s Day (February 14, 2015 at midnight)
    • St. Patrick’s Day (March 17, 2015 at midnight)

Here’s what your code should look like:

// Playground - noun: a place where people can play

import UIKit

let userCalendar = NSCalendar.currentCalendar()

// Let's create some dates to work with
// ====================================

// If you need to instantiate a number of pre-defined dates,
// an NSDateFormatter will get it done in the fewest number of lines.
let dateMaker = NSDateFormatter()
dateMaker.dateFormat = "yyyy/MM/dd hh:mm:ss Z"

// I'm setting these dates according to my time zone (UTC-0500);
// feel free to adjust the values according to your time zone.
let valentinesDay = dateMaker.dateFromString("2015/02/14 00:00:00 -05:00")!
let stPatricksDay = dateMaker.dateFromString("2015/03/17 00:00:00 -05:00")!

In the previous article, we looked at NSDate's compare method, which compares two NSDates and returns a result of type NSComparisonResult as shown in the table below:

If… compare returns…
the first date is earlier than the second date .OrderedAscending
the first date is equal to the second date .OrderedSame
the first date is later than the second date .OrderedDescending

Add the following code to your playground:

// (Previous code goes here)

// Comparing dates, part 1
// =======================

// First, the clunky NSDate::compare way
// -------------------------------------

// Returns true because Valentine's Day comes before St. Patrick's Day
valentinesDay.compare(stPatricksDay) == .OrderedAscending

// Returns true because they're the same date
valentinesDay.compare(valentinesDay) == .OrderedSame

// Returns true because St. Patrick's Day comes after Valentine's Day
stPatricksDay.compare(valentinesDay) == .OrderedDescending

The compare method works well, but its syntax has that C-style clunkiness. It’s a bit jarring in Swift, which has a lot of features that so-called “scripting” languages have. Wouldn’t it be nice if we could compare dates using the ==, <, and > operators?

Let’s make it happen. Add the following code to your playground:

// (Previous code goes here)

// Let's overload the <, >, and == operators to do date comparisons
// ----------------------------------------------------------------

func ==(lhs: NSDate, rhs: NSDate) -> Bool
{
  return lhs === rhs || lhs.compare(rhs) == .OrderedSame
}

func <(lhs: NSDate, rhs: NSDate) -> Bool
{
  return lhs.compare(rhs) == .OrderedAscending
}

func >(lhs: NSDate, rhs: NSDate) -> Bool
{
  return lhs.compare(rhs) == .OrderedDescending
}

// Comparisons are less clunky now!
// --------------------------------

valentinesDay < stPatricksDay   // true
valentinesDay == valentinesDay  // true
stPatricksDay > valentinesDay   // true

With these functions, we’re simply overloading the ==, <, and > operators so that they work on NSDates and hide the clunky compare syntax behind some syntactic sugar. In case you’re wondering about the parameter names, lhs is short for “left-hand side” and rhs is short for “right-hand side”.

Note than in our overload of the == operator, there are a couple of ways that two dates can be considered equal:

  • Their compare result is NSComparisonResult.OrderedSame, or
  • the two dates being compared are the same NSDate object (=== is the identity operator; if a === b, then a and b both reference the same object).

Make date comparisons more “human”

picard data riker

One recurring theme in science fiction and especially in Star Trek is the tendency for ultra-smart characters and computers to be overly, needlessly, pointlessly precise. The writers for the original series often did this with Spock, and it seemed that at least a few writers were aware of this annoying trope in later series. Here’s a bit of dialogue from The Next Generation:

Data: 6 days, 13 hours, 47 minutes.
Riker: What, no seconds?
Data: I have discovered, sir, a certain level of impatience when I calculate a lengthy time interval to the nearest second. [beat] However if you wish…
Riker: No. No. Minutes is fine.

NSDate‘s compare method, and, by extension, the ==, <, and > overloads we defined, have the same problem with being overly precise. Let’s consider a case where we have two NSDates that are only a second apart:

  • Groundhog Day 2015 (February 2, 2015) at 12:00 a.m. EST
  • One second after Groundhog Day 2015 at 12:00 a.m. EST
// (Previous code goes here)

// Comparing dates, part 2
// =======================

// Let's create two dates that are only one second apart:
let groundhogDay = dateMaker.dateFromString("2015/02/02 00:00:00 -05:00")!
let groundhogDayPlus1Second = dateMaker.dateFromString("2015/02/02 00:00:01 -05:00")!

// This line returns false:
groundhogDay == groundhogDayPlus1Second
// This line returns true:
groundhogDay < groundhogDayPlus1Second
// NSDate's compare method is too precise for a lot of uses!

For most purposes, we’d consider midnight on Groundhog Day and one second after midnight Groundhog Day the to be the same time. We need a way to do date comparisons at granularities other than seconds.

If you’re targeting iOS 8 or later, such a way already exists: NSCalendar‘s compareDate method! It expects the following parameters:

Parameter Description
fromDate The first date in the comparison.
toDate The other date in the comparison.
toUnitGranularity The level of precision for the comparison, expressed as an NSCalendarUnit value, which includes:

  • .CalendarUnitSecond
  • .CalendarUnitMinute
  • .CalendarUnitHour
  • .CalendarUnitDay
  • .CalendarUnitMonth
  • .CalendarUnitYear

This is a Cocoa method with the word “compare” in its name, and you’ve probably guessed that its return type is NSComparisonResult. Here’s what it returns:

If… compareDate returns…
fromDate is earlier than toDate, when compared at the specified level of precision .OrderedAscending
fromDate is equal to toDate, when compared at the specified level of precision .OrderedSame
fromDate is later than toDate, when compared at the specified level of precision .OrderedDescending

Let’s try compareDate out:

// (Previous code goes here)

// Enter NSCalendar's compareDate method, available in iOS 8 and later

// This returns false, because 2015/02/02 00:00:00 and 2015/02/02 00:00:01
// are NOT both within the same SECOND.
userCalendar.compareDate(groundhogDay,
  toDate: groundhogDayPlus1Second,
  toUnitGranularity: .Second)
  == .OrderedSame

// This returns true, because 2015/02/02 00:00:00 and 2015/02/02 00:00:01
// ARE both within the same MINUTE.
userCalendar.compareDate(groundhogDay,
  toDate: groundhogDayPlus1Second,
  toUnitGranularity: .Minute)
  == .OrderedSame

// This returns true, because 2015/02/02 00:00:00 and 2015/02/02 00:00:01
// ARE both within the same HOUR.
userCalendar.compareDate(groundhogDay,
  toDate: groundhogDayPlus1Second,
  toUnitGranularity: .Hour)
  == .OrderedSame

// This returns true, because 2015/02/02 00:00:00 and 2015/02/02 00:00:01
// ARE both within the same DAY.
userCalendar.compareDate(groundhogDay,
  toDate: groundhogDayPlus1Second,
  toUnitGranularity: .Day)
  == .OrderedSame

Note that compareDate checks to see if the two given dates are in the same given time period. It doesn’t check to see if the two given dates are separated at most by the given time period. If you’re finding that distinction hard to follow, don’t worry; it’s hard to explain.

It’s easy to demonstrate, however. Suppose we create a new NSDate that represents one second before Groundhog Day and run some compareDate tests on it:

// (Previous code goes here)

// 1 second before Groundhog Day, it was the previous day.
// Note what happens when we use compareDate:
let groundhogDayMinus1Second = dateMaker.dateFromString("2015/02/01 11:59:59 -05:00")!

// This returns false, because 2015/02/02 00:00:00 and 2015/02/01 11:59:59
// are NOT both within the same SECOND.
userCalendar.compareDate(groundhogDay,
  toDate: groundhogDayMinus1Second,
  toUnitGranularity: .Second)
  == .OrderedSame

// This returns false, because while 2015/02/02 00:00:00 and 2015/02/01 11:59:59
// ARE within a minute of each other, they're not both within the SAME MINUTE
// (00:00 vs. 11:59).
userCalendar.compareDate(groundhogDay,
  toDate: groundhogDayMinus1Second,
  toUnitGranularity: .Minute)
  == .OrderedSame

// This returns false, because while 2015/02/02 00:00:00 and 2015/02/01 11:59:59
// ARE within an hour of each other, they're not both within the SAME HOUR
// (0 vs. 11).
userCalendar.compareDate(groundhogDay,
  toDate: groundhogDayMinus1Second,
  toUnitGranularity: .Hour)
  == .OrderedSame

// This returns false, because while 2015/02/02 00:00:00 and 2015/02/01 11:59:59
// ARE within a day of each other, they're not both within the SAME DAY
// (February 2 vs. February 1).
userCalendar.compareDate(groundhogDay,
  toDate: groundhogDayMinus1Second,
  toUnitGranularity: .Day)
  == .OrderedSame

// This returns true, because while 2015/02/02 00:00:00 and 2015/02/01 11:59:59
// ARE in the same month.
userCalendar.compareDate(groundhogDay,
  toDate: groundhogDayMinus1Second,
  toUnitGranularity: .Month)
  == .OrderedSame

Note that compareDate isn’t available in iOS versions prior to 8. Code targeting iOS 7 or earlier will require writing an equivalent method, which I’ll leave as an exercise for the reader.

Making date arithmetic more Swift-like

You may have noticed in the code so far that I’ve been creating NSDates by using an instance of NSDateFormatter and a defined format string. That’s because this approach uses fewer lines than creating an NSDateComponents instance, setting its properties, then using a calendar to use the NSDateComponents instance to create an NSDate. Unfortunately, there’s no built-in quick way to build an NSDateComponents instance that represents an interval of time.

This means that answering questions like “What will the date be 1 month, 8 days, 6 hours, and 17 minutes after Groundhog Day?” requires a lot of yak shaving, my favorite term for “tedious setting-up”:

// (Previous code goes here)

// Date arithmetic
// ===============

// The clunky way
// --------------

// Suppose we want to get the date of Groundhog Day plus
// 1 month, 8 days, 6 hours, and 17 minutes
let timeInterval = NSDateComponents()
timeInterval.month = 1
timeInterval.day = 8
timeInterval.hour = 6
timeInterval.minute = 17
// The resulting date should be March 10, 2015, 6:17 a.m.
let resultDate = userCalendar.dateByAddingComponents(timeInterval,
  toDate: groundhogDay,
  options: [])!

This approach is a clunky Objective-C-flavored way of doing things. I’d much rather do this calculation with code that looked like this:

let resultDate = groundhogDay + 1.months + 8.days + 6.hours + 17.minutes

Luckily, we’re working with Swift. Some judicious use of operator overloading and extensions will let us do just that!

First, we need to overload some operators to simplify date component arithmetic:

// (Previous code goes here)

// The neat way
// ------------

// First, we define methods that allow us to add and subtract
// NSDateComponents instances

// The addition and subtraction code is nearly the same,
// so we've factored it out into this method
func combineComponents(lhs: NSDateComponents,
  rhs: NSDateComponents,
  _ multiplier: Int = 1)
  -> NSDateComponents
{
  let result = NSDateComponents()
  let undefined = Int(NSDateComponentUndefined)
  
  result.second = ((lhs.second != undefined ? lhs.second : 0) +
    (rhs.second != undefined ? rhs.second : 0) * multiplier)
  result.minute = ((lhs.minute != undefined ? lhs.minute : 0) +
    (rhs.minute != undefined ? rhs.minute : 0) * multiplier)
  result.hour = ((lhs.hour != undefined ? lhs.hour : 0) +
    (rhs.hour != undefined ? rhs.hour : 0) * multiplier)
  result.day = ((lhs.day != undefined ? lhs.day : 0) +
    (rhs.day != undefined ? rhs.day : 0) * multiplier)
  result.month = ((lhs.month != undefined ? lhs.month : 0) +
    (rhs.month != undefined ? rhs.month : 0) * multiplier)
  result.year = ((lhs.year != undefined ? lhs.year : 0) +
    (rhs.year != undefined ? rhs.year : 0) * multiplier)
  return result
}

// With combineComponents defined,
// overloading + and - is simple

func +(lhs: NSDateComponents, rhs: NSDateComponents) -> NSDateComponents
{
  return combineComponents(lhs, rhs: rhs)
}

func -(lhs: NSDateComponents, rhs: NSDateComponents) -> NSDateComponents
{
  return combineComponents(lhs, rhs: rhs, -1)
}

// We'll need to overload unary - so we can negate components
prefix func -(components: NSDateComponents) -> NSDateComponents {
  let result = NSDateComponents()
  let undefined = Int(NSDateComponentUndefined)
  
  if(components.second != undefined) { result.second = -components.second }
  if(components.minute != undefined) { result.minute = -components.minute }
  if(components.hour != undefined) { result.hour = -components.hour }
  if(components.day != undefined) { result.day = -components.day }
  if(components.month != undefined) { result.month = -components.month }
  if(components.year != undefined) { result.year = -components.year }
  return result
}

I derived these functions from Axel Schlueter’s SwiftDateTimeExtensions library. He wrote them when Swift was still in beta; I updated them so that they compile with the current version and added a couple of tweaks of my own. They make it possible to:

  • Add the respective second, minute, hour, day, month, and year properties of two NSDateComponent instances,
  • subtract the second, minute, hour, day, month, and year properties of one NSDateComponents instance from the corresponding properties of another NSDateComponents instance, and
  • negate the second, minute, hour, day, month, and year properties of an NSDateComponents instance.

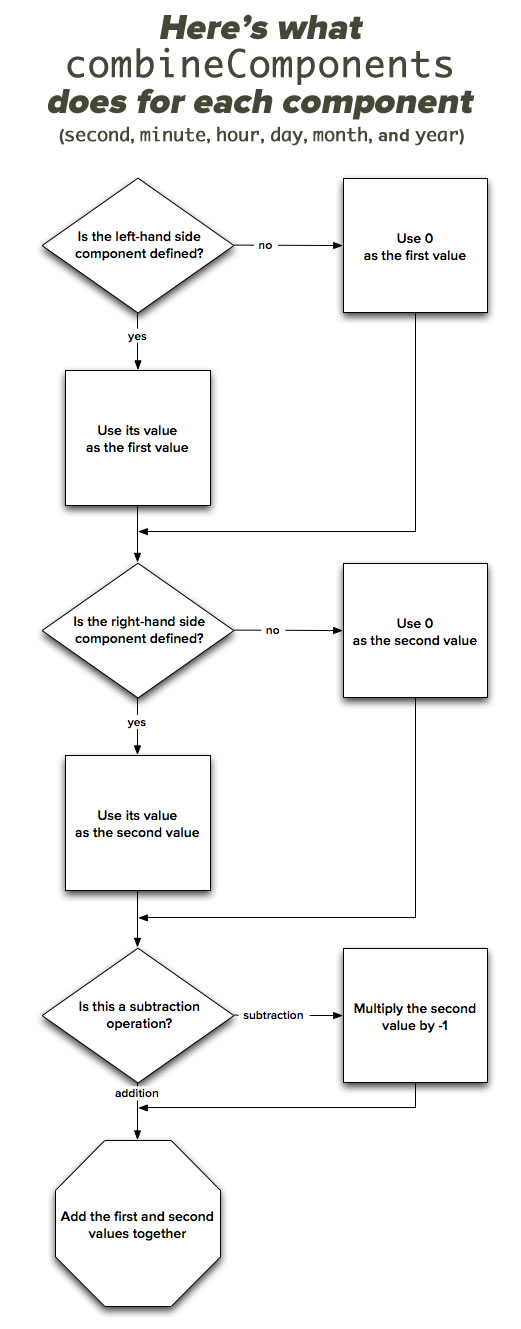
The addition and subtraction operations are so similar and so tedious; that’s a sign that there’s an opportunity to DRY up the code. That’s why we have the combineComponents method doing the work and the + and - overloads calling it with the right parameters. The combineComponents code is dense with ternary conditional operators, so I thought I’d explain what’s going on under the hood with this flowchart:

combineComponents

You may be wondering why we defined a negation method and didn’t use it when performing subtraction. That’s because the negation method simply ignores undefined components, while addition and subtraction require treating undefined component values as 0. The negation method comes in handy in other scenarios, which I’ll show later.

Now that we’ve got date component addition, subtraction, and negation defined, let’s extend the Int type so that it has some instance properties that let us define components with statements like 5.seconds, 3.minutes, 7.hours, 2.days, 4.weeks, and so on:

// (Previous code goes here)

// Next, we extend Int to bring some Ruby-like magic
// to date components

extension Int {
  
  var seconds: NSDateComponents {
    let components = NSDateComponents()
    components.second = self;
    return components
  }
  
  var second: NSDateComponents {
    return self.seconds
  }
  
  var minutes: NSDateComponents {
    let components = NSDateComponents()
    components.minute = self;
    return components
  }
  
  var minute: NSDateComponents {
    return self.minutes
  }
  
  var hours: NSDateComponents {
    let components = NSDateComponents()
    components.hour = self;
    return components
  }
  
  var hour: NSDateComponents {
    return self.hours
  }
  
  var days: NSDateComponents {
    let components = NSDateComponents()
    components.day = self;
    return components
  }
  
  var day: NSDateComponents {
    return self.days
  }
  
  var weeks: NSDateComponents {
    let components = NSDateComponents()
    components.day = 7 * self;
    return components
  }
  
  var week: NSDateComponents {
    return self.weeks
  }
  
  var months: NSDateComponents {
    let components = NSDateComponents()
    components.month = self;
    return components
  }
  
  var month: NSDateComponents {
    return self.months
  }
  
  var years: NSDateComponents {
    let components = NSDateComponents()
    components.year = self;
    return components
  }
  
  var year: NSDateComponents {
    return self.years
  }
  
}

Once again, I derived these functions from Axel Schlueter’s SwiftDateTimeExtensions library and added a couple of tweaks of my own.

There’s a little redundancy in the code above; it’s to allow for grammatically correct code. I didn’t like seeing code like 1.seconds, 1.minutes, 1.hours, 1.days, and so on.

With the date component addition and subtraction overloads and the extension to Int, building date components that represent time intervals is far less tedious:

// (Previous code goes here)

// Building an NSDateComponents instance that represents
// a time interval is now a lot nicer:
let newTimeInterval = 1.month + 8.days + 6.hours + 17.minutes
// Let's confirm that it works
newTimeInterval.month   // 1
newTimeInterval.day     // 8
newTimeInterval.hour    // 6
newTimeInterval.minute  // 17

With all our tweaks, adding components to dates using NSCalendar‘s dateByAddingComponents feels clunky by comparison. Here are some operator overloads that make this sort of coding more elegant if you’re working with dates and date components expressed in terms of the user’s current calendar:

// (Previous code goes here)

// Let's make it easy to add dates and components,
// and subtract components from dates

// Date + component
func +(lhs: NSDate, rhs: NSDateComponents) -> NSDate
{
  return NSCalendar.currentCalendar().dateByAddingComponents(rhs,
    toDate: lhs,
    options: [])!
}

// Component + date
func +(lhs: NSDateComponents, rhs: NSDate) -> NSDate
{
  return rhs + lhs
}

// Date - component
// (Component - date doesn't make sense)
func -(lhs: NSDate, rhs: NSDateComponents) -> NSDate
{
  return lhs + (-rhs)
}

With these methods, date arithmetic now looks like this:

// (Previous code goes here)

// Look at how easy date arithmetic is now:

// What's the date and time 2 weeks, 1 day, 13 hours, and 57 minutes
// after Groundhog Day 2015?
groundhogDay + 2.weeks + 1.day + 13.hours + 57.minutes
// (Answer: February 17, 2015, 1:57 p.m.)

// Adding dates to date components is quite flexible:
2.weeks + 1.day + 13.hours + 57.minutes + groundhogDay
2.weeks + 1.day + groundhogDay + 13.hours + 57.minutes

// What was the date 1 year, 2 months, and 12 days
// prior to Groundhog Day 2015?
groundhogDay - 1.year - 2.months - 12.days
/// (Answer: November 20, 2013)

That code is so much more pleasant to read (and write!).

And finally, a Ruby on Rails trick comes to Swift

Ruby on Rails lets you do very readable calculations like 2.days.from_now and 2.days.ago. We can bring that Rails magic to Swift by using everything we’ve build so far and extending NSDateComponents with two computer properties:

// (Previous code goes here)

// And finally some Ruby on Rails magic, that allows us to create dates
// with code like "2.days.fromNow" and "2.days.ago"

extension NSDateComponents {
  
  var fromNow: NSDate {
    let currentCalendar = NSCalendar.currentCalendar()
    return currentCalendar.dateByAddingComponents(self,
      toDate: NSDate(),
      options: [])!
  }
  
  var ago: NSDate {
    let currentCalendar = NSCalendar.currentCalendar()
    return currentCalendar.dateByAddingComponents(-self,
      toDate: NSDate(),
      options: [])!
  }
  
}

Equipped with everything we’ve made, we can now write code like this:

// (Previous code goes here)

// Let's test the Rails magic!
// (It's August 26, 2015, 23:06 as I execute this code)

// August 28, 2015, 11:06 p.m.
2.days.fromNow
// August 29, 2015, 2:23 a.m.
(2.days + 3.hours + 17.minutes).fromNow
// August 24, 2015, 11:06 p.m.
2.days.ago
// August 24, 2015, 7:49 p.m.
(2.days + 3.hours + 17.minutes).ago

The entire playground

And with that. we’ve got a more Swift-like way of doing date arithmetic. I’m going to take all these methods and extensions and post them as a library on GitHub, but in the meantime, here’s the complete playground for the exercises in this article. Go forth and write some readable date/time code!

// Date/time overloads and extensions Swift playground
// by Joey deVilla - August 2015
// Partially based on Axel Schlueter's SwiftDateTimeExtensions library
// (https://github.com/schluete/SwiftDateTimeExtensions)
//
// Released under the MIT License (MIT)
// (c) 2015 Joey deVilla


import UIKit

let userCalendar = NSCalendar.currentCalendar()

// Let's create some dates to work with
// ====================================

// If you need to instantiate a number of pre-defined dates,
// an NSDateFormatter will get it done in the fewest number of lines.
let dateMaker = NSDateFormatter()
dateMaker.dateFormat = "yyyy/MM/dd hh:mm:ss Z"

// I'm setting these dates according to my time zone (UTC-0500);
// feel free to adjust the values according to your time zone.
let valentinesDay = dateMaker.dateFromString("2015/02/14 00:00:00 -05:00")!
let stPatricksDay = dateMaker.dateFromString("2015/03/17 00:00:00 -05:00")!


// Comparing dates, part 1
// =======================

// First, the clunky NSDate::compare way
// -------------------------------------

// Returns true because Valentine's Day comes before St. Patrick's Day
valentinesDay.compare(stPatricksDay) == .OrderedAscending

// Returns true because they're the same date
valentinesDay.compare(valentinesDay) == .OrderedSame

// Returns true because St. Patrick's Day comes after Valentine's Day
stPatricksDay.compare(valentinesDay) == .OrderedDescending

// Let's overload the <, >, and == operators to do date comparisons
// ----------------------------------------------------------------

func ==(lhs: NSDate, rhs: NSDate) -> Bool
{
  return lhs === rhs || lhs.compare(rhs) == .OrderedSame
}

func <(lhs: NSDate, rhs: NSDate) -> Bool
{
  return lhs.compare(rhs) == .OrderedAscending
}

func >(lhs: NSDate, rhs: NSDate) -> Bool
{
  return lhs.compare(rhs) == .OrderedDescending
}

// Comparisons are less clunky now!
// --------------------------------

valentinesDay < stPatricksDay   // true
valentinesDay == valentinesDay  // true
stPatricksDay > valentinesDay   // true


// Comparing dates, part 2
// =======================

// Let's create two dates that are only one second apart:
let groundhogDay = dateMaker.dateFromString("2015/02/02 00:00:00 -05:00")!
let groundhogDayPlus1Second = dateMaker.dateFromString("2015/02/02 00:00:01 -05:00")!

// This line returns false:
groundhogDay == groundhogDayPlus1Second
// This line returns true:
groundhogDay < groundhogDayPlus1Second
// NSDate's compare method is too precise for a lot of uses!

// Enter NSCalendar's compareDate method, available in iOS 8 and later

// This returns false, because 2015/02/02 00:00:00 and 2015/02/02 00:00:01
// are NOT both within the same SECOND.
userCalendar.compareDate(groundhogDay,
  toDate: groundhogDayPlus1Second,
  toUnitGranularity: .Second)
  == .OrderedSame

// This returns true, because 2015/02/02 00:00:00 and 2015/02/02 00:00:01
// ARE both within the same MINUTE.
userCalendar.compareDate(groundhogDay,
  toDate: groundhogDayPlus1Second,
  toUnitGranularity: .Minute)
  == .OrderedSame

// This returns true, because 2015/02/02 00:00:00 and 2015/02/02 00:00:01
// ARE both within the same HOUR.
userCalendar.compareDate(groundhogDay,
  toDate: groundhogDayPlus1Second,
  toUnitGranularity: .Hour)
  == .OrderedSame

// This returns true, because 2015/02/02 00:00:00 and 2015/02/02 00:00:01
// ARE both within the same DAY.
userCalendar.compareDate(groundhogDay,
  toDate: groundhogDayPlus1Second,
  toUnitGranularity: .Day)
  == .OrderedSame

// 1 second before Groundhog Day, it was the previous day.
// Note what happens when we use compareDate:
let groundhogDayMinus1Second = dateMaker.dateFromString("2015/02/01 11:59:59 -05:00")!

// This returns false, because 2015/02/02 00:00:00 and 2015/02/01 11:59:59
// are NOT both within the same SECOND.
userCalendar.compareDate(groundhogDay,
  toDate: groundhogDayMinus1Second,
  toUnitGranularity: .Second)
  == .OrderedSame

// This returns false, because while 2015/02/02 00:00:00 and 2015/02/01 11:59:59
// ARE within a minute of each other, they're not both within the SAME MINUTE
// (00:00 vs. 11:59).
userCalendar.compareDate(groundhogDay,
  toDate: groundhogDayMinus1Second,
  toUnitGranularity: .Minute)
  == .OrderedSame

// This returns false, because while 2015/02/02 00:00:00 and 2015/02/01 11:59:59
// ARE within an hour of each other, they're not both within the SAME HOUR
// (0 vs. 11).
userCalendar.compareDate(groundhogDay,
  toDate: groundhogDayMinus1Second,
  toUnitGranularity: .Hour)
  == .OrderedSame

// This returns false, because while 2015/02/02 00:00:00 and 2015/02/01 11:59:59
// ARE within a day of each other, they're not both within the SAME DAY
// (February 2 vs. February 1).
userCalendar.compareDate(groundhogDay,
  toDate: groundhogDayMinus1Second,
  toUnitGranularity: .Day)
  == .OrderedSame

// This returns true, because while 2015/02/02 00:00:00 and 2015/02/01 11:59:59
// ARE in the same month.
userCalendar.compareDate(groundhogDay,
  toDate: groundhogDayMinus1Second,
  toUnitGranularity: .Month)
  == .OrderedSame


// Date arithmetic
// ===============

// The clunky way
// --------------

// Suppose we want to get the date of Groundhog Day plus
// 1 month, 8 days, 6 hours, and 17 minutes
let timeInterval = NSDateComponents()
timeInterval.month = 1
timeInterval.day = 8
timeInterval.hour = 6
timeInterval.minute = 17
// The resulting date should be March 10, 2015, 6:17 a.m.
let resultDate = userCalendar.dateByAddingComponents(timeInterval,
  toDate: groundhogDay,
  options: [])!


// The neat way
// ------------

// First, we define methods that allow us to add and subtract
// NSDateComponents instances

// The addition and subtraction code is nearly the same,
// so we've factored it out into this method
func combineComponents(lhs: NSDateComponents,
  rhs: NSDateComponents,
  _ multiplier: Int = 1)
  -> NSDateComponents
{
  let result = NSDateComponents()
  let undefined = Int(NSDateComponentUndefined)
  
  result.second = ((lhs.second != undefined ? lhs.second : 0) +
    (rhs.second != undefined ? rhs.second : 0) * multiplier)
  result.minute = ((lhs.minute != undefined ? lhs.minute : 0) +
    (rhs.minute != undefined ? rhs.minute : 0) * multiplier)
  result.hour = ((lhs.hour != undefined ? lhs.hour : 0) +
    (rhs.hour != undefined ? rhs.hour : 0) * multiplier)
  result.day = ((lhs.day != undefined ? lhs.day : 0) +
    (rhs.day != undefined ? rhs.day : 0) * multiplier)
  result.month = ((lhs.month != undefined ? lhs.month : 0) +
    (rhs.month != undefined ? rhs.month : 0) * multiplier)
  result.year = ((lhs.year != undefined ? lhs.year : 0) +
    (rhs.year != undefined ? rhs.year : 0) * multiplier)
  return result
}

// With combineComponents defined,
// overloading + and - is simple

func +(lhs: NSDateComponents, rhs: NSDateComponents) -> NSDateComponents
{
  return combineComponents(lhs, rhs: rhs)
}

func -(lhs: NSDateComponents, rhs: NSDateComponents) -> NSDateComponents
{
  return combineComponents(lhs, rhs: rhs, -1)
}

// We'll need to overload unary - so we can negate components
prefix func -(components: NSDateComponents) -> NSDateComponents {
  let result = NSDateComponents()
  let undefined = Int(NSDateComponentUndefined)
  
  if(components.second != undefined) { result.second = -components.second }
  if(components.minute != undefined) { result.minute = -components.minute }
  if(components.hour != undefined) { result.hour = -components.hour }
  if(components.day != undefined) { result.day = -components.day }
  if(components.month != undefined) { result.month = -components.month }
  if(components.year != undefined) { result.year = -components.year }
  return result
}

// Next, we extend Int to bring some Ruby-like magic
// to date components

extension Int {
  
  var seconds: NSDateComponents {
    let components = NSDateComponents()
    components.second = self;
    return components
  }
  
  var second: NSDateComponents {
    return self.seconds
  }
  
  var minutes: NSDateComponents {
    let components = NSDateComponents()
    components.minute = self;
    return components
  }
  
  var minute: NSDateComponents {
    return self.minutes
  }
  
  var hours: NSDateComponents {
    let components = NSDateComponents()
    components.hour = self;
    return components
  }
  
  var hour: NSDateComponents {
    return self.hours
  }
  
  var days: NSDateComponents {
    let components = NSDateComponents()
    components.day = self;
    return components
  }
  
  var day: NSDateComponents {
    return self.days
  }
  
  var weeks: NSDateComponents {
    let components = NSDateComponents()
    components.day = 7 * self;
    return components
  }
  
  var week: NSDateComponents {
    return self.weeks
  }
  
  var months: NSDateComponents {
    let components = NSDateComponents()
    components.month = self;
    return components
  }
  
  var month: NSDateComponents {
    return self.months
  }
  
  var years: NSDateComponents {
    let components = NSDateComponents()
    components.year = self;
    return components
  }
  
  var year: NSDateComponents {
    return self.years
  }
  
}


// Building an NSDateComponents instance that represents
// a time interval is now a lot nicer:
let newTimeInterval = 1.month + 8.days + 6.hours + 17.minutes
// Let's confirm that it works
newTimeInterval.month   // 1
newTimeInterval.day     // 8
newTimeInterval.hour    // 6
newTimeInterval.minute  // 17


// Let's make it easy to add dates and components,
// and subtract components from dates

// Date + component
func +(lhs: NSDate, rhs: NSDateComponents) -> NSDate
{
  return NSCalendar.currentCalendar().dateByAddingComponents(rhs,
    toDate: lhs,
    options: [])!
}

// Component + date
func +(lhs: NSDateComponents, rhs: NSDate) -> NSDate
{
  return rhs + lhs
}

// Date - component
// (Component - date doesn't make sense)
func -(lhs: NSDate, rhs: NSDateComponents) -> NSDate
{
  return lhs + (-rhs)
}

// Look at how easy date arithmetic is now:

// What's the date and time 2 weeks, 1 day, 13 hours, and 57 minutes
// after Groundhog Day 2015?
groundhogDay + 2.weeks + 1.day + 13.hours + 57.minutes
// (Answer: February 17, 2015, 1:57 p.m.)

// Adding dates to date components is quite flexible:
2.weeks + 1.day + 13.hours + 57.minutes + groundhogDay
2.weeks + 1.day + groundhogDay + 13.hours + 57.minutes

// What was the date 1 year, 2 months, and 12 days
// prior to Groundhog Day 2015?
groundhogDay - 1.year - 2.months - 12.days
/// (Answer: November 20, 2013)


// And finally some Ruby on Rails magic, that allows us to create dates
// with code like "2.days.fromNow" and "2.days.ago"

extension NSDateComponents {
  
  var fromNow: NSDate {
    let currentCalendar = NSCalendar.currentCalendar()
    return currentCalendar.dateByAddingComponents(self,
      toDate: NSDate(),
      options: [])!
  }
  
  var ago: NSDate {
    let currentCalendar = NSCalendar.currentCalendar()
    return currentCalendar.dateByAddingComponents(-self,
      toDate: NSDate(),
      options: [])!
  }
  
}

// Let's test the Rails magic!
// (It's August 26, 2015, 23:06 as I execute this code)

// August 28, 2015, 11:06 p.m.
2.days.fromNow
// August 29, 2015, 2:23 a.m.
(2.days + 3.hours + 17.minutes).fromNow
// August 24, 2015, 11:06 p.m.
2.days.ago
// August 24, 2015, 7:49 p.m.
(2.days + 3.hours + 17.minutes).ago

Related articles

dates and times in swift - small

A very brief introduction to date formatting in Swift and iOS: The oversight in a mostly-good book on Swift programming led me down the path of writing articles about dates and times in Swift, starting with this one, where I look atNSDateFormatter.

How to work with dates and times in Swift, part one: An introduction of Cocoa’s date and time classes, and how they work together. This article covers UTC (Coordinated Universal Time), and the key classes: NSDate, NSCalendar, NSDateComponents.

How to work with dates and times in Swift, part two: Calculations with dates: Now that we’ve got the basics, it’s time to do some date arithmetic: comparing two dates to see which one is the earlier and later one, finding out how far apart two dates are, and adding and subtracting from dates.

How to work with dates and times in Swift, part four: A more Swift-like way to get the time interval between two dates: This quick article shows you how to make an operator overload that makes getting the time interval between two dates more like subtraction.

Categories
Swift Kick

How to work with dates and times in Swift, part two: Calculations with dates [Updated for Swift 2]

cocoa date time class chart

Click the chart to see it at full size.

Update, August 26, 2015: I’ve updated this article so that its code works with Swift 2. It compiles under the latest version of Xcode 7, beta 6.

swift kick

In the previous installment in this series that looks at working with dates and times in Cocoa, we looked at:

  • The NSDate class, which is the heart of date and time in Cocoa, and represents a single point in time relative to the start of the third millennium (midnight, January 1, 2001)
  • the NSCalendar class, which provides a context for dates and the ability to do date arithmetic,
  • the NSDateComponents class, which represents the parts that make up either a date or a span of time, and
  • the NSDateFormatter class, which turns dates into string representations and vice versa.

We also covered creating dates, converting components into dates and vice versa, and converting dates into strings and vice versa. With this knowledge under our belts, let’s get to this article’s topic: doing date calculations.

Creating a couple of dates to work with

valentines st patricks

Start with a fresh playground, and enter or paste the following code so it looks like this:

// Playground - noun: a place where people can play

import UIKit

let userCalendar = NSCalendar.currentCalendar()

// Let's create an NSDate for Valentine's Day
// using NSDateComponents
let valentinesDayComponents = NSDateComponents()
valentinesDayComponents.year = 2015
valentinesDayComponents.month = 2
valentinesDayComponents.day = 14
let valentinesDay = userCalendar.dateFromComponents(valentinesDayComponents)!

// Let's create an NSDate for St. Patrick's Day
// using NSDateFormatter
let dateMakerFormatter = NSDateFormatter()
dateMakerFormatter.calendar = userCalendar
dateMakerFormatter.dateFormat = "yyyy/MM/dd"
let stPatricksDay = dateMakerFormatter.dateFromString("2015/03/17")!

In the code above, we’re creating two dates in two different ways (which we covered in the previous article):

  • We’re creating Valentine’s Day (February 14 for those of you in places where it’s not celebrated) by setting up date components and then using the user’s calendar to convert the components into a date.
  • We’re creating St. Patrick’s Day (March 17 for those of you in places where it’s not celebrated) by converting a string representing that date into a date by means of a date formatter. You may find that if you need to instantiate a large number of dates in code, you may want to do so this way, as you can do it in far fewer lines than by using date components.

Now that we have a couple of date objects, let’s do some date arithmetic!

Which came first?

which came first

NSDate has two methods, earlierDate and laterDate, which compare one date to another and return the appropriate date. Add the highlighted code below so that your playground looks like this:

// Playground - noun: a place where people can play

import UIKit

let userCalendar = NSCalendar.currentCalendar()

// Let's create an NSDate for Valentine's Day
// using NSDateComponents
let valentinesDayComponents = NSDateComponents()
valentinesDayComponents.year = 2015
valentinesDayComponents.month = 2
valentinesDayComponents.day = 14
let valentinesDay = userCalendar.dateFromComponents(valentinesDayComponents)!

// Let's create an NSDate for St. Patrick's Day
// using NSDateFormatter
let dateMakerFormatter = NSDateFormatter()
dateMakerFormatter.calendar = userCalendar
dateMakerFormatter.dateFormat = "yyyy/MM/dd"
let stPatricksDay = dateMakerFormatter.dateFromString("2015/03/17")!

// Which date comes first? Which comes last?
valentinesDay.earlierDate(stPatricksDay)
valentinesDay.laterDate(stPatricksDay)

This is pretty straightforward: valentinesDay.earlierDate(stPatricksDay) returns the valentinesDay instance, while valentinesDay.laterDate(stPatricksDay) returns stPatricksDay.

NSDate has a compare method that works in a way similar to a lot of other “compare” methods (such as C’s strcmp) that compare a value a and b, where:

  • If a < b, it returns a negative number
  • if a == b, it returns 0
  • if a > b, it returns a positive number

Cocoa comparison methods return values of type NSComparisonResult, so that when you’re comparing two values a and b:

  • If a < b, it returns NSOrderedAscending
  • if a == b, it returns NSOrderedSame
  • if a > b, it returns NSOrderedDescending

Let’s take it out for a spin. Add the highlighted code below so that your playground looks like this:

// Playground - noun: a place where people can play

import UIKit

let userCalendar = NSCalendar.currentCalendar()

// Let's create an NSDate for Valentine's Day
// using NSDateComponents
let valentinesDayComponents = NSDateComponents()
valentinesDayComponents.year = 2015
valentinesDayComponents.month = 2
valentinesDayComponents.day = 14
let valentinesDay = userCalendar.dateFromComponents(valentinesDayComponents)!

// Let's create an NSDate for St. Patrick's Day
// using NSDateFormatter
let dateMakerFormatter = NSDateFormatter()
dateMakerFormatter.calendar = userCalendar
dateMakerFormatter.dateFormat = "yyyy/MM/dd"
let stPatricksDay = dateMakerFormatter.dateFromString("2015/03/17")!

// Which date comes first? Which comes last?
valentinesDay.earlierDate(stPatricksDay)
valentinesDay.laterDate(stPatricksDay)

// Another way to compare dates
let dayOrder = valentinesDay.compare(stPatricksDay)
if dayOrder == .OrderedAscending {
  print("Valentine's Day comes before St. Patrick's Day.")
}
else if dayOrder == .OrderedDescending {
  print("Valentine's Day comes after St. Patrick's Day.")
}
else if dayOrder == .OrderedSame {
  print("They're the same day!")
}
else {
  print("Something weird happened.")
}

Valentine’s Day comes before St. Patrick’s Day, so the result you see the in sidebar should be Valentine’s Day comes before St. Patrick’s Day.

Date arithmetic: How far apart are two dates and times?

countdown clock

NSDate has the timeIntervalSinceDate method, which gives you the difference between 2 dates…in seconds.

// (Previous code goes here)

// Not all that useful
valentinesDay.timeIntervalSinceDate(stPatricksDay)
stPatricksDay.timeIntervalSinceDate(valentinesDay)

Since Valentine’s Day comes before St. Patrick’s Day, the first value is negative, while the second value is positive. Most users won’t find knowing that there are nearly 2.7 million seconds between the two days. How can we find out the number of days between Valentine’s and St. Patrick’s?

That’s where date components come in. I mentioned last time that date components can represent either:

  • A specific point in time, or
  • a duration of time.

We’re going to use date components for the second purpose in this example. We need to do the following:

  • Specify the units of time that we want from the calculation, which in this case is days, and
  • Provide those units of time and the two dates to NSCalendar‘s components method:
// (Previous code goes here)

// How many days between Valentine's Day and St. Patrick's Day?
let dayCalendarUnit: NSCalendarUnit = [.Day]
let stPatricksValentinesDayDifference = userCalendar.components(
  dayCalendarUnit,
  fromDate: valentinesDay,
  toDate: stPatricksDay,
  options: [])
// The result should be 31
stPatricksValentinesDayDifference.day

This version of NSCalendar‘s components method takes the following arguments:

  • unitFlags: An option set of components we want to retrieve. Since we want to know the number of days between Valentine’s and St. Patrick’s, there’s only one option in the set: .Day.
  • fromDate: The start date in the calculation.
  • toDate: The end date in the calculation.
  • options: In most cases, you’ll want this set to [], which means no options. This causes overflows in a unit to carry to the next higher unit. For example, if you specify in unitFlags that you want your result expressed in minutes and seconds, and the calculation’s result is 61 seconds, the result will be changed to 1 minute, 1 second.

Let’s try another calculation: what’s the time difference between 10:45 a.m. and 12:00 noon?

// (Previous code goes here)

// How many hours and minutes between 10:45 a.m. and 12:00 noon?
dateMakerFormatter.dateFormat = "yyyy/MM/dd hh:mm a Z"
let startTime = dateMakerFormatter.dateFromString("2015/01/27 10:45 AM -05:00")!
let endTime = dateMakerFormatter.dateFromString("2015/01/27 12:00 PM -05:00")!
let hourMinuteComponents: NSCalendarUnit = [.Hour, .Minute]
let timeDifference = userCalendar.components(
  hourMinuteComponents,
  fromDate: startTime,
  toDate: endTime,
  options: [])
timeDifference.hour
timeDifference.minute

You should see in the sidebar that timeDifference.hour‘s value is 1 and timeDifference.minute‘s value is 15.

Date addition and subtraction

plus minus dice

If you’re writing some kind of reminder app, you might want to be able to let the user say “give me a reminder in 10 days”, which means you’ll need to calculate what the date and time will be 10 days from now. Since we’re doing date addition with only one unit, we can perform this calculation by using NSCalendar‘s dateByAddingUnit method:

// (Previous code goes here)

// What will the date and time be be ten days from now?
let tenDaysFromNow = userCalendar.dateByAddingUnit(
  [.Day],
  value: 10,
  toDate: NSDate(),
  options: [])!

// What weekday (Sunday through Saturday) will it be ten days from now, and
// which weekday of the month will it be -- the 1st, 2nd, 3rd...?
let weekdayAndWeekdayOrdinal: NSCalendarUnit = [.Weekday, .WeekdayOrdinal]
let tenDaysFromNowComponents = userCalendar.components(
  weekdayAndWeekdayOrdinal,
  fromDate: tenDaysFromNow)
tenDaysFromNowComponents.weekday
tenDaysFromNowComponents.weekdayOrdinal

dateByAddingUnit expects the following parameters:

  • unit: The type of unit to be added to the date. We want to add days, so we’re setting this value to [.Day].
  • value: The number of units to be added to the date. We want to know what the date will be 10 days from now, so we set this to 10.
  • toDate: The date to which we’ll be adding units. We want to add 10 days to today, so we set this to a new NSDate (remember, instantiating an NSDate object without parameters creates an instance that refers to the current date and time).
  • options: In most cases, you’ll want to set this to [].

I ran the code on January 28, 2015 at 11:29 p.m., so the resulting date stored in tenDaysFromNow is displayed in my playground’s sidebar as Feb 7, 2015, 11:29 PM.

I wanted to know what day of the week it would be 10 days from now, and which weekday of the month (the first, second, third…?) so I used the version of NSCalendar‘s components method that takes a single date and use it to extract the weekday and weekdayOrdinal components from tenDaysFromNow. At the time I ran the code, tenDaysFromNowComponents.weekday‘s value was 7 (Saturday) and tenDaysFromNowComponents.weekdayOrdinal‘s value was 1 (meaning that it’s the first Saturday of the month).

Here’s another calculation: what was the date and time 3 days, 10 hours, 42 minutes, and 5 seconds ago? We’re doing date arithmetic with more than one kind of unit — days, hours, minutes, and seconds — so we need NSCalendar‘s dateByAddingComponents method instead:

// (Previous code goes here)

// What was the date and time 3 days, 10 hours, 42 minutes, and 5 seconds ago?
let periodComponents = NSDateComponents()
periodComponents.day = -3
periodComponents.hour = -10
periodComponents.minute = -42
periodComponents.second = -5
let then = userCalendar.dateByAddingComponents(
  periodComponents,
  toDate: NSDate(),
  options: [])!

dateByAddingComponents expects the following parameters:

  • comps: the date components that we want to add to the given date. Note that since we’re performing date subtraction, all the components are expressed as negative numbers.
  • toDate: The date from which we’ll be adding (or in this case, subtracting). We want to subtract from the current date and time, so we set this to a new NSDate object instantiated without parameters (which, as I’ve said before, gives an instance representing the current date and time).
  • options: In most cases, you’ll want to set this to [].

I ran the code on January 28, 2015 at 11:52 p.m., so the resulting date stored in then is displayed in my playground’s sidebar as Jan 25, 2015, 1:10 PM.

In closing

In this article, we covered:

  • Comparing two dates to see which one is the earlier on and which is the later one,
  • finding out how far apart two dates are, and
  • adding and subtracting from dates.

In the next installment, we’ll a closer look at date calculations and see some convenience methods that make date and time calculations simpler.

dates and times in swift - smallRelated articles

A very brief introduction to date formatting in Swift and iOS: The oversight in a mostly-good book on Swift programming led me down the path of writing articles about dates and times in Swift, starting with this one, where I look atNSDateFormatter.

How to work with dates and times in Swift, part one: An introduction of Cocoa’s date and time classes, and how they work together. This article covers UTC (Coordinated Universal Time), and the key classes: NSDate, NSCalendar, NSDateComponents.

How to work with dates and times in Swift, part three: Making date arithmetic more Swift-like: Cocoa’s date and time classes have an Objective-C heritage, which in the Swift context, feel kind of clunky. In this article, I look at ways — and by ways, I mean helper functions and class extensions — to make date calculations feel more like Swift.

How to work with dates and times in Swift, part four: A more Swift-like way to get the time interval between two dates: This quick article shows you how to make an operator overload that makes getting the time interval between two dates more like subtraction.

Categories
Swift Kick

How to work with dates and times in Swift, part one [Updated for Swift 2]

i just want to use dates

Update, August 26, 2015: I’ve updated this article so that its code works with Swift 2. It compiles under the latest version of Xcode 7, beta 6.

swift kickIf you’re just getting started with date and time programming in Swift, chances are that you probably did some Googling, found NSDate and its companion classes in Apple’s documentation and promptly got confused. Let me reassure you that it isn’t your fault. Apple’s Date and Time Programming Guide isn’t set up in the most helpful way, and its examples are in Objective-C, which can throw you off if you’re not familiar with its [instance method] calling syntax.

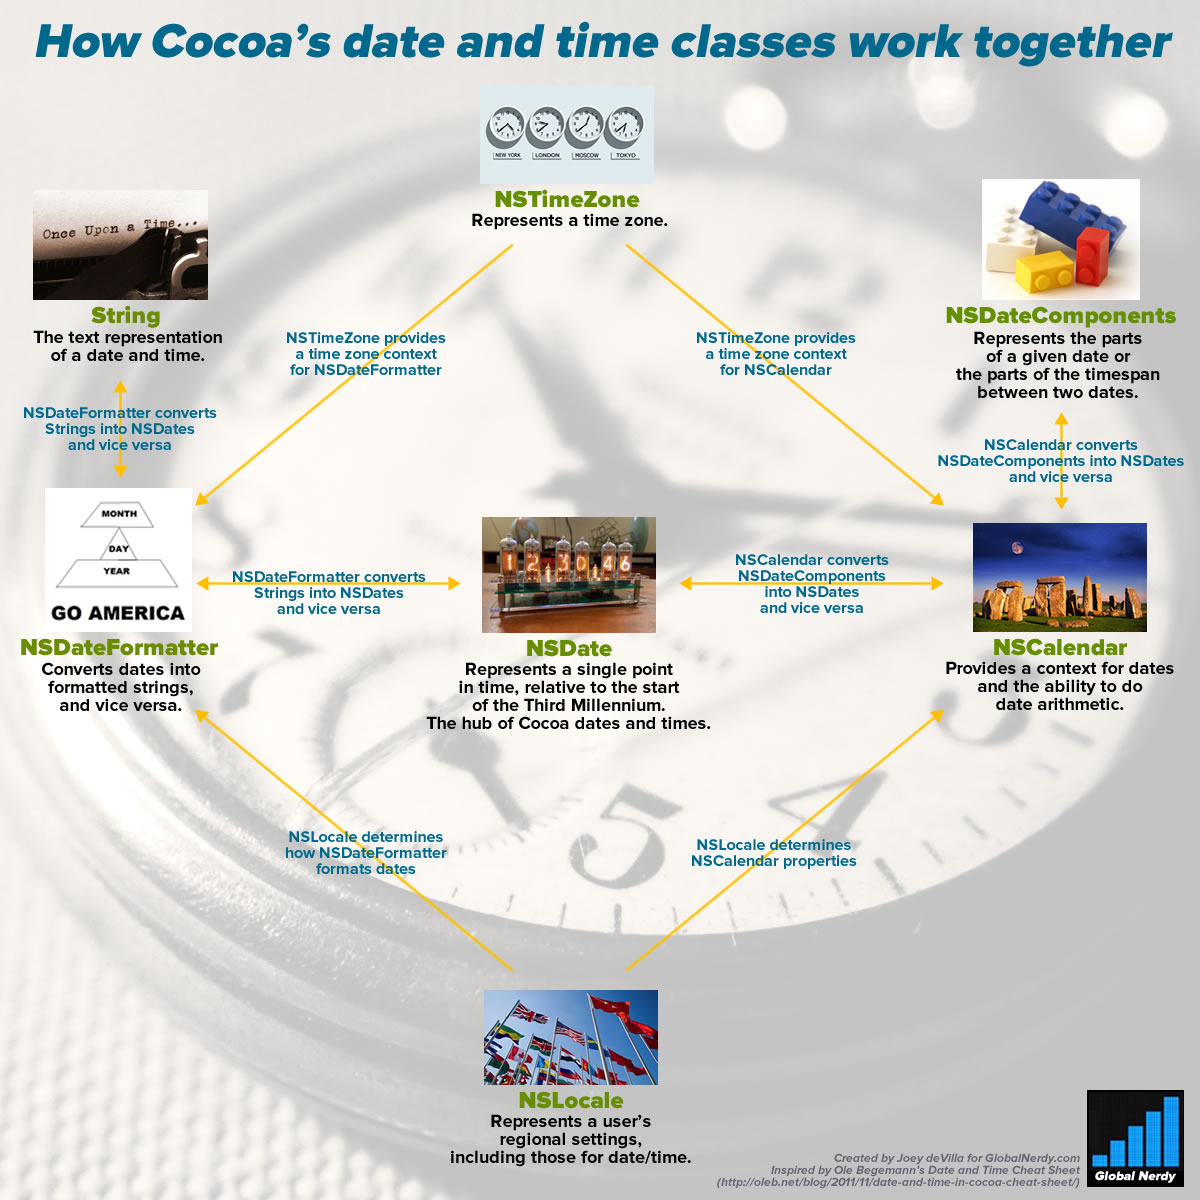
If you’re coming to Swift from JavaScript, which makes do with a single object type called Date, the idea of having this set of classes just to handle dates and times looks like overkill:
cocoa date time class chart

Click the chart to see it at full size.

This is the first article in a short series on programming dates and times in Swift. It’ll help you make sense of working with NSDate and its companion classes.

What is UTC? (or: “It’s 5 o’clock somewhere!”)
what time is it right now

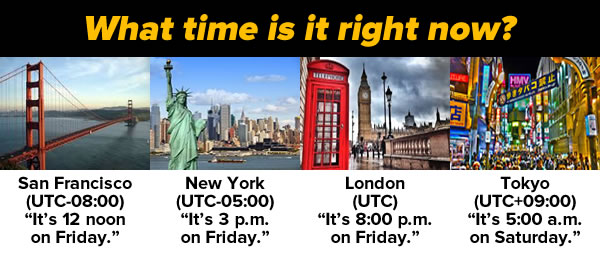
People who like to drink are fond of saying “Well, it’s five o’clock somewhere!“, and it’s my favorite way of illustrating that what time it is depends on where you are. It’s why we have UTC — Coordinated Universal Time — the “One True Time” on which every other time zone is based. UTC replaced GMT (Greenwich Meridian Time, the time as observed at the Royal Observatory in Greenwich, London), and it doesn’t change for daylight savings. By having this standard, we eliminate the confusion that comes up when discussing times.

While most places have some names to refer to time zones in everyday conversation — such as Pacific, Mountain, Central, and Eastern in North America — the clearest way to indicate time zones is to express them as negative or positive offsets from UTC. For example, the North American time zone known as “Eastern” is 5 hours behind UTC, so it’s expressed as UTC-05:00. There are certain time zones where the offset isn’t whole hours, such as Newfoundland’s, which is UTC-03:30, and Nepal’s, which for some reason is UTC+05:45.

NSDate: Cocoa standard time

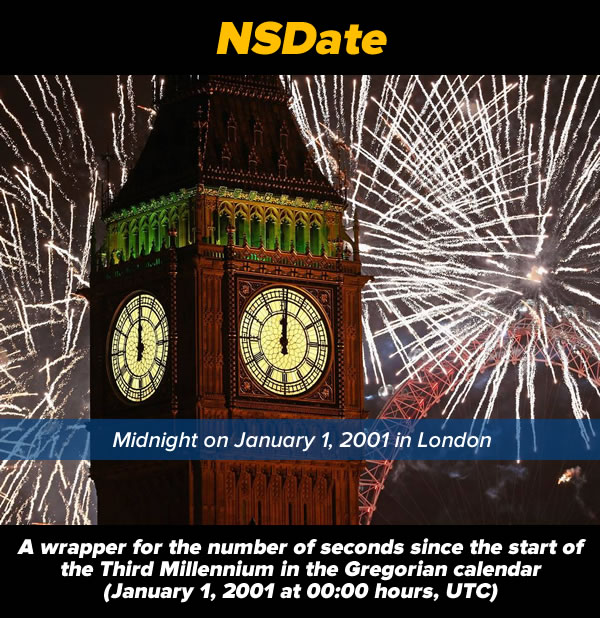
When you want to represent a date or time in Cocoa, you do so with an instance of the NSDate class. Here’s a nice, simple description of what NSDate is:
nsdate

When you’re measuring time, you need a reference point. The Gregorian calendar — the one that I’m 99.999999% sure that you’re using right now — uses what is said to be the year of the birth of Christ as its reference point. Your age uses the date of your birth as a reference point. A time trial race uses the time at the start of the race as its reference point.

NSDate‘s reference point is the start of the third millennium: January 1, 2001 at midnight UTC. It stores time as an NSTimeInterval, a 64-bit floating point value representing a number of seconds. Negative values represent a number seconds before January 1, 2001, 00:00 UTC, and positive values represent a number seconds after that time. According to Apple’s documentation, this representation of time “yields sub-millisecond precision over a range of 10,000 years”, which means that an NSDate instance can represent any point in time from about 3000 BC/BCE to 7000 AD/CE.

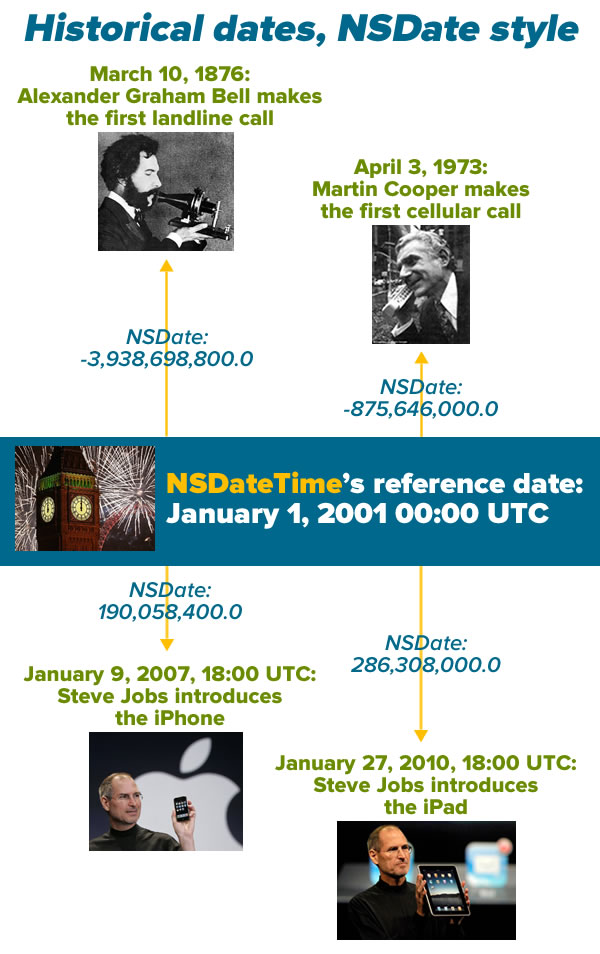
Here are 4 historical dates, as seen from NSDate‘s perspective:
historical dates nsdate style

There are some consequences to the fact that NSDate treats time as an offset of seconds:

  • All NSDate values refer to both a date and a time. If you want to use an NSDate to store a date only, you ignore the time portion, and vice versa.
  • NSDate has no concept of time zones or any time unit other than seconds. That means you can’t ask it what year, month, day, hour, or minute correspond to the time it’s storing. As far as it’s concerned, there are no calendars; you work with NSDate‘s representation of time, when it’s time to display a date, time, or both, you format it to use the calendar and time zone that’s appropriate for the user.

There’s a method to this madness: it allows us to use and store dates and times in a way that’s independent of calendar systems, time zones, languages, and date formats. As I write this, it’s the year 2015 in the Gregorian calendar, but the Buddhist calendar says it’s 2558, and if you go by the Hebrew Calendar, it’s 5775. I may say it’s 9:45 a.m. as I write this in Tampa, but if you’re in California, it’s 6:45, and if you’re a soldier, you might call it 14:45 Zulu Time. I call the current month January, but you might call it Enero or Janvier. It’s all the same as far as NSDate is concerned, which makes it incredibly flexible.

Creating NSDates without any helper classes: now is easy, other dates ain’t so pretty

Let’s create some NSDates right now. Fire up Xcode, open a new playground, and enter the following code so that it looks like this:

// Playground - noun: a place where people can play

import UIKit

let now = NSDate()
print(now)
now.timeIntervalSinceReferenceDate

You should see results in the sidebar that look similar to this:

playground 01

If you create an NSDate without any parameters, you get an instance representing the date and time at the moment it was created. That’s what we’ve done by creating the instance named now.

Note that in the sidebar beside line 5, where we created now, the result displayed in the sidebar is Jan 19, 2015, 8:52 AM. While the internal representation of the current time is a 64-bit floating point value, Xcode’s doing us a favor by representing it in a more readable format and using the local time zone. It’s doing this by making use of a date formatter, which we’ll cover later.

In line 6, we’re using the println function to display the default string representation of an NSDate, which is a completely numeric one. It’s more readable than a 64-bit floating point value, but it might not be in the format or time zone (or even the calendar system) that you want. Once again, this output comes courtesy of a date formatter.

Finally, in line 7, we use the timeIntervalSinceReferenceDate property to display now‘s internal representation of the date and time it’s storing: about 443 million seconds after January 1, 2001 at midnight UTC.

Let’s create the dates from the Historical dates, NSDate style picture above. Enter or paste the highlighted code below so that your playground looks like this:

// Playground - noun: a place where people can play

import UIKit

let now = NSDate()
println(now)
now.timeIntervalSinceReferenceDate

// March 10, 1876 was 3,938,698,800 seconds before the third millennium (January 1, 2001 midnight UTC)
let firstLandPhoneCallDate = NSDate(timeIntervalSinceReferenceDate: -3_938_698_800.0)

// April 3, 1973 was 875,646,000 seconds before the third millennium
let firstCellPhoneCallDate = NSDate(timeIntervalSinceReferenceDate: -875_646_000.0)

// January 9, 2007, 18:00 UTC was 190,058,400 seconds after the third millennium
let iPhoneAnnouncementDate = NSDate(timeIntervalSinceReferenceDate: 190_058_400.0)

// January 27, 2010, 18:00 UTC was 286,308,000 seconds after the third millennium
let iPadAnnouncementDate = NSDate(timeIntervalSinceReferenceDate: 286_308_000.0)

Note my use of the underscore character, _, to act as a “thousands” separator. It’s not required; it just makes large numbers easier to read.

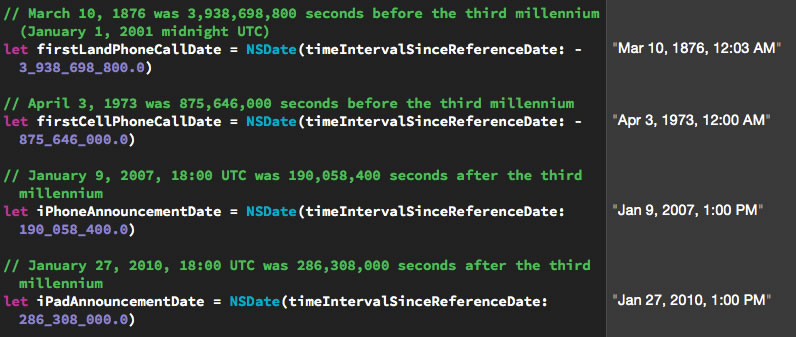
In the sidebar, you should see nicely-formatted dates beside the NSDates you created:
playground 02

Click the screenshot to see it at full size.

NSDate has four initializers for creating specified dates and times:

Initializer Description
init(timeIntervalSinceReferenceDate:) Create an NSDate instance representing a time specified by a number of seconds before or after January 1, 2001 00:00 UTC.
init(timeIntervalSinceNow:) Create an NSDate instance representing a time specified by a number of seconds before or after the current date and time.
init(timeIntervalSince1970:) Create an NSDate instance representing a time specified by a number of seconds before or after January 1, 1970 00:00 UTC. This method exists not because Apple’s founders were California hippies nostalgic for the era of their youth, but for compatibility with Unix time.
init(timeInterval:sinceDate:) Create an NSDate instance representing a time specified by a number of seconds before or after a given NSDate.

You’ve probably noticed that none of these initializers lets you create an NSDate by giving it something convenient like a year, month, day, time zone and so on. Luckily, there are classes that will help us do this.

Creating NSDates with the help of NSCalendar and NSDateComponents

If you’re like most people, you’d probably much rather initialize a date object using a day, month, year, and time instead of some number of seconds before and after midnight on January 1, 1970, January 1, 2001, or any other arbitrary date. For this, we’ll need a couple of additional classes:
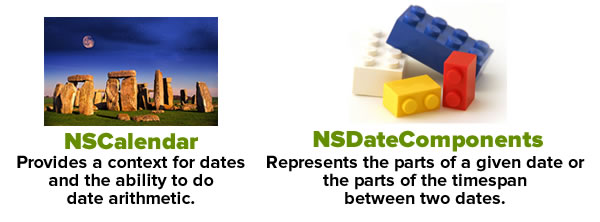
nscalendar and nsdatecomponents

First, there’s the NSCalendar class, which among other things, gives us a context for converting NSDate‘s “seconds before or after the third millennium” measurements into a familiar time system with years, months, days, hours, and minutes, and it accounts for time zones as well. Most of the time, the date and time system will be the Gregorian calendar, but iOS also lets you choose from 15 other calendar systems, including Hebrew and Buddhist.

Next, there’s the NSDateComponents class, which is an assembly of properties that make up a date, such as year, month, date, hour, minute, second, and so on. An NSDateComponents instance can be used to represent either:

  • A specific point in time, or
  • a duration of time.

To create an NSDate by specifying things like a year, month, day, and time, we’ll do the following:

  • Create an NSCalendar instance pointing to the user’s calendar
  • Specify a date using an NSDateComponents instance
  • Create the NSDate by passing the NSDateComponents instance to NSCalendar‘s dateFromComponents instance method

nsdatecomponents to nsdate

Let’s go back to our playground and create our first historical date: that of Alexander Graham Bell’s first phone call. We know it took place on March 10, 1876. While we don’t know the exact time it happened, we do know that it happened in North America’s Eastern time zone, as opposed to something like Kiritimati, a.k.a. Christmas Island. That place is 19 hours ahead and would’ve resulted in historians recording that day as March 11th rather than the 10th.

Enter or paste the highlighted code below so that your playground looks like this:

// Playground - noun: a place where people can play

import UIKit

// The user's calendar incorporates the user's locale and
// time zones settings, so we'll often use it.
let userCalendar = NSCalendar.currentCalendar()


// March 10, 1876
// In this case, we're using an NSDatesComponents instance
// to represent a date rather than a duration of time.
let firstLandPhoneCallDateComponents = NSDateComponents()

// We don't know the time when Alexander Graham Bell made
// his historic phone call, so we'll simply provide the
// year, month and day. 
// We *do* know that he made that call in North America's
// eastern time zone, so we'll specify that.
firstLandPhoneCallDateComponents.year = 1876
firstLandPhoneCallDateComponents.month = 3
firstLandPhoneCallDateComponents.day = 10
firstLandPhoneCallDateComponents.timeZone = NSTimeZone(name: "US/Eastern")

Any calendar, regardless of its time zone, to turn date components into dates using its calendar system. If you specify a time zone in the date components, it will take that time zone into account; if you don’t specify one, the date will be created using the calendar’s time zone. We created an instance of the user’s calendar, which incorporates the user’s local and time zone settings, because it’ll be useful later when we want to go in the opposite direction and convert dates into date components.

Note that after setting the year, month, and day properties of firstLandPhoneCallComponents, we set the timeZone component using the preferred initializer, init(name:), which lets you specify a time zone by any of the standard string identifiers listed in the tz database of time zones. I could’ve used one of the city names such as America/New_York (or for those of you familiar with Canada, America/Toronto, America/MontrealAmerica/Atikokan, or America/Pangnirtung) to specify the Eastern time zone. It’s far clearer — especially to people not from the U.S. — to use the time zone names that begin with US or Canada, such as US/Eastern, US/Central, US/Mountain, and US/Pacific rather than city names.

Once we’ve set up the date components, we use the calendar’s dateFromComponents instance method to convert them into a date. I’m in the US/Eastern time zone, the same one as the one specified in the date components, so the result in the sidebar beside this line of code shows as “Mar 10, 1876, 12:00 AM” (we didn’t specify a time in the date components, so the resulting date has the default time of 00:00). The date displayed in the sidebar uses your system settings, which may be different from mine.

Let’s enter the other three historic dates. Enter or paste the highlighted code below so that your playground looks like this:

// Playground - noun: a place where people can play

import UIKit

// The user's calendar incorporates the user's locale and
// time zones settings, so we'll often use it.
let userCalendar = NSCalendar.currentCalendar()


// March 10, 1876
// In this case, we're using an NSDatesComponents instance
// to represent a date rather than a duration of time.
let firstLandPhoneCallDateComponents = NSDateComponents()

// We don't know the time when Alexander Graham Bell made
// his historic phone call, so we'll simply provide the
// year, month and day. 
// We *do* know that he made that call in North America's
// eastern time zone, so we'll specify that.
firstLandPhoneCallDateComponents.year = 1876
firstLandPhoneCallDateComponents.month = 3
firstLandPhoneCallDateComponents.day = 10
firstLandPhoneCallDateComponents.timeZone = NSTimeZone(name: "US/Eastern")

// We have a calendar and date components. We can now make a date!
// On my system (US/Eastern time zone), the result for the line below is
// "Mar 10, 1876, 12:00 AM"
let firstLandPhoneCallDate = userCalendar.dateFromComponents(firstLandPhoneCallDateComponents)!


// April 3, 1973
let firstCellularPhoneCallDateComponents = NSDateComponents()
firstCellularPhoneCallDateComponents.year = 1973
firstCellularPhoneCallDateComponents.month = 4
firstCellularPhoneCallDateComponents.day = 3
firstCellularPhoneCallDateComponents.timeZone = NSTimeZone(name: "US/Eastern")
// On my system (US/Eastern time zone), the result for the line below is
// "Apr 3, 1973, 12:00 AM"
let firstCellularPhoneCallDate = userCalendar.dateFromComponents(firstCellularPhoneCallDateComponents)!


// January 9, 2007, 18:00 UTC
let iPhoneAnnouncementDateComponents = NSDateComponents()
// We know that the "Stevenote" when the iPhone was announced
// started at 10:00 am Pacific time.
iPhoneAnnouncementDateComponents.year = 2007
iPhoneAnnouncementDateComponents.month = 1
iPhoneAnnouncementDateComponents.day = 9
iPhoneAnnouncementDateComponents.hour = 13
iPhoneAnnouncementDateComponents.minute = 0
iPhoneAnnouncementDateComponents.timeZone = NSTimeZone(name: "US/Eastern")
// On my system (US/Eastern time zone), the result for the line below is
// "Jan 9, 2007, 1:00 PM"
let iPhoneAnnouncementDate = userCalendar.dateFromComponents(iPhoneAnnouncementDateComponents)!


// January 27, 2010, 18:00 UTC
// We know that the "Stevenote" when the iPad was announced
// started at 10:00 am Pacific time.
let iPadAnnouncementDateComponents = NSDateComponents()
iPadAnnouncementDateComponents.year = 2010
iPadAnnouncementDateComponents.month = 1
iPadAnnouncementDateComponents.day = 27
// Let's set the clock using Pacific Time
iPadAnnouncementDateComponents.hour = 10
iPadAnnouncementDateComponents.minute = 0
iPadAnnouncementDateComponents.timeZone = NSTimeZone(name: "US/Pacific")
// On my system (US/Eastern time zone), the result for the line below is
// "Jan 27, 2010, 1:00 PM"
let iPadAnnouncementDate = userCalendar.dateFromComponents(iPadAnnouncementDateComponents)!

Note that we used different time zones for the “Stevenotes”. Both took place at the same time, 10:00 a.m. Pacific, but we set the time for the iPhone announcement as 1:00 p.m. US/Eastern, and the time for the iPad announcement as 10:00 a.m. US/Pacific. Both results in the sidebar appear at the same time; on my machine, they appear as Jan 27, 2010, 1:00 PM.

dateFromComponents works with what you give it

Suppose we want to create a date just by specifying that it’s 11:00 a.m. on the first Saturday of March 2015 in the US/Eastern time zone. Here’s how it’s done:

// (Previous code goes here)

// First Saturday of March 2015, US/Eastern
let firstSaturdayMarch2015DateComponents = NSDateComponents()
firstSaturdayMarch2015DateComponents.year = 2015
firstSaturdayMarch2015DateComponents.month = 3
firstSaturdayMarch2015DateComponents.weekday = 7
firstSaturdayMarch2015DateComponents.weekdayOrdinal = 1
firstSaturdayMarch2015DateComponents.hour = 11
firstSaturdayMarch2015DateComponents.minute = 0
firstSaturdayMarch2015DateComponents.timeZone = NSTimeZone(name: "US/Eastern")
// On my system (US/Eastern time zone), the result for the line below is
// "Mar 7, 2015, 11:00 AM"
let firstSaturdayMarch2015Date = userCalendar.dateFromComponents(firstSaturdayMarch2015DateComponents)!

NSDateComponentsweekday property lets you specify a weekday numerically. In Cocoa’s Gregorian calendar, the first day is Sunday, and is represented by the value 1. Monday is represented by 2, Tuesday is represented by 3, all the way to Saturday, which is represented by 7.

The weekdayOrdinal property lets you specify which specified weekday of the month. By setting weekday to 7, we’re specifying a Saturday; by then setting weekdayOrdinal to 1, we’re specifying the first Saturday of the month.

Here’s another example, where we get the date for the Thursday on the 18th week of 2015:

// (Previous code, including the definition of calendar,
// goes here)

// Thursday of the 18th week of 2015, US/Eastern
let thursday18thWeekOf2015DateComponents = NSDateComponents()
thursday18thWeekOf2015DateComponents.year = 2015
thursday18thWeekOf2015DateComponents.weekOfYear = 18
thursday18thWeekOf2015DateComponents.weekday = 5
thursday18thWeekOf2015DateComponents.timeZone = NSTimeZone(name: "US/Eastern")
// On my system (US/Eastern time zone), the result for the line below is
// ""Apr 30, 2015, 12:00 AM""
let thursday18thWeekOf2015Date = userCalendar.dateFromComponents(thursday18thWeekOf2015DateComponents)!

The other way around: getting NSDateComponents from NSDates

Right now, your playground should look like this, with a number of dates being created from date components:

// Playground - noun: a place where people can play

import UIKit

// The user's calendar incorporates the user's locale and
// time zones settings, so we'll often use it.
let userCalendar = NSCalendar.currentCalendar()


// March 10, 1876
// In this case, we're using an NSDatesComponents instance
// to represent a date rather than a duration of time.
let firstLandPhoneCallDateComponents = NSDateComponents()

// We don't know the time when Alexander Graham Bell made
// his historic phone call, so we'll simply provide the
// year, month and day. 
// We *do* know that he made that call in North America's
// eastern time zone, so we'll specify that.
firstLandPhoneCallDateComponents.year = 1876
firstLandPhoneCallDateComponents.month = 3
firstLandPhoneCallDateComponents.day = 10
firstLandPhoneCallDateComponents.timeZone = NSTimeZone(name: "US/Eastern")

// We have a calendar and date components. We can now make a date!
// On my system (US/Eastern time zone), the result for the line below is
// "Mar 10, 1876, 12:00 AM"
let firstLandPhoneCallDate = userCalendar.dateFromComponents(firstLandPhoneCallDateComponents)!


// April 3, 1973
let firstCellularPhoneCallDateComponents = NSDateComponents()
firstCellularPhoneCallDateComponents.year = 1973
firstCellularPhoneCallDateComponents.month = 4
firstCellularPhoneCallDateComponents.day = 3
firstCellularPhoneCallDateComponents.timeZone = NSTimeZone(name: "US/Eastern")
// On my system (US/Eastern time zone), the result for the line below is
// "Apr 3, 1973, 12:00 AM"
let firstCellularPhoneCallDate = userCalendar.dateFromComponents(firstCellularPhoneCallDateComponents)!


// January 9, 2007, 18:00 UTC
let iPhoneAnnouncementDateComponents = NSDateComponents()
// We know that the "Stevenote" when the iPhone was announced
// started at 10:00 am Pacific time.
iPhoneAnnouncementDateComponents.year = 2007
iPhoneAnnouncementDateComponents.month = 1
iPhoneAnnouncementDateComponents.day = 9
iPhoneAnnouncementDateComponents.hour = 13
iPhoneAnnouncementDateComponents.minute = 0
iPhoneAnnouncementDateComponents.timeZone = NSTimeZone(name: "US/Eastern")
// On my system (US/Eastern time zone), the result for the line below is
// "Jan 9, 2007, 1:00 PM"
let iPhoneAnnouncementDate = userCalendar.dateFromComponents(iPhoneAnnouncementDateComponents)!


// January 27, 2010, 18:00 UTC
// We know that the "Stevenote" when the iPad was announced
// started at 10:00 am Pacific time.
let iPadAnnouncementDateComponents = NSDateComponents()
iPadAnnouncementDateComponents.year = 2010
iPadAnnouncementDateComponents.month = 1
iPadAnnouncementDateComponents.day = 27
// Let's set the clock using Pacific Time
iPadAnnouncementDateComponents.hour = 10
iPadAnnouncementDateComponents.minute = 0
iPadAnnouncementDateComponents.timeZone = NSTimeZone(name: "US/Pacific")
// On my system (US/Eastern time zone), the result for the line below is
// "Jan 27, 2010, 1:00 PM"
let iPadAnnouncementDate = userCalendar.dateFromComponents(iPadAnnouncementDateComponents)!


// First Saturday of March 2015, US/Eastern
let firstSaturdayMarch2015DateComponents = NSDateComponents()
firstSaturdayMarch2015DateComponents.year = 2015
firstSaturdayMarch2015DateComponents.month = 3
firstSaturdayMarch2015DateComponents.weekday = 7
firstSaturdayMarch2015DateComponents.weekdayOrdinal = 1
firstSaturdayMarch2015DateComponents.hour = 11
firstSaturdayMarch2015DateComponents.minute = 0
firstSaturdayMarch2015DateComponents.timeZone = NSTimeZone(name: "US/Eastern")
// On my system (US/Eastern time zone), the result for the line below is
// "Mar 7, 2015, 11:00 AM"
let firstSaturdayMarch2015Date = userCalendar.dateFromComponents(firstSaturdayMarch2015DateComponents)!


// Thursday of the 18th week of 2015, US/Eastern
let thursday18thWeekOf2015DateComponents = NSDateComponents()
thursday18thWeekOf2015DateComponents.year = 2015
thursday18thWeekOf2015DateComponents.weekOfYear = 18
thursday18thWeekOf2015DateComponents.weekday = 5
thursday18thWeekOf2015DateComponents.timeZone = NSTimeZone(name: "US/Eastern")
// On my system (US/Eastern time zone), the result for the line below is
// "Apr 30, 2015, 12:00 AM"
let thursday18thWeekOf2015Date = userCalendar.dateFromComponents(thursday18thWeekOf2015DateComponents)!

Now it’s time to go the other way around, and extract date components from those dates. Once again, it’s the calendar that provides the method for making the conversion.

To extract NSDateComponents from an NSDate, we’ll do the following:

  • Create NSCalendar instances, if needed
  • Specify a set of date components using NSCalendarUnit bitmasks
  • Create the NSDateComponents by passing the NSDate instance to NSCalendar‘s components instance method

nsdate to nsdatecomponents

We already have a calendar instance: userCalendar, which is associated with the user’s time zone. If we use it to extract date components from a given date, the dates and times will be interpreted in the context of its time zone.

Let’s create two more calendars with two different time zones:

  • The US/Pacific time zone (UTC-08:00)
  • The Japan time zone (UTC+09:00)

Here’s what the code looks like:

// (Previous code goes here)

let pacificCalendar = NSCalendar(calendarIdentifier: NSCalendarIdentifierGregorian)!
pacificCalendar.timeZone = NSTimeZone(name: "US/Pacific")!

let japanCalendar = NSCalendar(calendarIdentifier: NSCalendarIdentifierGregorian)!
japanCalendar.timeZone = NSTimeZone(name: "Asia/Tokyo")!

Extracting all the possible date components from a date can be computationally costly, so NSCalendar‘s components instance method requires you to specify the components you want to extract. We want to extract these components from our dates:

  • year
  • month
  • day
  • hour
  • minute
  • weekday
  • weekdayOrdinal

Here’s the code that specifies this:

// (Previous code goes here)

let requestedDateComponents: NSCalendarUnit = [.Year,
                                               .Month,
                                               .Day,
                                               .Hour,
                                               .Minute,
                                               .Weekday,
                                               .WeekdayOrdinal]

Now that we’ve done that, we can start extracting date components:

// (Previous code goes here)

// Date components in the user's time zone
let jan9_2007Components = userCalendar.components(requestedDateComponents,
                                                  fromDate: iPhoneAnnouncementDate)
jan9_2007Components.year
jan9_2007Components.month
jan9_2007Components.day
jan9_2007Components.hour
jan9_2007Components.minute
jan9_2007Components.weekday
jan9_2007Components.weekdayOrdinal

// Date components in the US/Pacific time zone
let march10_1876PacificComponents = pacificCalendar.components(requestedDateComponents,
                                                               fromDate: iPhoneAnnouncementDate)
march10_1876PacificComponents.year
march10_1876PacificComponents.month
march10_1876PacificComponents.day
march10_1876PacificComponents.hour
march10_1876PacificComponents.minute
march10_1876PacificComponents.weekday
march10_1876PacificComponents.weekdayOrdinal

// Date components in Japan's time zone
let march10_1876JapanComponents = japanCalendar.components(requestedDateComponents,
                                                           fromDate: iPhoneAnnouncementDate)
march10_1876JapanComponents.year
march10_1876JapanComponents.month
march10_1876JapanComponents.day
march10_1876JapanComponents.hour
march10_1876JapanComponents.minute
march10_1876JapanComponents.weekday
march10_1876JapanComponents.weekdayOrdinal

In your playground’s sidebar, you should see results similar to those listed in the table below:

Component My user calendar Pacific calendar Japan calendar
year 2007 2007 2007
month 1 1 1
day 9 9 10
hour 13 10 3
minute 0 0 0
weekday 3 3 4
weekdayOrdinal 2 2 2

As you can see, January 9, 2007 at 10:00 a.m. in the US/Pacific time zone is January 9, 2007 at 1:00 p.m. in my time zone (US/Eastern) and January 10, 2007 at 3:00 a.m. in Japan. In the US, that date was the second Tuesday in January 2007; in Japan, it was the second Wednesday.

Turning dates into strings (and vice versa) with NSDateFormatter

nsdate - nsdateformatter - stringJust as you use an calendar to convert date components into dates and vice versa, you use a date formatter — an instance of the NSDateFormatter — to do the conversions.

Formatting date strings for the user

If you need to display a date as text for the user, it’s best if you use Cocoa’s built-in date styles. These are a set of predefined styles for formatting dates and times based on the user’s preferred settings. These styles, which are all values of the NSDateFormatterStyle enumeration, come in a selection of lengths — short, medium, long, and full — and using them is the preferred way to create date strings for the user to read.

Add the following code to your playground:

// (Previous code goes here)

let formatter = NSDateFormatter()

// No date style or time style defined:
// The result for the line below is
// ""
formatter.stringFromDate(firstLandPhoneCallDate)

// Only the date style is defined:
formatter.dateStyle = .MediumStyle
// The result for the line below is
// "Mar 10, 1876"
formatter.stringFromDate(firstLandPhoneCallDate)

// The date style and time style have been defined:
formatter.timeStyle = .ShortStyle
// The result for the line below is
// "Mar 10, 1876, 12:00 AM"
formatter.stringFromDate(firstLandPhoneCallDate)

Here’s how the various date and time formatter styles get rendered:

If dateStyle and timeStyle are both set to… the date formatter’s output looks like…
NoStyle
ShortStyle 1/27/10, 1:00 PM
MediumStyle Jan 27, 2010, 1:00:00 PM
LongStyle January 27, 2010 at 1:00:00 PM EST
FullStyle Wednesday, January 27, 2010 at 1:00:00 PM Eastern Standard Time

What’s up with NoStyle? It’s there so you can limit the resulting string so that it shows only the date or only the time.

NSDateFormatter has a timeZone property so that you can ensure that the date string reflects a specific time zone:

// (Previous code goes here)

formatter.dateStyle = .MediumStyle
formatter.timeStyle = .ShortStyle
formatter.timeZone = NSTimeZone(name: "US/Pacific")

// The result for the line below is
// "Jan 27, 2010, 10:00 AM"
formatter.stringFromDate(iPadAnnouncementDate)

Formatting date strings for other computers

As I wrote earlier, if you’re formatting dates for the user, it’s strongly recommended that you use NSDateFormatter‘s dateStyle and timeStyle properties, which will format dates and times according to the user’s settings. However, if you need to need your date strings to be in a specific format (for an API, for example), you can provide NSDateFormatter with a format string:

// (Previous code goes here)

// Setting the locale to POSIX ensures that
// the user's locale won't be used
formatter.locale = NSLocale(localeIdentifier: "en_US_POSIX")

// NSDateFormatter's format string uses the date format specifiers
// spelled out in Unicode Technical Standard #35 (located at
// http://www.unicode.org/reports/tr35/tr35-25.html#Date_Format_Patterns)
formatter.dateFormat = "y-MM-dd"

// The result for the line below is
// "2007-01-09"
formatter.stringFromDate(iPhoneAnnouncementDate)

While you can browse through Appendix F of the Unicode Technical Standard #35 to look at all the date format specifiers supported by NSDateFormatter, you might find it easier to use the table below. It shows a number of format strings applied to the iPhone announcement date (January 9, 2007 at 10:00 a.m. Pacific):

Format string Result
'Year: 'y' Month: 'M' Day: 'd Year: 2007 Month: 1 Day: 9
MM/dd/yy 01/09/07
MMM dd, yyyy Jan 09, 2007
E MMM dd, yyyy Tue Jan 09, 2007
EEEE, MMMM dd, yyyy' at 'h:mm a. Tuesday, January 09, 2007 at 10:00 AM.
EEEE, MMMM dd, yyyy' at 'h:mm a zzzz. Tuesday, January 09, 2007 at 10:00 AM Pacific Standard Time.

Turning strings into dates

If you specify a date format string, you can use NSDateFormatter to take a string following that format to turn it into an NSDate. For example:

// (Previous code goes here)

formatter.dateFormat = "yyyy/MM/dd hh:mm Z"
// This string will be converted to a date because
// it's in the same format as the dateFormat string:
formatter.dateFromString("2015/03/07 11:00 -0500")!
// This string will NOT be converted to a date because
// it's NOT in the same format as the dateFormat string;
// its result will be nil:
formatter.dateFromString("Mar 7, 2015 11:00 AM EST")

// Let's change the date format strings and try
// dateFromString with the same two strings:
formatter.dateFormat = "MMM d, yyyy hh:mm a zz"
// This results in an NSDate:
formatter.dateFromString("Mar 7, 2015 11:00 AM EST")!
// This results in nil:
formatter.dateFromString("2014/11/05")

Tying it all together

If you’ve made it to this point in the article, this chart should now make sense:

cocoa date time class chart

Once again, click the chart to see it at full size.

You should now be able to:

  • Create dates “from scratch” (that is, create them using an offset of a number of  seconds from the start of the third millennium)
  • Create dates from date components (that is, from numbers representing a day, month, and year)
  • Convert between dates and date components
  • Convert dates into string representations and string representations of dates into dates

In the next article in this series, we’ll look at date calculations and some handy functions that let you harness Swift’s expressive power and make working with dates easier.
dates and times in swift - smallRelated articles

A very brief introduction to date formatting in Swift and iOS: The oversight in a mostly-good book on Swift programming led me down the path of writing articles about dates and times in Swift, starting with this one, where I look atNSDateFormatter.

How to work with dates and times in Swift, part two: Calculations with dates: Now that we’ve got the basics, it’s time to do some date arithmetic: comparing two dates to see which one is the earlier and later one, finding out how far apart two dates are, and adding and subtracting from dates.

How to work with dates and times in Swift, part three: Making date arithmetic more Swift-like: Cocoa’s date and time classes have an Objective-C heritage, which in the Swift context, feel kind of clunky. In this article, I look at ways — and by ways, I mean helper functions and class extensions — to make date calculations feel more like Swift.

How to work with dates and times in Swift, part four: A more Swift-like way to get the time interval between two dates: This quick article shows you how to make an operator overload that makes getting the time interval between two dates more like subtraction.
Categories
Swift Kick

How to program an iOS text field that takes only numeric input with a maximum length [Updated]

Update (April 27, 2015)

updated article

Guess what — this article’s out of date. If you want the latest version of the code for programming constrained text fields in iOS with improved features, point your browser at the revised article, How to program an iOS text field that takes only numeric input or specific characters with a maximum length. It even comes with a sample app that you can download!

The original article

control fun app

One of my favorite ways to get a deeper understanding of programming in a given language or for a given platform is to pick up a highly-rated book for that language or platform and go through all the example tutorials and exercises, no matter how simple they seem. Although I often end up covering ground that I’ve gone over so many times before, I usually find that one or both of the following happen:

  • I end up learning something I didn’t know before, even in subject areas where I consider myself well-versed, or
  • I decide to see if I can improve the implementation or add a new feature, and in the process, learn about a feature new to me or figure out a new way to use a feature I’m already familiar with.

beginning ios development with swiftI got Apress’ Beginning iPhone Development with Swift for less than half price during their recent Cyber Monday sale, and I’ve been working through its tutorials during the holiday downtime. It’s a revision of a book released in late March 2014, Beginning iOS 7 Development (which I also own), updated to cover both a language and OS version whose first betas were released in June and whose 1.0 versions were made available in September. Given that the book was released in mid-November, they updated it in a hurry, which means that the book contains a few errors and oversights. In spite of this, I still recommend the book because:

  • The book is pretty much a straight “port” of an excellent book, Beginning iOS7 Development, for Swift and iOS 8, and
  • where some may see only errors and oversights, I also see learning opportunities.

The oversight

In chapter 4 of Beginning iPhone Development with Swift, whose title is More User Interface Fun, the exercise is to build an app that features a number of commonly-used user interface controls. The app you build starts with a couple of labels and text fields laid out so that they look like this:

name and number text fields

The user is supposed to be able to type in any kind of character into the Name text field, and only numeric characters into the Number field. The exercise in the chapter walks you through the process of setting the Keyboard Type of the Number field to Number Pad using the Storyboard and the Attributes Inspector:

setting keyboard type

While doing this goes a long way to preventing non-numeric input, it isn’t enough. On the iPhone, the Number Pad keyboard allows only digits to be entered…

ios 8 iphone number pad

…which works just fine if the user needs to enter positive whole numbers. If you want the user to enter negative numbers or use a decimal point, you’ll need to use the Numbers and Punctation keyboard, which features some additional characters. Here’s what it looks like on the iPhone:

ios 8 iphone numbes-punctuation keyboard

On the iPad, choosing either the Number Pad or Numbers and Punctuation keyboard gives you the same thing. It looks like this:

ipad number pad keyboard

These keyboards make it possible to enter some decidedly non-numeric input into the Number field.

copy and paste

If that weren’t enough, there’s also cut/copy and paste to contend with. The user can easily type an alphabetical string into the Name field, copy or cut it, and then paste it into the Number field. Clearly, you need to take more active measures if you want to ensure that a field meant for numeric input gets only numeric input.

Beginning iPhone Development with Swift points the way to a solution, but stops short. Here’s what the book says on page 110:

Tip    If you really want to stop the user typing anything other than numbers into a text field, you can do so by creating a class that implements the textView(_, shouldChangeTextInRange:, replacementText:) method of the UITextViewDelegate protocol and making it the text view’s delegate. The details are not too complex, but beyond the scope of this book.

This is wrong for two reasons:

  • I don’t think that disallowing unwanted characters from being input into a text field, which I think is a pretty basic UI feature in this day and age, is beyond the scope of the book, and
  • the method that should be used is part of the UITextFieldDelegate protocol, not the UITextViewDelegate protocol. As I said earlier, they rushed the production of this book.

In this article, I’m going to correct this oversight and show you how to do the following in iOS 8 and Swift:

  • Intercept the user’s input as s/he types or pastes into a text field
  • Allow only a specified set of characters to be entered into a given text field
  • Limit the number of characters that can be entered into a given text field
  • Confirm that the value entered into a text field is numeric

Intercepting the user’s input as s/he types or pastes into a text field

interception

Creative Commons photo by Torsten Bolten, AFpix.de. Click the photo to see the source.

Beginning iPhone Development with Swift was right: the way to really control what the user can enter into a text field is to implement this method in the UITextFieldDelegate protocol:

func textField(textField: UITextField, 
               shouldChangeCharactersInRange range: NSRange, 
               replacementString string: String) 
     -> Bool {
  // code goes here
}

This method, called textField(_:shouldChangeCharactersInRange:replacementString:), is automatically called in view controllers that conform to the UITextFieldDelegate protocol whenever the user adds a new character to a text field or deletes an existing one. It gives you three parameters to work with:

  • textField: The text field whose contents are being changed
  • range: The range of characters to be replaced
  • string: The replacement string

If we want to accept the changes that the user made to the text field as-is, we have this method return true. If we don’t want to accept the changes, or if we want to alter them, we have this method return false.

In order to implement this method, we need to make the view controller conform to the UITextFieldDelegate protocol. We do this by adding UITextFieldDelegate the view controller’s declaration. In this example, the view controller is simply named ViewController, so we’ll added UITextFieldDelegate to its declaration like so:

class ViewController: UIViewController, UITextFieldDelegate {

  // The rest of the class' code goes here

}

In this example, the text field that we want to make “numbers only” is named numberField. We need to specify its delegate — the class containing the UITextFieldDelegate protocol methods that will be called whenever changes are made to its contents. We’ll specify that the view controller should be the delegate, and we’ll do it in the viewDidLoad() method:

override func viewDidLoad() {
  super.viewDidLoad()
    
  numberField.delegate = self
}

Allowing only a specified set of characters to be entered into a given text field

Now that we have the view controller properly set up as a delegate for calls from the numberField text field whenever changes are made to its content, it’s time to implement textField(_:shouldChangeCharactersInRange:replacementString:). We want to implement it in such a way that the only characters that can be entered or pasted into numberField are the digits 0 through 9 and the . and characters.

Here’s the code:

func textField(textField: UITextField, shouldChangeCharactersInRange range: NSRange, replacementString string: String) -> Bool {
  var result = true
  
  if textField == numberField {
    if count(string) > 0 {
      let disallowedCharacterSet = NSCharacterSet(charactersInString: "0123456789.-").invertedSet
      let replacementStringIsLegal = string.rangeOfCharacterFromSet(disallowedCharacterSet) == nil
      result = replacementStringIsLegal
    }
  }

  return result
}

The method starts off with the assumption that the user’s input is legal, and then applies the test to see if that’s actually the case. It then checks to see that the text field whose contents changed is numberField, the field whose content we want to restrict to numeric values. Next, it sees if the replacement string contains at least one character; if it doesn’t, there’s no point testing its content.

The method makes use of an NSCharacterSet instance to define the set of characters that we don’t want to allow inside numberField. Since the set of disallowed characters is much larger than the set of characters we want to allow in numberField,  we define the set by first creating an NSCharacterSet of allowed characters and use the invertedSet method.

Once we’ve defined a set of disallowed characters, we test the replacement string string to see if it contains any of them. If the replacement string string contains disallowed characters, string.rangeOfCharactersFromSet(disallowedCharacterSet) returns the range of the first disallowed character. If it doesn’t have any disallowed characters, it returns nil.

Limiting the number of characters that can be entered into a given text field

Now that we’ve restricted numberField to a small set of characters — the digits 0 through 9 and the . and characters — let’s set a maximum number of characters that numberField can contain; let’s make it 6.

Here’s what our code looks like with this new constraint:

func textField(textField: UITextField, shouldChangeCharactersInRange range: NSRange, replacementString string: String) -> Bool {
  var result = true
  let prospectiveText = (textField.text as NSString).stringByReplacingCharactersInRange(range, withString: string)
  
  if textField == numberField {
    if count(string) > 0 {
      let disallowedCharacterSet = NSCharacterSet(charactersInString: "0123456789.-").invertedSet
      let replacementStringIsLegal = string.rangeOfCharacterFromSet(disallowedCharacterSet) == nil
      
      let resultingStringLengthIsLegal = count(prospectiveText) <= 6
      
      result = replacementStringIsLegal &&
               resultingStringLengthIsLegal
    }
  }
  return result
}

First we determine the prospective text — that is, what the text field would contain if we allow the user’s changes. We do this by using the stringByReplacingCharactersInRange:withString: method, which accepts a range of characters to be replaced, and the string to replace that range of characters.

Note that we have to cast textField.text into an NSString first; that’s because Swift’s String class’ stringByReplacingCharactersInRange:withString: method expects a range in Range<String.Index> format, and we’re working with a range specified as an NSRange. Good ol’ NSString‘s stringByReplacingCharactersInRange:withString: method takes its range as an NSRange.

Once we have the prospective text, we simply check its length. If it’s greater than 6, we have the method return false, which means that the text field simply won’t accept any more than 6 characters.

Confirming that the value entered into a text field is numeric

Let’s add one more constraint to our text field: let’s make sure that only proper numeric values can be entered into the text field. Even though we’ve restricted the user to entering the digits 0 through 9 and the . and characters, it’s still possible to enter non-numeric values such as:

  • 1.2.3 (more than one decimal point), and
  • 4-5 (placing the unary minus anywhere other than at the start of the number).

Let’s add some code to disallow such entries:

func textField(textField: UITextField, shouldChangeCharactersInRange range: NSRange, replacementString string: String) -> Bool {
  var result = true
  let prospectiveText = (textField.text as NSString).stringByReplacingCharactersInRange(range, withString: string)
  
  if textField == numberField {
    if count(string) > 0 {
      let disallowedCharacterSet = NSCharacterSet(charactersInString: "0123456789.-").invertedSet
      let replacementStringIsLegal = string.rangeOfCharacterFromSet(disallowedCharacterSet) == nil
      
      let resultingStringLengthIsLegal = count(prospectiveText) <= 6
      
      let scanner = NSScanner(string: prospectiveText)
      let resultingTextIsNumeric = scanner.scanDecimal(nil) && scanner.atEnd
      
      result = replacementStringIsLegal &&
               resultingStringLengthIsLegal &&
               resultingTextIsNumeric
    }
  }
  return result
}

What powers this constraint is NSScanner, which is a great tool for parsing string data. We’re using two of its methods:

  • scanDecimal(_:), which returns true if the scanner finds a valid NSDecimal representation in the string, and
  • atEnd, which returns true if the scanner has scanned the entirety of the string.

With the final code shown above, we’ve got a way to ensure that the user can enter only numeric values into a text field, and that those values no longer than a specified number of characters. Contrary to what was implied in Beginning iPhone Development with Swift, it wasn’t all that hard to do.

Categories
Swift Kick

Swift roundup: Game programming!

swift kick

Today’s Swift Kick features a roundup of tutorials and resources for the Swift developer who’s into game programming. If you’ve been meaning to learn Swift, games are a fun way to do so, and if you’ve been meaning to learn game programming, you’ll find these useful!

Brian Advent’s tutorial on building a networked tic-tac-toe game with Swift and the Multipeer Connectivity Framework

Brian Advent (whom I’ve written about before) has posted a video tutorial showing how to build a networked tic-tac-toe game using iOS’ Multipeer Connectivity Framework, which allows you to connect and share data with devices nearby.

RayWenderlich.com’s Sprite Kit Tutorial for Beginners updated for Swift

ray wenderlich ninja game

Two years ago, Ray Wenderlich posted the sort of game programming tutorial that he wanted to see: in his own words, “very simple but functional game with animation, collisions, and audio without using too many advanced features.” The resulting game is the one pictured above, featuring a shuriken-hurling ninja taking on approaching monsters.

The game was originally written in Objective-C and used the open source cross-platform 2D gaming framework Cocos2D 1.X, and was followed by an update for Cocos2D 2.X. When Sprite Kit came out, Ray wrote a new version of the game using that framework, and I took some ideas from that game and turned it into a simple shoot ’em up game in Swift.

Ray’s updated his Sprite Kit Tutorial for Beginners for Swift, and it’s a great way to brush up on Swift and game programming at the same time. Check it out!

Conway’s Game of Life in functional Swift

life

While it can be argued that Swift is not a functional programming language, it certainly lends itself better to functional programming techniques than many other languages, Objective-C included. With this in mind, take The Game of Life with Functional Swift, written by Colin Eberhardt, one of the co-authors of the RayWenderlich.com books iOS8 by Tutorials, Swift By Tutorials, and Core Data by Tutorials. He writes:

This blog post shows an implementation of Conway’s Game of Life using functional techniques in Swift. This results in code which is a clear and concise representation of the game’s logic. I also take a closer look at ranges, intervals, the pattern match operator, ~= and how local functions help organise your code.

Taking a functional programming approach allowed Colin to condense the rules of Conway’s Game of Life down to this:

// rules of life
let liveCells = cells.filter { $0.state == .Alive }
let deadCells = cells.filter { $0.state != .Alive }

let dyingCells = liveCells.filter { livingNeighboursForCell($0) !~= 2...3 }
let newLife =  deadCells.filter { livingNeighboursForCell($0) == 3 }

// updating the world state
newLife.each { (cell: Cell) in cell.state = .Alive }
dyingCells.each { (cell: Cell) in cell.state = .Dead }

If you’re looking for a challenge, you might want to take MakeGamesWith.Us’ implementation of the Game of Life (pictured below) and refactor it using Colin’s functional approach.

life in swift

SwiftCast: Game Programming in Swift

The latest Swiftcast, which you can listen to using the player above, is all about game programming in Swift:

Swift game development is very exciting. If it isn’t already obvious with the content of our site, we love to talk about game development. Mobile gaming is a rapidly growing market, and iOS is by far the most rewarding and exciting to build games for. If you’ve ever wanted to learn how to build an iOS game as an indie developer, we have some resources and advice for you.

iOS Games by Tutorials updated for Swift

RayWenderlich.com’s book, iOS Games by Tutorials, has been updated for iOS 8 and Swift. In 28 chapters and over 800 pages, you’ll learn game programing with Swift and Sprite Kit by building the following games:

zombie conga

Zombie Conga, where the player is a partying zombie who’s trying to build a conga line of cats while avoiding crazy cat ladies. It covers introductory topics such as sprites, processing touches, collision detection and scrolling.

XBlaster

XBlaster: a space shooter where you’ll work with physics and particle systems.

cat nap

Cat Nap, where you’re trying to help a sleepy kitty get to bed. This is a “physics-based” game, so this introduces the Sprite Kit’s physics engine starting with the basics, but getting into stuff advanced enough for you to write your own version of Angry Birds or Cut the Rope.

pest control

Pest Control, a tile-mapped game where you take a Schwarzeneggarian hero on a bug-killing spree. This covers building a tile-mapping engine and adding all sorts of effects to a game.

circuit racer

Circuit Racer, a racing game made more complicated by obstacles on the track. This one features mixing Sprite Kit-based UIs with UIKit-based UIs, using the accelerometer, and interfacing with Game Center.

Also covered:

  • Porting your iOS games to OS X
  • Using texture atlases for reduced memory overhead and better performance
  • Tips and tricks for getting the most performance out of your game code
  • Basic game art-making for programmers

iOS Games by Tutorials is available in PDF form for $54, and it’s a great deal at the price. Buying it also gets you free updates for the life of the book; if you bought the earlier Objective-C/iOS 7 edition, you already own the current Swift/iOS 8 edition!

…and don’t forget…

The Flappening, in which I fix the implementation of Flappy Bird that changes to iOS’ Swift APIs broke, and…

my simple “shoot ’em up” game in Swift, which has also been updated to work with post-beta Swift.