Categories
Swift Kick

Swift/iOS developer tutorials of note

swift kick

Even though the new iOS and new iPhones have finally been released, it’s still the early days of the iOS 8/Swift era. The language is still evolving, people are still trying to figure out how to best make use of its features, and there are no veterans. It’s not too late for you to get started with iOS development.

In this article, I’ll look at some Swift/iOS 8 tutorials of note, including one that I’ll be reviewing regularly.

Before you begin: Xcode 6.0.1 now available!

xcode iconYou may have missed it amidst all the hoopla about the new iPhones and upcoming Apple Watch: Xcode has already undergone its first post-iOS 8 update. Xcode 6.0.1 was released on Wednesday, September 17th — get it now!

The iOS Apprentice, Third Edition

ios apprentice swift edition

When people ask me the question “What tutorial would you recommend for getting started with iOS programming?”, my answer is consistently The iOS Apprentice, published by RayWenderlich.com and written by Matthijs Hollemans. I recommend it to both people who are completely new to programming, as well as experienced developers who want to get the hang of iOS programming.

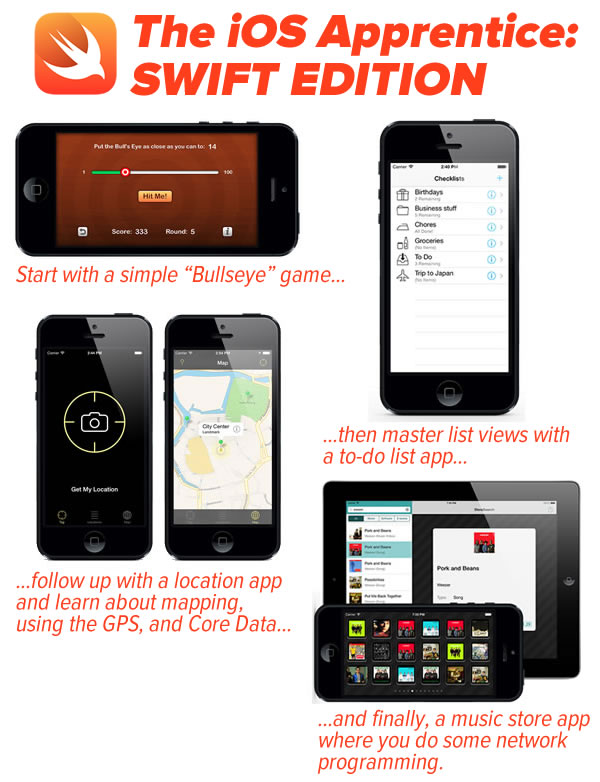
In 4 tutorials spanning 900 pages, Matthijs takes the reader from building a simple “Hello World” app and through all sorts of iOS development topics from UI controls to common iOS design patterns to working with location and mapping to storing data to accessing web services and more. The iOS Apprentice is written in a casual style and packed with screenshots and illustrations to make sure that you get the point. The third edition has been rewritten for programming in Swift and using the iOS 8 SDK, he also covers the Swift programming language.  With the tutorials, you also get each app’s full source code and assets, which you can reuse in your own apps.

Part 1 of the third edition is available right now, and it’s free if you subscribe to RayWenderlich.com’s newsletter. You have to buy The iOS Apprentice to get parts 2 through 4, and the third edition of these parts will become available in the coming weeks (in the meantime, you’ll be able to get the 2nd edition, which is in Objective-C and covers iOS 7’s SDK).

All four parts of The iOS Apprentice are a great deal at $54, and it was helped me get up to speed with iOS programming very quickly. I can’t recommend it highly enough. Bonus: If you bought an earlier edition of The iOS Apprentice, you get the third edition for free!

Find out more about The iOS Apprentice on its page at RayWenderlich.com.

(By the bye, you should check out RayWenderlich.com regularly; it’s a great source of iOS programming info.)

Swift for Rubyists / Swift for JavaScript Developers

If Ruby is your native tongue, JP Simard (an iOS developer at Realm) can help ease you into Swift programming in his 50-minutes-and-change session titled Swift for Rubyists. The video above is only part of the experience; you should go to the Swift for Rubyists blog entry on Realm’s site where you can see the video synced up with his slides and read the transcript of his presentation, complete with code.

If you’re more comfortable with JavaScript, JP also gave a presentation of Swift for JavaScript developers. It’s from the end of July, and while some details may have changed between then and Swift 1.0, most of it should still be applicable today.

(You might also want to check out Realm itself; it’s a mobile database and API that replaces Core Data and SQLite. They’re also working on an Android version.)

Free Swift/iOS game programming tutorial

swiftris

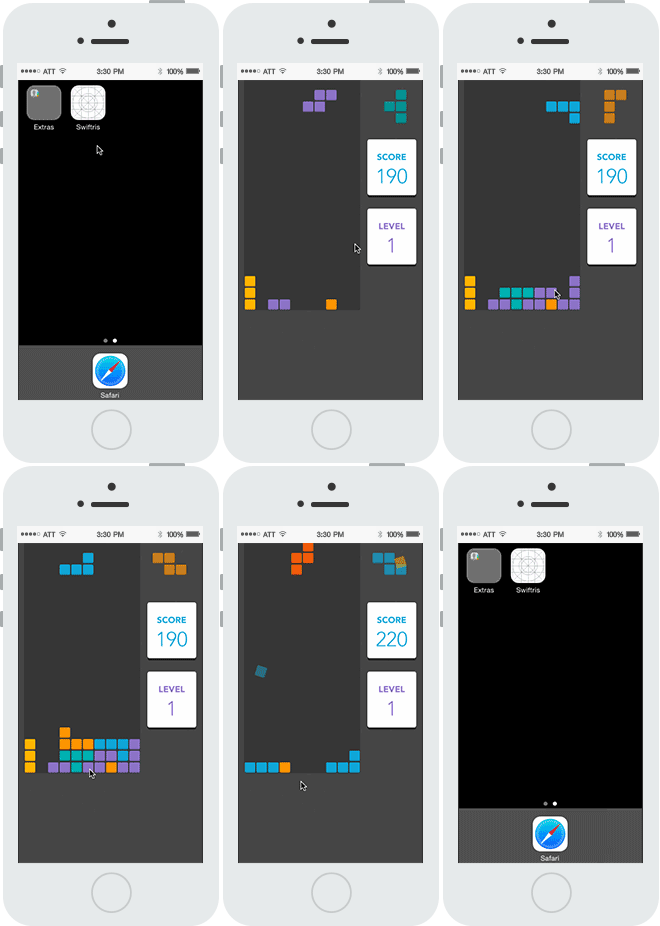
Bloc, “the world’s largest online bootcamp”, offers a free tutorial in which you learn iOS game programming in Swift and Sprite Kit by building Swiftris (pictured above), a version of the classic game Tetris.

I’ll be your guinea pig: Going through Rob Percival’s “Complete iOS 8 and Swift Course”

rob percival udemy course

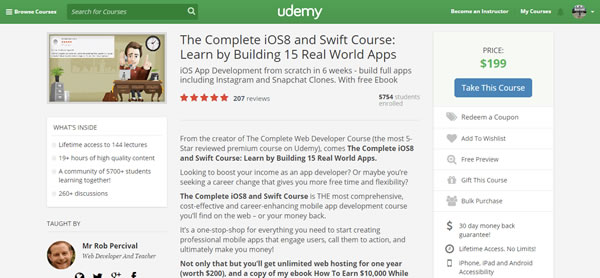
Rob Percival’s courses on Udemy have an impressive number of five-star ratings. His Complete Web Developer Course has over 900 five-star reviews, and his iOS 7/Objective-C course has earned rave reviews. He’s updated his iOS course, which is now called The Complete iOS 8 and Swift Course, which makes the claim of being “THE most comprehensive, cost-effective and career-enhancing mobile app development course you’ll find on the web – or your money back.”

In the course, you learn iOS 8 and Swift development by building “15 Real World Apps” over 145 lectures and over 19 hours of content, starting from the basics and working your way up to building clones of Instagram and Snapchat. He even throws in some very tempting extras, including:

  • A tutorial on loading OS X and Xcode on a Wintel machine so you don’t need to use a Mac
  • Unlimited web hosting for one year (“worth $200”) and a WordPress tutorial so that you can set up a site with which to promote your apps
  • A copy of his ebook, How to Earn $10,000 While Learning to Code
  • Over 1,000 graphical assets (“worth $300”) to use in your own apps

If you’ve every stumbled across an ad for the course or the page for the course itself, you may have wondered “Is this course everything it claims to be?”. I’ve wondered myself, and I’ve decided to give it a try. I signed up for the course (thanks to a very short-lived deal where it was available for a mere $29) and will go through every lesson, lecture, and exercise. I’ll report my findings regularly here on Global Nerdy.
Categories
Swift Kick

A simple “shoot-em-up” game with Sprite Kit and Swift, part two: Code organization and vector math

a simple shoot em up game

swift kickThis article is part two in a series that looks at a simple “Shoot ‘Em Up”-style game for iOS written using Sprite Kit and Swift. If you missed the first installment, which provides the complete code, the necessary graphics and sound resources, as well as instructions for assembly, it’s here.

In this article, we’ll look at:

  • How the code is organized, both in the way it’s ordered, and through the use of MARK: comments, and
  • The operator overloads and extensions to CGPoint that support vector math

How the code is organized, and those MARK: comments

The code in the Simple Shoot ‘Em Up game is divided into two major sections:

  1. A set of operator overrides and extension properties for doing vector math on CGPoints
  2. The GameScene class, which defines the entire game

The GameScene class is divided into three subsections:

  1. Properties
  2. Event-handling methods
  3. Game state methods

Each section is marked with a MARK: comment. If you’re familiar with iOS development with Objective-C, // MARK: is Swift’s answer to good ol’ #pragma mark. If you’re not familiar with #pragma mark, read on…

Organizing code with MARK: comments

There’s a jump bar at the top of every editor window in Xcode, which makes it easy to navigate throughout your project. If you’re editing the GameScene.swift file (go edit it right now if you’re not), it should look like this:

jump bar

Click on the part of the jump bar just to the right of GameScene.swift, as shown below:

click on the jump bar

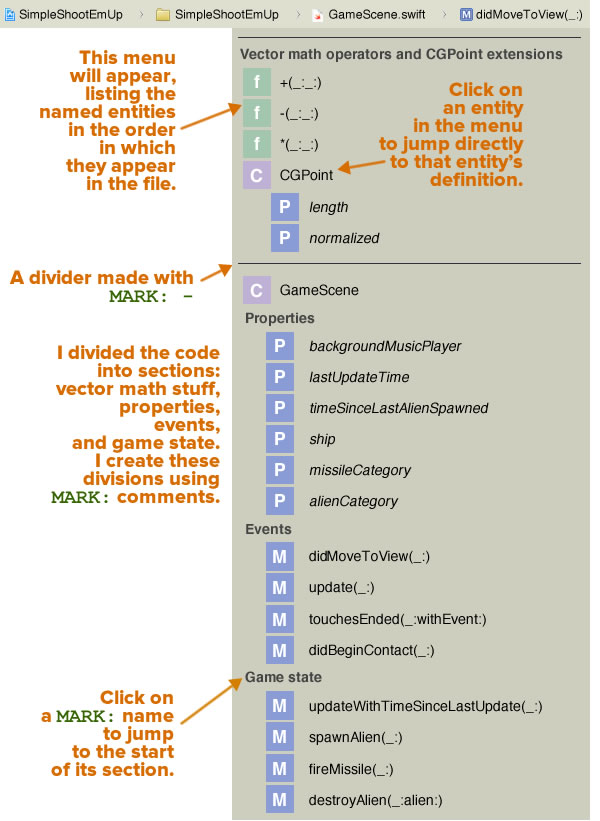
A menu will appear. It will display the various named entities — functions, classes, properties, methods, and so on — inside GameScene.swift:

jump list menu

You might notice that the menu lists the entities in the order in which they appear in the code, and that they’ve been organized into the following sections. You’ll see that:

  • There’s a line above each major section: one for the vector math stuff, and one for the GameScene class, and
  • The code has named sections, namely:
    • Vector math operators and CGPoint extensions: A set of operator overloads and extension properties to allow for vector math on CGPoints.
    • Properties: Properties of the GameScene class.
    • Events: Methods that respond to events.
    • Game state: Methods that change the game state.

These divisions were created using MARK: comments:

  • The Properties, Events, and Game state sections were created using the comments // MARK: Properties, // MARK: Events, and // MARK: Game state respectively,
  • The Vector math operators and CGPoint extensions section, complete with a line above it, was created using the comment // MARK: - Vector math operators and CGPoint extensions. Note the - (minus sign) that comes between // MARK: and the section name.
  • The dividing line separating the vector math stuff and the GameScene class was created with the comment // MARK: - — that is, // MARK: followed by a - (minus sign with nothing after it).

Using // MARK: and its Objective-C cousin, #pragma mark to organize your code is a good habit to take up.

Vector math

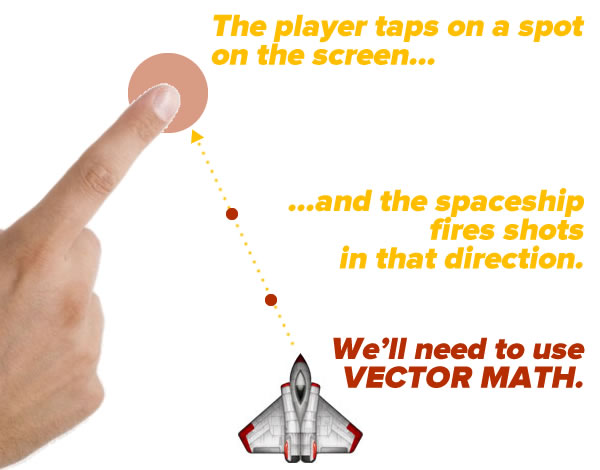
In the game, the player’s ship remains stationary and dead-center at the bottom of the screen. The player shoots at the aliens passing overhead by tapping on the screen, and the ship fires shots in the direction of that tap:

vector 1

In order to program this action, we’ll need to make use of vector math.

Before we begin: Sprite Kit’s coordinate system

Most UI and computer graphics programming systems have their origin at the upper right-hand corner of the screen, with X increasing as you go rightward, and Y increasing as you go downward. Sprite Kit is based on OpenGL, which uses the same coordinate system that you use in math, with X increasing as you go rightward, and Y increasing as you go upward:

origin

With this coordinate system, the origin (0, 0) is located at the lower left-hand corner of the screen rather than the upper left-hand corner.

Vectors and points

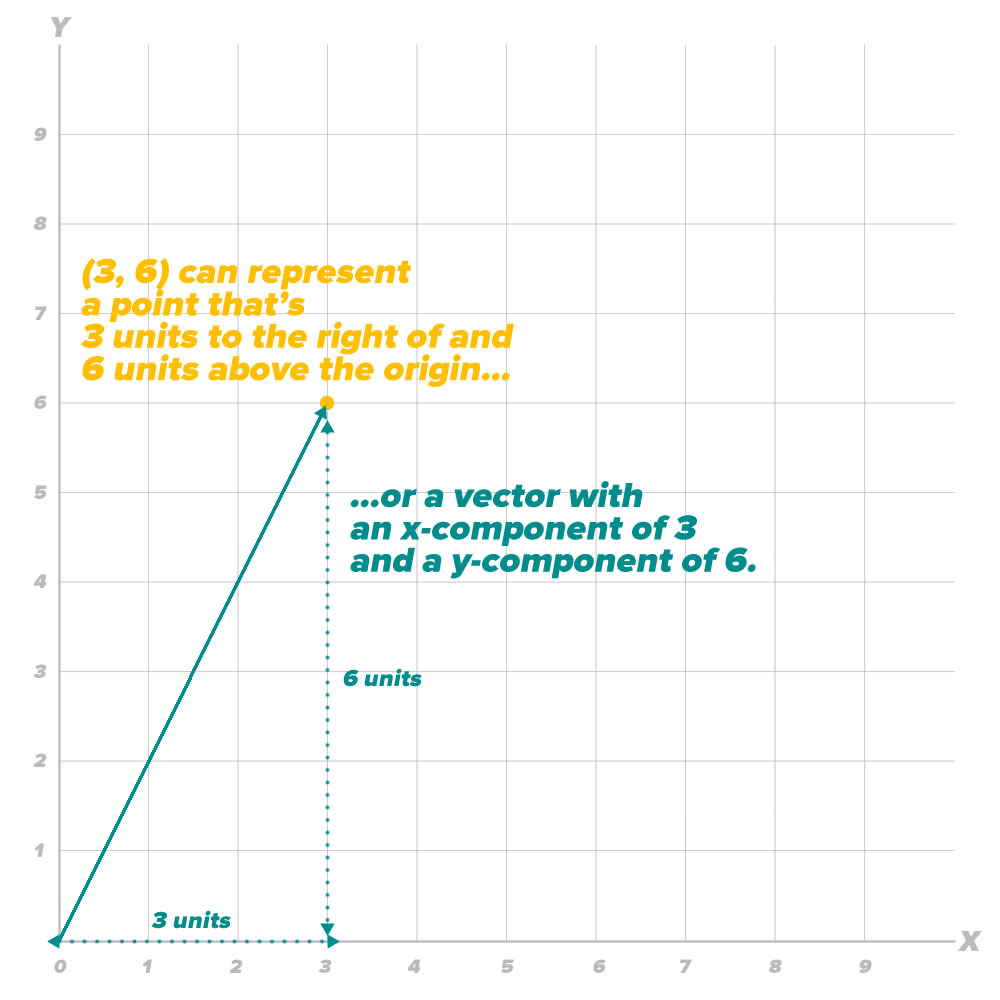
An ordered pair (x, y) can represent:

  • A point located at (x, y), or
  • A vector that starts at (0, 0) and ends at the point (x, y)

vector 2

We’re going to use the connection between point coordinates and vector coordinates to create some overloads and extensions that will help simplify programming our game.

Vector addition

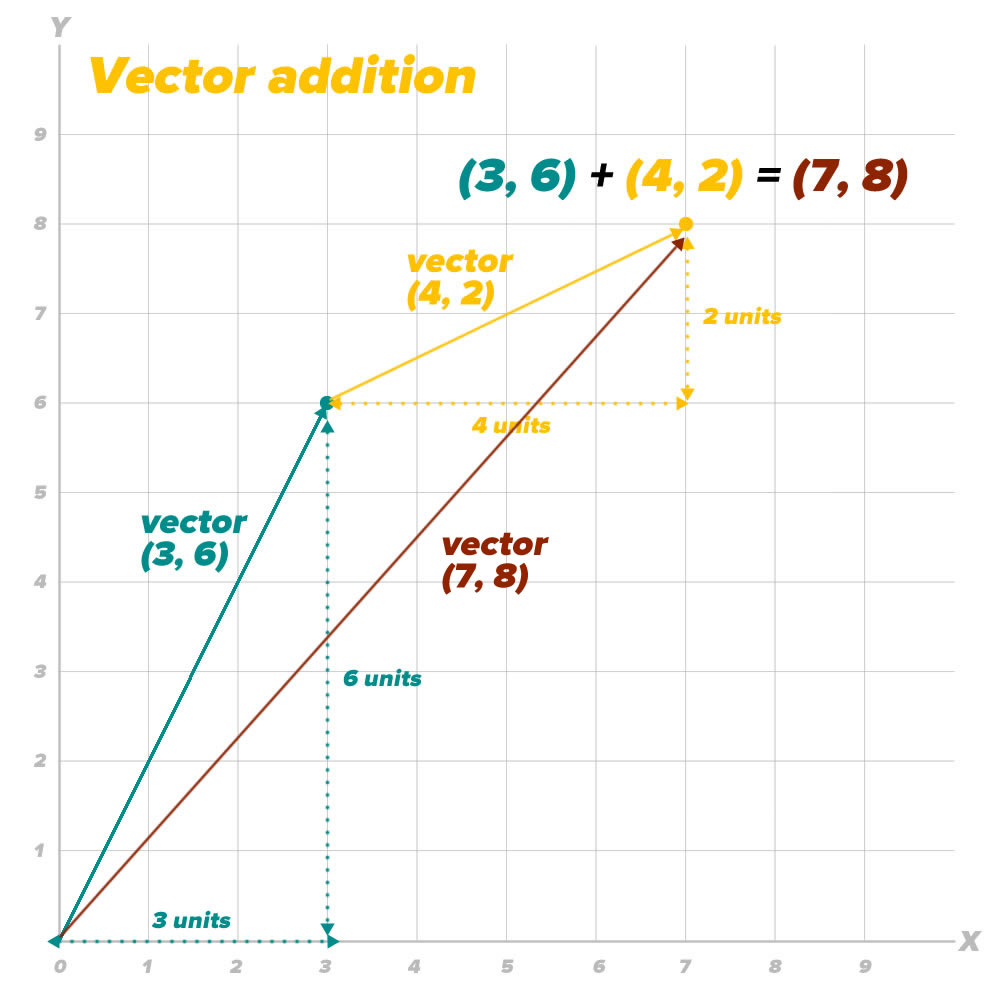
The first overload we’ll implement will allow us to add two vectors together, as pictured below:

vector 3

If you take a vector (x1, y1) and add another vector (x2, y2) to it, the resulting vector is (x1 + x2, y1 + y2).

In Swift, we’ll implement vector addition by taking advantage of the point coordinate/vector coordinate connection and use CGPoints to represent vectors. As a result, our vector addition overload of the + operator takes two CGPoints (x1y1) and (x2y2), and returns the vector sum (x1 + x2y1 + y2):

// Vector addition
private func + (left: CGPoint, right: CGPoint) -> CGPoint {
  return CGPoint(x: left.x + right.x, y: left.y + right.y)
}

With this overload, you can add any two vectors represented by CGPoints just by adding them with the + operator.

Vector subtraction

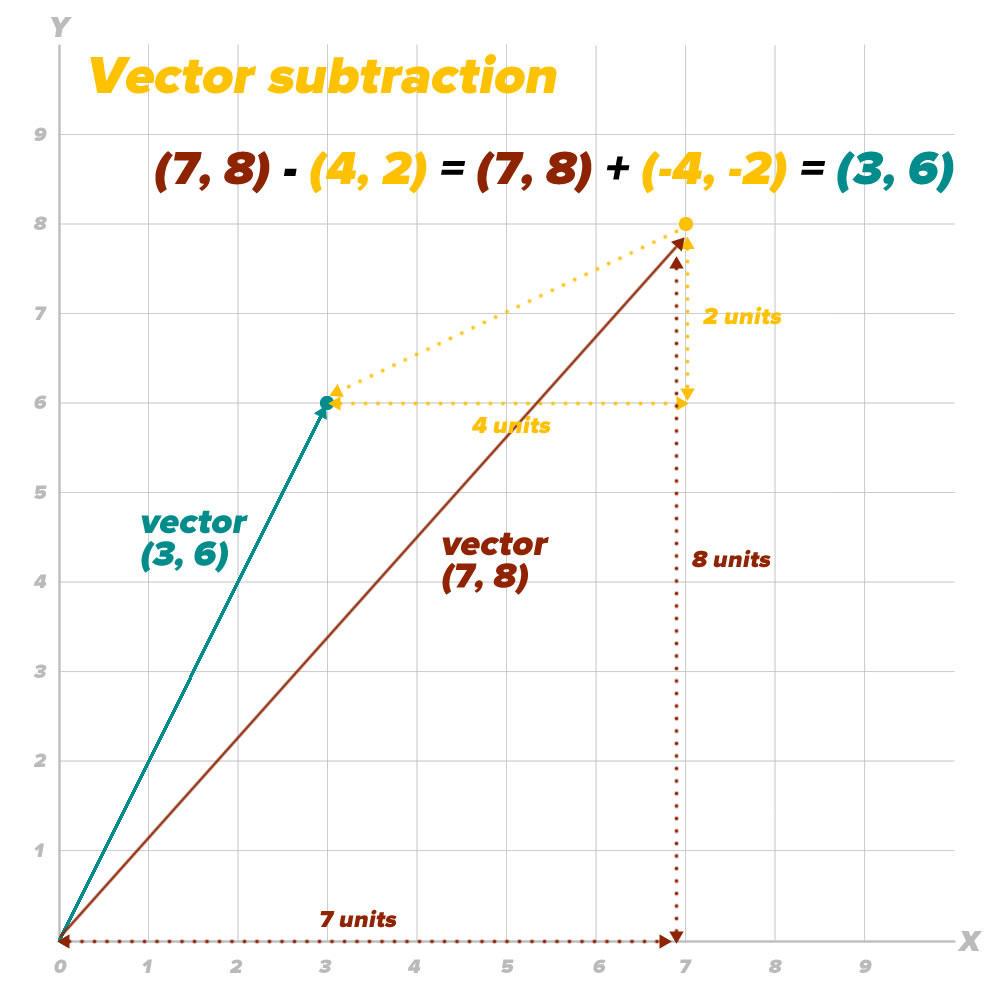
It’s easy to picture vector addition, but it’s a little harder to picture vector subtraction. The diagram below should help:

vector 4

Subtracting a vector is easy to see in equation form: taking a vector (x1y1) and subtracting another vector (x2y2) gives you a resulting vector (x1 – x2y1 – y2). Here’s our game’s implementation of vector subtraction:

// Vector subtraction
private func -(left: CGPoint, right: CGPoint) -> CGPoint {
  return CGPoint(x: left.x - right.x, y: left.y - right.y)
}

This overload lets you subtract a vector represented by a CGPoint from another vector represented by a CGPoint through the use of the - operator.

Vector multiplied by a scalar

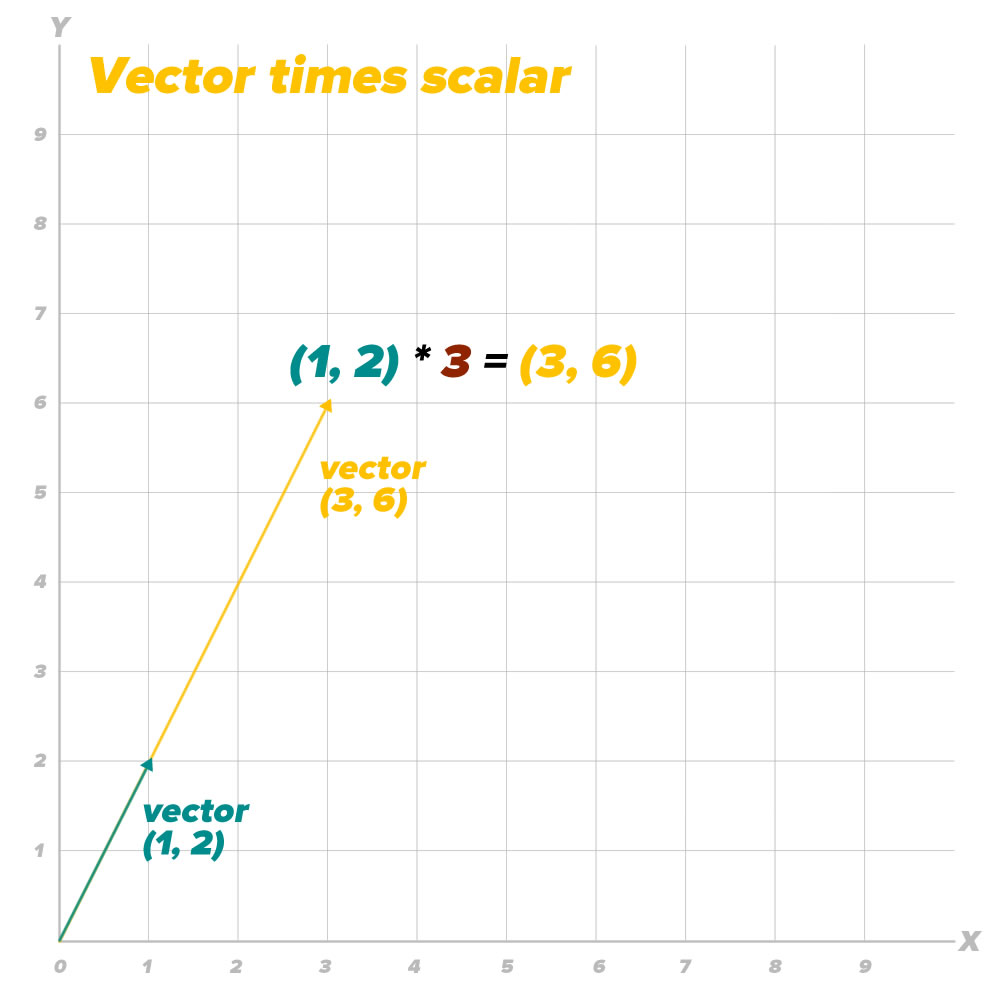
Multiplying a vector by a scalar preserves the vector’s direction, but changes its magnitude:

vector 5

Multiplying a vector (xy) by a scalar k gives you the resulting vector (kx, ky). Here’s how we implement vector-scalar multiplication in our game:

// Vector * scalar
private func *(point: CGPoint, factor: CGFloat) -> CGPoint {
  return CGPoint(x: point.x * factor, y:point.y * factor)
}

With this overload, you use the * operator to multiply a vector represented by a CGPoint by a scalar factor represented by a CGFloat. Note that order is very important in this operation: the first operand must be the vector, and the second operand must be the scalar — it won’t work the other way around!

Length of a vector and normalizing a vector

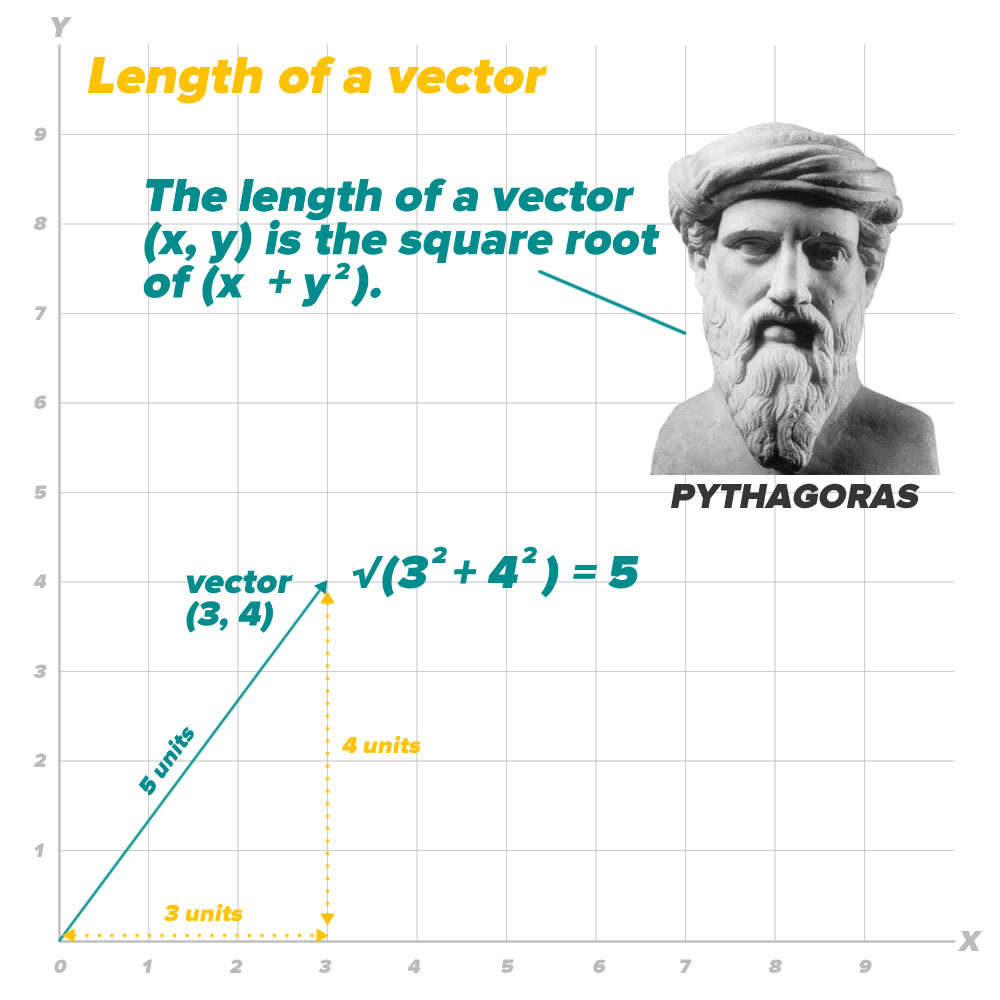
We’ll need to get the length of a vector, and for that we’ll use the Pythagorean theorem:

vector 6

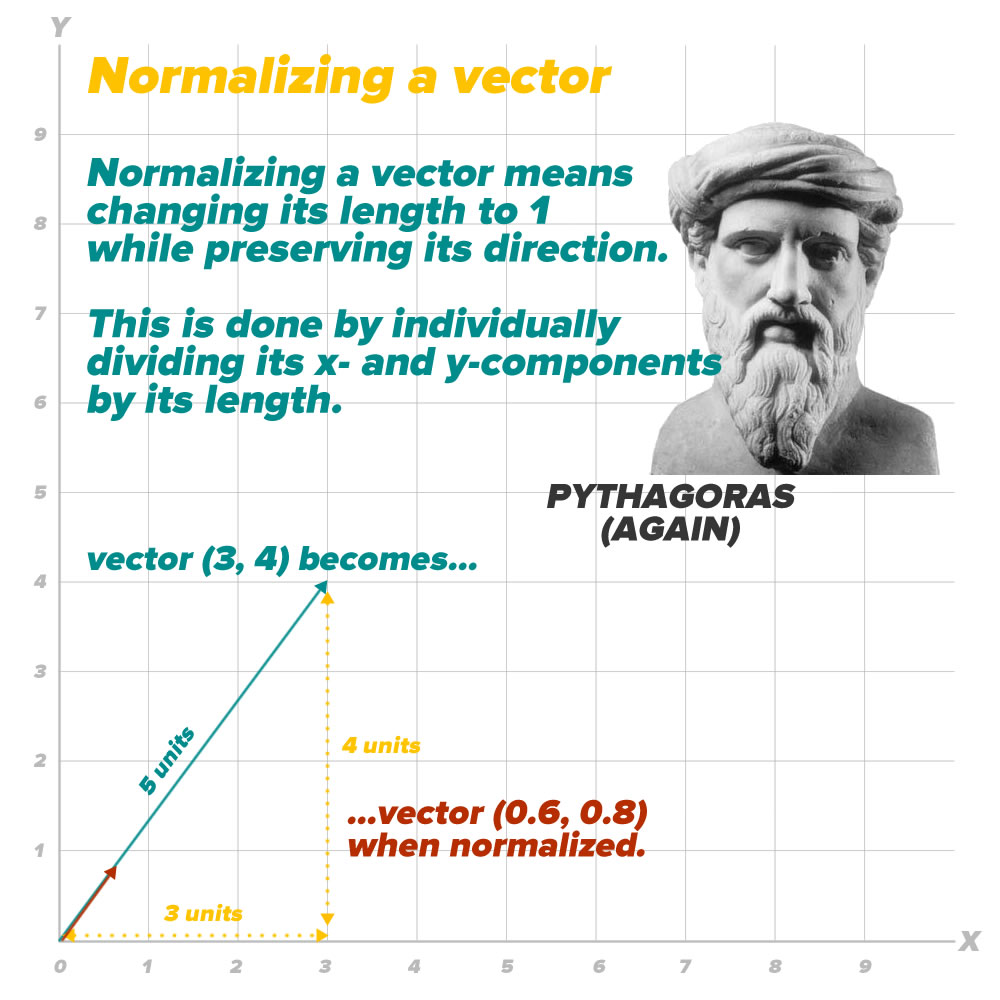
Being able to get the length of a vector will come in handy when we want to normalize it. By “normalizing”, we mean preserving its direction, but changing its length to 1:

vector 7

I wrote an extension to the CGPoint struct that provides two properties:

  • length, which returns the length of a vector represented by a CGPoint, and
  • normalized, which returns a CGPoint representing 1-unit-long vector that has the same direction as the vector in question.

Here’s the code:

private extension CGPoint {
  // Get the length (a.k.a. magnitude) of the vector
  var length: CGFloat { return sqrt(self.x * self.x + self.y * self.y) }
   
  // Normalize the vector (preserve its direction, but change its magnitude to 1)
  var normalized: CGPoint { return CGPoint(x: self.x / self.length, y: self.y / self.length) }
}

Next steps

With the code organization explained and the vector math taken care of, we’ll cover the actual workings of the game in the next installment.

Categories
Swift Kick

How to fix the “Apple Mach-O Linker / Undefined symbols for architecture” error in Xcode 6 beta 6

swift kickIf you’ve been faithfully downloading all the Xcode 6 betas to work with the latest version of Swift, you’re probably used to dealing with new betas breaking your code. In many cases, it’s due to changes in Swift, but once in a while, it’ll be completely unrelated to the language.

When I tried to compile my simple shoot ’em up game using Xcode 6 beta 6, I kept getting a couple of errors with text like this:

Apple Mach-O Linker error, Undefined symbols for architecture

You’re pretty insulated from the details of compiling and linking in Swift, and I hadn’t modified the code since I last ran it in beta 5, which left Xcode as the thing that changed and broke the build. A quick search on Stack Overflow revealed that deleting the DerivedData directory, which contains dSYM data (debug symbols — information used during the build process and for debugging), fixes the problem.

The default location for DerivedData is:

/Users/[your username]/Library/Developer/Xcode/DerivedData

Wait! I can’t find the Library folder in my home directory!

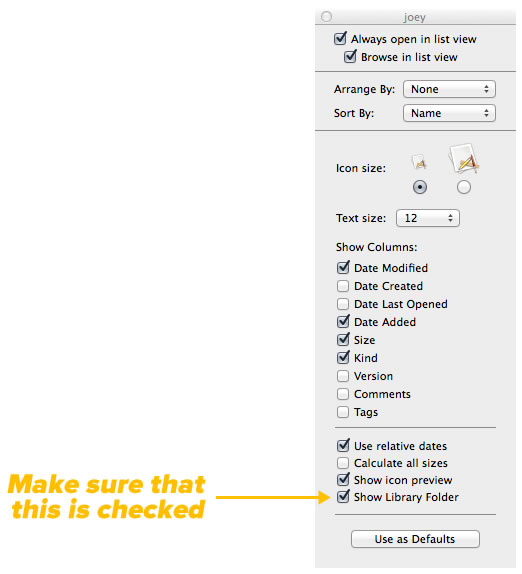
The Library folder is hidden by default in order to prevent non-technical users from messing around with it. However, as a developer, there are times that you’ll need to access it. Here’s how you make it visible within Finder in Mavericks:

  1. Open a Finder window.
  2. Go to your Home folder (the keyboard shortcut is commandShift-H).
  3. In the View menu, select Show View Options (the keyboard shortcut is command-J).
  4. Make sure that the Show Library Folder checkbox is checked.

view options window

Categories
Swift Kick

A simple “shoot-em-up” game with Sprite Kit and Swift, part one: Last things first – the complete project

In case you were wondering: yes, this code has been updated so that it’s compatible with the iOS APIs that came after the XCode 6 beta period.

a simple shoot em up game

swift kick

Here’s a fun programming exercise that you might want to try if you’ve been meaning to learn both Swift and game development for iOS: building a simple “shoot ’em” game using both!

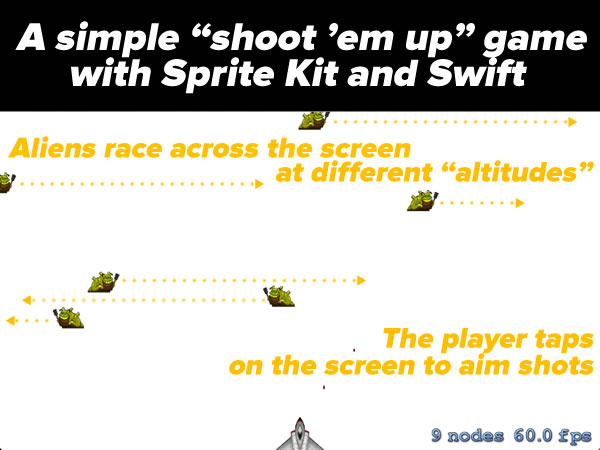
alienThis game features alien slugs (pictured on the left) that appear at random “altitudes” onscreen and travel from left to right or right to left, right in the line of fire of your ship, located near the bottom of the screen at the center. The player shoots at them by tapping on the screen; the locations of the player’s taps determine the direction of the shots.

As I said, it’s a simple game, but it introduces a fair number of concepts including:Spaceship

  • Drawing, positioning, scaling and moving sprites with Sprite Kit
  • Operator overloading and extensions in Swift
  • Vector math
  • Responding to user taps
  • Figuring out when two sprites collide
  • Playing sound effects and a continuous soundtrack

I thought I’d do things “backwards” with this article series by giving you what you need to complete the project first, and then exploring the code section by section in subsequent articles. That way, you can immediately see what the final result should look like and do some experimenting and exploring on your own.

How to build the simple shoot ’em up game

  1. Create a new iOS project in Xcode based on the Game template. Give the project any name you like; I named mine SimpleShootEmUp.
  2. Make sure the app uses landscape orientation only by selecting your the project and target in the Project Navigator, and then in the Deployment section, make sure that Portrait is unchecked and Landscape Left and Landscape Right are checked.
  3. Download the .zip file of resources for the game, then unzip it. There’ll be two folders, Images.atlas and Sounds, which you should drag into your project. A dialog box will appear; make sure that Copy items into destination group’s folder (if needed) is checked, and that your project’s target is selected.
  4. And finally, replace the contents of the GameScene.swift file that was automatically generated for your project with the code below. I’ve commented it rather heavily to help you get a better idea of what’s going on:
//
// GameScene.swift
// SpriteKitTutorial1
//
// Written by Joey deVilla - August 2014
// Last updated September 30, 2014
// using XCode 6.0.1
//
// A simple shoot-em-up game that shows some Sprite Kit basics in Swift.
// Some of the code was adapted from the simple game featured in
// Ray Wenderlich's article, "Sprite Kit Tutorial for Beginners"
// at RayWenderlich.com
// (http://www.raywenderlich.com/42699/spritekit-tutorial-for-beginners).

import SpriteKit
import AVFoundation


// MARK: - Vector math operators and CGPoint extensions
// ====================================================
// In this app, we're using CGPoints to do some vector math (yes, there's a CGVector type,
// but in this case, it's just more convenient to use CGPoints to represent both vectors
// and points).
//
// I've marked these as private to limit the scope of these overloads and extensions
// to this file.

// Vector addition
private func + (left: CGPoint, right: CGPoint) -> CGPoint {
  return CGPoint(x: left.x + right.x, y: left.y + right.y)
}

// Vector subtraction
private func -(left: CGPoint, right: CGPoint) -> CGPoint {
  return CGPoint(x: left.x - right.x, y: left.y - right.y)
}

// Vector * scalar
private func *(point: CGPoint, factor: CGFloat) -> CGPoint {
  return CGPoint(x: point.x * factor, y:point.y * factor)
}

private extension CGPoint {
  // Get the length (a.k.a. magnitude) of the vector
  var length: CGFloat { return sqrt(self.x * self.x + self.y * self.y) }
  
  // Normalize the vector (preserve its direction, but change its magnitude to 1)
  var normalized: CGPoint { return CGPoint(x: self.x / self.length, y: self.y / self.length) }
}

// MARK: -

class GameScene: SKScene, SKPhysicsContactDelegate {
  
  // MARK: Properties
  // ================
  
  // Background music
  // ----------------
  private var backgroundMusicPlayer: AVAudioPlayer!
  
  // Game time trackers
  // ------------------
  private var lastUpdateTime: CFTimeInterval = 0  // Time when update() was last called
  private var timeSinceLastAlienSpawned: CFTimeInterval  = 0  // Seconds since the last alien was spawned
  
  // Ship sprite
  // -----------
  // For simplicity's sake, we'll use the spaceship that's provided in Images.xcassets
  // when you start a new Game project
  private let ship = SKSpriteNode(imageNamed: "Spaceship")
  
  // Physics body category bitmasks
  // ------------------------------
  // We'll use these to determine missle-alien collisions
  private let missileCategory: UInt32 = 0x1 << 0   // 00000000000000000000000000000001 in binary
  private let alienCategory: UInt32   = 0x1 << 1   // 00000000000000000000000000000010 in binary
  
  
  // MARK: Events
  // ============
  
  // Called immediately after the view presents this scene.
  override func didMoveToView(view: SKView) {
    // Start the background music player
    var error: NSError?
    let backgroundMusicURL = NSBundle.mainBundle().URLForResource("background-music", withExtension: "aiff")
    backgroundMusicPlayer = AVAudioPlayer(contentsOfURL: backgroundMusicURL, error: &error)
    backgroundMusicPlayer.numberOfLoops = -1
    backgroundMusicPlayer.prepareToPlay()
    backgroundMusicPlayer.play()
    
    // Set the game's background color to white
    backgroundColor = SKColor(red: 1, green: 1, blue: 1, alpha: 1)
    
    // Position the player's ship halfway across the screen,
    // near the bottom
    ship.setScale(0.25)
    ship.position = CGPoint(x: size.width / 2, y: ship.size.height * 1.25)
    addChild(ship)
    
    // Game physics
    physicsWorld.gravity = CGVector(0, 0) // No gravity in this game...yet!
    physicsWorld.contactDelegate = self // We'll handle contact between physics bodies in this class
    
    spawnAlien() // Start the game with a single alien
  }
  
  // Called exactly once per frame as long as the scene is presented in a view
  // and isn't paused
  override func update(currentTime: CFTimeInterval) {
    var timeSinceLastUpdate = currentTime - lastUpdateTime
    lastUpdateTime = currentTime
    if timeSinceLastUpdate > 1 {
      timeSinceLastUpdate = 1.0 / 60.0
      lastUpdateTime = currentTime
    }
    updateWithTimeSinceLastUpdate(timeSinceLastUpdate)
  }
  
  // Called whenever the user touches the screen
  override func touchesEnded(touches: NSSet, withEvent event: UIEvent) {
    // Select one of the user's touches. Given the event loop's speed, there aren't likely
    // to be more than 1 or 2 touches in the set.
    let touch = touches.anyObject() as UITouch
    let touchLocation = touch.locationInNode(self)
    
    // Reject any shots that are below the ship, or directly to the right or left
    let targetingVector = touchLocation - ship.position
    if targetingVector.y > 0 {
      // FIRE ZE MISSILES!!!
      fireMissile(targetingVector)
    }
  }
  
  // SKPhysicsContactDelegate method: called whenever two physics bodies
  // first contact each other
  func didBeginContact(contact: SKPhysicsContact!) {
    var firstBody: SKPhysicsBody!
    var secondBody: SKPhysicsBody!
    
    // An SKPhysicsContact object is created when 2 physics bodies make contact,
    // and those bodies are referenced by its bodyA and bodyB properties.
    // We want to sort these bodies by their bitmasks so that it's easier
    // to identify which body belongs to which sprite.
    if contact.bodyA.categoryBitMask < contact.bodyB.categoryBitMask {
      firstBody = contact.bodyA
      secondBody = contact.bodyB
    }
    else {
      firstBody = contact.bodyB
      secondBody = contact.bodyA
    }
    
    // We only care about missile-alien contacts.
    // If the contact is missile-alien, firstBody refers to the missile's physics body,
    // and second body refers to the alien's physics body.
    if (firstBody.categoryBitMask & missileCategory) != 0 &&
      (secondBody.categoryBitMask & alienCategory) != 0 {
        destroyAlien(firstBody.node as SKSpriteNode, alien: secondBody.node as SKSpriteNode)
    }
  }
  
  
  // MARK: Game state
  // ================
  
  func updateWithTimeSinceLastUpdate(timeSinceLastUpdate: CFTimeInterval) {
    // If it's been more than a second since we spawned the last alien,
    // spawn a new one
    timeSinceLastAlienSpawned += timeSinceLastUpdate
    if (timeSinceLastAlienSpawned > 0.5) {
      timeSinceLastAlienSpawned = 0
      spawnAlien()
    }
  }
  
  func spawnAlien() {
    
    enum Direction {
      case GoingRight
      case GoingLeft
    }
    
    var alienDirection: Direction!
    var alienSpriteImage: String!
    
    // Randomly pick the alien's origin
    if Int(arc4random_uniform(2)) == 0 {
      alienDirection = Direction.GoingRight
      alienSpriteImage = "alien-going-right"
    }
    else {
      alienDirection = Direction.GoingLeft
      alienSpriteImage = "alien-going-left"
    }
    
    // Create the alien sprite
    let alien = SKSpriteNode(imageNamed: alienSpriteImage)
    
    // Give the alien sprite a physics body
    alien.physicsBody = SKPhysicsBody(rectangleOfSize: alien.size)
    alien.physicsBody?.dynamic = true
    alien.physicsBody?.categoryBitMask = alienCategory
    alien.physicsBody?.contactTestBitMask = missileCategory
    alien.physicsBody?.collisionBitMask = 0
    
    // Set the alien's initial coordinates
    var alienSpawnX: CGFloat!
    var alienEndX: CGFloat!
    if alienDirection == Direction.GoingRight {
      alienSpawnX = -(alien.size.width / 2)
      alienEndX = frame.size.width + (alien.size.width / 2)
    }
    else {
      alienSpawnX = frame.size.width + (alien.size.width / 2)
      alienEndX = -(alien.size.width / 2)
    }
    let minSpawnY = frame.size.height / 3
    let maxSpawnY = (frame.size.height * 0.9) - alien.size.height / 2
    let spawnYRange = UInt32(maxSpawnY - minSpawnY)
    let alienSpawnY = CGFloat(arc4random_uniform(spawnYRange)) + minSpawnY
    alien.position = CGPoint(x: alienSpawnX, y: alienSpawnY)
    
    // Put the alien onscreen
    addChild(alien)
    
    // Set the alien's speed
    let minMoveTime = 2
    let maxMoveTime = 4
    let moveTimeRange = maxMoveTime - minMoveTime
    let moveTime = NSTimeInterval((Int(arc4random_uniform(UInt32(moveTimeRange))) + minMoveTime))
    
    // Send the alien on its way
    let moveAction = SKAction.moveToX(alienEndX, duration: moveTime)
    let cleanUpAction = SKAction.removeFromParent()
    alien.runAction(SKAction.sequence([moveAction, cleanUpAction]))
  }
  
  func fireMissile(targetingVector: CGPoint) {
    // Now that we've confirmed that the shot is "legal", FIRE ZE MISSILES!
    
    // Play shooting sound
    runAction(SKAction.playSoundFileNamed("missile.mp3", waitForCompletion: false))
    
    // Create the missile sprite at the ship's location
    let missile = SKSpriteNode(imageNamed: "missile")
    missile.position.x = ship.position.x
    missile.position.y = ship.position.y + (ship.size.height / 2)
    
    // Give the missile sprite a physics body
    missile.physicsBody = SKPhysicsBody(circleOfRadius: missile.size.width / 2)
    missile.physicsBody?.dynamic = true
    missile.physicsBody?.categoryBitMask = missileCategory
    missile.physicsBody?.contactTestBitMask  = alienCategory
    missile.physicsBody?.collisionBitMask = 0
    missile.physicsBody?.usesPreciseCollisionDetection = true
    
    addChild(missile)
    
    // Calculate the missile's speed and final destination
    let direction = targetingVector.normalized
    let missileVector = direction * 1000
    let missileEndPos = missileVector + missile.position
    let missileSpeed: CGFloat = 500
    let missileMoveTime = size.width / missileSpeed
    
    // Send the missile on its way
    let actionMove = SKAction.moveTo(missileEndPos, duration: NSTimeInterval(missileMoveTime))
    let actionMoveDone = SKAction.removeFromParent()
    missile.runAction(SKAction.sequence([actionMove, actionMoveDone]))
  }
  
  func destroyAlien(missile: SKSpriteNode, alien: SKSpriteNode) {
    // Play explosion sound
    runAction(SKAction.playSoundFileNamed("explosion.wav", waitForCompletion: false))
    
    // When a missile hits an alien, both disappear
    missile.removeFromParent()
    alien.removeFromParent()
  }
  
}


Once that’s done, the game’s ready to run. Go ahead and run it, play, explore the code, experiment, and learn! In the next installment, I’ll start explaining the code, starting with some Sprite Kit basics.

Credit where credit is due

  • Much of the code is a Swift adaptation of the code in Ray Wenderlich’s September 2013 article, Sprite Kit Tutorial for Beginners. If you’re serious about learning iOS development, you want to bookmark Ray’s site, RayWenderlich.com, the home of not just tutorial articles, but tutorial videos, very in-depth books, and even starter kits for budding iOS game developers.
  • The alien images were taken from Backyard Ninja Design’s Free Stuff page, specifically the set of sprite from their “Crapmunch” game.
  • The ship image is the one included in the example game that’s automatically created when you generate a game project.
  • The background music is FU4, created by Partners in Rhyme, and can be found on their Free Royalty-Free Music Loops page.
Categories
Swift Kick

You can use Swift’s “private” access modifier to limit the reach of overrides and extensions, but not monkeypatches

evil monkey pointing at swift code

What happens when you mark operator overload definitions as private?

swift kickWhile I was translating the code in the RayWenderlich.com article Sprite Kit Tutorial for Beginners from its original Objective-C to Swift, I got to the point where he provides some routines to do vector math on CGPoints. These are “standalone” utility functions and aren’t methods inside any class.

The first three functions are for vector arithmetic:

  • Adding two vectors together: (x1, y1) + (x2, y2) = (x1 + x2, y1 + y2)
  • Subtracting on vector from another: (x1, y1) – (x2, y2) = (x1 – x2, y1 – y2)
  • Multiplying a vector by a scalar: (x, y) * k = (k * x, k * y)

Here’s his original code, written in Objective-C:

// Objective-C

static inline CGPoint rwAdd(CGPoint a, CGPoint b) {
    return CGPointMake(a.x + b.x, a.y + b.y);
}
 
static inline CGPoint rwSub(CGPoint a, CGPoint b) {
    return CGPointMake(a.x - b.x, a.y - b.y);
}

static inline CGPoint rwMult(CGPoint a, float b) {
    return CGPointMake(a.x * b, a.y * b);
}

I’ve always found methods like add(firstThing, secondThing) a little clunky-looking; I’d much rather write it as firstThing + secondThing. Since Swift supports operator overloading (Objective-C doesn’t), I decided to implemented the rwAdd(), rwSub(), and rwMult() functions as overloads of the +, -, and * operators. Here’s my equivalent Swift code:

// Swift

// Vector addition
private func + (left: CGPoint, right: CGPoint) -> CGPoint {
  return CGPoint(x: left.x + right.x, y: left.y + right.y)
}

// Vector subtraction
private func - (left: CGPoint, right: CGPoint) -> CGPoint {
  return CGPoint(x: left.x - right.x, y: left.y - right.y)
}

// Vector * scalar
private func * (point: CGPoint, factor: CGFloat) -> CGPoint {
  return CGPoint(x: point.x * factor, y:point.y * factor)
}

Note that I added a private access modifier to each of the functions above. As I pointed out in my last Swift article, Swift’s access modifiers are based on files and modules, not the class hierarchy. In Swift, any entity marked private is visible and accessible within its own file, and invisible and inaccessible from outside its own file. I wanted to see what would happen to operator overloads.

Here’s what I found:

Operator overloads marked private are available within the file where they’re defined, and are not available outside that file. Outside the file where the private operator overloads were defined, any attempt to use them results in an error.

A little testing confirmed that I could add and subtract CGPoints and multiply them by scalars using the + operation from inside the same file, but couldn’t do so from inside in other files.

What happens when you mark extensions as private?

The next couple of functions that were in Sprite Kit Tutorial for Beginners were for getting and normalizing the length of a vector. Here’s the original Objective-C code:

// Objective-C

static inline float rwLength(CGPoint a) {
    return sqrtf(a.x * a.x + a.y * a.y);
}
 
// Makes a vector have a length of 1
static inline CGPoint rwNormalize(CGPoint a) {
    float length = rwLength(a);
    return CGPointMake(a.x / length, a.y / length);
}

Swift supports the addition of functionality to types by means of extensions. I thought that implementing these functions as computed properties of CGPoint in an extension would make for more elegant code — I’d rather write vector.length and vector.normalized than rwLength(vector) and rwNormalize(vector). Here’s what I wrote:

// Swift

private extension CGPoint {
  // Get the length (a.k.a. magnitude) of the vector
  var length: CGFloat { return sqrt(self.x * self.x + self.y * self.y) }
  
  // Normalize the vector (preserve its direction, but change its magnitude to 1)
  var normalized: CGPoint { return CGPoint(x: self.x / self.length, y: self.y / self.length) }
}

Note that I marked the entire extension as private. How would that affect their visibility inside and outside the file where the extension was defined?

The members of extensions marked private are available within the file where they’re defined, and are not available outside that file. Outside the file where the private extension members were defined, any attempt to use them results in an error, and auto-complete wouldn’t even list them.

Once again, testing confirmed that I could normalize and get the length of vectors represented by CGPoints from inside the same file, but couldn’t do so from inside in other files.

What happens when you mark “monkeypatches” as private?

Marking overrides and extensions as private led me to wonder what would happen if I marked a “monkeypatch” as private.

Monkeypatching is a term that’s used in the Python and Ruby developer communities, and it means dynamically replacing an existing class method with one of your own. It’s takes some effort to do in Objective-C (thanks to Joe Smith for the heads-up!), but it’s quite simple to do in Swift — and not just to methods, but properties as well. Here’s a quick example, in which I redefine the String class property utf16Count, which returns the number of UTF-16 characters in a string (it maps to NSString‘s length method):

extension String {
  var utf16Count: Int { return 5 }
}

With this extension, I’ve monkeypatched utf16Count so that it always returns 5, no matter what the number of UTF-16 characters in the string is.

Monkeypatching is powerful, and it’s sometimes useful, but as smarter people than I have pointed out, it can create more problems than it solves. As Jeff Atwood asked in Coding Horror, “Can you imagine debugging code where the String class had subtly different behaviors from the Stringyou’ve learned to use?”

That’s what got me thinking: what if private could be used to limit the scope of a monkeypatch, to limit the applicability of my warped verstion of utf16Count to a single file? Is such a thing possible? To answer these questions, I created this extension to String in one file:

// File: ViewController.swift

private extension String {
  var utf16Count: Int { return 5 }  // already defined in String
  var someNumber: Int { return 10 } // a new addition to String
}

This extension provides two things:

  • A monkeypatch for String‘s already-existent utf16Count property so that it always returns the value 5
  • A new property for String called someNumber, which always returns the value 10

In the same file where I defined my extension to String, I wrote this code:

// File: ViewController.swift

let testString = "This is a test"
println("UTF-16 count inside: \(testString.utf16Count)")
    
doOutsideCount()

And in another file, I defined the doOutsideCount method:

// File: SomeOtherFile.swift

func doOutsideCount() {
  let testString = "This is a test"
  println("UTF-16 count outside: \(testString.utf16Count)")
}

If making the extension private limited my redefinition of utf16Count to the file where I redefined it, the output of doOutsideCount() would be “UTF-16 count outside: 14”, since there are 14 UTF-16 characters in testString. I noticed that while typing in the code in this file, utf16Count was available to me in auto-complete.

Here’s the output that appeared on the console when I ran the app:

UTF-16 count inside: 5
UTF-16 count outside: 5

It appears that monkeypatching (redefining an existing member) in an extension marked private does not limit the monkeypatch to the file where the monkeypatch was defined. You can’t use private to limit the scope of a monkeypatch to a single file.

I changed the code in both files to try calling on someNumber, a method that didn’t already exist in String:

// File: ViewController.swift

func doOutsideCount() {
  let testString = "This is a test"
  println("someNumber inside: \(testString.someNumber)")
}

// File: SomeOtherFile.swift

func doOutsideCount() {
  let testString = "This is a test"
  println("someNumber inside: \(testString.someNumber)")
}

This wouldn’t even compile. Calling on the someNumber property of String outside of the file where I defined the private extension raises an error: 'String' does not have a member named 'SomeNumber'.

My conclusion from this little bit of experimenting is also this article’s title:

You can use Swift’s private access modifier to limit the reach of overrides and extensions, but not monkeypatches.

Categories
Swift Kick

A first look at Swift’s new access levels

privacy

swift kickC# and Java programmers are used to working with class member access level modifiers like public, private, and protected. With the latest version of Swift (which came with the latest version of Xcode), we got access level modifiers too. They’re just a little bit different.

Prior to Xcode beta 4, there was one and only one level of access in Swift. Now there are three:

  • private – accessible only from within the source file where it’s defined,
  • internal – accessible only from any file within the target where it’s defined, and
  • public – accessible from any file within the target where’s it’s defined, and from within any other context that imports the current target’s module.

In case you’re not clear on what’s meant by a target: it’s the end result of doing a build in Xcode. For most of us, this is likely an app, but it could also be a library, framework or unit test bundle.

These levels of access are file-based rather than class-based. To help make things clear, I’ve put together some illustrations.

The default access level: internal

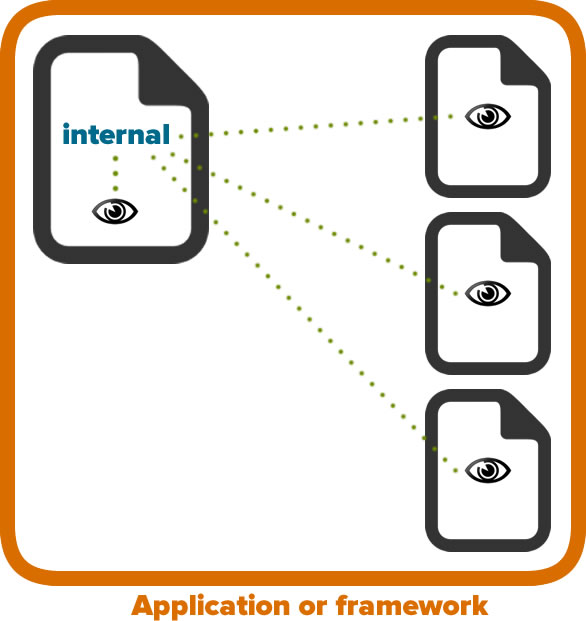
The first level of access I’ll cover is internal

internal

An internal entity can be “seen” within the file where it’s defined, as well as from any other file in the same application or framework.

internal is the default level of access, and the only access level in versions of Swift prior to beta 4. If an entity — that is, a variable, constant, enum, struct, or class — doesn’t have a specified access level, its access level is internal.

The locked-down access level: private

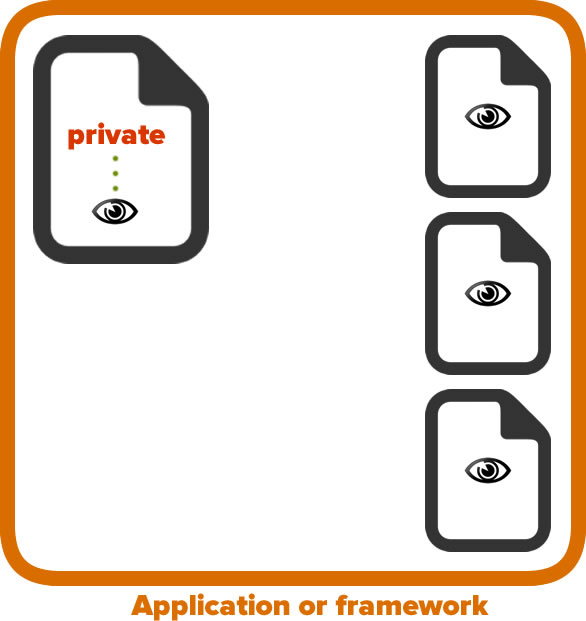
The next level of access is private

private

private entity can be “seen” within the file where it’s defined, and only within that file. It’s invisible from outside that file.

If you’re used to the sort of access C# or Java programmer, you’re used to the idea of a private entity being one that can’t be “seen” outside the class. In Swift, access level is about files, not classes, meaning that a Swift private entity is one that can’t be seen outside its own file. Two Swift classes in the same file would be able to access each other’s private variables, methods, and so on. This approach will make it possible to encapsulate related classes in a single file, with “internal use only” classes marked as private. It also gets around having to use access kludges like C++’s friend functions and classes.

The “putting myself out there” access level: public

Just as private is a little bit different from what you might expect, so is public

public

public entity can be “seen” within the file where it’s defined, from any other file in the same application or framework, and by another file any other application or framework that imports the application or framework where the public entity was defined.

Once again, if you’re a C# or Java programmer, this may seem weird. Swift’s internal is closest in spirit to C#’s and Java’s public; Swift’s public exposes entities to outside code that imports our application or framework. This should come in particularly handy for those of you who are writing libraries: you can choose which classes and methods to expose to clients by marking them as public.

Trying out the new access levels

The following is a copy-and-paste from some code I wrote while taking these new access levels for a spin. I created a file called RelatedClasses.swift that contain classes named SomeClass, SomeOtherClass, and HiddenClass:

// RelatedClasses.swift

class SomeClass {
  
  internal func doSomethingInternal() -> () {
    println("SomeClass::doSomethingInternal() called.")
  }
  
  func doSomethingDefault() -> () {
    println("SomeClass::doSomethingDefault() called.")
  }
  
  private func doSomethingPrivate() -> () {
    println("SomeClass::doSomethingPrivate() called.")
  }
  
}

class SomeOtherClass {
  
  let someClassInstance = SomeClass()
  private let hiddenClassInstance = HiddenClass()
  
  func usePrivateMethodInSameFileDifferentClass() -> () {
    someClassInstance.doSomethingPrivate()
  }
  
}

private class HiddenClass {
  
}

Note that:

  • SomeClass has two internal methods: doSomethingInternal() and doSomethingDefault(). doSomethingInternal()‘s internal access level is explicit, and doSomethingDefault()‘s internal access level is explicit. Both these methods are callable from inside RelatedClasses.swift, or from any file inside the application or framework containing RelatedClasses.swift.
  • SomeClass also has a private method: doSomethingPrivate(). It’s accessible from within SomeClass, but also from anywhere else inside RelatedClasses.swift, including from within the other two classes. You can’t call this method from outside RelatedClasses.swift
  • SomeOtherClass contains an instance of SomeClass and HiddenClass. Note that because HiddenClass is private, any instance of HiddenClass must also be declared private.
  • SomeOtherClass has a method with the rather long name usePrivateMethodInSameFileDifferentClass(), and it lives up to its name. It can access SomeClass' doSomethingPrivate() method even though it’s private because it’s in the same file, and Swift’s access control is more file-based than class hierarchy-based.
  • HiddenClass is a private class. Since SomeClass and SomeOtherClass are in the same file, they can “see” it and create instances of it. Its definition is “invisible” outside the file, and thus you can’t create a HiddenClass instance outside of RelatedClasses.swift.

As you can see, Swift’s access control is different from C#’s and Java’s, which will lead to different coding patterns. We typically see the one-class-per-file approach in C# and Java, but Swift’s different kind of private access will likely give rise to larger-scale type of encapsulation, with related classes in the same file. public may change the way people write libraries and frameworks — I’m more of a library/framework user than a writer, so I’ll leave it to others to deliver more informed comment on that. It’ll be interesting to see the approaches that programmers come up with as they use Swift.

Recommended Reading

The online Swift documentation has been updated to cover the addition of access control in beta 4. There’s also some interesting discussion about Swift’s access levels in the Human Friendly’s blog, in an article titled Swift Access Controls are like C’s (and that isn’t necessarily a bad thing).

Categories
Swift Kick

Swift roundup: Interesting sample code and tutorials I’ve found this week

swift roundup

swift kickAs useful as Apple’s The Swift Programming Language book is, it’s focused solely on the language and has nothing at all about the other 90% of iOS development: the various Cocoa Touch APIs and libraries. Luckily, it’s not that hard for a developer with some iOS/Objective-C coding experience to figure out how to call on them in Swift, and a number of them are sharing their knowledge and findings. Here are some of the more interesting Swift finds that I’ve stumbled across online this week.

Tutorial: Conway’s “Game of Life”

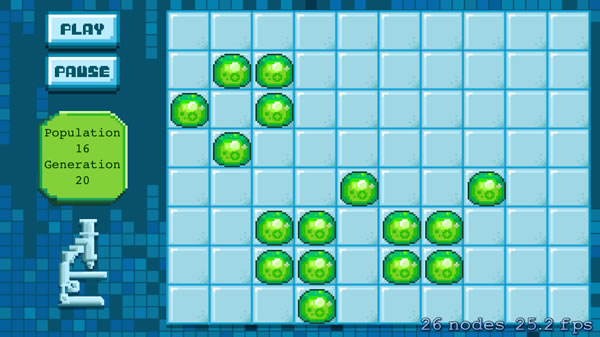
life in swift

If you’re looking for a tutorial that walks you through the process of building a reasonably complete iOS app, MakeGamesWith.Us’s tutorial is for you! You’ll build Conway’s Game of Life using SpriteKit, and get a better understanding of how to call various Cocoa Touch APIs in Swift.

Brian Advent’s video tutorials

If you’ve gone through Apple’s The Swift Programming Language book and are feeling confident about the language itself but less so about calling the various iOS APIs, you’ll find Brian Advent’s video tutorials helpful.

Simple UI in Swift

Want to get started writing full iOS apps in Swift rather than just coding up language-features-only stuff from the book? Start here.

Swift and UIKit

This goes over Swift and some of the UI features we’ve come to know and love — text fields, alert views, and table views — as well as using Swift delegates and closures.

Blurring with UIVisualEffect and Preview in Interface Builder

UIVisualEffect is a new class in iOS 8; this tutorial shows you how to use it to get a blur visual effect. This video also shows you how to use the Preview feature in IB.

iOS 8 notification

iOS 8 lets you add custom actions to your notifications, whether on the lock screen, the Home screen, or the Notification Center. This tutorial shows you how to code them.

Swift projects on Github

Swift-2048

swift - 2048

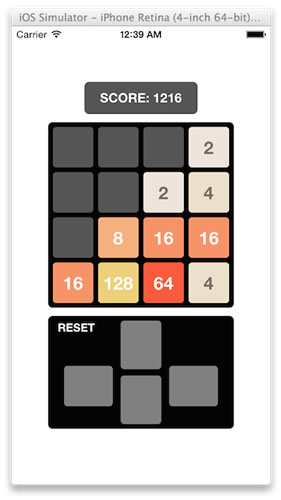
Austin Zheng posted iOS-2048, his rendition of the game 2048 in Objective-C a few months back, and he’s since made a Swift version, Swift-2048. It’s not complete, but the basic game works, and it should give you a good starting point for your own non-SpriteKit game projects.

Swift Weather

swiftweather

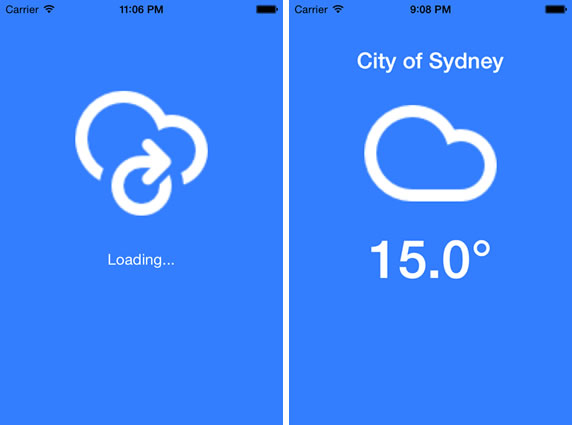
Swift Weather uses not just an Apple API — Core Location —  but also the third-party AFNetworking framework by way of CocoaPods. Be sure to follow the “How to Build” section of the readme.

Want to see more Swift content?

Click here or on the “Swift Kick” logo near the top of this article to see all the Swift-related articles on Global Nerdy.