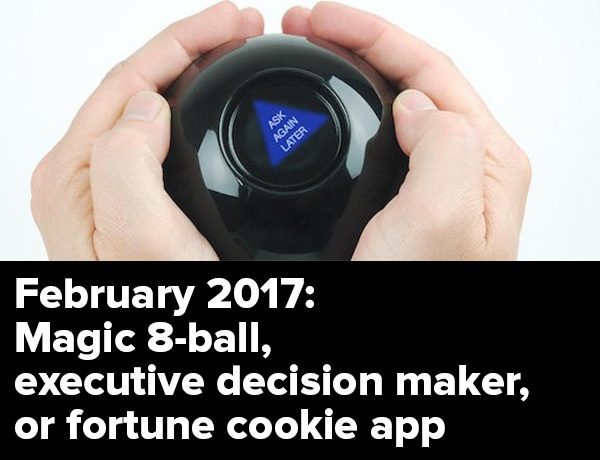
 This past Tuesday, I held another session of Tampa iOS Meetup, which I’ve changed to be considerably more hands-on and aimed squarely at beginning developers. This session covered building “Magic 8-Ball”- or “executive decision maker”-style apps — the kind where the user presses a button and the app presents a randomly-selected response.
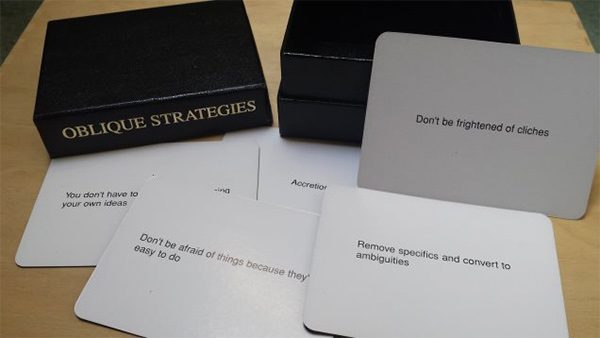
For the benefit of the people who attended, for those who couldn’t make it, and for the curious, I’ll walk you through the process of coding an app called Oblique Strategies, a “press a button and get a random response” app based on Brian Eno (as in the avant-garde musician and producer) and Peter Schmidt’s (the visual artist) creativity tool.
What is Oblique Strategies?
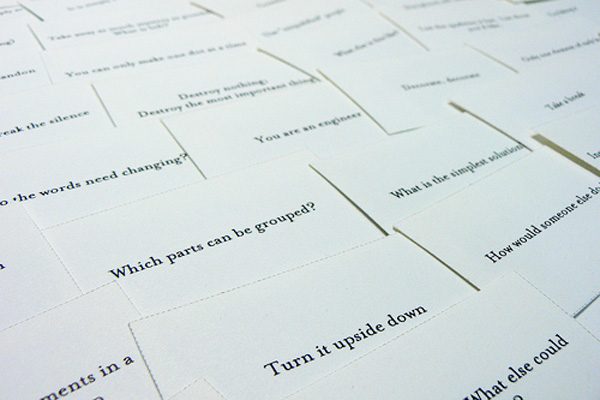
Eno and Schmidt created Oblique Strategies in late 1974 as a tool to help artists, writers, musicians, and other creative types overcome creative blocks. The original version was a deck of cards, each with a constraint, question, or suggestion that encouraged what was then called “lateral thinking” and now called “thinking outside the box”. If you were feeling creatively blocked, you’d shuffle the deck and then draw one or more cards, each of which would say something such as:
- Abandon one stricture.
- Emphasize repetitions.
- Is there something missing?
- What would your closest friend do?
- Use an old idea.
If you’d like to try out Oblique Strategies, there are a number of web versions: here, here, here, and here, for starters.
In this exercise, we’ll remake Oblique Strategies as an app. Here’s what the end result will look like:

The apps is pretty simple: the user taps the Get a strategy button, and a randomly-selected strategy appears below it.
Download the starter project
Rather than have you type in all the strategies and monkey around with the user interface layout, I’ve already done those things and incorporated them into a starter project that you can download and use for this coding exercise.
 Click here to download the starter project.
Once you’ve downloaded the project, unzip it, which will give you a folder containing the entire project. Open that folder, then open Oblique Strategies.xcodeproj in Xcode.
Connect the view objects to the underlying view controller
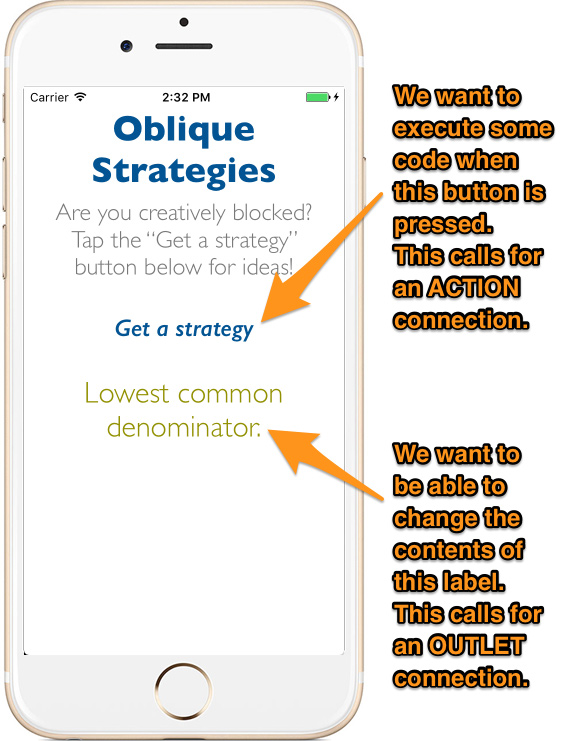
The Oblique Strategies app has two user interface objects that we need to connect to the underlying code:
- A button, which the user presses to get a new random strategy. The button causes something to happen (that is, it executes code) in response to an event (which in this case, is the user pressing it). This requires an action connection.
- A label, which the app uses to display the strategy. In order to be able to change the text contents of the label, the underlying code needs to be able to refer to it using a variable. This requires an outlet connection.
Let’s start by creating the outlet connection for the label:
Do the following:
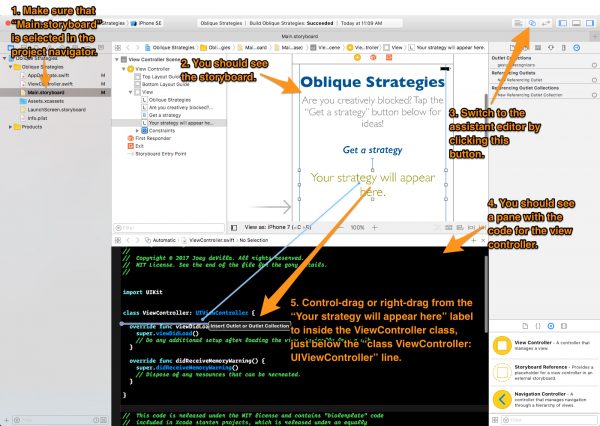
- We need to see the main storyboard. Do this by selecting the Main.storyboard file in the project navigator.
- The storyboard should appear. Make sure that the label that we’ll use to display the randomly-selected strategy (its default text is “Your strategy will appear here.”) is visible.
- Turn on the assistant editor by clicking on the assistant editor button (see the screenshot above).
- The center of your Xcode window should now be split in two, with one part still showing the main storyboard, but another part showing the underlying view controller code.
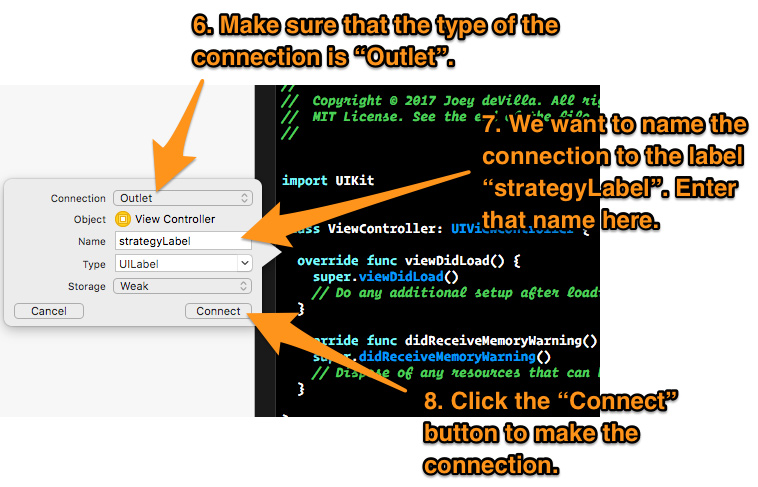
- Control-drag from the label to the underlying code, inside the
ViewController class, just below the line that reads class ViewController: UIViewController, then drop.
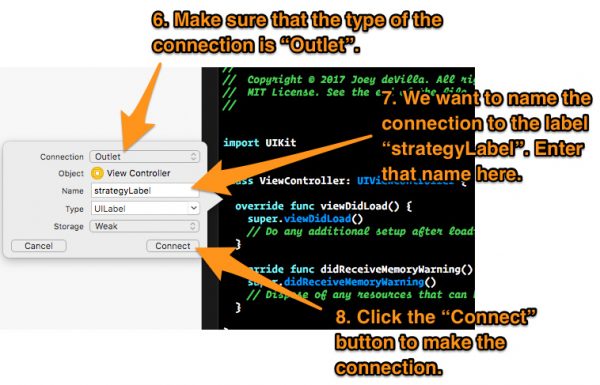
- A pop-up will appear. In it:
- Make sure that the selection in the Connection drop-down list is set to Outlet.
- You”ll need to give the connection a name in the Name text field. Set it to strategyLabel.
- To make the connection, click the Connect button.
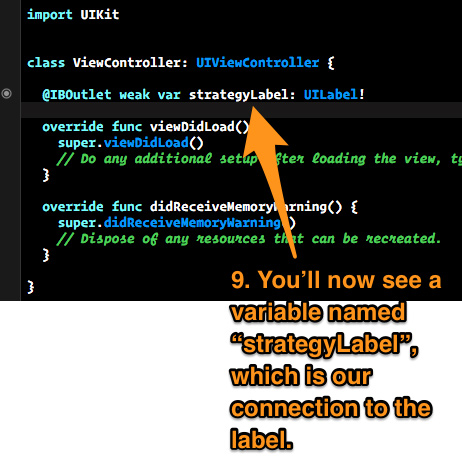
- Xcode will add a new instance variable to the class named
strategyLabel. We’ll use this variable to refer to the label so that we can change its text.
Now it’s time to connect the button.
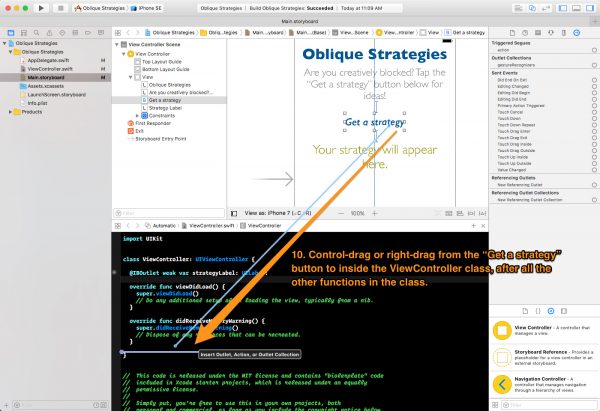
Do the following:
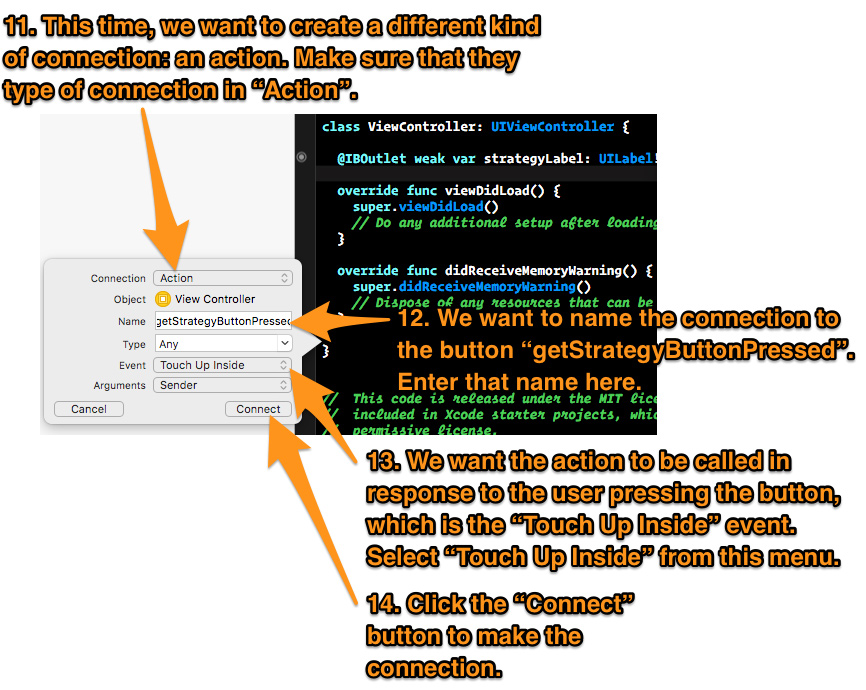
- Control-drag from the button to the underlying code, inside the
ViewController class, after all the other functions in the class, then drop.

A pop-up will appear. In it:
- Make sure that the selection in the Connection drop-down list is set to Action.
- You”ll need to give the connection a name in the Name text field. Set it to getStrategyButtonPressed.
- You’ll need to specify the event that the connection should respond to. Select Touch Up Inside in the Event drop-down menu, which specifies that the event we want to respond to is one where the user presses down on and releases his/her finger while it’s still within the bounds of the button.
- To make the connection, click the Connect button.
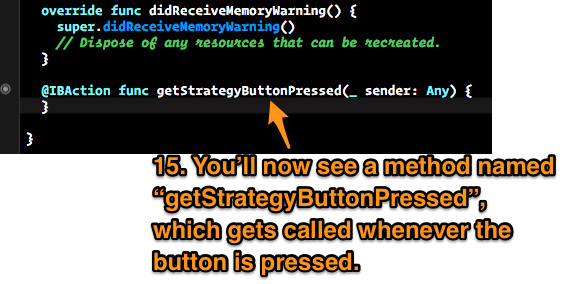
Xcode will add a new empty method to the class named getStrategyButtonPressed. We’ll use this method to carry out actions in response to the button being pressed.
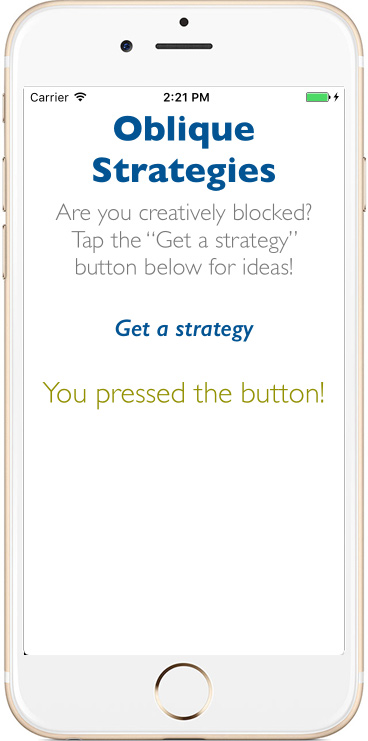
We can test both the button and label connections with a single line of code. Change the contents of the getStrategyButtonPressed method so that it looks like this:
@IBAction func getStrategyButtonPressed(_ sender: Any) {
  strategyLabel.text = "You pressed the button!"
}
Run the app and press the Get a strategy button. The result should look like this:
Let’s code!
Near the top of the class, you should see a declaration that looks like this:
let strategies = [
  "Remove specifics and convert to ambiguities.",
  "Think of the radio.",
  "Don’t be frightened of clichés.",
  "Abandon one stricture.",
  "What is the reality of the situation?",
  "Simple subtraction.",
  "Are there sections? Consider transitions.",
  "Turn it upside down.",
  "Go slowly all the way round the outside.",
  "Remember: a line has two sides.",
  "Two words: Infinitesimal gradations.",
  "Make a list of everything you might do, do last item on list.",
  "Change instrument roles.",
  "Into the impossible.",
  "One word: accretion.",
  "Ask people to work against their better judgement.",
  "Disconnect from desire.",
  "Take away the elements in order of apparent non-importance.",
  "Emphasize repetitions.",
  "Don’t be afraid of things because they’re easy to do.",
  "Is there something missing?",
  "Don't be frightened to display your talents.",
  "Use unqualified people.",
  "Breathe more deeply.",
  "How would you have done it?",
  "Honor thy error as a hidden intention.",
  "Emphasize differences.",
  "Only one element of each kind.",
  "Do nothing for as long as possible.",
  "Bridges. Build? Burn?",
  "One word: water.",
  "You don’t have to be ashamed of using your own ideas.",
  "Make a sudden, destructive unpredictable action; incorporate.",
  "Tidy up.",
  "Consult other sources.",
  "Do the words need changing?",
  "Use an unacceptable color.",
  "Ask your body.",
  "Humanize something free of error.",
  "Use filters.",
  "Balance the consistency principle with the inconsistency principle.",
  "Fill every beat with something.",
  "Discard an axiom.",
  "Listen to the quiet voice.",
  "What wouldn’t you do?",
  "Is it finished?",
  "Decorate, decorate!",
  "Put in earplugs.",
  "Give the game away.",
  "Reverse.",
  "Abandon normal instruments.",
  "Trust in the you of now.",
  "Use fewer notes.",
  "What would your closest friend do?",
  "Repetition is a form of change.",
  "Two words: distorting time.",
  "Give way to your worst impulse.",
  "Make a blank valuable by putting it in an exquisite frame.",
  "The inconsistency principle.",
  "Ghost echoes.",
  "Don't break the silence.",
  "You can only make one dot at a time.",
  "Discover the recipes you are using and abandon them.",
  "Just carry on.",
  "Comrades.",
  "(Organic) machinery.",
  "Courage!",
  "What mistakes did you make last time?",
  "You are an engineer.",
  "Consider different fading systems.",
  "Remove ambiguities and convert to specifics.",
  "Mute and continue.",
  "Look at the order in which you do things.",
  "It is quite possible (after all).",
  "Go outside. Shut the door.",
  "Don't stress one thing more than another.",
  "Do we need holes?",
  "Two words: cluster analysis.",
  "Work at a different speed.",
  "Do something boring.",
  "Look closely at the most embarrassing details and amplify them.",
  "Define an area as ‘safe’ and use it as an anchor.",
  "Mechanicalize something idiosyncratic.",
  "Overtly resist change.",
  "Emphasize the flaws.",
  "Accept advice.",
  "Remember those quiet evenings.",
  "Take a break.",
  "Imagine the music as a moving chain or caterpillar.",
  "Use an old idea.",
  "Imagine the music as a set of disconnected events.",
  "Change nothing and continue with immaculate consistency.",
  "What are you really thinking about just now? Incorporate.",
  "Look at a very small object, look at its center.",
  "Not building a wall, but making a brick.",
  "The most important thing is the thing most easily forgotten.",
  "Always first steps.",
  "Question the heroic approach.",
  "Be extravagant.",
  "State the problem in words as clearly as possible.",
  "Faced with a choice, do both.",
  "Retrace your steps.",
  "Convert a melodic element into a rhythmic element.",
  "Go to an extreme, move back to a more comfortable place.",
  "Once the search is in progress, something will be found.",
  "Only a part, not the whole.",
  "From nothing to more than nothing.",
  "Be less critical more often.",
  "When is it for? Who is it for?",
  "Destroy nothing. Destroy the most important thing.",
  "Take away as much mystery as possible. What’s left?",
  "What most recently impressed you? How is it similar? What can you learn from it? What could you take from it?",
  "First work alone, then work in unusual pairs.",
  "What do you do? Now, what do you do best?",
  "Back up a few steps. What else could you have done?",
  "What were the branch points in the evolution of this entity?",
  "Try faking it.",
  "How would you explain this to your parents?",
  "Who would make this really successful?",
  "What would make this really successful?",
  "Instead of changing the thing, change the world around it.",
  "List the qualities it has. List those you'd like.",
  "What else is this like?",
  "Describe the landscape in which this belongs.",
  "Steal a solution.",
  "Assemble some of the elements in a group and treat the group.",
  "Be dirty.",
  "Lost in useless territory.",
  "Lowest common denominator.",
]
This declaration creates an array of strings named strategies. The array will act as the “deck”, from which a “card” will be randomly selected.
Let’s try displaying the last strategy in the array when the user presses the button. Change getStrategyButtonPressed() to the following:
@IBAction func getStrategyButtonPressed(_ sender: Any) {
  let lastStrategyIndex = strategies.count
  strategyLabel.text = strategies[lastStrategyIndex]
}
If you try to run the app right now, you’ll see something like this:
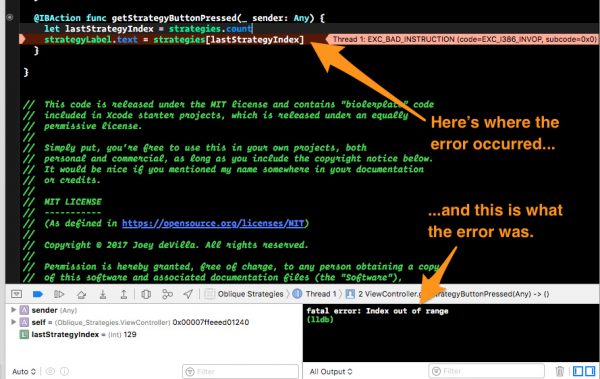
We’ve just encountered what’s called an “off-by-one error”. If there are x items in an array, the index of the last item isn’t x, but x-1, since array indexes start at 0.
The error is easy to fix:
@IBAction func getStrategyButtonPressed(_ sender: Any) {
  let lastStrategyIndex = strategies.count - 1
  strategyLabel.text = strategies[lastStrategyIndex]
}
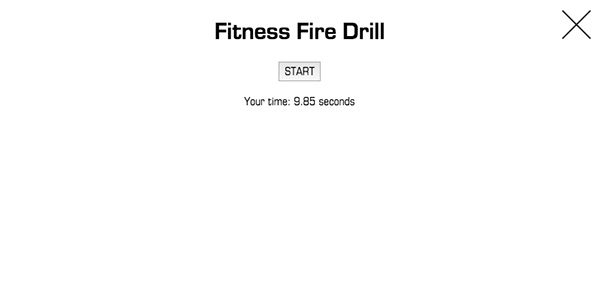
Now try running the app. It should compile this time, and if you press the Get a strategy button, the app responds with the last strategy in the array:

Of course, the app would be rather uninteresting if it displayed the same result all the time. We’ll use a random number generator’s output as a way to pick a strategy from the strategies array.
Swift comes with a number of built-in random number generator functions, but the preferred general-purpose random number generator is arc4random_uniform(). It takes a positive integer n as its sole argument, and returns a pseudo-random positive integer in the range starting at 0 and ending at n – 1.
arc4random_uniform() is a little unwieldy because the argument you’re supposed to pass it is a special kind of integer: UInt32. You’ll need to convert any value you pass to it to that type. The value that arc4random_uniform() returns is also of type UInt32, which you’ll typically have to convert back into plain old Int. If you look at Swift code that uses arc4random_uniform(), you’ll often see something like this:
result = Int(arc4random_uniform(UInt32(upperBound)))
Rather than deal with all that clunkiness, let’s write a function that wraps arc4random_uniform() and frees us from having to do all those type conversions from Int to UInt32 and back again:
func randomNumber(upToButNotIncluding upperBound: Int) -> Int {
  return Int(arc4random_uniform(UInt32(upperBound)))
}
Now update getStrategyButtonPressed() so that it makes use of our new randomNumber() function:
@IBAction func getStrategyButtonPressed(_ sender: Any) {
  let numberOfStrategies = strategies.count
  strategyLabel.text = strategies[randomNumber(upToButNotIncluding: numberOfStrategies)]
}
We can even pare it down to a single line of code and make it even more concise:
@IBAction func getStrategyButtonPressed(_ sender: Any) {
  strategyLabel.text = strategies[randomNumber(upToButNotIncluding: strategies.count)]
}
We now have a properly functioning Oblique Strategies app. Run it, press the Get a strategy button, and see what strategies come up!
Add a “fade in” animation
Let’s give our app a little polish by having the strategy “fade in”. Whenever the user presses the Get a strategy button, we will:
- Set the strategy label’s alpha (opacity) value to 0, making it completely transparent.
- Randomly select a strategy and use it to set the text of the label.
- Animate the label so that its alpha value is brought up to 1 over a period of 3 seconds, making it completely opaque.
Do this by updating getStrategyButtonPressed() so that it looks like this:
@IBAction func getStrategyButtonPressed(_ sender: Any) {
  strategyLabel.alpha = 0
  strategyLabel.text = strategies[randomNumber(upToButNotIncluding: strategies.count)]
  UIView.animate(withDuration: 3.0,
                 animations: {
    self.strategyLabel.alpha = 1
  })
}
Run the app. You should see the strategy fade in when you press the Get a strategy button.
All the code
If you’ve made it to this point, the code in ViewController.swift should look like this:
import UIKit


class ViewController: UIViewController {

  let strategies = [
    "Remove specifics and convert to ambiguities.",
    "Think of the radio.",
    "Don’t be frightened of clichés.",
    "Abandon one stricture.",
    "What is the reality of the situation?",
    "Simple subtraction.",
    "Are there sections? Consider transitions.",
    "Turn it upside down.",
    "Go slowly all the way round the outside.",
    "Remember: a line has two sides.",
    "Two words: Infinitesimal gradations.",
    "Make a list of everything you might do, do last item on list.",
    "Change instrument roles.",
    "Into the impossible.",
    "One word: accretion.",
    "Ask people to work against their better judgement.",
    "Disconnect from desire.",
    "Take away the elements in order of apparent non-importance.",
    "Emphasize repetitions.",
    "Don’t be afraid of things because they’re easy to do.",
    "Is there something missing?",
    "Don't be frightened to display your talents.",
    "Use unqualified people.",
    "Breathe more deeply.",
    "How would you have done it?",
    "Honor thy error as a hidden intention.",
    "Emphasize differences.",
    "Only one element of each kind.",
    "Do nothing for as long as possible.",
    "Bridges. Build? Burn?",
    "One word: water.",
    "You don’t have to be ashamed of using your own ideas.",
    "Make a sudden, destructive unpredictable action; incorporate.",
    "Tidy up.",
    "Consult other sources.",
    "Do the words need changing?",
    "Use an unacceptable color.",
    "Ask your body.",
    "Humanize something free of error.",
    "Use filters.",
    "Balance the consistency principle with the inconsistency principle.",
    "Fill every beat with something.",
    "Discard an axiom.",
    "Listen to the quiet voice.",
    "What wouldn’t you do?",
    "Is it finished?",
    "Decorate, decorate!",
    "Put in earplugs.",
    "Give the game away.",
    "Reverse.",
    "Abandon normal instruments.",
    "Trust in the you of now.",
    "Use fewer notes.",
    "What would your closest friend do?",
    "Repetition is a form of change.",
    "Two words: distorting time.",
    "Give way to your worst impulse.",
    "Make a blank valuable by putting it in an exquisite frame.",
    "The inconsistency principle.",
    "Ghost echoes.",
    "Don't break the silence.",
    "You can only make one dot at a time.",
    "Discover the recipes you are using and abandon them.",
    "Just carry on.",
    "Comrades.",
    "(Organic) machinery.",
    "Courage!",
    "What mistakes did you make last time?",
    "You are an engineer.",
    "Consider different fading systems.",
    "Remove ambiguities and convert to specifics.",
    "Mute and continue.",
    "Look at the order in which you do things.",
    "It is quite possible (after all).",
    "Go outside. Shut the door.",
    "Don't stress one thing more than another.",
    "Do we need holes?",
    "Two words: cluster analysis.",
    "Work at a different speed.",
    "Do something boring.",
    "Look closely at the most embarrassing details and amplify them.",
    "Define an area as ‘safe’ and use it as an anchor.",
    "Mechanicalize something idiosyncratic.",
    "Overtly resist change.",
    "Emphasize the flaws.",
    "Accept advice.",
    "Remember those quiet evenings.",
    "Take a break.",
    "Imagine the music as a moving chain or caterpillar.",
    "Use an old idea.",
    "Imagine the music as a set of disconnected events.",
    "Change nothing and continue with immaculate consistency.",
    "What are you really thinking about just now? Incorporate.",
    "Look at a very small object, look at its center.",
    "Not building a wall, but making a brick.",
    "The most important thing is the thing most easily forgotten.",
    "Always first steps.",
    "Question the heroic approach.",
    "Be extravagant.",
    "State the problem in words as clearly as possible.",
    "Faced with a choice, do both.",
    "Retrace your steps.",
    "Convert a melodic element into a rhythmic element.",
    "Go to an extreme, move back to a more comfortable place.",
    "Once the search is in progress, something will be found.",
    "Only a part, not the whole.",
    "From nothing to more than nothing.",
    "Be less critical more often.",
    "When is it for? Who is it for?",
    "Destroy nothing. Destroy the most important thing.",
    "Take away as much mystery as possible. What’s left?",
    "What most recently impressed you? How is it similar? What can you learn from it? What could you take from it?",
    "First work alone, then work in unusual pairs.",
    "What do you do? Now, what do you do best?",
    "Back up a few steps. What else could you have done?",
    "What were the branch points in the evolution of this entity?",
    "Try faking it.",
    "How would you explain this to your parents?",
    "Who would make this really successful?",
    "What would make this really successful?",
    "Instead of changing the thing, change the world around it.",
    "List the qualities it has. List those you'd like.",
    "What else is this like?",
    "Describe the landscape in which this belongs.",
    "Steal a solution.",
    "Assemble some of the elements in a group and treat the group.",
    "Be dirty.",
    "Lost in useless territory.",
    "Lowest common denominator.",
  ]

  @IBOutlet weak var strategyLabel: UILabel!

  override func viewDidLoad() {
    super.viewDidLoad()
    // Do any additional setup after loading the view, typically from a nib.
  }

  override func didReceiveMemoryWarning() {
    super.didReceiveMemoryWarning()
    // Dispose of any resources that can be recreated.
  }

  @IBAction func getStrategyButtonPressed(_ sender: Any) {
    strategyLabel.alpha = 0
    strategyLabel.text = strategies[randomNumber(upToButNotIncluding: strategies.count)]
    UIView.animate(withDuration: 3.0,
                   animations: {
      self.strategyLabel.alpha = 1
    })
  }

  func randomNumber(upToButNotIncluding upperBound: Int) -> Int {
    return Int(arc4random_uniform(UInt32(upperBound)))
  }

}
In addition to the starter project, I’ve also posted a finished project, which you can download:
Click here to download the starter project.

You can also find this project on my GitHub.
Suggested features and further reading
- Change the responses: A change to the string array at the top of ViewController.swift will change the app into all sorts of things: a random inspiring quote machine, a daily affirmation app, “joke of the day”, the I Ching, suggestions for architects — in the end, your imagination is the limit.
- Try different animations: At the end of this exercise, we added an animation to “fade in” the strategy. You might want to experiment with different animation effects. A good place to learn more about animations in iOS is this tutorial at RayWenderlich.com.
- Reduce repetition: Add a feature that ensures that the user isn’t shown any given response again until s/he’s seen all the other responses first.
- Find out more about Oblique Strategies:
Come learn iOS development at Tampa iOS Meetup!

If you’re in the Tampa area and you’ve always wanted to learn iOS development but needed some help getting started, Tampa iOS Meetup is for you! It’s a regular gathering aimed at people new to iOS development or software development in general where we cover all sorts of programming topics as we build applications together in a casual, fun, hands-on setting. Find out more at the Tampa iOS Meetup page.