Categories
Uncategorized

With Surface Dial and the Touch Bar, the battle for your non-dominant hand is heating up again

surface-dial-and-touch-bar

This week, we’ve had demos of interesting new user interface hardware, most notably Microsoft’s Surface Dial

…and Apple’s Touch Bar:

In many of the demos for both devices:

  • The user’s dominant hand — the one with the better fine motor control — is being used to operate a pointing device, whether it’s a mouse, stylus, or touchscreen for some kind of fine motor control action — typically pointing at, creating, or editing onscreen objects, and
  • The user’s non-dominant hand is used to operate a option-picking device that affects the outcome of what s/he is doing with his/her dominant hand.

The UI tech for our dominant hands caught on quickly, making the transition from obscure device found only in super-advanced computing labs to a tool common enough to be part of a now-legendary gag in a popular movie in less than two decades…

…but our non-dominant hands have stayed empty for the most part, as no clear winners have emerged. Tools like the Surface Dial and Touch Bar may represent a new movement to bring our non-dominant hands back into the computing game.

It’s kind of odd to think that our non-dominant hands have little to do at our computers, when the demo that introduced to the mouse to an unsuspecting world actually featured an equally unusual device for our non-dominant hands.

mother-of-all-demos-chorded-keyboard-keyboard-mouse

Doug Englebart’s console from “The Mother of All Demos”, which was given on December 9, 1968. From left to right, the input devices are: chorded keyboard, standard keyboard, and the then-newfangled mouse.

On December 9, 1968, computer engineer Doug Englebart gave a presentation of a combined hardware/software system called oN-Line System, or NLS for short at the ACM/IEEE Fall Joint Computer Conference in San Francisco. In this now-legendary presentation — since dubbed “The Mother of All Demos” — he demonstrated so many computing innovations that we take for granted today, including windowed GUIs, hypertext, networking, and most famously, the mouse:

There was one innovation in the Mother of All Demos that didn’t catch on, and it was under Englebart’s left hand:

chorded-keyboard

It was the keyset, a chorded keyboard. Pressing a single key would generate a character or command, and pressing combinations of keys — like playing chords on a piano — would generate different characters or commands. With 5 keys and 2 states per key, the keyset allowed for the input of 31 different characters or commands (5 keys and 2 states actually allows for 32 combinations, but one of them is where no keys are pressed):

The keyset didn’t catch on, probably because it required you to memorize what each chording combination did. The Surface Dial and Touch Bar get around this by providing a context-sensitive visual guide — Surface Dial does this by providing you with a pie menu (a.k.a. radial menu), and the Touch Bar is a tiny touchscreen that gives you the context-appropriate virtual buttons and sliders.

Right now, the closest thing we have to non-dominant hand interface that’s used by a significant number of people is the W-A-S-D set of keys for games with a first-person-type perspective:

wasd-keyboard

Clean your keyboards every now and then. Please.

I expect (and hope) that our non-dominant hands are in for an interesting time over the next little while.

Watch the Mother of All Demos

If you’ve never seen Doug Englebart give the Mother of All Demos — or if you haven’t seen it in a while — watch it, keeping in mind that at the time, a lot of people were still interacting with computers by feeding punch cards into them!

Categories
Uncategorized

No escape: The new MacBook Pro in the leaked photos apparently doesn’t have an “esc” key

alleged-2016-macbook-pro
If you’re a regular reader of this blog, chances are that you’ve heard about and even seen the leaked photos that purport to show the new MacBook Pro that is expected to be announced on their Thursday, October 27th event. MacRumors has posted these photos, which show the inclusion of a touch-sensitive, fingerprint-reading OLED display where the function keys would normally go.

Here’s the same photo, zoomed in at the upper left-hand corner of the keyboard. Note that the esc key is missing:

alleged-2016-macbook-pro-keyboard

For the purposes of comparison, here’s a photo of the upper left-hand part of the keyboard on my work-issued machine, a mid-2015 MacBook Pro. Along with function keys, it has the esc key:

2015-macbook-pro-keyboard

The esc key generates the “escape character” — ASCII 27 in decimal, Unicode U+001B, equivalent to ctrl[ — and was meant to be a “cancel” or “stop operations” signal, or to mark the beginning of an escape sequence to specify that incoming characters should be interpreted as instructions rather than data. A number of Mac applications use the esc key as a “cancel” or “stop operations” signal, but according to Mac OS’ UX guidelines, the official key sequence for stopping operations is command. (command-period).

Most users will likely not miss the esc key, but there is one set of users for whom its removal could be a big problem…

vim-user

…vi/vim users. In vi and vim, the esc key gets you into command mode. Yes, there’s still ctrl[, but it’s not the same as having a single, dedicated key located at the uppermost, leftmost part of the keyboard.

Expect to hear some angry developers this week.

Categories
Uncategorized

Last Friday’s IoT botnet attack and internet outages, explained for non-techies

dns-attack-map

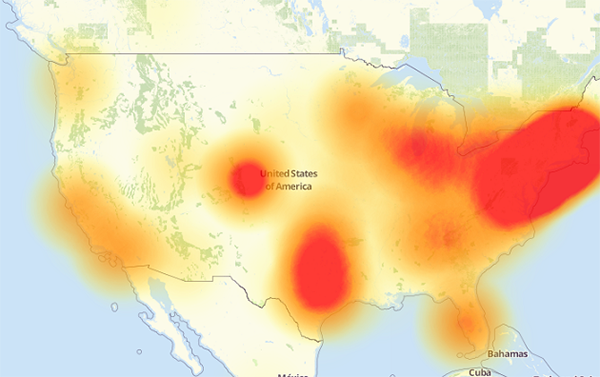
A map of the parts of the internet affected by Friday’s attack. The redder an area is, the more heavily it was affected.

If you’ve been reading about the cyberattack that took place last Friday and are confused by the jargon and technobabble, this primer was written for you! By the end of this article, you’ll have a better understanding of what happened, what caused it, and what can be done to prevent similar problems in the future.

coffee-cup

While I’ve gone to great lengths to make this article easily understood by non-techies, it’s still a little long because of all the material that has to be covered. Feel free to grab your favorite beverage before settling in to read it!

Before I explain the attack, let’s cover some terminology. It’ll make it easier to understand what happened…

What’s DNS?

phone-book

DNS is short for Domain Name Service. It translates domain names — names like google.com, slideshare.net, wikipedia.org, and so on — into their corresponding IP (internet protocol) addresses, each of which is a set of numbers that specifies a computer connected to the internet. Every computer and device connected to the internet has a unique IP address assigned to it; without an IP address, there’s no way it can send or receive information to and from the internet.

DNS is often described as “the phone book of the internet”: just as old-school phone books like the one in the photo above were used to look up the phone number corresponding to a given name, DNS is used to look up the IP address numbers corresponding to a given domain name. As you might have deduced, DNS is a key part of internet infrastructure; without it, connecting to anything on the internet is much, much harder.

If you’d like a more in-depth (but still non-techie-friendly) explanation of DNS, I recommend reading George Flanagin’s DNS Explained So You Can Understand.

What’s a denial-of-service attack?

crowd-at-door

A denial-of-service attack — often called by its short form, a “DoS attack” — is an attempt to make a network resource, such as a web site or service, unavailable to its intended users. This is typically done by having computers bombard a site or service with superfluous or nonsense requests so that its ability to fulfill real requests is either reduced or eliminated. Wikipedia has a good analogy for DoS attacks: “It is analogous to a group of people crowding the entry door or gate to a shop or business, and not letting legitimate parties enter into the shop or business, disrupting normal operations.”

You may often seen the term “Dos” with an extra D: “DDos”. That’s short for distributed denial-of-service attack, which is a denial-of-service attack being performed by a large number of computers, often spread throughout the globe. These days, most denial-of-service attacks are distributed ones, and DoS and DDoS attacks are pretty much the same thing.

If you’d like to learn more about Dos/DDoS attacks, Digital Attack Map’s Undertsanding DDOS page is a layperson-friendly starting point.

What’s Dyn, and what do they do?

dyn-logo

Dyn is a company that provides sells all sorts of internet infrastructure services including DNS, which was the first service they provided.

The “Phone book of the internet” analogy is a very big simplification of how DNS actually works. The task of resolving domain names into IP addresses is actually carried out by a large number of internet-connected computers. When you connect to the internet at home or in a small office, chances are you’re using the DNS provided by your internet service provider for free as part of the service.

There are times when the DNS provided by an internet service provider won’t cut it, and that’s where third-party DNS services come in handy. Some home internet service providers run DNS servers that are slow or unreliable; I once had a home provider that gave me great bandwidth but terrible DNS. In such cases, you can switch to the free DNS provided by Google by changing your computer’s network settings. There’s also the case of popular sites and online services that get lots of traffic — the numbers of people trying to connect to them online are so large that they need to make use of commercial DNS, which is designed for high throughput and reliability. Dyn provides such a service to businesses that deal with large volumes of internet traffic, including Twitter, Zappos, and Etsy.

There are a number of reasons to use third-party DNS instead of the service provided by your internet service provider. Digital Citizen lists them in their article, 6 reasons why you should use third-party public DNS servers.

What’s the internet of things?

nest-iot-devices

The “internet of things” — often shortened to IoT — is a catch-all term that we use to describe everything that we don’t usually think of as a computer that is connected to the internet. A “smart thermostat” that lets you use an app to adjust the temperature in your house while you’re on your way home is an IoT device. So is a home security system that you can activate remotely and notifies you of break-ins even when you’re on the other side of the world. So are internet-enabled security cameras that let you keep an eye on your home and pets through a web site while you’re at the office.

The things in the internet of things are typically connected to the internet as one or both of the following:

  • As a sensor, providing some kind of measurement data, such as temperature, speed, signals from an RFID chip or tag, pressure, sounds picked up by a microphone, sights caught by a camera, and so on. These devices have sensors that can take real-world measurements and turn them into digital data that can then be transmitted on the internet.
  • As a computer, performing some number-crunching and causing some action to be taken, with some examples being: turning on the air conditioning or heating, rotating a camera in a certain direction, and unlocking or locking a door. These devices have small computers — some of which have power that rivals desktop computers from only a few years ago — embedded in them.

A number of internet of things devices connect to the internet as both sensor and computer. For example, a smart thermostat functions as a sensor when getting the temperature of the room, and as a computer when turning on cooling or heating to reach a desired temperature. A smart camera functions as a sensor when taking video, and as a computer when changing its focus or direction.

IBM’s video, How It Works: Internet of Things, is a good primer on the internet of things and some of its practical applications.

What’s a botnet?

droid-army

A botnet — the term is a combination of “robot” and “network” — is a collection of internet-connected computers networked together and using their spare processing power and network bandwidth to perform some kind of coordinated (and usually malicious) action. The computers on a botnet are usually commandeered without the approval or knowledge of their owners.

  • On desktop and laptop computers (as well as some less-secure mobile devices), this is typically done by tricking the user into installing malware without his or her knowledge, which lets the botnet controller use any spare processing power and network bandwidth that the computer’s owner isn’t using.
  • On IoT devices, it’s often done by taking over their embedded computers. Many of these devices have a built-in account with easy-to-guess or easy-to-find usernames and passwords that grants full control over them. There’s malware called Mirai and Bashlight that scans the internet for these easily-compromised devices and uses these accounts to take them over.

Once you have a botnet, you can harness its power to do all sorts of unsavory things. Two of the most popular uses for botnets are sending spam and launching denial-of-service attacks.

For more on botnets, see How-To Geek’s article, What is a botnet?

Okay, you just defined five technical things. Now can you tell me what happened to the internet on Friday, October 21, 2016?

Hackread’s animation of what happened last Friday. Click the image to see the source.

Here’s what happened, using all the terminology we just covered:

On Friday, October 21, 2016 at around 6:00 a.m. EDT, a botnet made up of what could be up to tens of millions of machines — a large number of which were IoT devices — mounted a denial-of-service attack on Dyn, disrupting DNS over a large part of the internet in the U.S.. This in turn led to a large internet outage on the U.S. east coast, slowing down the internet for many users and rendered a number of big sites inaccessible, including Amazon, Netflix, Reddit, Spotify, Tumblr, and Twitter.

Flashpoint, a firm that detects and mitigates online threats, was the first to announce that the attack was carried out by a botnet of compromised IoT devices controlled by Mirai malware. Dyn later corroborated Flashpoint’s claim, stating that their servers were under attack from devices located at millions of IP addresses.

The animation above is a visualization of the attack based on the devices’ IP addresses and IP geolocation (a means of approximating the geographic location of an IP address; for more, see this explanation on Stack Overflow). Note that the majority of the devices were at IP addresses (and therefore, geographic locations) outside the United States.

What’s “Mirai” all about?

anna-senpai

The anime character “Anna-Senpai”, a.k.a. Anna Nishikinomiya. Yes, this is where it gets a little weird.

As I mentioned earlier, Mirai is the name of the malware that was used to seize control of poorly-secured IoT devices and coordinate them into Friday’s attack. It propagates itself by continuously searching the internet for IoT systems that can be taken over by logging into them with the built-in default or hard-wired usernames and passwords.

Friday’s attack isn’t the first Mirai attack to make the news. In September, internet security journalist Brian Krebs’ Krebs on Security site was targeted by a Mirai botnet in an attack powerful enough to affect the Akamai content distribution network (that’s no mean feat — take a look at their customers to get an idea of the amount of data they can distribute through the internet). The attack on Krebs’ site was likely in retaliation for his series of articles on the takedown of vDOS, a DoS-for-hire business (yes, there’s a business model for denial-of-service attacks). The publication of these articles coincided with the arrest of two men that Krebs named as vDOS’s founders.

On Friday, September 30th, someone going by the name of and using the image of “Anna-Senpai” (a character from the Japanese comic book and animated series Shimoneta: A Boring World Where the Concept of Dirty Jokes Don’t Exist — I told you it would get a little weird, didn’t I?) posted the source code of Mirai to Hackforums, an online discussion board where people who like to break into and disrupt other people’s computers hang out. Anna-Senpai released the source code as part of an announcement that s/he was getting out of the DoS-for-hire business, as s/he was under growing scrutiny from people in the internet security business (and likely law enforcement as well). Here’s what s/he wrote:

“When I first go in DDoS industry, I wasn’t planning on staying in it long. I made my money, there’s lots of eyes looking at IOT now, so it’s time to GTFO.” [Here’s the Urban Dictionary definition of GTFO, in case you need it. Be advised that the “F” in GTFO is a swear word.]

In continuation with the anime-fan theme, “Mirai” is a less-common Japanese girl’s name. It means “future”.

Krebs has a good guess as to why Anna-Senpai released the code into the wild:

It’s an open question why anna-senpai released the source code for Mirai, but it’s unlikely to have been an altruistic gesture: Miscreants who develop malicious software often dump their source code publicly when law enforcement investigators and security firms start sniffing around a little too close to home. Publishing the code online for all to see and download ensures that the code’s original authors aren’t the only ones found possessing it if and when the authorities come knocking with search warrants.

The publication of Mirai’s source code will likely have the following short- and long-term effects:

  • In the short term, it will enable a number of reasonably tech-savvy, socially-maladjusted people to launch their own attacks, including the one we saw on Friday. This will also hinder attempts by law enforcement to find the parties responsible for creating Mirai and using it.
  • In the long term, it will help prevent future attacks based on Mirai’s approach. Internet security professionals are already studying the code in an attempt to find ways to counter it.

What are these poorly-secured IoT devices?
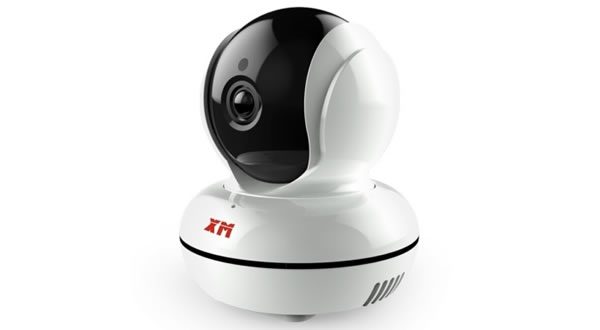
xiongmai-camera

Brian Krebs has been working overtime recently, and covered this topic well in an article titled Who Make the IoT Things Under Attack? This is where the publication of Mirai’s source code turned out to be a good thing; it contains the usernames and passcodes it used to access poorly-secured IoT devices. By matching these to the known factory default settings of IoT devices, it was possible to determine which makes and models of IoT devices were compromised.

Krebs published a list of compromised IoT devices, including the usernames and passwords used by Mirai to gain unauthorized access to them. Many of these passwords are so laughably bad that your email service or online banking wouldn’t allow you to use them, and in one case — the Vivtoek IP camera — there’s no password at all.

A number of these username/password combinations are for maintenance purposes and hard-wired into the devices; they cannot be changed by their users. Imagine manufacturing hundreds of thousands, or even millions, of cars or door locks that can all be opened with the same, easily-copied key. That’s pretty much what these manufacturers have done.

Chinese technology manufacturer Hangzhou Xiongmai Technology (who often refer to themselves as “XM”) have admitted that some of their products, which include webcams, digital video recorders, and white-label components used by other device vendors were partially responsible for Friday’s attack. At the time of writing, their response has been to recall a pitifully small number (10,000) of their webcams, and to threaten legal action against anyone who they say tarnishes their brand.

What can you do?

If you’re reading this, it’s quite likely that you’re based in North America. Given that most of the attacks came from outside North America and originated on devices that aren’t common in North America, it’s unlikely that any of your devices were part of Friday’s botnet attack. However, it doesn’t mean that they could be used in future attacks.

As individuals, the best thing we can do is secure our home routers. They act as the gateway that our devices at home use to reach the internet, and they’re the first, best place to take security measures. You’ll need to access your router’s settings (these are different for various makes and models, so you’ll have to consult the manual) and perform these steps:

  1. Change the administrative password for your router. By “administrative password”, I mean the password used to access the settings for the router, not the password to get on the wifi network. Mirai works by logging into devices using default usernames and passwords, so make sure you’re not using the default password!
  2. Disable remote management, especially remote management through telnet. Telnet is a protocol that lets one computer remotely control another, and for most non-techie users, it isn’t useful. Disabling remote management and telnet cuts off one of Mirai’s avenues to the devices on your home network.
  3. Disable Universal Plug-and-Play (also known as UPnP). It’s a protocol designed for devices on home networks to find and communicate with each other, and most routers have it enabled by default. It is a big security hole that malware like Mirai can exploit, and disabling it is unlikely to make any difference in the way you use your devices at home.

If your router is more than a few years old, get a new one. This is even more important if you’ve been using your current one without a password or the default one. You may find that in addition to being more secure, it’s also faster.

If you’re using the default password on any device, change it now! Once again, part of Mirai’s effectiveness is based on our laziness — it counts on people not changing the default passwords on their devices to gain access to them without permission.

What else can be done, part 1: We all have to stop being so damned cheap

cheapskate

Buying things based primarily on price only starts a race to the bottom, and this is doubly true for the internet of things. Adding sensors, computers, and networking capability to things naturally makes those things more expensive. Vendors and manufacturers who compete primarily on price love to cut corners, and quality — which includes security — often gets cut with them.

As customers, we need to stop buying based just on price, and as vendors and manufacturers, we have to stop using price and start using quality as our main differentiator (and this means taking security very seriously, and not treating it as an afterthought). This is a chicken-and-egg problem, but it’s one we must solve in order to prevent the internet of things’ downward slide.

What else can be done, part 2: It may require law enforcement and governments to step in

law

In the rather libertarian world of technology, suggesting the increased involvement of law and government in our sphere may be anathema, but it might be the best alternative. Techies’ preferred approach is to let the free market solve problems, but security guru Bruce Schneier explains why it might not work in this case, because the incentives that usually drive free market corrections aren’t there:

The market can’t fix this because neither the buyer nor the seller cares. Think of all the CCTV cameras and DVRs used in the attack against Brian Krebs. The owners of those devices don’t care. Their devices were cheap to buy, they still work, and they don’t even know Brian. The sellers of those devices don’t care: they’re now selling newer and better models, and the original buyers only cared about price and features. There is no market solution because the insecurity is what economists call an externality: it’s an effect of the purchasing decision that affects other people. Think of it kind of like invisible pollution.

What this all means is that the IoT will remain insecure unless government steps in and fixes the problem. When we have market failures, government is the only solution. The government could impose security regulations on IoT manufacturers, forcing them to make their devices secure even though their customers don’t care. They could impose liabilities on manufacturers, allowing people like Brian Krebs to sue them. Any of these would raise the cost of insecurity and give companies incentives to spend money making their devices secure.

What else can be done, part 3: Internet service providers need to get better at detecting and mitigating these attacks

submarine-cable-map

A map of the world’s submarine cables. Click to see the source.

In a world that is increasingly dependent on computers, devices, and networking, internet service providers can’t be content to simply shuttle bits around. They may need to consider examining the kind of traffic they allow through them, and we’ll all need to consider what kind of impact this move would have on security, privacy, and the principle of network neutrality.

Categories
Uncategorized

Swift 3 text field magic, part 3: Creating text fields that ban a specific set of characters

creating-text-fields-that-ban-specified-characters

So far, in this series of articles, we’ve created classes that extend the capabilities of iOS’ default text fields so that they can:

These limits can be set in both Interface Builder and code.

In this article, we’ll create a new text field: one that doesn’t allow a specified set of characters to be entered into it. You may want to read the first two articles in this series, as this article builds their material.

The MaxLengthTextField class, in review

In the first article in this series, we created a subclass of UITextField called MaxLengthTextField. MaxLengthTextField added one additional ability to UITextField: the ability to limit the number of characters that could be entered into it. Here’s its code:

import UIKit


// 1
class MaxLengthTextField: UITextField, UITextFieldDelegate {
  
  // 2
  private var characterLimit: Int?
  
  
  // 3
  required init?(coder aDecoder: NSCoder) {
    super.init(coder: aDecoder)
    delegate = self
  }
  
  // 4
  @IBInspectable var maxLength: Int {
    get {
      guard let length = characterLimit else {
        return Int.max
      }
      return length
    }
    set {
      characterLimit = newValue
    }
  }

  // 5  
  func textField(_ textField: UITextField, shouldChangeCharactersIn range: NSRange, replacementString string: String) -> Bool {

    // 6    
    guard string.characters.count > 0 else {
      return true
    }
    
    // 7
    let currentText = textField.text ?? ""
    // 8
    let prospectiveText = (currentText as NSString).replacingCharacters(in: range, with: string)
    // 9
    return allowedIntoTextField(text: prospectiveText)
  }
  
  func allowedIntoTextField(text: String) -> Bool {
    return text.characters.count <= maxLength
  }
  
}

Here’s what’s happening in MaxLengthTextField — these notes go with the numbered comments:

  1. In order to create a text field with the ability to set a maximum length, we’re defining a new class — MaxLengthTextField — as a subclass of UITextField, which gives it all the properties and behaviors of a UITextField. We also specify thatMaxLengthTextField adopts the UITextFieldDelegate protocol, which allows us to manage changes to the content of our new text fields. We’ll need this in order to set a limit on how much text will be allowed inside the text field.
  2. characterLimit will hold the maximum number of characters that can be entered into the text field. It’s defined as an Int? since its value may or may not be defined, and defined as private since its value will be get and set using themaxLength property.
  3. In the initializer, we specify that MaxLengthTextField will define its ownUITextFieldDelegate protocol methods. We’ll make use of one of these protocol methods later on to ensure that the text field doesn’t accept any more than the specified maximum number of characters.
  4. The @IBInspectable attribute makes the maxLength property editable from within Interface Builder’s Attribute Inspector.
  5. The actual functionality of MaxLengthTextField is contained within textField(_:shouldChangeCharactersIn:replacementString:), one of the methods made available by adopting the UITextFieldDelegate protocol. This method is called whenever user actions change the text field’s content, and itsBool return value specifies if the text change should actually change place. We’ll use this method to limit the number of characters that can be entered into the text field — if user changes would cause the number of characters in the text field to exceed characterLimit, it returns false; otherwise, it returns true.
  6. Get to know and love the guard statement and the “early return” style of programming; you’re going to see a lot of it in a lot of Swift coding. Here, we’re using guard to filter out cases where the user’s changes are of zero length, which means that characters aren’t being added, but deleted. In this case, we don’t have to see if the user’s changes will cause the text field to exceed its set maximum number of characters. We do want the method to return true in order to allow the user’s deletions to take place.
  7. If we’ve reached this point of the method, it means that the user has made additions to the text field. We should see if these changes would cause the text field to contain more than characterLimit characters. The first step in this process is getting the text currently in the text field. We use the nil coalescing operator?? — to assign the contents of the text field if they are not nil, or the empty string if they are nil.
  8. Now that we have the current text, we’ll determine the prospective text — the text that would result if the changes were accepted.
  9. Finally, we use the the length of the prospective text to decide whether to allow the changes or not. We’ve factored this logic into its own method because we expect to create subclasses to override it.

The AllowedCharsTextField class, in review

In the second article in this series, we built of MaxLengthTextField and subclassed it to create AllowedCharsTextField. AllowedCharsTextField adds the ability to limit the characters that can be entered into it to only those in a specified string. Here’s its code:

import UIKit
import Foundation


class AllowedCharsTextField: MaxLengthTextField {
  
  // 1
  @IBInspectable var allowedChars: String = ""
  
  
  required init?(coder aDecoder: NSCoder) {
    super.init(coder: aDecoder)
    delegate = self
    // 2
    autocorrectionType = .no
  }
  
  // 3
  override func allowedIntoTextField(text: String) -> Bool {
    return super.allowedIntoTextField(text: text) &&
           text.containsOnlyCharactersIn(matchCharacters: allowedChars)
  }
  
}


// 4
private extension String {
  
  // Returns true if the string contains only characters found in matchCharacters.
  func containsOnlyCharactersIn(matchCharacters: String) -> Bool {
    let disallowedCharacterSet = CharacterSet(charactersIn: matchCharacters).inverted
    return self.rangeOfCharacter(from: disallowedCharacterSet) == nil
  }

}

Here’s what’s happening in AllowedCharsTextField — these notes go with the numbered comments:

  1. The instance variable allowedChars contains a string specifying the characters that will be allowed into the text field. If a character does not appear within this string, the user will not be able to enter it into the text field. This instance variable is marked with the @IBInspectable attribute, which means that its value can be read and set from within Interface Builder.
  2. We disable autocorrect for the text field, because it may try to suggest words that contain characters that we won’t allow into it.
  3. Overriding MaxLengthTextField‘s allowedIntoTextField method lets us add additional criteria to our new text field type. This method limits the text field to a set maximum number of characters and to characters specified inallowedChars.
  4. We extend the String class to include a new method,containsOnlyCharactersIn(_:), which returns true if the string contains only characters within the given reference string. We use the private keyword to limit this access to this new String method to this file for the time being.

Let’s make BannedCharsTextField

BannedCharsTextField is a slight variation on AllowedCharsTextField. Here’s its code:

import UIKit


class BannedCharsTextField: MaxLengthTextField {
  
  @IBInspectable var bannedChars: String = ""
  
  
  required init?(coder aDecoder: NSCoder) {
    super.init(coder: aDecoder)
    delegate = self
    autocorrectionType = .no
  }

  override func allowedIntoTextField(text: String) -> Bool {
    return super.allowedIntoTextField(text: text) &&
           text.doesNotContainCharactersIn(matchCharacters: bannedChars)
  }
  
}


private extension String {
  
  // Returns true if the string contains no characters in common with matchCharacters.
  func doesNotContainCharactersIn(matchCharacters: String) -> Bool {
    let disallowedCharacterSet = CharacterSet(charactersIn: matchCharacters)
    return self.rangeOfCharacter(from: disallowedCharacterSet) == nil
  }
  
}

The differences between BannedCharsTextField and AllowedCharsTextField are:

  • We store a string containing the characters that we want to ban from being entered into the text field in an instance variable called bannedChars.
  • The allowedIntoTextField method calls a String extension method called doesNotContainCharactersIn, which returns true if the string doesn’t any of the banned characters.

Using BannedCharsTextField

Using BannedCharsTextField within storyboards is pretty simple. First, use a standard text field and place it on the view. Once you’ve done that, you can change it into an BannedCharsTextField by changing its class in the Identity Inspector (the inspector with the identity-inspector icon):

bannedcharstextfield-custom-class

If you switch to the Attributes Inspector (the inspector with the attributes inspector icon icon), you’ll be able to edit the text field’s Allowed Chars and Max Length properties:

bannedcharstextfield-attributes-inspector

If you prefer, you can also set BannedCharsTextField‘s properties in code:

// myNextTextField is an instance of BannedCharsTextField
myNewTextField.bannedChars = "AEIOUaeiou" // No vowels allowed!
myNewTextField.maxLength = 7

A sample project showing MaxLengthTextFieldAllowedCharsTextField, and BannedCharsTextField in action

app

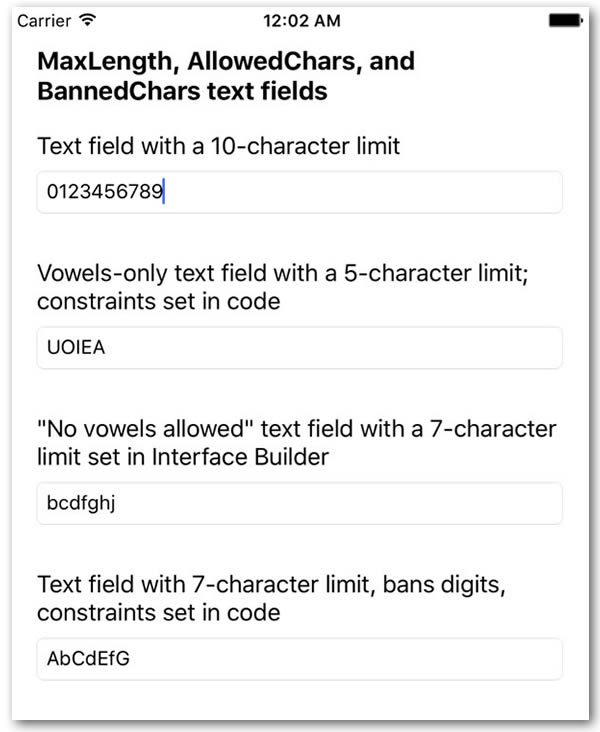
If you’d like to try out the code from this article, I’ve created a project named Swift 3 Text Field Magic 3 (pictured above), which shows both MaxLengthTextField andAllowedCharsTextField in action. It’s a simple app that presents 3 text fields:

  1. A MaxLengthTextField with a 10-character limit.
  2. An AllowedCharsTextField text field with a 5-character maximum length that accepts only upper- and lower-case vowels. Its Max Length and Allowed Chars properties were set in Interface Builder.
  3. BannedCharsTextField text field with a 7-character maximum length that doesn’t allow vowels to be entered into it. Its Max Length and Allowed Chars properties were set in Interface Builder.
  4. BannedCharsTextField text field with a 7-character maximum length that doesn’t allow digits to be entered into it. Its maxLength and allowedChars properties were set in code.

Try it out, see how it works, and use the code in your own projects!

xcode download

You can download the project files for this article (67KB zipped) here.

Coming up next in this series…

In the next installment in this series, we’ll build a text field that accepts only valid numerical values.

Categories
Uncategorized

Tools of my new trade (or: My sweet, sweet SMARTRAC-assigned gear)

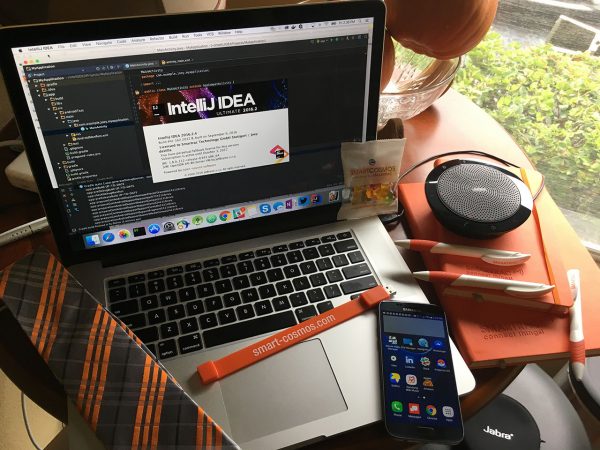
15-inch MacBook Pro, Samsung Galaxy S7, Jabra speakerphone, and other goodies assigned to me by SMARTRAC.

I’m working on my kitchen table because I’ve got people in the house installing a brand new air conditioner. You need one in Florida.

Today marks the end of my first week at SMARTRAC as their Technology and Developer Evangelist. Those of you who follow this blog and my social media feeds probably know that I’ve spent most of this week in Fletcher, North Carolina (it’s just outside Asheville), where SMARTRAC has one of its U.S. offices, as well as one of its RFID tag-manufacturing factories.

Although a lot of my work will be done from my home office in Accordion Bay (a.k.a. Tampa), I traveled to Fletcher for a number of reasons:

  • To have some serious face time with Product Manager Jason Rusk and Portfolio Architect Robert van Voorhees and get up to speed on SMARTRAC, the SMART COSMOS IoT platform, and our plans for evangelizing,
  • to get a tour of the factory and see how RFID tags are made, from raw materials to finished product,
  • and to get my grubby paws on the sweet, sweet, sweeeeeet gear that they assigned to me (pictured above).

I didn’t even know that I was getting assigned anything until I toured the factory on Tuesday morning. Here’s a pretty accurate rendition of my reaction:

In order to help me do my job, I have been assigned the following:

  • 2015 15″ MacBook Pro with maxed-out RAM, suitable for coding and creative work
  • IntelliJ IDEA Ultimate and Adobe Creative Cloud, which will come in extremely handy with the evangelizing (and we’ll add the new version of Camtasia to the mix once it’s released)
  • Samsung Galaxy S7 (no, not the exploding one) because I’ll be on the road often
  • Jabra Speak 510 speakerphone module because I’ll be on conference calls often
  • Graph-ruled hardcover notebooks
  • Pens in company colors
  • A whole lotta USB keys that you can wear as wristbands
  • A pile of NFC and other RFID tags
  • SMART COSMOS-branded gummi bears, because why not?
  • A SMARTRAC tie in company colors. Those of you who attended Microsoft TechDays Canada’s conferences back during my time there know that I can pull off orange:

Me, circa 2009. And yes, since I was in Canada, I used the Canadian spelling: favourite

It’s a very promising sign that SMARTRAC gives their employees not just the tools they need to get their jobs done, but such very nice versions of those tools. In a world where many businesses see employees only as necessary evils and expenses, it’s heartening to see that there are still companies out there that invest in their people.

What comes next is the reason I was assigned all this stuff: to help customers understand the technology and platform that we’re building, and to help systems integrators and developers make the most of it. I know that what I’m saying sounds all hand-wavey and amorphous right now, but keep an eye on this blog — there’s going to be a lot of very, very interesting new stuff on it over the coming weeks and months!

Categories
Uncategorized

How to rescue a princess in 8 programming languages

Two of the jokes from the 'Git the Princess! How to save the princess using 8 programming languages' comic.

This is an excerpt. Click the comic to see the full version.

Just in time for Hump Day comes Git the Princess! How to save the princess using 8 programming languages, a comic that pokes fun at JavaScript, C, C#, Java, Lisp, Go, Pascal, and (of course) PHP.

The comic is yet another variation on the “If programming languages were $THING joke, such as “If programming languages were vehicles”, which goes all the way back to the days when all the interesting stuff happened on USENET.

The comic is the creation of the dev team at Toggl, the time tracking tool. Come to think of it, since I’m contract-to-hire at my new job for the next six months, I should sign up for an account.

Categories
Uncategorized

End of an era: BlackBerry no longer making its phones

losing-the-signal

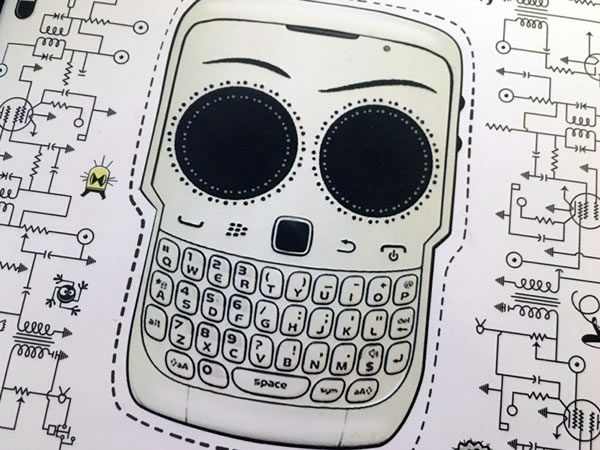
Close-up of J. Scott Paul’s cover design for the Canadian edition of Losing the Signal: The Spectacular Rise and Fall of BlackBerry, written by Jacquie McNish and my schoolmate from Crazy Go Nuts University, Sean Silcoff.

BlackBerry CEO John Chen’s statement today marks the end of an era: “The company plans to end all internal hardware development and will outsource that function to partners.”

With revenues in the second quarter of 2016 falling by nearly a third and its recent pivot to Android failing to boost sales, there was no choice but to follow through on the promise to leave the handset business if they couldn’t make it profitable.

alcatel-idol-4-blackberry-dtek50

The same phone: Alcatel’s Idol 4 and BlackBerry’s DTEK50.

The departure from hardware isn’t unexpected. Analysts have been predicting that BlackBerry would switch to software for some time, and its most recent device are other vendors’ hardware with BlackBerry branding (the DTEK50 is an Alcatel Idol 4, and leaked photos suggest that the DTEK60 is the Idol 4S). There’s also the matter of Chen being less than enthusiastic about the company’s hardware business, from his focus on the software side of BlackBerry, to outsourcing manufacturing to several Taiwanese companies, to this “I don’t really use the thing” demo of the Priv from last September:

“We are reaching an inflection point with our strategy,” says Chen. “Our financial foundation is strong, and our pivot to software is taking hold.” The sea change may keep the company alive, but it’ll be a far different entity than the industry-defining behemoth it once was.