In the previous article in this series, we added a long-missing feature to iOS text fields: the ability to limit them to a maximum number of characters, specifying this limit using either Interface Builder or in code. In this article, we’ll add an additional capability to our improved text field: the ability to allow only specified characters to be entered into them.
MaxLengthTextField: A quick review
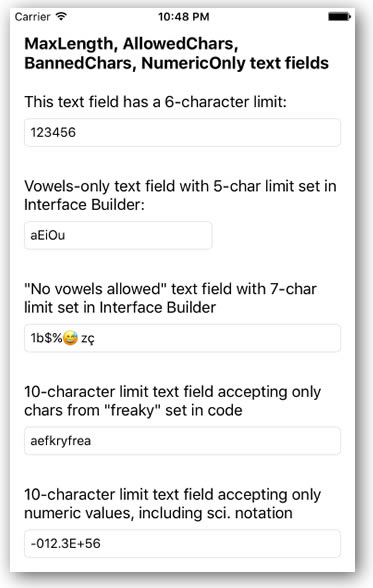
A screen shot of the example app demonstrating our improved text field class, MaxLengthTextField, in action. Download the project files for the app.
In the previous article, we subclassed the standard iOS text field, UITextField, to create a new class called MaxLengthTextField. MaxLengthTextField uses the following to give it the ability to limit itself to a set maximum number of characters:
- It adopts the
UITextFieldDelegate protocol, giving it access to its textField(_:shouldChangeCharactersIn:replacementString:) method, which is called whenever is called whenever user actions change the text field’s content. This method lets us intercept this event, and determine whether or not the changes should be allowed. If the method returns true, the changes are allowed; otherwise, it forbids the change, and the text field acts as if the user didn’t do any editing.
- It adds a private variable,
characterLimit, which stores that maximum number of characters allowed into the text field.
- It adds a property,
maxLength, which is used to get and set the value stored in characterLimit. maxLength is marked with the @IBInspectable attribute, which allows its value to be read and set from within Interface Builder.
- The code within
textField(_:shouldChangeCharactersIn:replacementString:) determines the length of the string that would result if the user’s edits to the text field were to be made. If the resulting number of characters is less than or equal to the set maximum, the method returns true and the changes are allowed. If the resulting number of character is greater than the set maximum, the method returns false, and the changes do not take place.
We’ll build our new text field class, which we’ll call AllowedCharsTextField, as a subclass of MaxLengthTextField. Before we do that, we need to tweak the MaxLengthTextField class so that it’s easier to subclass.
Let’s refactor MaxLengthTextField, just a little
If you didn’t work with any of the code from the previous article, don’t worry — this article will provide you with the code for MaxLengthTextField. In fact, it’ll provide you with a slightly tweaked version, shown below.
Create a new project, and within that project, create a Swift file named MaxLengthTextField.swift, which you should then fill with the following code:
import UIKit

class MaxLengthTextField: UITextField, UITextFieldDelegate {

  private var characterLimit: Int?


  required init?(coder aDecoder: NSCoder) {
    super.init(coder: aDecoder)
    delegate = self
  }

  @IBInspectable var maxLength: Int {
    get {
      guard let length = characterLimit else {
        return Int.max
      }
      return length
    }
    set {
      characterLimit = newValue
    }
  }

  func textField(_ textField: UITextField, shouldChangeCharactersIn range: NSRange, replacementString string: String) -> Bool {

    guard string.characters.count > 0 else {
      return true
    }

    let currentText = textField.text ?? ""
    let prospectiveText = (currentText as NSString).replacingCharacters(in: range, with: string)

    // 1. Here's the first change...
    return allowedIntoTextField(text: prospectiveText)
  }

  // 2. ...and here's the second!
  func allowedIntoTextField(text: String) -> Bool {
    return text.characters.count <= maxLength
  }

}
This version of MaxLengthTextField differs from the version in the previous article in two ways, each one marked with a numbered comment.
The original version of the textField(_:shouldChangeCharactersIn:replacementString:) method contained all the logic of determining whether or not the text field should accept the changes made by the user:
- First, we filter out cases where the changes do not add any characters to the text field. In such a case, we know that the changes will not cause the text field to exceed the set maximum number of characters, so we accept the changes by returning
true.
- Then, we determine what the prospective text — the text that would result if the changes to the text field were accepted — would be.
- Finally, use the length of the prospective text to decide whether or not to accept the changes.
Steps 1 and 2 are applicable to any text field where we want to limit input to some criteria. Step 3 is specific to a text field where we want to limit input to a set maximum number of characters. We’ve factored step 3 into its own method, which returns true if the prospective text meets some criteria. There’s a method to this madness, and it’ll become clear once we build the AllowedCharsTextField class.
Now let’s subclass MaxLengthTextField to make AllowedCharsTextField
Add a new a Swift file to the project and name it AllowedCharsTextField.swift. Enter the following code into it:
import UIKit
import Foundation


class AllowedCharsTextField: MaxLengthTextField {

  // 1
  @IBInspectable var allowedChars: String = ""


  required init?(coder aDecoder: NSCoder) {
    super.init(coder: aDecoder)
    delegate = self
    // 2
    autocorrectionType = .no
  }

  // 3
  override func allowedIntoTextField(text: String) -> Bool {
    return super.allowedIntoTextField(text: text) &&
           text.containsOnlyCharactersIn(matchCharacters: allowedChars)
  }

}


// 4
private extension String {

  // Returns true if the string contains only characters found in matchCharacters.
  func containsOnlyCharactersIn(matchCharacters: String) -> Bool {
    let disallowedCharacterSet = CharacterSet(charactersIn: matchCharacters).inverted
    return self.rangeOfCharacter(from: disallowedCharacterSet) == nil
  }

}
Here’s what’s happening in the code above — these notes go with the numbered comments:
- The instance variable
allowedChars contains a string specifying the characters that will be allowed into the text field. If a character does not appear within this string, the user will not be able to enter it into the text field. This instance variable is marked with the @IBInspectable attribute, which means that its value can be read and set from within Interface Builder.
- We disable autocorrect for the text field, because it may try to suggest words that contain characters that we won’t allow into it.
- Overriding
MaxLengthTextField‘s allowedIntoTextField method lets us add additional criteria to our new text field type. This method limits the text field to a set maximum number of characters and to characters specified in allowedChars.
- We extend the
String class to include a new method, containsOnlyCharactersIn(_:), which returns true if the string contains only characters within the given reference string. We use the private keyword to limit this access to this new String method to this file for the time being.
Using AllowedCharsTextField
Using AllowedCharsTextField within storyboards is pretty simple. First, use a standard text field and place it on the view. Once you’ve done that, you can change it into an AllowedCharsTextField by changing its class in the Identity Inspector (the inspector with the  icon):
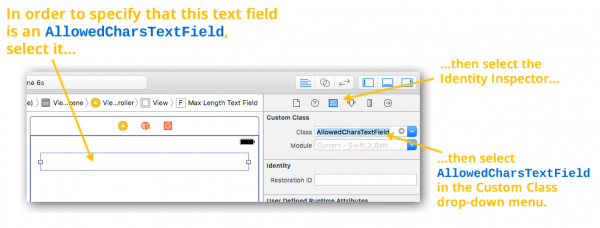
If you switch to the Attributes Inspector (the inspector with the  icon), you’ll be able to edit the text field’s Allowed Chars and Max Length properties:
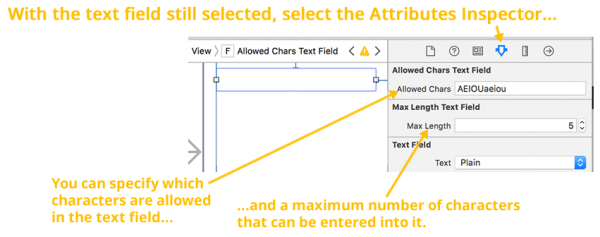
If you prefer, you can also set AllowedCharsTextField‘s properties in code:
// myNextTextField is an instance of AllowedCharsTextField
myNewTextField.allowedChars = "AEIOUaeiou" // Vowels only!
myNewTextField.maxLength = 5
A sample project showing MaxLengthTextField and AllowedCharsTextField in action
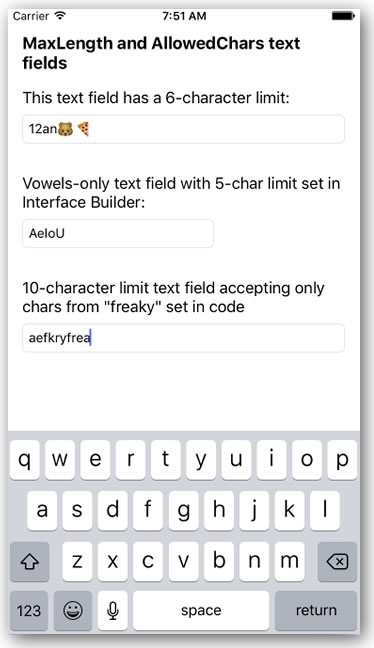
If you’d like to try out the code from this article, I’ve created a project named Swift 3 Text Field Magic 2 (pictured above), which shows both MaxLengthTextField and AllowedCharsTextField in action. It’s a simple app that presents 3 text fields:
- A
MaxLengthTextField with a 6-character limit.
- An
AllowedCharsTextField text field with a 5-character maximum length that accepts only upper- and lower-case vowels. Its Max Length and Allowed Chars properties were set in Interface Builder.
- An
AllowedCharsTextField text field with a 10-character maximum length that accepts only the characters from “freaky”. Its maxLength and allowedChars properties were set in code.
Try it out, see how it works, and use the code in your own projects!

You can download the project files for this article (68KB zipped) here.
Coming up next in this series…
In the next installment in this series, we’ll build a slightly different text field: one that allows all characters except for some specified banned ones.
