Categories
Uncategorized

Julia “@b0rk” Evans is programming’s zine queen!

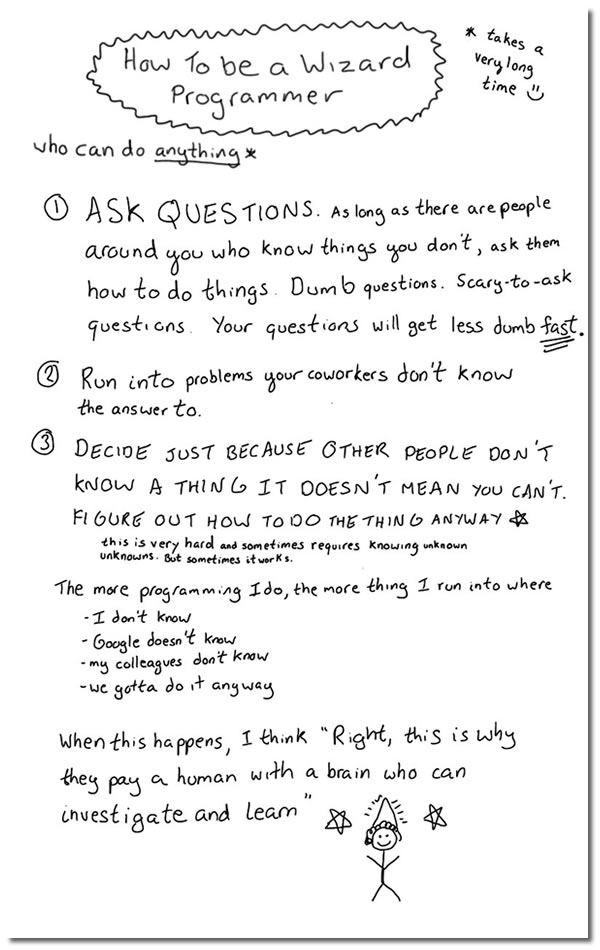
julia evans - how to be a wizard programmer

Solid advice from Julia Evans’ Twitter feed. Click to see the source.

If you’re a programmer (or hope to be one) and you’re not following Julia Evans (@b0rk) on Twitter, go and fix that mistake right now.

Her Twitter feed has the vibe of a zine — pronounced zeen — which is short for fanzine, which in turn is short for fan magazine. Before the web, fans of certain things — alt-rock or punk bands, cyberpunk, various cultural movements or social causes, jokes, whatever — would publish stapled-together photocopied publications as little do-it-yourself magazines:

zine covers

Zines. Click on the photo to see the source.

Here’s a definition of zine in zine format:

whats a zine

Click the photo to see the source.

Zines came about when it was easier to get your hands on a photocopier and Letraset than a computer and printer that could print more than just text. By necessity, they featured a lot of hand-drawn, hand-lettered art and comics…

zines

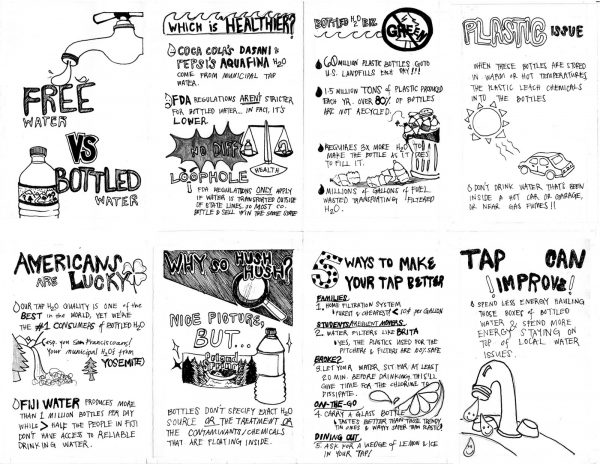
…and because they’re labors of love, they often feature material that you wouldn’t find in larger, more mainstream publications. Zines cover all sorts of topics, from underground culture and music to science and social responsibility…

Free Water v Bottle Water

Click to see at full size.

…and there’s at least one heavily-trafficked site that started off as a zine:

boing boing zines

Julia’s actually up and made zines about programming, what with her zine on debugging your programs using strace and her upcoming one, Linux debugging tools you’ll ❤️  (pictured below):

linux debugging tools youll love

Here’s another gem from her Twitter feed:

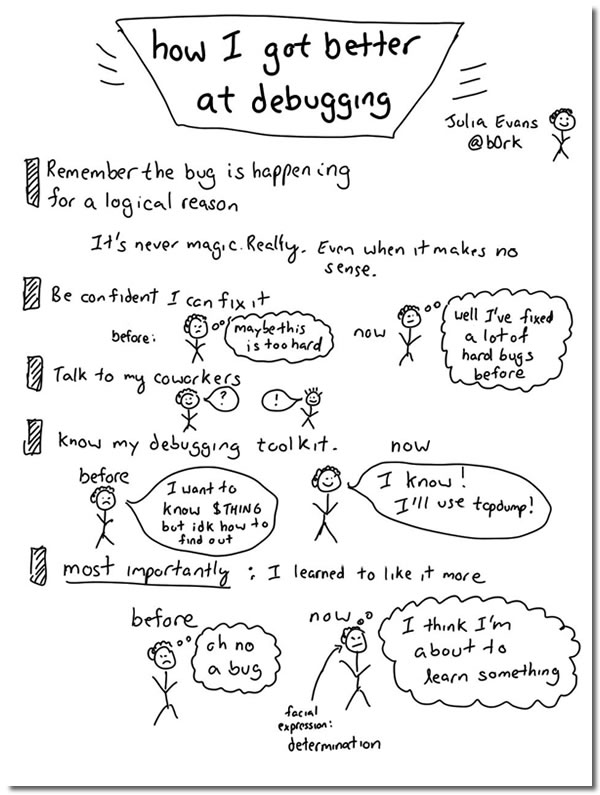
julia evans - how i got better at debugging

Click to see the source.

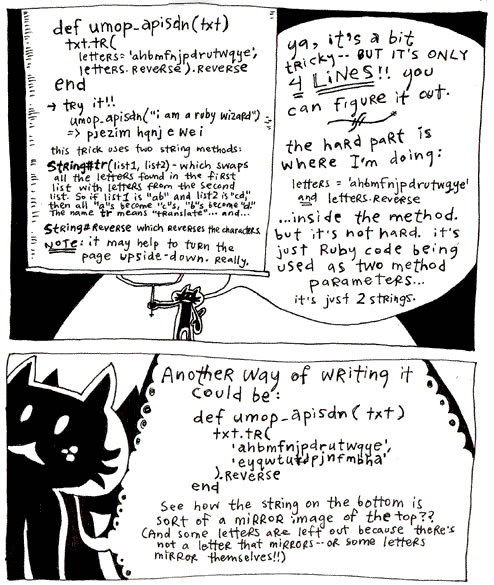
I think she’s bringing back something that we lost when why the lucky stiff decided to pull a J.D. Salinger and disappear from the web:

why upside-down ruby

But hey, this post is about Julia, so let’s end it with one more goodie from her Twitter feed!

julia evans - spy on your cpu

Click to see the source.

Once again, if you haven’t added @b0rk to your Twitter feed, you’re missing out on some great stuff!

Categories
Uncategorized

Swift 3 text field magic, part 1: Creating text fields with maximum lengths [Updated]

text field max lengths

Update, September 8, 2016: My original implementation of this solution had a memory leak problem. This new implementation doesn’t!

In this series of articles, we’ll look at making iOS text fields even better using Swift 3. We’ll start by adding an important capability that iOS text fields have been missing for far too long: the ability to limit themselves to a maximum number of characters.

.NET has a maxLength property for text fields; why can’t Cocoa?

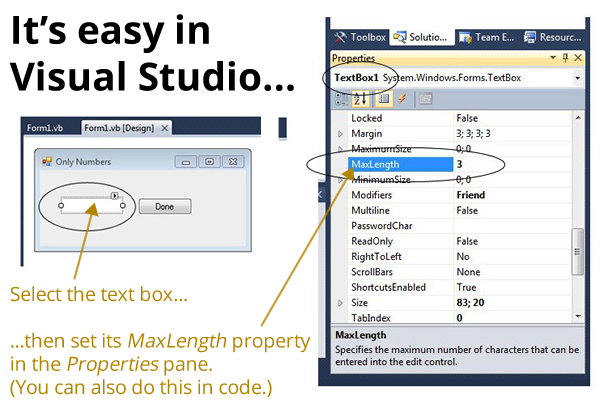
In Microsoft’s .NET framework, TextBoxes — the .NET equivalent of Cocoa’sUITextFields —  have a MaxLength property that you can set, either visually or in code, that specifies the maximum number of characters that can be entered into them:

easy-in-visual-studio

In the setup shown above, the TextBox‘s MaxLength property is set to 3, which ensures that the maximum number of characters that can be entered into it is 3, whether the characters are inserted by the user typing or pasting them in, or by code.

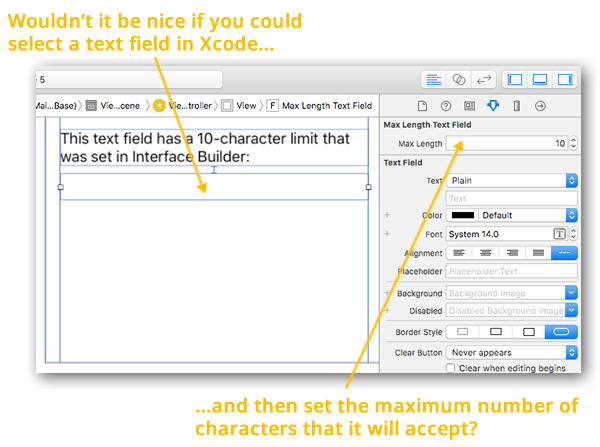
Cocoa’s UIKit doesn’t provide an analog to MaxLength for its UITextFields, but there’s no reason we can’t create it ourselves. By the end of this article, we’ll haveUITextFields that feature a maxLength property that can be set either in code or Interface Builder, as shown below:

wouldnt-it-be-nice

Creating a new class that subclasses UITextField and features a maxLength property that can be edited in Interface Builder

Start a new project by doing the standard File → New → Project… dance to create a new Single View Application.

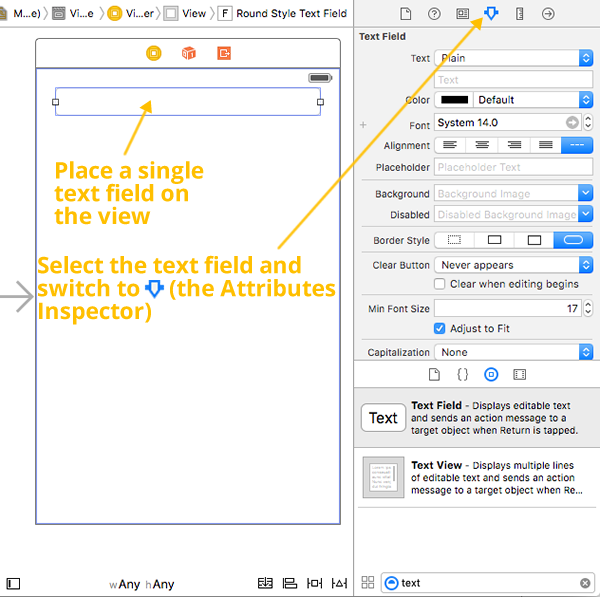
Open Main.storyboard, place a single text field on the view, select the text field and switch to the Attributes Inspector view (the inspector panel with the attributes inspector icon icon):

plain-text-field-and-attributes-inspector

The Attributes Inspector lets you edit all sorts of text field properties, but not the maximum length…yet.

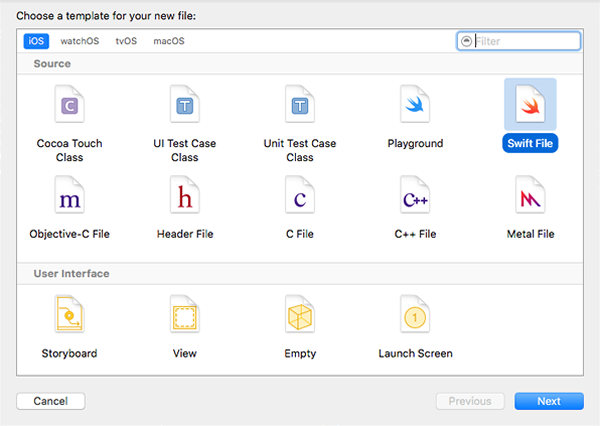
Use File → New → File… to create a new Swift File

new-swift-file

…and give it the name MaxLengthTextField.swift. We’ll use it for the code of a new class, MaxLengthTextField, which will contain the necessary properties and behaviors for a text field where you can specify a maximum length.

Change the contents ofMaxLengthTextField.swift to the code below:

import UIKit

// 1
class MaxLengthTextField: UITextField, UITextFieldDelegate {
  
  // 2
  private var characterLimit: Int?
  
  
  // 3
  required init?(coder aDecoder: NSCoder) {
    super.init(coder: aDecoder)
    delegate = self
  }
  
  // 4
  @IBInspectable var maxLength: Int {
    get {
      guard let length = characterLimit else {
        return Int.max
      }
      return length
    }
    set {
      characterLimit = newValue
    }
  }
  
}

Here’s what’s happening in the code above — these notes go with the numbered comments:

  1. In order to create a text field with the ability to set a maximum length, we’re defining a new class — MaxLengthTextField — as a subclass of UITextField, which gives it all the properties and behaviors of a UITextField. We also specify that MaxLengthTextField adopts the UITextFieldDelegate protocol, which allows us to manage changes to the content of our new text fields. We’ll need this in order to set a limit on how much text will be allowed inside the text field.
  2. characterLimit will hold the maximum number of characters that can be entered into the text field. It’s defined as an Int? since its value may or may not be defined, and defined as private since its value will be get and set using the maxLength property.
  3. In the initializer, we specify that MaxLengthTextField will define its own UITextFieldDelegate protocol methods. We’ll make use of one of these protocol methods later on to ensure that the text field doesn’t accept any more than the specified maximum number of characters.
  4. The @IBInspectable attribute makes the maxLength property editable from within Interface Builder’s Attribute Inspector.

Trying out our new MaxLengthTextField class

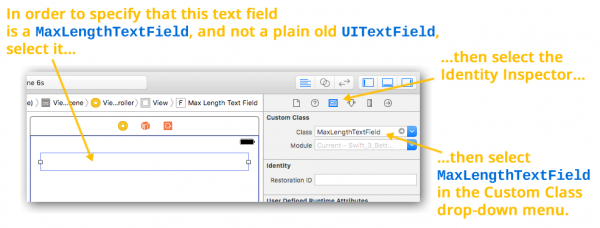
With the starter code for MaxLengthTextField done, let’s try it out. Switch to Main.storyboard and put a text field on the view. With the text field still selected, select the Identity Inspector (the one with the identity-inspector icon). Within the Identity Inspector’s Custom Class section, use the Class drop-down to change the text field’s class from UITextField to MaxLengthTextField:

custom-class

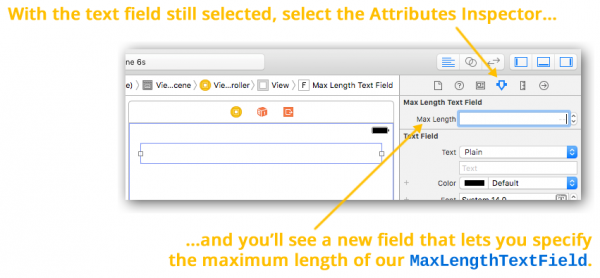
With this change, the text field is no longer an instance of UITextField; it’s now an instance of MaxLengthTextField. This becomes obvious when you switch to the Attributes Inspector (the inspector with the attributes inspector icon icon). Near the top of the Attributes Inspector, you’ll see that the text field has a new section of properties, Max Length Text Field, and within it, a new property called Max Length:

attributes-inspector

Note that Interface Builder did a couple of things in response to our marking the maxLength property with the @IBInspectable attribute:

  • It created a new section of the Attributes Inspector titled Max Length Text Field, deriving its name from the MaxLengthTextField class, where you can edit its @IBInspectable properties.
  • It created a new property field titled Max Length, which lets you edit MaxLengthTextField‘s maxLength property.

You’ll want to keep the way Xcode names Attribute Inspector fields in mind when naming classes and properties that you want to be editable within Interface Builder.

You can set the Max Length property to any valid integer value. It won’t have any apparent effect if you run the app; right now, all it does is get and set the value of MaxLengthTextField‘s private characterLimit variable. Let’s make Max Length actually do something.

Making the maxLength property limit the number of characters allowed in a text field

Update the code in MaxLengthTextField.swift so that it contains the following:

import UIKit

class MaxLengthTextField: UITextField, UITextFieldDelegate {

  private var characterLimit: Int?
  
  
  required init?(coder aDecoder: NSCoder) {
    super.init(coder: aDecoder)
    delegate = self
  }
  
  @IBInspectable var maxLength: Int {
    get {
      guard let length = characterLimit else {
        return Int.max
      }
      return length
    }
    set {
      characterLimit = newValue
    }
  }
  
  // 1
  func textField(_ textField: UITextField, shouldChangeCharactersIn range: NSRange, replacementString string: String) -> Bool {
  
    // 2
    guard string.characters.count > 0 else {
      return true
    }
    
    // 3
    let currentText = textField.text ?? ""
    // 4
    let prospectiveText = (currentText as NSString).replacingCharacters(in: range, with: string)
    // 5
    return prospectiveText.characters.count <= maxLength
  }
  
}

Here’s what’s happening in the code above — these notes go with the numbered comments:

  1. The actual functionality of MaxLengthTextField is contained within textField(_:shouldChangeCharactersIn:replacementString:), one of the methods made available by adopting the UITextFieldDelegate protocol. This method is called whenever user actions change the text field’s content, and its Bool return value specifies if the text change should actually change place. We’ll use this method to limit the number of characters that can be entered into the text field — if user changes would cause the number of characters in the text field to exceed characterLimit, it returns false; otherwise, it returns true.
  2. Get to know and love the guard statement and the “early return” style of programming; you’re going to see a lot of it in a lot of Swift coding. Here, we’re using guard to filter out cases where the user’s changes are of zero length, which means that characters aren’t being added, but deleted. In this case, we don’t have to see if the user’s changes will cause the text field to exceed its set maximum number of characters. We do want the method to return true in order to allow the user’s deletions to take place.
  3. If we’ve reached this point of the method, it means that the user has made additions to the text field. We should see if these changes would cause the text field to contain more than characterLimit characters. The first step in this process is getting the text currently in the text field. We use the nil coalescing operator?? — to assign the contents of the text field if they are not nil, or the empty string if they are nil.
  4. Now that we have the current text, we’ll determine the prospective text — the text that would result if the changes were accepted.
  5. Finally, we use the the length of the prospective text to decide whether to allow the changes or not.

If you include MaxLengthTextField.swift in any of your iOS projects, it’s pretty simple to turn ordinary text fields into ones with maxLength properties that you can set either GUI builder-style in Interface Builder or in code, using myTextField.maxLength = n syntax, just like the .NET people do.

Happy text field coding!

A sample project showing Visual Studio-style text field maximum lengths in action

text field max lengths

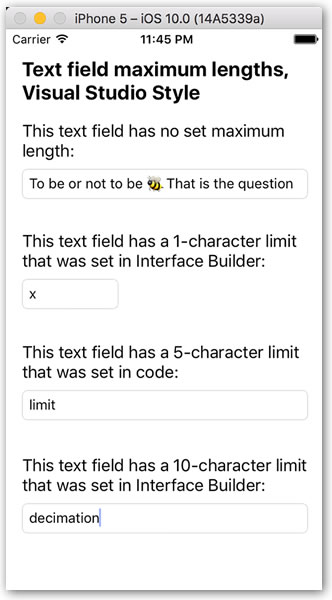
If you’d like to try out the code from this article, I’ve created a project named Swift 3 Text Field Magic 1 (pictured above), which shows our new MaxLengthTextField subclass in action. It’s a quick-and-dirty single-view app that presents 4 text fields:

  1. A text field without a set maximum length.
  2. A text field with a 1-character maximum length, with the Max Length property set in Interface Builder.
  3. A text field with a 5-character maximum length, with the maxLength property set in code (in the view controller’s viewDidLoad method).
  4. A text field with a 10-character maximum length, with the Max Length property set in Interface Builder.

Give it a try, learn what makes it tick, and use it as a jumping-off point for your own projects!

xcode download

You can download the project files for this article (61KB zipped) here.

Coming up next in this series…

In the next installment in this series, we’ll build on what we’ve made so far to create a text field that accepts only a defined set of characters.

Categories
Uncategorized

Mobile reading list for September 2, 2016: Galaxy Note 7 recall, the next great platform, speech beats typing

Samsung Galaxy Note 7 recalled worldwide over battery combustion issue

galaxy note 7 recall

In response to reports of the Galaxy Note 7 “phablet” catching fire while charging, Samsung has announced that they will recall and “voluntarily replace” users’ current devices with new ones “over the coming weeks”. Samsung reports that they are aware of 35 faulty Galaxy Note 7 devices and says that they’ve found 24 problem devices for every million sold. At the time of writing, 2.5 million Note 7s have been sold.

Here’s an ABC News report on the issue:

Samsung says that it will take two weeks to set up the recall. After that, replacement devices will be made available, with replacement dates varying by country. If you are concerned about your Galaxy Note 7, Samsung advises that you contact your nearest Samsung service center. If you purchased your Note 7 from a carrier, you should keep an eye out for announcements (T-Mobile has already issued one).

The next great platform is the one that we already have

the next great platform

Josh Elman, a partner at Silicon Valley venture firm Greylock Partners, makes a convincing argument that the next great platform just happens to be the current great platform: mobile.

History is his guide. Just as some people say “mobile is over” now, people were saying “the web is over” a little over a decade ago — and then Web 2.0, the LAMP stack, AJAX, and social networking came along. A little over ten years before that, some people were worried that desktop computing had plateaued — and then CD-ROM multimedia and the web came along.

There are still plenty of needs that aren’t being met by mobile today, but they could be met by mobile tomorrow.

Speech is 3x faster than typing for English and Mandarin text entry on mobile devices

hello computer

A recent experiment at Stanford University revealed some interesting results: entering text via speech recognition into mobile devices yielded faster input rates and lower error rates. If these results are repeated in other experiments, we may find a radical change in the way we interact with our phones in the near future.

They produced a two-minute video summarizing their findings:

this article also appears in the GSG blog

Categories
Uncategorized

A list of iOS development podcasts, September 2016 edition

podcast

For those of you looking for podcasts on iOS development, here’s a list of podcasts that were active at the time of writing. If I’ve missed any, please drop me a line or let me know in the comments, and I’ll update the list!

Podcast Description Number of episodes at the time of writing
The App Guy Podcast Paul Kemp’s long-running interview podcast featuring app developers and app development authors. 485
AppMasters App entrepreneur Steve Young’s podcast, which he started so he could interview app creators he admired. Each podcast is an interview with an app developer. 471
Build Phase A weekly podcast hosted by iOS developers Mark Adams, Jack Nutting, and Gordon Fontenot. 102
Concepts in Code Hank Turowski and BJ Miller discuss best practices for iOS programming and programming in general. 16
Core Intuition A long-running indie software developer podcast covering iOS, MacOS and other Apple technologies hosted by Daniel Jalkut and Manton Reece, who’ve developed a comfortable, conversation podcasting style and rhythm over their long history together. 247
iOS Bytes A podcast with bite-sized episodes (each one about 5 minutes long) covering the latest iOS news. Of all the podcasts in this list, this one may be on hiatus or cancelled — the most recent episode was posted on June 16, 2016. It’s hosted by Zach Cowart and John Friskics. 119
iOhYes Darryl Thomas’ and John Sextro’s podcast, featuring “news, tips, and rants for professional iOS/Mac developers, with something for enterprise and indie developers alike”. 117
iPhreaks A group discussion podcast featuring a varying panel that discusses iOS development, related technologies, Apple, tools, practices, and code. 167
More Than Just Code A mix of current issues, news, notes, and tech tips discussed by Aaron VeghJaime LopezMark Rubin, and Tim Mitra (and sometimes Greg Heo and Tammy Coron). Their podcasts are pretty freewheeling and go through many topics; episodes are typically at least an hour long. 106
RayWenderlich.com Podcast The podcast of the leading iOS (and expanding to other platforms) tutorial site, hosted by Mic Pringle and Jake Gundersen. In the current format, the podcast covers two topics per episode, with 20 minutes devoted to each topic. 59
Release Notes Joe Cieplinski and Charles Perry‘s podcast about the business of independent iOS and MacOS development. They cover “nspiration, design, trends, and tools — everything but the code”, and “topics for the new or curious independent developer looking to make his or her way in the iOS and Mac ecosystem”. 172
Under the Radar Full-time independent iOS developers David Smith (Activity++, Pedometer++, Sleep++ and more) and Marco Arment (Overcast for iOS, Quitter for MacOS) pick a topic about some aspect of indie app development and have a back-and-forth conversation about it. Each episode never goes longer than 30 minutes. 42
Categories
Uncategorized

Yup.

most used language in programming

Categories
Uncategorized

How to work with dates and times in Swift 3, part 4: Adding Swift syntactic magic

In this article, we’ll expand on material covered in the three previous articles in this series:

A more readable way to work with Dates and DateComponents

Suppose we want to find out what the date and time will be 2 months, 3 days, 4 hours, 5 minutes, and 6 seconds from now will be. If you recall what we covered in the last installment in this series, you’d probably use code like this:

var timeInterval = DateComponents()
timeInterval.month = 2
timeInterval.day = 3
timeInterval.hour = 4
timeInterval.minute = 5
timeInterval.second = 6
let futureDate = Calendar.current.date(byAdding: timeInterval, to: Date())!

In the code above, we did the following:

  • We created an instance of a DateComponents struct.
  • We set its properties so that it would represent a time interval of 2 months, 3 days, 4 hours, 5 minutes, and 6 seconds.
  • We then used Calendar‘s date(byAdding:to:) method to add the time interval to a Date.

This code wouldn’t look out of place in a lot of other programming languages, but we can do better in Swift. What if I told you that by defining a few helper functions, you can turn the code above into the code below?

let coolerFutureDate = Date() + 2.months + 3.days + 4.hours + 5.minutes + 6.seconds
let coolerPastDate   = Date() - 2.months - 3.days - 4.hours - 5.minutes - 6.seconds

Or this code?

let coolerFutureDate = (2.months + 3.days + 4.hours + 5.minutes + 6.seconds).fromNow
let coolerPastDate   = (2.months + 3.days + 4.hours + 5.minutes + 6.seconds).ago

I’d much rather write the code above. This article will cover the code necessary to make this kind of syntactic magic possible.

Overloading + and - so that we can add and subtract DateComponents

First, let’s write some code that allows us to add and subtract DateComponents. Start a new playground and enter the following code into it:

func +(_ lhs: DateComponents, _ rhs: DateComponents) -> DateComponents {
  return combineComponents(lhs, rhs)
}

func -(_ lhs: DateComponents, _ rhs: DateComponents) -> DateComponents {
  return combineComponents(lhs, rhs, multiplier: -1)
}

func combineComponents(_ lhs: DateComponents,
                       _ rhs: DateComponents,
                       multiplier: Int = 1)
                       -> DateComponents {
  var result = DateComponents()
  result.second     = (lhs.second     ?? 0) + (rhs.second     ?? 0) * multiplier
  result.minute     = (lhs.minute     ?? 0) + (rhs.minute     ?? 0) * multiplier
  result.hour       = (lhs.hour       ?? 0) + (rhs.hour       ?? 0) * multiplier
  result.day        = (lhs.day        ?? 0) + (rhs.day        ?? 0) * multiplier
  result.weekOfYear = (lhs.weekOfYear ?? 0) + (rhs.weekOfYear ?? 0) * multiplier
  result.month      = (lhs.month      ?? 0) + (rhs.month      ?? 0) * multiplier
  result.year       = (lhs.year       ?? 0) + (rhs.year       ?? 0) * multiplier
  return result
}

In the code above, we’ve overloaded the + and – operators so that we can add and subtract DateComponents. I derived these functions from Axel Schlueter’s SwiftDateTimeExtensions library. He wrote them when Swift was still in beta; I updated them so that they compile with the current version and added a couple of tweaks of my own.

The addition and subtraction operations are so similar and so tedious, which is a sign that there’s an opportunity to DRY up the code. I factored out the duplicate code from both the + and - overloads and put it into its own method, combineComponents, which does the actual DateComponents addition and subtraction.

You may have noticed a lot of ?? operators in the code for combineComponents. ?? is referred to as the nil coalescing operator, and it’s a clever bit of syntactic shorthand. For the expression below:

let finalValue = someOptionalValue ?? fallbackValue

  • If someOptionalValue is not nil, finalValue is set to someOptionalValue‘s value.
  • If someOptionalValue is nil, finalValue is set to fallbackValue‘s value.

Let’s confirm that our code works. Try out the following code:

// (Previous code goes here)

// Let's define a couple of durations of time

var oneDayFiveHoursTenMinutes = DateComponents()
oneDayFiveHoursTenMinutes.day = 1
oneDayFiveHoursTenMinutes.hour = 5
oneDayFiveHoursTenMinutes.minute = 10

var threeDaysTenHoursThirtyMinutes = DateComponents()
threeDaysTenHoursThirtyMinutes.day = 3
threeDaysTenHoursThirtyMinutes.hour = 10
threeDaysTenHoursThirtyMinutes.minute = 30


// Now let's add and subtract them

let additionResult = OneDayFiveHoursTenMinutes + ThreeDaysTenHoursThirtyMinutes
additionResult.day     // 4
additionResult.hour    // 15
additionResult.minute  // 40

let subtractionResult = ThreeDaysTenHoursThirtyMinutes - OneDayFiveHoursTenMinutes
subtractionResult.day     // 2
subtractionResult.hour    // 5
subtractionResult.minute  // 20

Overloading - so that we can negate DateComponents

Now that we can add and subtract DateComponents, let’s overload the unary minus so that we can negate DateComponents:

// (Previous code goes here)

prefix func -(components: DateComponents) -> DateComponents {
  var result = DateComponents()
  if components.second     != nil { result.second     = -components.second! }
  if components.minute     != nil { result.minute     = -components.minute! }
  if components.hour       != nil { result.hour       = -components.hour! }
  if components.day        != nil { result.day        = -components.day! }
  if components.weekOfYear != nil { result.weekOfYear = -components.weekOfYear! }
  if components.month      != nil { result.month      = -components.month! }
  if components.year       != nil { result.year       = -components.year! }
  return result
}

With this overload defined, we can now use the unary minus to negate DateComponents:

// (Previous code goes here)

let negativeTime = -oneDayFiveHoursTenMinutes
negativeTime.day     // -1
negativeTime.hour    // -5
negativeTime.minute  // -10

Overloading + and - so that we can add Dates and DateComponents and subtract DateComponents from Dates

With the unary minus defined, we can now define the following operations:

  • Date + DateComponents
  • DateComponents + Date
  • DateDateComponents
// (Previous code goes here)

// Date + DateComponents
func +(_ lhs: Date, _ rhs: DateComponents) -> Date
{
  return Calendar.current.date(byAdding: rhs, to: lhs)!
}

// DateComponents + Dates
func +(_ lhs: DateComponents, _ rhs: Date) -> Date
{
  return rhs + lhs
}

// Date - DateComponents
func -(_ lhs: Date, _ rhs: DateComponents) -> Date
{
  return lhs + (-rhs)
}

Note that we didn’t define an overload for subtracting Date from DateComponents — such an operation doesn’t make any sense.

With these overloads defined, a lot of Date/DateComponents arithmetic in Swift becomes much easier to enter and read:

// (Previous code goes here)

// What time will it be 1 day, 5 hours, and 10 minutes from now?

// Here's the standard way of finding out:
Calendar.current.date(byAdding: oneDayFiveHoursTenMinutes, to: Date())

// With our overloads and function definitions, we can now do it this way:
Date() + oneDayFiveHoursTenMinutes
// This will work as well:
oneDayFiveHoursTenMinutes + Date()


// What time was it 3 days, 10 hours, and 30 minutes ago?

// Doing it the standard way takes some work
var minus3Days5Hours30minutes = threeDaysTenHoursThirtyMinutes
minus3Days5Hours30minutes.day = -threeDaysTenHoursThirtyMinutes.day!
minus3Days5Hours30minutes.hour = -threeDaysTenHoursThirtyMinutes.hour!
minus3Days5Hours30minutes.minute = -threeDaysTenHoursThirtyMinutes.minute!
Calendar.current.date(byAdding: minus3Days5Hours30minutes, to: Date())

// With our overloads and function definitions, it's so much easier:
Date() - threeDaysTenHoursThirtyMinutes

Extending Date so that creating dates is simpler

Creating Dates in Swift is a roundabout process. Usually, you end up creating them in one of two ways:

  • Instantiating a DateComponents struct and then using it to create a Date using Calendar‘s date(from:) method, or
  • Creating a String representation of the Date and then using it to create a Date using DateFormatter‘s date(from:) method.

Let’s simplify things by extending the Date struct with a couple of convenient init method overloads:

extension Date {
  
  init(year: Int,
       month: Int,
       day: Int,
       hour: Int = 0,
       minute: Int = 0,
       second: Int = 0,
       timeZone: TimeZone = TimeZone(abbreviation: "UTC")!) {
    var components = DateComponents()
    components.year = year
    components.month = month
    components.day = day
    components.hour = hour
    components.minute = minute
    components.second = second
    components.timeZone = timeZone
    self = Calendar.current.date(from: components)!
  }
  
  init(dateString: String) {
    let formatter = DateFormatter()
    formatter.dateFormat = "yyyy-MM-dd HH:mm:ss zz"
    self = formatter.date(from: dateString)!
  }
  
}

With these methods, initializing Dates is a lot more simple:

// (Previous code goes here)

// The Stevenote where the original iPhone was announced took place
// on January 9, 2007 at 10:00 a.m. PST
let iPhoneStevenoteDate = Date(year: 2007,
                               month: 1,
                               day: 9,
                               hour: 10,
                               minute: 0,
                               second: 0,
                               timeZone: TimeZone(abbreviation: "PST")!)

// The original iPhone went on sale on June 27, 2007
let iPhoneReleaseDate = Date(year: 2007, month: 6, day: 27) // June 27, 2007, 00:00:00 UTC

// The Stevenote where the original iPhone was announced took place
// on January 27, 2010 at 10:00 a.m. PST
let iPadStevenoteDate = Date(dateString: "2010-01-27 10:00:00 PST")

Overloading - so that we can use it to find the difference between two Dates

When we’re trying to determine the time between two given Dates, what we’re doing is finding the difference between them. Wouldn’t it be nice if we could use the - operator to find the difference between Dates, just as we can use it to find the difference between numbers?

Let’s code an overload to do just that:

// (Previous code goes here)

func -(_ lhs: Date, _ rhs: Date) -> DateComponents
{
  return Calendar.current.dateComponents([.year, .month, .day, .hour, .minute],
                                         from: lhs,
                                         to: rhs)
}

Let’s test it in action:

let timeFromAnnouncementToRelease = iPhoneReleaseDate - iPhoneStevenoteDate
timeFromAnnouncementToRelease.year    // 0
timeFromAnnouncementToRelease.month   // 5
timeFromAnnouncementToRelease.day     // 17
timeFromAnnouncementToRelease.hour    // 7
timeFromAnnouncementToRelease.minute  // 0

// How long ago was the first moon landing, which took place
// on July 20, 1969, 20:18 UTC?
Date() - Date(dateString: "1969-07-20 20:18:00 UTC")
// At the time of writing, this value was a Date with the following properties:
// - year: 47 
// - month: 1 
// - day: 9 
// - hour: 22 
// - minute: 14

Extending Int to add some syntactic magic to date components

We’ve already got some syntactic niceties, but the real Swift magic happens when we add this code to the mix:

// (Previous code goes here)

extension Int {

  var second: DateComponents {
    var components = DateComponents()
    components.second = self;
    return components
  }
  
  var seconds: DateComponents {
    return self.second
  }
  
  var minute: DateComponents {
    var components = DateComponents()
    components.minute = self;
    return components
  }
  
  var minutes: DateComponents {
    return self.minute
  }
  
  var hour: DateComponents {
    var components = DateComponents()
    components.hour = self;
    return components
  }
  
  var hours: DateComponents {
    return self.hour
  }
  
  var day: DateComponents {
    var components = DateComponents()
    components.day = self;
    return components
  }
  
  var days: DateComponents {
    return self.day
  }
  
  var week: DateComponents {
    var components = DateComponents()
    components.weekOfYear = self;
    return components
  }
  
  var weeks: DateComponents {
    return self.week
  }
  
  var month: DateComponents {
    var components = DateComponents()
    components.month = self;
    return components
  }
  
  var months: DateComponents {
    return self.month
  }
  
  var year: DateComponents {
    var components = DateComponents()
    components.year = self;
    return components
  }
  
  var years: DateComponents {
    return self.year
  }
  
}

This additions to Int allow us to convert Ints to DateComponents in an easy-to-read way, and with our overloads to add and subtract DateComponents to and from each other, and to add Dates to DateComponents, we can now perform all sorts of syntactic magic like this:

// From our earlier test of Date subtraction, we know that
// there were 5 months, 17 days, and 7 hours between 
// the Stevenote when the iPhone was announced and
// midnight UTC on the day it was released.
iPhoneStevenoteDate + 5.months + 17.days + 7.hours  // June 27, 2007, 00:00:00 UTC

// What was the date 10 years, 9 months, 8 days, 7 hours, and 6 minutes ago?
Date() - 10.years - 9.months - 8.days - 7.hours - 6.minutes
// At the time of writing, this value was Nov 22, 2005, 6:51 a.m. EST.

Extending DateComponents to add even more syntactic magic: fromNow and ago

And finally, a couple of additions to the DateComponents struct to make Date/DateComponent calculations even more concise and readable:

extension DateComponents {
  
  var fromNow: Date {
    return Calendar.current.date(byAdding: self,
                                 to: Date())!
  }
  
  var ago: Date {
    return Calendar.current.date(byAdding: -self,
                                 to: Date())!
  }
  
}

Here are these additions in action:

2.weeks.fromNow
// At the time of writing, this value was
// Sep 13, 2016, 2:55 PM

3.months.fromNow
// At the time of writing, this value was
// Nov 30, 2016, 2:55 PM

(2.months + 3.days + 4.hours + 5.minutes + 6.seconds).fromNow
// At the time of writing, this value was
// Nov 2, 2016, 7:04 PM

(2.months + 3.days + 4.hours + 5.minutes + 6.seconds).ago
// At the time of writing, this value was
// Nov 2, 2016, 7:04 PM

Wrapping it all up

Here’s the playground containing all the code we just worked with:

import UIKit


// Overloading + and - so that we can add and subtract DateComponents
// ------------------------------------------------------------------

func +(_ lhs: DateComponents, _ rhs: DateComponents) -> DateComponents {
  return combineComponents(lhs, rhs)
}

func -(_ lhs: DateComponents, _ rhs: DateComponents) -> DateComponents {
  return combineComponents(lhs, rhs, multiplier: -1)
}

func combineComponents(_ lhs: DateComponents,
                       _ rhs: DateComponents,
                       multiplier: Int = 1)
                       -> DateComponents {
  var result = DateComponents()
  result.second     = (lhs.second     ?? 0) + (rhs.second     ?? 0) * multiplier
  result.minute     = (lhs.minute     ?? 0) + (rhs.minute     ?? 0) * multiplier
  result.hour       = (lhs.hour       ?? 0) + (rhs.hour       ?? 0) * multiplier
  result.day        = (lhs.day        ?? 0) + (rhs.day        ?? 0) * multiplier
  result.weekOfYear = (lhs.weekOfYear ?? 0) + (rhs.weekOfYear ?? 0) * multiplier
  result.month      = (lhs.month      ?? 0) + (rhs.month      ?? 0) * multiplier
  result.year       = (lhs.year       ?? 0) + (rhs.year       ?? 0) * multiplier
  return result
}


// Let's define a couple of durations of time

var oneDayFiveHoursTenMinutes = DateComponents()
oneDayFiveHoursTenMinutes.day = 1
oneDayFiveHoursTenMinutes.hour = 5
oneDayFiveHoursTenMinutes.minute = 10


var threeDaysTenHoursThirtyMinutes = DateComponents()
threeDaysTenHoursThirtyMinutes.day = 3
threeDaysTenHoursThirtyMinutes.hour = 10
threeDaysTenHoursThirtyMinutes.minute = 30


// Now let's add and subtract them

let additionResult = oneDayFiveHoursTenMinutes + threeDaysTenHoursThirtyMinutes
additionResult.day     // 4
additionResult.hour    // 15
additionResult.minute  // 40

let subtractionResult = threeDaysTenHoursThirtyMinutes - oneDayFiveHoursTenMinutes
subtractionResult.day     // 2
subtractionResult.hour    // 5
subtractionResult.minute  // 20


// Overloading - so that we can negate DateComponents
// --------------------------------------------------

// We'll need to overload unary - so we can negate components
prefix func -(components: DateComponents) -> DateComponents {
  var result = DateComponents()
  if components.second     != nil { result.second     = -components.second! }
  if components.minute     != nil { result.minute     = -components.minute! }
  if components.hour       != nil { result.hour       = -components.hour! }
  if components.day        != nil { result.day        = -components.day! }
  if components.weekOfYear != nil { result.weekOfYear = -components.weekOfYear! }
  if components.month      != nil { result.month      = -components.month! }
  if components.year       != nil { result.year       = -components.year! }
  return result
}


let negativeTime = -oneDayFiveHoursTenMinutes
negativeTime.day     // -1
negativeTime.hour    // -5
negativeTime.minute  // -10


// Overloading + and - so that we can add Dates and DateComponents 
// and subtract DateComponents from Dates

// Date + DateComponents
func +(_ lhs: Date, _ rhs: DateComponents) -> Date
{
  return Calendar.current.date(byAdding: rhs, to: lhs)!
}

// DateComponents + Dates
func +(_ lhs: DateComponents, _ rhs: Date) -> Date
{
  return rhs + lhs
}

// Date - DateComponents
func -(_ lhs: Date, _ rhs: DateComponents) -> Date
{
  return lhs + (-rhs)
}


// What time will it be 1 day, 5 hours, and 10 minutes from now?

// Here's the standard way of finding out:
Calendar.current.date(byAdding: oneDayFiveHoursTenMinutes, to: Date())

// With our overloads and function definitions, we can now do it this way:
Date() + oneDayFiveHoursTenMinutes
// This will work as well:
oneDayFiveHoursTenMinutes + Date()


// What time was it 3 days, 10 hours, and 30 minutes ago?

// Doing it the standard way takes some work
var minus3Days5Hours30minutes = threeDaysTenHoursThirtyMinutes
minus3Days5Hours30minutes.day = -threeDaysTenHoursThirtyMinutes.day!
minus3Days5Hours30minutes.hour = -threeDaysTenHoursThirtyMinutes.hour!
minus3Days5Hours30minutes.minute = -threeDaysTenHoursThirtyMinutes.minute!
Calendar.current.date(byAdding: minus3Days5Hours30minutes, to: Date())

// With our overloads and function definitions, it's so much easier:
Date() - threeDaysTenHoursThirtyMinutes


// Extending Date so that creating dates is simpler
// ------------------------------------------------

extension Date {
  
  init(year: Int,
       month: Int,
       day: Int,
       hour: Int = 0,
       minute: Int = 0,
       second: Int = 0,
       timeZone: TimeZone = TimeZone(abbreviation: "UTC")!) {
    var components = DateComponents()
    components.year = year
    components.month = month
    components.day = day
    components.hour = hour
    components.minute = minute
    components.second = second
    components.timeZone = timeZone
    self = Calendar.current.date(from: components)!
  }
  
  init(dateString: String) {
    let formatter = DateFormatter()
    formatter.dateFormat = "yyyy-MM-dd HH:mm:ss zz"
    self = formatter.date(from: dateString)!
  }
  
}


// The Stevenote where the original iPhone was announced took place
// on January 9, 2007 at 10:00 a.m. PST
let iPhoneStevenoteDate = Date(year: 2007,
                               month: 1,
                               day: 9,
                               hour: 10,
                               minute: 0,
                               second: 0,
                               timeZone: TimeZone(abbreviation: "PST")!)

// The original iPhone went on sale on June 27, 2007
let iPhoneReleaseDate = Date(year: 2007, month: 6, day: 27) // June 27, 2007, 00:00:00 UTC

// The Stevenote where the original iPhone was announced took place
// on January 27, 2010 at 10:00 a.m. PST
let iPadStevenoteDate = Date(dateString: "2010-01-27 10:00:00 PST")


// Overloading - so that we can use it to find the difference between two Dates

func -(_ lhs: Date, _ rhs: Date) -> DateComponents
{
  return Calendar.current.dateComponents([.year, .month, .day, .hour, .minute],
                                         from: rhs,
                                         to: lhs)
}


let timeFromAnnouncementToRelease = iPhoneReleaseDate - iPhoneStevenoteDate
timeFromAnnouncementToRelease.year    // 0
timeFromAnnouncementToRelease.month   // 5
timeFromAnnouncementToRelease.day     // 17
timeFromAnnouncementToRelease.hour    // 7
timeFromAnnouncementToRelease.minute  // 0

// How long ago was the first moon landing, which took place
// on July 20, 1969, 20:18 UTC?
Date() - Date(dateString: "1969-07-20 20:18:00 UTC")
// At the time of writing, this value was a Date with the following properties:
// - year: 47 
// - month: 1 
// - day: 9 
// - hour: 22 
// - minute: 14


// Extending Int to add some syntactic magic to date components
// ------------------------------------------------------------

extension Int {
  
  var second: DateComponents {
    var components = DateComponents()
    components.second = self;
    return components
  }
  
  var seconds: DateComponents {
    return self.second
  }
  
  var minute: DateComponents {
    var components = DateComponents()
    components.minute = self;
    return components
  }
  
  var minutes: DateComponents {
    return self.minute
  }
  
  var hour: DateComponents {
    var components = DateComponents()
    components.hour = self;
    return components
  }
  
  var hours: DateComponents {
    return self.hour
  }
  
  var day: DateComponents {
    var components = DateComponents()
    components.day = self;
    return components
  }
  
  var days: DateComponents {
    return self.day
  }
  
  var week: DateComponents {
    var components = DateComponents()
    components.weekOfYear = self;
    return components
  }
  
  var weeks: DateComponents {
    return self.week
  }
  
  var month: DateComponents {
    var components = DateComponents()
    components.month = self;
    return components
  }
  
  var months: DateComponents {
    return self.month
  }
  
  var year: DateComponents {
    var components = DateComponents()
    components.year = self;
    return components
  }
  
  var years: DateComponents {
    return self.year
  }
  
}


// From our earlier test of Date subtraction, we know that
// there were 5 months, 17 days, and 7 hours between 
// the Stevenote when the iPhone was announced and
// midnight UTC on the day it was released.
iPhoneStevenoteDate + 5.months + 17.days + 7.hours  // June 27, 2007, 00:00:00 UTC

// What was the date 10 years, 9 months, 8 days, 7 hours, and 6 minutes ago?
Date() - 10.years - 9.months - 8.days - 7.hours - 6.minutes
// At the time of writing, this value was Nov 22, 2005, 6:51 a.m. EST.


// Extending DateComponents to add even more syntactic magic: fromNow and ago
// --------------------------------------------------------------------------

extension DateComponents {
  
  var fromNow: Date {
    return Calendar.current.date(byAdding: self,
                                 to: Date())!
  }
  
  var ago: Date {
    return Calendar.current.date(byAdding: -self,
                                 to: Date())!
  }
  
}


2.weeks.fromNow
// At the time of writing, this value was
// Sep 13, 2016, 2:55 PM

3.months.fromNow
// At the time of writing, this value was
// Nov 30, 2016, 2:55 PM

(2.months + 3.days + 4.hours + 5.minutes + 6.seconds).fromNow
// At the time of writing, this value was
// Nov 2, 2016, 7:04 PM

(2.months + 3.days + 4.hours + 5.minutes + 6.seconds).ago
// At the time of writing, this value was
// Nov 2, 2016, 7:04 PM


Categories
Uncategorized

How to work with dates and times in Swift 3, part 3: Date arithmetic

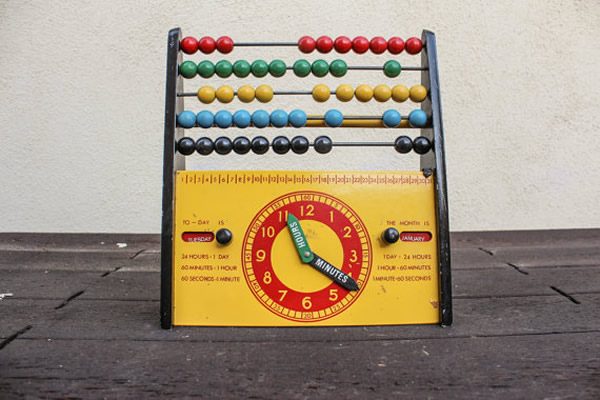
abacus with toy clock

You can actually buy this thing on Etsy! Click the photo for details.

What we’ve covered so far, and what we’ll cover in this installment

So far, in this series on date and time programming in Swift 3, we’ve looked at:

With this knowledge under our belts, let’s get to this article’s topic: doing date calculations.

Creating a couple of Dates to work with

stevenotes

Let’s create a couple of Dates to work with:

  • The date and time of the Stevenote where the iPhone was introduced: January 9, 2007, 10:00 a.m. Pacific time (UTC-8), and
  • The date and time of the Stevenote where the iPad was introduced: January 27, 2010, 10:00 a.m. Pacific time (UTC-8).

Start with a fresh playground, and paste or enter the following code into it:

import UIKit

// The user's calendar incorporates the user's locale and
// time zone settings, which means it's the one you'll use
// most often.
let userCalendar = Calendar.current

// Let's create a Date for the start of the Stevenote
// where the iPhone was introduced (January 9, 2007, 10:00:00 Pacific time)
// using DateComponents.
var iPhoneStevenoteDateComponents = DateComponents()
iPhoneStevenoteDateComponents.year = 2007
iPhoneStevenoteDateComponents.month = 1
iPhoneStevenoteDateComponents.day = 9
iPhoneStevenoteDateComponents.hour = 10
iPhoneStevenoteDateComponents.timeZone = TimeZone(abbreviation: "PST")
let iPhoneStevenoteDate = userCalendar.date(from: iPhoneStevenoteDateComponents)!

// Let's create a Date for the start of the Stevenote
// where the iPad was introduced (January 27, 2010, 10:00:00 Pacific time)
// using DateFormatter.
var dateMakerFormatter = DateFormatter()
dateMakerFormatter.calendar = userCalendar
dateMakerFormatter.dateFormat = "MMM d, yyyy, hh:mm a zz"
let iPadStevenoteDate = dateMakerFormatter.date(from: "Jan 27, 2010, 10:00 AM PST")!

In the code above, we’ve created our dates in two different ways:

  • We created iPhoneStevenoteDate by setting up a DateComponents struct and then using the user’s Calendar to convert those DateComponents into a Date.
  • We created iPadStevenoteDate by converting its String representation into a Date using a DateFormatter. You may find that if you need to instantiate a large number of Dates in code, you may want to do so this way, since this approach requires far fewer lines of code than doing so using DateComponents.

Date comparisons, part 1

A chick looking at an egg.

Now that we have two Dates, let’s compare them. In Swift 3, we can use familiar comparison operators — <, <=, ==, !=, >, >== — to tell which Date came first, or if they represent the same point in time.

Add the following code to the playground:

// (Previous code goes here)

// Does Valentine's Day come BEFORE St. Patrick's Day?
valentinesDay < stPatricksDay   // true

// Does Valentine's Day come AFTER St. Patrick's Day?
valentinesDay > stPatricksDay   // false

// Does St. Patrick's Day come BEFORE Valentine's Day?
stPatricksDay < valentinesDay   // false

// Did the iPhone Stevenote come BEFORE the iPad Stevenote?
iPhoneStevenoteDate < iPadStevenoteDate   // true

// Did the iPhone Stevenote come AFTER the iPad Stevenote?
iPhoneStevenoteDate > iPadStevenoteDate   // false

// Did the iPad Stevenote come BEFORE the iPhone Stevenote?
iPadStevenoteDate < iPhoneStevenoteDate   // false

// Does the iPad Stevenote come AFTER the iPhone Stevenote?
iPadStevenoteDate > iPhoneStevenoteDate   // true

// Do the iPhone Stevenote and the iPad Stevenote fall on DIFFERENT dates?
iPhoneStevenoteDate == iPadStevenoteDate  // false

// Do the iPhone Stevenote and the iPad Stevenote fall on the SAME date?
iPhoneStevenoteDate != iPadStevenoteDate  // true

// And just for kicks, some trivial comparisons.
iPhoneStevenoteDate == iPhoneStevenoteDate  // true
iPadStevenoteDate == iPadStevenoteDate  // true

Note that these are comparisons of Dates, which measure time down to the nearest nanosecond. If you compare two Dates named date1 and date2, where date2 represents a point in time one nanosecond after date1, they will not be equal; date2 will be greater than date1.

A little later on in this article, we’ll look at more “human” ways of comparing Dates.

How far apart are the iPhone and iPad Stevenotes, part 1: In seconds, using Date’s timeIntervalSince method

Date‘s timeIntervalSince method can give us the difference between two dates and times — in seconds. Add the following code to the playground:

// (Previous code goes here)

// Number of seconds between the iPhone Stevenote and the iPad Stevenote
iPhoneStevenoteDate.timeIntervalSince(iPadStevenoteDate)  // -96249600

// Number of seconds between the iPad Stevenote and the iPhone Stevenote
iPadStevenoteDate.timeIntervalSince(iPhoneStevenoteDate)  // 96249600

The results tell us that there were 96,248,600 seconds between the iPhone Stevenote and the iPad Stevenote.

While there are cases when you’ll want to know how many seconds there are between two given points in time, there are also many cases where you’ll want to find the differences between two points in time using other units, such as days, weeks, months, and years, not to mention hours and minutes.  Date‘s timeIntervalSince method isn’t going to work for these cases.

How far apart are the iPhone and iPad Stevenotes, part 2: In days, using Calendar’s dateComponents(_:from:to:) method

Most of the time, when you are calculating how far apart two given Dates are, you’ll be using this method of the Calendar struct:

dateComponents(components, from: startDate, to: endDate)

Here’s a run-down of its parameters:

Parameter Description
components Set (expressed in array notation) of Calendar.Component values specifying the time units you want, which can be:

  • .second
  • .minute
  • .hour
  • .day
  • .month
  • .year
startDate .orderedSame
endDate .orderedAscending

Let’s use dateComponents(_:from:to:) to find out how many days there were between the iPhone Stevenote and the iPad Stevenote. Add the following code to the playground:

// (Previous code goes here)

// The result in the sidebar should be:
// day: 1114 isLeapMonth: false
let daysBetweenStevenotes = userCalendar.dateComponents([.day],
                                                        from: iPhoneStevenoteDate,
                                                        to: iPadStevenoteDate)
daysBetweenStevenotes.day!  // 1114

In the code above, we passed dateComponents(_:from:to:) three values:

  • An array containing the Calendar.Component value .day, which specifies that we want the result expressed as the difference between iPadStevenoteDate and iPhoneStevenoteDate in terms of days.
  • The two dates in question, iPhoneStevenoteDate and iPadStevenoteDate.

As the result tells us, there were 1,114 days between the iPhone Stevenote and the iPad Stevenote.

How far apart are the iPhone and iPad Stevenotes, part 3: In weeks

By changing the contents of the array of Calendar.Component values that we provide in the first argument of Calendar’s dateComponents(components, from: startDate, to: endDate) method, we can get the result expressed in different time units. Add the following code to the playground:

// (Previous code goes here)

// The result in the sidebar should be:
// weekOfYear: 159 isLeapMonth: false
let weeksBetweenStevenotes = userCalendar.dateComponents([.weekOfYear],
                                                         from: iPhoneStevenoteDate,
                                                         to: iPadStevenoteDate)
weeksBetweenStevenotes.weekOfYear!  // 159

In the code above, we passed dateComponents(_:from:to:) three values:

  • An array containing the Calendar.Component value .weekOfYear, which specifies that we want the result expressed as the difference between iPadStevenoteDate and iPhoneStevenoteDate in terms of the numbered weeks of the year on which both dates fall. For example, if event1 took place on week 2 of a year and event2 took place on week 5, the difference between the two in .weekOfYear terms would be 3.
  • The two dates in question, iPhoneStevenoteDate and iPadStevenoteDate.

The result indicates that 159 weeks passed between the iPhone Stevenote and the iPad Stevenote.

If you do the math, 159 times 7 days is 1,113 days, but our previous calculation said that the iPhone Stevenote and the iPad Stevenote were 1,114 days apart. That’s because the two events are 159 whole weeks apart, plus an extra day.

How far apart are the iPhone and iPad Stevenotes, part 4: In years, months, and days

We can also put multiple values of Calendar.Component into the array that we provide as the first argument of Calendar’s dateComponents(components, from: startDate, to: endDate) method. Add the following code to the playground:

// (Previous code goes here)

// The result in the sidebar should be:
// year: 3 month: 0 day: 18 hour: 0 minute: 0 isLeapMonth: false
let yearsMonthsDaysHoursMinutesBetweenStevenotes = userCalendar.dateComponents([.year, .month, .day, .hour, .minute],
                                                                               from: iPhoneStevenoteDate,
                                                                               to: iPadStevenoteDate)
yearsMonthsDaysHoursMinutesBetweenStevenotes.year!    // 3
yearsMonthsDaysHoursMinutesBetweenStevenotes.month!   // 0
yearsMonthsDaysHoursMinutesBetweenStevenotes.day!     // 18
yearsMonthsDaysHoursMinutesBetweenStevenotes.hour!    // 0
yearsMonthsDaysHoursMinutesBetweenStevenotes.minute!  // 0

In the code above, we passed dateComponents(_:from:to:) three values:

  • An array containing the Calendar.Component values .year, .month, .day, .hour, .minute, which specifies that we want the result expressed as the difference between iPadStevenoteDate and iPhoneStevenoteDate in terms of years, months, days, hours, and minutes. The method uses the largest applicable component before using smaller ones — for example, it will give results like 1 month and 5 days rather than 35 days.
  • The two dates in question, iPhoneStevenoteDate and iPadStevenoteDate.

The results show that the iPhone Stevenote and the iPad Stevenote were 3 years and 18 days apart.

Date addition, part 1: What’s the last day of a 90-day warranty that starts today?

90-day-warranty

Now that we know how to answer the question “What’s the difference in time between two Dates?”, let’s try answering a different question: “If we add a time interval to a Date, what’s the resulting Date?”

To answer this question, we’ll use this method of the Calendar struct:

date(byAdding: timeUnit, value: numberOfTimeUnits to: startDate)

Here’s a run-down of its parameters:

Parameter Description
timeInterval dateComponents struct whose properties contain values defining the interval of time.
numberOfTimeUnits The number of timeInterval units to be added to the Date in question.
startDate The Date in question.

Let’s start with a simple bit of code that tells us the last day of a 90-day warranty whose term starts right now:

// (Previous code goes here)

// What's the last day of a 90-day warranty that starts today?
userCalendar.date(byAdding: .day, value: 90, to: Date())  // 90 days from now

The result is a Date representing a point in time 90 days from the present.

Date addition, part 2: What was the date 5 weeks ago?

Just as we can convert addition to subtraction by adding a negative value, we can also do Date subtraction by providing date(byAdding:value:to:) with negative values. Here’s an example of code that returns a date that is an interval of time prior to the date in question:

// What was the date 5 weeks ago?
userCalendar.date(byAdding: .weekOfYear, value: -5, to: Date())

The result is a Date representing a point in time 5 weeks in the past.

Date addition, part 3: What time will it be 4 hours and 30 minutes from now, and 4 hours and 30 minutes ago?

The date(byAdding:value:to:) method works when you just want to add one kind of time unit — a minute, hour, day, week, month, or year — to a Date. If you want to add multiple kinds of time units to a Date, such as 4 hours and 30 minutes, you need to use this Calendar method instead:

date(byAdding: timeIntervalComponents, to: startDate)

Here’s a run-down of its parameters:

Parameter Description
timeInterval dateComponents struct whose properties contain values defining the interval of time.
startDate The Date in question.

Here’s the code that answers the question “What time will it be 4 hours and 30 minutes from now?”

// (Previous code goes here)

// What time will it be 4 hours and 30 minutes from now?
// First, we need to define a DateComponents struct representing
// a time interval of 4 hours and 30 minutes
var fourHoursThirtyMinutes = DateComponents()
fourHoursThirtyMinutes.hour = 4
fourHoursThirtyMinutes.minute = 30

// Now add the interval to the Date
let fourHoursThirtyMinutesFromNow = userCalendar.date(byAdding: fourHoursThirtyMinutes, to: Date()) // 4 hours and 30 minutes from now

In the code above, we did the following:

  • First, we defined a DateComponents struct representing a 4-hour, 30-minute span of time,
  • then we added that span of time to the present date and time using the date(byAdding:to:) method.

The result is a Date representing a time 4 hours and 30 seconds in the future.

Let’s find out what the Date was 4 hours and 30 seconds ago:

// (Previous code goes here)

// What time was it 4 hours and 30 minutes ago?
var minusFourHoursThirtyMinutes = DateComponents()
minusFourHoursThirtyMinutes.hour = -4
minusFourHoursThirtyMinutes.minute = -30
let fourHoursThirtyMinutesAgo = userCalendar.date(byAdding: fourHoursThirtyMinutes, to: Date()) // 4 hours and 30 minutes ago

Date comparisons, part 2: Making Date comparisons a little more “human”

One recurring theme in science fiction (and especially in Star Trek) is the tendency for ultra-smart characters and computers to be overly, needlessly, pointlessly precise. The writers for the original series often did this with Spock, and it seemed that at least a few writers were aware of this annoying trope in later series. Here’s a bit of dialogue from The Next Generation:

Data: 6 days, 13 hours, 47 minutes.
Riker: What, no seconds?
Data: I have discovered, sir, a certain level of impatience when I calculate a lengthy time interval to the nearest second. [beat] However if you wish…
Riker: No. No. Minutes is fine.

Date‘s comparison operators have the same problem with being overly precise. Consider the following Dates:

  • The start of the iPhone Stevenote: January 9, 2007, 10:00:00 a.m. PST
  • One second after the start of the iPhone Stevenote: January 9, 2007, 10:00:01 a.m. PST
  • Five minutes after the start of the iPhone Stevenote: January 9, 2007, 10:05:00 a.m. PST
  • Three hours after the start of the iPhone Stevenote: January 9, 2007, 1:00:00 p.m. PST

Date‘s comparison operators think of all these points in time as very different, but depending on your circumstances you may think of them as being practically the same:

  • In most cases, there really isn’t a difference between the time when the iPhone Stevenote and one second after.
  • If you’re concerned only with the day on which the iPhone Stevenote took place and not the exact time, there’s effectively no difference between any of the Dates listed above.

Calendar‘s compare(_:to:toGranularity) method allows us to perform Date comparisons at different levels of granularity:

compare(firstDate, to: secondDate, toGranularity: granularity)

Here’s a run-down of its parameters:

Parameter Description
firstDate The first Date in the comparison.
secondDate The second Date in the comparison.
granularity The level of precision for the comparison, expressed as an Calendar.Component value, which includes:

  • .second
  • .minute
  • .hour
  • .day
  • .month
  • .year

This is a Cocoa method named “compare”, so you’ve probably guessed that its return type is ComparisonResult. Here’s what it returns:

If… compare returns:
firstDate is earlier than secondDate, when compared at the specified level of precision .orderedAscending
firstDate is equal to secondDate, when compared at the specified level of precision .orderedSame
firstDate is later than secondDate, when compared at the specified level of precision .orderedAscending

It’s easier to show compare(_:to:toGranularity) in action than to explain how it works. Add the following code into the playground:

// (Previous code goes here)

// Let's define some Dates relative to iPhoneStevenoteDate
let iPhoneStevenotePlusOneSecond = userCalendar.date(byAdding: .second, value: 1, to: iPhoneStevenoteDate)!
let iPhoneStevenotePlusFiveMinutes = userCalendar.date(byAdding: .minute, value: 5, to: iPhoneStevenoteDate)!
let iPhoneStevenotePlusThreeHours = userCalendar.date(byAdding: .hour, value: 3, to: iPhoneStevenoteDate)!

// This returns false, because iPhoneStevenoteDate and iPhoneStevenotePlusOneSecond
// are NOT both within the same SECOND.
userCalendar.compare(iPhoneStevenoteDate,
                     to: iPhoneStevenotePlusOneSecond,
                     toGranularity: .second)
  == .orderedSame

// This returns true, because iPhoneStevenoteDate comes one second BEFORE
// iPhoneStevenotePlusOneSecond, and we're comparing the two at the one-second
// level of granularity.
userCalendar.compare(iPhoneStevenoteDate,
                     to: iPhoneStevenotePlusOneSecond,
                     toGranularity: .second)
  == .orderedAscending

// This returns true, because iPhoneStevenoteDate and iPhoneStevenotePlusOneSecond
// ARE both within the same MINUTE.
userCalendar.compare(iPhoneStevenoteDate,
                     to: iPhoneStevenotePlusOneSecond,
                     toGranularity: .minute)
  == .orderedSame

// This returns true, because iPhoneStevenoteDate and iPhoneStevenotePlusFiveMinutes
// ARE both within the same HOUR.
userCalendar.compare(iPhoneStevenoteDate,
                     to: iPhoneStevenotePlusFiveMinutes,
                     toGranularity: .hour)
  == .orderedSame

// This returns true, because iPhoneStevenotePlusFiveMinutes comes 5 minutes AFTER
// iPhoneStevenoteDate, and we're comparing the two at the one-minute level 
// of granularity.
userCalendar.compare(iPhoneStevenotePlusFiveMinutes,
                     to: iPhoneStevenoteDate,
                     toGranularity: .minute)
  == .orderedDescending

// This returns true, because iPhoneStevenoteDate and iPhoneStevenotePlusThreeHours
// ARE both within the same DAY.
userCalendar.compare(iPhoneStevenoteDate,
                     to: iPhoneStevenotePlusThreeHours,
                     toGranularity: .day)
  == .orderedSame

Wrapping it all up

Here’s the playground containing all the code we just worked with:

import UIKit

// The user's calendar incorporates the user's locale and
// time zone settings, which means it's the one you'll use
// most often.
let userCalendar = Calendar.current


// A couple of Dates to work with
// ------------------------------

// Let's create a Date for the start of the Stevenote
// where the iPhone was introduced (January 9, 2007, 10:00:00 Pacific time)
// using DateComponents.
var iPhoneStevenoteDateComponents = DateComponents()
iPhoneStevenoteDateComponents.year = 2007
iPhoneStevenoteDateComponents.month = 1
iPhoneStevenoteDateComponents.day = 9
iPhoneStevenoteDateComponents.hour = 10
iPhoneStevenoteDateComponents.timeZone = TimeZone(abbreviation: "PST")
let iPhoneStevenoteDate = userCalendar.date(from: iPhoneStevenoteDateComponents)!

// Now let's create a Date for the start of the Stevenote
// where the iPad was introduced (January 27, 2010, 10:00:00 Pacific time)
// using DateFormatter.
var dateMakerFormatter = DateFormatter()
dateMakerFormatter.calendar = userCalendar
dateMakerFormatter.dateFormat = "MMM d, yyyy, hh:mm a zz"
let iPadStevenoteDate = dateMakerFormatter.date(from: "Jan 27, 2010, 10:00 AM PST")!


// Date comparisons, part 1
// ------------------------

// Did the iPhone Stevenote come BEFORE the iPad Stevenote?
iPhoneStevenoteDate < iPadStevenoteDate   // true

// Did the iPhone Stevenote come AFTER the iPad Stevenote?
iPhoneStevenoteDate > iPadStevenoteDate   // false

// Did the iPad Stevenote come BEFORE the iPhone Stevenote?
iPadStevenoteDate < iPhoneStevenoteDate   // false

// Does the iPad Stevenote come AFTER the iPhone Stevenote?
iPadStevenoteDate > iPhoneStevenoteDate   // true

// Do the iPhone Stevenote and the iPad Stevenote fall on DIFFERENT dates?
iPhoneStevenoteDate == iPadStevenoteDate  // false

// Do the iPhone Stevenote and the iPad Stevenote fall on the SAME date?
iPhoneStevenoteDate != iPadStevenoteDate  // true

// And just for kicks, some trivial comparisons.
iPhoneStevenoteDate == iPhoneStevenoteDate  // true
iPadStevenoteDate == iPadStevenoteDate  // true


// Date arithmetic, part 1:
// Number of seconds between the iPhone Stevenote and iPad Stevenote
// -----------------------------------------------------------------

// Number of seconds between the iPhone Stevenote and the iPad Stevenote
iPhoneStevenoteDate.timeIntervalSince(iPadStevenoteDate)  // -96249600

// Number of seconds between the iPad Stevenote and the iPhone Stevenote
iPadStevenoteDate.timeIntervalSince(iPhoneStevenoteDate)  // 96249600


// Date arithmetic, part 2:
// Number of days between the iPhone Stevenote and iPad Stevenote
// --------------------------------------------------------------

// The result in the sidebar should be:
// day: 1114 isLeapMonth: false
let daysBetweenStevenotes = userCalendar.dateComponents([.day],
                                                        from: iPhoneStevenoteDate,
                                                        to: iPadStevenoteDate)
daysBetweenStevenotes.day!  // 1114


// Date arithmetic, part 3:
// Number of weeks between the iPhone Stevenote and iPad Stevenote
// ---------------------------------------------------------------

// The result in the sidebar should be:
// weekOfYear: 159 isLeapMonth: false
let weeksBetweenStevenotes = userCalendar.dateComponents([.weekOfYear],
                                                         from: iPhoneStevenoteDate,
                                                         to: iPadStevenoteDate)
weeksBetweenStevenotes.weekOfYear!  // 159


// Date arithmetic, part 4:
// Number of years, months, and days between the
// iPhone Stevenote and iPad Stevenote
// ---------------------------------------------

// The result in the sidebar should be:
// year: 3 month: 0 day: 18 hour: 0 minute: 0 isLeapMonth: false
let yearsMonthsDaysHoursMinutesBetweenStevenotes = userCalendar.dateComponents([.year, .month, .day, .hour, .minute],
                                                                               from: iPhoneStevenoteDate,
                                                                               to: iPadStevenoteDate)
yearsMonthsDaysHoursMinutesBetweenStevenotes.year!    // 3
yearsMonthsDaysHoursMinutesBetweenStevenotes.month!   // 0
yearsMonthsDaysHoursMinutesBetweenStevenotes.day!     // 18
yearsMonthsDaysHoursMinutesBetweenStevenotes.hour!    // 0
yearsMonthsDaysHoursMinutesBetweenStevenotes.minute!  // 0


// Date addition, part 1:
// What's the last day of a 90-day warranty that starts today?
// -----------------------------------------------------------
userCalendar.date(byAdding: .day, value: 90, to: Date())  // 90 days from now


// Date addition, part 2:
// What was the date 5 weeks ago?
// ------------------------------
userCalendar.date(byAdding: .weekOfYear, value: -5, to: Date())


// Date addition, part 3:
// What time will it be 4 hours and 30 minutes from now, 
// and 4 hours and 30 minutes ago?
// -----------------------------------------------------

// What time will it be 4 hours and 30 minutes from now?
// First, we need to define a DateComponents struct representing
// a time interval of 4 hours and 30 minutes
var fourHoursThirtyMinutes = DateComponents()
fourHoursThirtyMinutes.hour = 4
fourHoursThirtyMinutes.minute = 30

// Now add the interval to the Date
let fourHoursThirtyMinutesFromNow = userCalendar.date(byAdding: fourHoursThirtyMinutes, to: Date()) // 4 hours and 30 minutes from now

// Now, let's define a DateComponents struct representing
// a time interval of -4 hours and -30 minutes
var minusFourHoursThirtyMinutes = DateComponents()
minusFourHoursThirtyMinutes.hour = -4
minusFourHoursThirtyMinutes.minute = -30

// Now add the interval to the Date
let fourHoursThirtyMinutesAgo = userCalendar.date(byAdding: fourHoursThirtyMinutes, to: Date()) // 4 hours and 30 minutes ago


// Date comparisons, part 2:
// Making Date comparisons a little more "human"
// ---------------------------------------------

// Let's define some Dates relative to iPhoneStevenoteDate
let iPhoneStevenotePlusOneSecond = userCalendar.date(byAdding: .second, value: 1, to: iPhoneStevenoteDate)!
let iPhoneStevenotePlusFiveMinutes = userCalendar.date(byAdding: .minute, value: 5, to: iPhoneStevenoteDate)!
let iPhoneStevenotePlusThreeHours = userCalendar.date(byAdding: .hour, value: 3, to: iPhoneStevenoteDate)!

// This returns false, because iPhoneStevenoteDate and iPhoneStevenotePlusOneSecond
// are NOT both within the same SECOND.
userCalendar.compare(iPhoneStevenoteDate,
                     to: iPhoneStevenotePlusOneSecond,
                     toGranularity: .second)
  == .orderedSame

// This returns true, because iPhoneStevenoteDate comes one second BEFORE
// iPhoneStevenotePlusOneSecond, and we're comparing the two at the one-second
// level of granularity.
userCalendar.compare(iPhoneStevenoteDate,
                     to: iPhoneStevenotePlusOneSecond,
                     toGranularity: .second)
  == .orderedAscending

// This returns true, because iPhoneStevenoteDate and iPhoneStevenotePlusOneSecond
// ARE both within the same MINUTE.
userCalendar.compare(iPhoneStevenoteDate,
                     to: iPhoneStevenotePlusOneSecond,
                     toGranularity: .minute)
  == .orderedSame

// This returns true, because iPhoneStevenoteDate and iPhoneStevenotePlusFiveMinutes
// ARE both within the same HOUR.
userCalendar.compare(iPhoneStevenoteDate,
                     to: iPhoneStevenotePlusFiveMinutes,
                     toGranularity: .hour)
  == .orderedSame

// This returns true, because iPhoneStevenotePlusFiveMinutes comes 5 minutes AFTER
// iPhoneStevenoteDate, and we're comparing the two at the one-minute level 
// of granularity.
userCalendar.compare(iPhoneStevenotePlusFiveMinutes,
                     to: iPhoneStevenoteDate,
                     toGranularity: .minute)
  == .orderedDescending

// This returns true, because iPhoneStevenoteDate and iPhoneStevenotePlusThreeHours
// ARE both within the same DAY.
userCalendar.compare(iPhoneStevenoteDate,
                     to: iPhoneStevenotePlusThreeHours,
                     toGranularity: .day)
  == .orderedSame

In the next installment, we’ll look at making working with dates and times more Swift-like.