Categories
Uncategorized

“Why can’t girls code?” hilariously sends up the sexist excuses for shooing girls and women away from tech

If you watch only one video today, make it Why Can’t Girls Code?, which provides all sorts of crazy reasons why girls (and eventually, woman) shouldn’t take up programming or anything tech-related, from this one…

boobs

…to this one…

auburn strands of mink

…to this one:

mood swings

As Margot Richaud, an alumna of Girls Who Code (the people behind the video) puts it:

“These videos may seem absurd, but sadly they’re not so off the mark. As a high school senior, I’ve had classmates and teachers tell me that coding is not for me, or that I’d be better off focusing on design and making something look ‘pretty’. These comments, plus the stereotypes that we see everyday of a coder as a nerdy guy in a hoodie, keep a lot of my friends from considering computer science as a career path. We need to change that and stop telling girls that coding is not for us. There is never be an excuse for a girl to not code.”

For more, visit GirlsWhoCode.com.

Categories
Uncategorized

iOS programming trick: How to use Xcode to set a text field’s maximum length, Visual Studio-style [Updated for Swift 3]

Setting a text box’s maximum length, the Visual Studio way

easy in visual studio

Here’s how you set the maximum number of characters than can be entered into a text box when developing C# and VB applications in Microsoft Visual Studio:

There’s the GUI builder way…

  1. Select the text box.
  2. Set its MaxLength property in the Properties pane.

…and there’s the code way:

myTextBox.maxLength = 3 // or whatever length you like

Setting a text field’s maximum length, the out-of-the-box Xcode way

guy yelling at computer

Here’s how you set the maximum number of characters than can be entered into a text field when developing Objective-C and Swift applications in Xcode:

There isn’t a GUI builder way — just a code way, and it’s a little more work than it needs to be. The typical steps are:

  1. Make the containing view controller a text field delegate (i.e. make it adopt the UITextFieldDelegate protocol) so that it receives messages from all the text fields it contains.
  2. Implement the textfield(_:shouldChangeCharactersInRange:replacementString) method in order to intercept changes to any of the view’s text fields before they’re finalized. This involves:
    • Identifying the text field whose contents were changed, usually with an if or switch statement. If the text field is one whose text we want to limit to a certain length, then:
      • If the change in contents will result in the text not exceeding that length, simply return true.
      • If the change in contents will result in the text exceeding that length,  return false. You may want to take some additional action: for example, if the user tries to paste in more text you want to allow in the text field, you may want to allow a “partial paste” — pasting in the first n characters that will fit in the remaining space — and not reject the pasted text outright.

If you’re curious, I covered this in an earlier article, How to program an iOS text field that takes only numeric input or specific characters with a maximum length.

That’s a lot of work. Isn’t there a way we can get a “max length” property for text fields, like the .NET people?

wouldnt it be nice in xcode

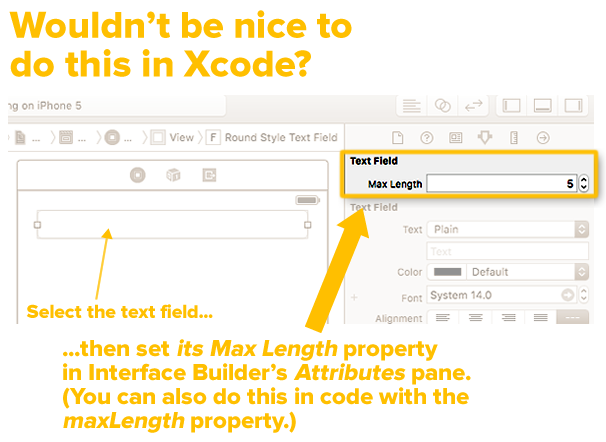
The screen shot above (if you ignore my text annotations) isn’t Photoshoppery on my part. That’s a screen shot of my Xcode showing a selected text field and a corresponding Max Length property editor in the Attributes panel. With just a little coding in a single file, you too can your iOS text fields these goodies that .NET developers have had for ages and set the maximum length of text in a text field in both these ways:

  1. The GUI builder way, and
  2. With a single line of code.

Setting a text field’s maximum length, the improved Xcode way

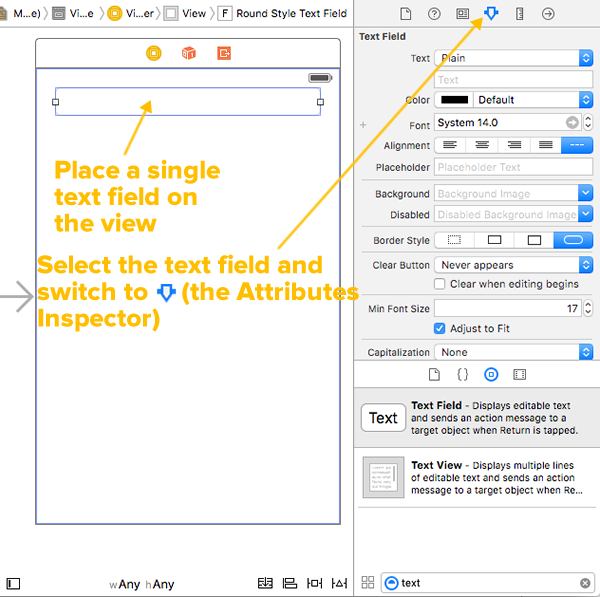
Start a new project by doing the standard File → New → Project… dance to create a new Single View Application. Open Main.storyboard and place a single text field on the view:

plain text field and attributes inspector

Select the text field and switch to the Attributes Inspector (the inspector panel with the attributes inspector icon icon). The Attributes Inspector lets you edit all sorts of text field properties, but not the maximum length…yet.

new swift file

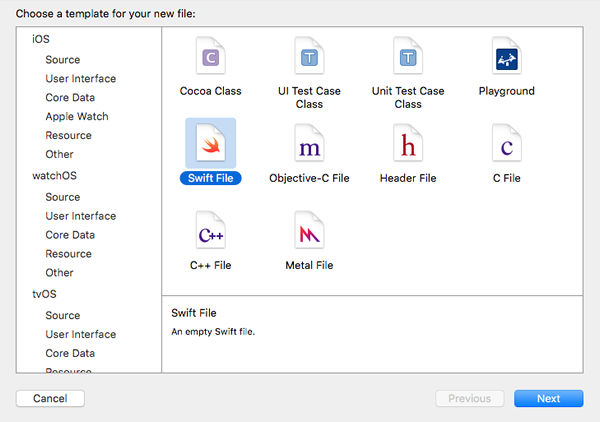
Use File → New → File… to create a new Swift File. Give it the name TextFieldMaxLengths.swift, and once you’ve created it, enter the following code into it:

import UIKit

extension UITextField {
  
  @IBInspectable var maxLength: Int {
    get {
      return 5
    }
    set {
      
    }
  }

}

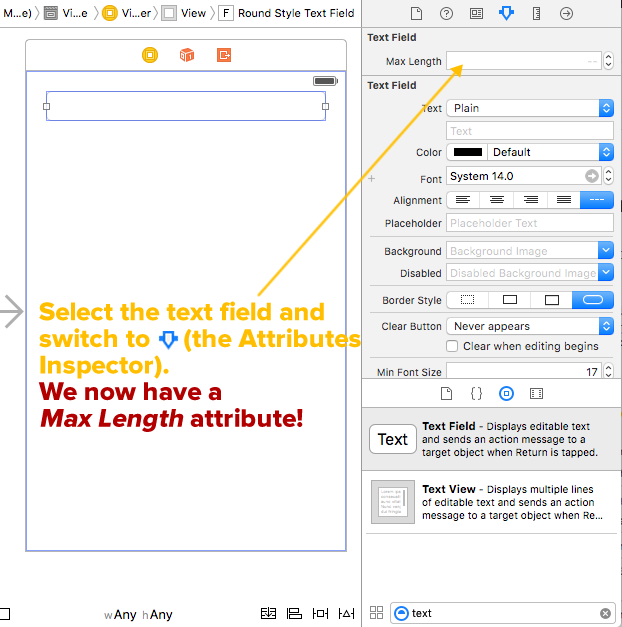
Switch back to Main.storyboard, select the text field and look at the Attributes Inspector. You may notice that something’s changed:

enhanced text field and attributes inspector

All we did was create an extension for the UITextField class to give it an extra Int property named maxLength. Marking this property with the @IBInspectable keyword makes the property available to the Attributes Inspector (hence the name — the property can be inspected in Interface Builder).

Now that we’ve added a property to UITextField and made it inspectable within Interface Builder, it’s time to make the property do something.

If you’re using Swift 2.x, update the code in TextFieldMaxLengths.swift to the code below (keep scrolling if you’re using Swift 3):

// Swift 2.x version
// This will NOT work with Swift 3!
// ================================

import UIKit

// 1
private var maxLengths = [UITextField: Int]()

// 2
extension UITextField {
  
  // 3
  @IBInspectable var maxLength: Int {
    get {
      // 4
      guard let length = maxLengths[self] else {
        return Int.max
      }
      return length
    }
    set {
      maxLengths[self] = newValue
      // 5
      addTarget(
        self,
        action: #selector(limitLength),
        forControlEvents: UIControlEvents.EditingChanged
      )
    }
  }
  
  func limitLength(textField: UITextField) {
    // 6
    guard let prospectiveText = textField.text
      where prospectiveText.characters.count > maxLength else {
        return
    }
    
    let selection = selectedTextRange
    // 7
    text = prospectiveText.substringWithRange(
      Range<String.Index>(prospectiveText.startIndex ..< prospectiveText.startIndex.advancedBy(maxLength))
    )
    selectedTextRange = selection
  }
  
}

If you’re using Swift 3, update the code in TextFieldMaxLengths.swift to the code below:

// Swift 3 version
// This will NOT work with Swift 2.x!
// ==================================

import UIKit

// 1
private var maxLengths = [UITextField: Int]()

// 2
extension UITextField {
  
  // 3
  @IBInspectable var maxLength: Int {
    get {
      // 4
      guard let length = maxLengths[self] else {
        return Int.max
      }
      return length
    }
    set {
      maxLengths[self] = newValue
      // 5
      addTarget(
        self,
        action: #selector(limitLength),
        for: UIControlEvents.editingChanged
      )
    }
  }
  
  func limitLength(textField: UITextField) {
    // 6
    guard let prospectiveText = textField.text,
              prospectiveText.characters.count > maxLength
    else {
      return
    }
    
    let selection = selectedTextRange
    // 7
    let maxCharIndex = prospectiveText.index(prospectiveText.startIndex, offsetBy: maxLength)
    text = prospectiveText.substring(to: maxCharIndex)
    selectedTextRange = selection
  }
  
}

Here are my annotations that match the numbered comments in the code:

  1. There are two big things going on in this single line of code, which declares and initializes maxLengths, a dictionary that stores the maximum lengths of text fields:
    • First, there’s the private declaration. In many programming languages, private means “accessible only inside the class”, but in Swift, private means “accessible only inside the source file where they’re defined”. Any code inside TextFieldMaxLengths.swift has access to maxLengths, and any code outside TextFieldMaxLengths.swift does not. By putting maxLengths in the same file as our UITextField extension, we get a place where we can store the maximum lengths of text fields (remember: extensions can only add methods, not properties), and by making it private, we keep other code from messing with it.
    • Then there’s the matter of what to use as the key for the maxLengths dictionary. Swift lets you use anything that conforms to the Hashable protocol as a dictionary key, and UITextField does just that. It makes sense to use the text fields themselves as the keys to the values for their maximum lengths.
  2. Swift extensions let you add new functionality to existing classes, structs, enumerations, and protocols. We’re using an extension to UITextField to add two things:
    • maxLength, a property that lets the programmer set and get the maximum length of a text field, and
    • limitLength, a method called whenever the contents of a text field are changed, and limits the number of characters in that text field.
  3. By marking the maxLength property with @IBInspectable, we make it available to Interface Builder, which then provides an editor for its value in the Attributes Inspector.
  4. Get to know and love the guard statement and the “early return” style of programming; you’re going to see a lot of it in a lot of Swift coding. Here, we’re using guard to filter out cases where no maximum length has been defined for the text field, in which case, we simply return the theoretical maximum string size.
  5. We use addTarget in maxLength‘s setter to ensure that if a text field is assigned a maximum length, the limitLength method is called whenever the text field’s contents change.
  6. Another guard statement. Any case that gets past it is one where the text about to go into the text field is longer than the maximum length.
  7.  Cocoa sometimes likes to make things complicated. This line is the Cocoa way of saying “put the first maxLength characters of prospectiveText into text“. If you’re going to be playing with substrings, you need to get comfortable with Ranges and intervals.

If you include TextFieldMaxLengths.swift in any of your iOS projects, all text fields will have a maxLength property that you can set either GUI builder style in Interface Builder or in code, using myTextField.maxLength = n syntax, just like the .NET people do.

Happy text field coding!

“Text2”: A sample project showing Visual Studio-style text field maximum lengths in action

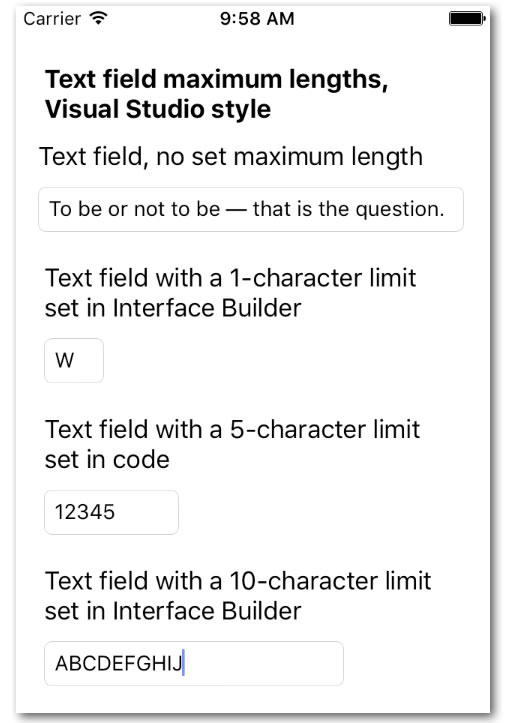
text2 screenshot

If you’d like to try out the code from this article, I’ve create a project — unimaginatively named Text2 and pictured above— that shows our UITextField extension in action. It’s a quick-and-dirty single view app that presents 4 text fields:

  1. A text field without a set maximum length.
  2. A text field with a 1-character maximum length, with the Max Length property set in Interface Builder.
  3. A text field with a 5-character maximum length, with the maxLength property set in code (in the view controller’s viewDidLoad method).
  4. A text field with a 10-character maximum length, with the Max Length property set in Interface Builder.

Give it a try, learn what makes it tick, and use it as a jumping-off point for your own projects!

xcode download

You can download the project files for this article (27KB zipped) here.

This code was derived from a Swift 1.2 solution posted by Frouo in Stack Overflow. I annotated it, and updated it so that it would be compatible with both Swift 2 and 3.

Categories
Uncategorized

This quick hack lets you use a standard pop filter with a Blue Yeti microphone

pop filter - blue yeti - hex dumbbell - 1

If you do podcasting or any kind of narrative recording with your computer at your desk, I can’t recommend the Blue Yeti microphone highly enough. Its shape and design ensure that it fits on even the most crowded of desktops, but many pop filters weren’t designed to clip onto it.

Here’s a quick and clever fix, and you may already have all the necessary parts sitting about your house.

pop filter - blue yeti - hex dumbbell - 2

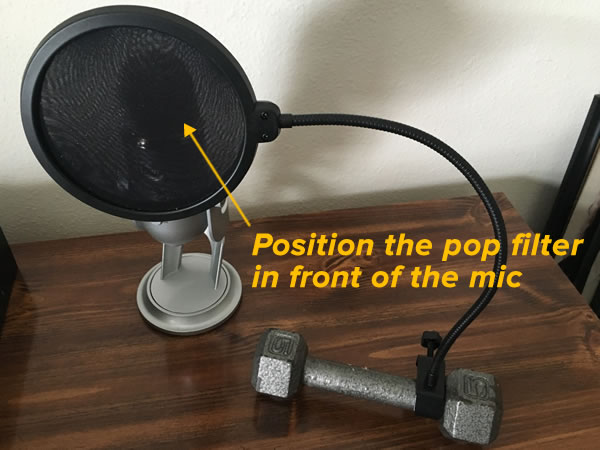
Most pop filters were designed to attach to microphone stands. Their C-clamps were designed to wrap around something thin and cylindrical, a shape that doesn’t appear anywhere on the Blue Yeti. However, if you’ve got a small dumbbell lying around home — especially a hex-style dumbbell that won’t roll around — you’ve got the makings of a pop filter stand.

(If you don’t have a dumbbell like this handy, you should be able to find one at a garage sale or a used sporting goods store. You shouldn’t have to pay more than $5 for one.)

pop filter - dumbbell 1

Simply attach the pop filter to the dumbbell by clamping it onto one of the ends of its handle, as pictured above…

pop filter - dumbbell 2

…and then position your new pop filter/dumbbell combo in front of your mic!

felt pads

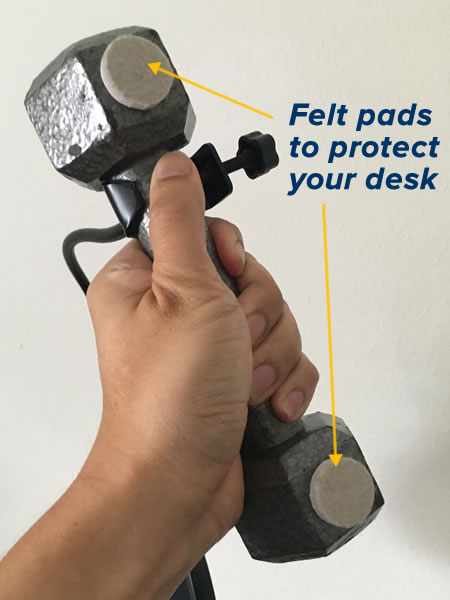
I’ve got a desk made of pine, which is pretty soft wood, so I attached a couple of felt pads to my dumbbell to prevent scratching.

And there you have it: a quick, easy, and even portable (I’ve flown with this setup) fix that lets you use a standard pop filter with a Blue Yeti mic!

Categories
Uncategorized

How to build an iOS weather app in Swift, part 5: Putting it all together

putting it all together

There’ve been four articles in this series on building a simple weather iOS weather app with Swift:

  • In the first article, we introduced OpenWeatherMap, its current forecast API, and how to use that API to get weather data for a specific city, both manually and programatically.
  • In the second article, we went a little deeper into NSURLSession and the related classes that made iOS networking possible. We also took the weather data that OpenWeatherMap returned and converted it from a string containing JSON-formatted weather data into a more easily processed Swift dictionary.
  • In the third article, we gave our weather app a user interface.
  • In the fourth article, we took a little detour from the weather app in order to introduce geolocation. We wrote a simple geolocation app that outputs the device’s coordinates to the debug console.
simpleweather 5 screenshot

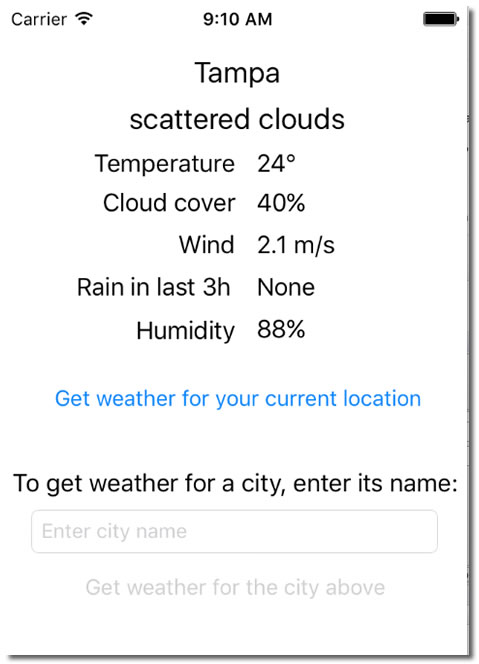
What our app will look like by the end of this article.

In this article, we’re going to take what we’ve learned from our little geolocation app and make some changes to our weather app so that:

  • When the app is launched, it automatically determine the user’s current location and displays the weather for that location.
  • The user can press a button marked Get weather for your current location to display the weather at his/her current location.
  • The user can also enter a city name into a text field and press a button below it marked Get weather for the city above to display the weather in that city.

Another way to use OpenWeatherMap’s “current weather” API
latitude and longitude

To get the weather for a given city using OpenWeatherMap’s “current weather” API, we’ve been using this call:

http://api.openweathermap.org/data/2.5/weather?APPID=API_KEY&q=CITY_NAME

where:

  • API_KEY is the developer’s API key for OpenWeatherMap
  • CITY_NAME is the name of the city that we want the current weather for

There’s also a way to get the weather for a given latitude and longitude. It’s done by making this call:

http://api.openweathermap.org/data/2.5/weather?APPID=API_KEY&lat=LATITUDE&lon=LONGITUDE

where:

  • API_KEY is the developer’s API key for OpenWeatherMap
  • LATITUDE is the latitude of the location that we want the current weather for
  • LONGITUDE is the longitude of the location that we want the current weather for

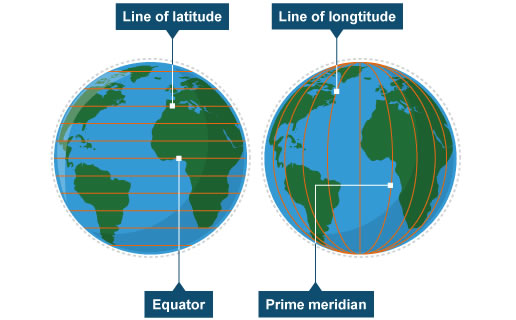
I’m based in Tampa, whose coordinates are 27.9506° N, 82.4572° W. That translates into:

  • A latitude of 27.9506 (positive latitudes are north of the equator, negative latitudes are south)
  • A longitude of -82.4572 (positive longitudes are east of the prime meridian in London, negative longitudes are west)

Another way of getting the current weather for Tampa from OpenWeatherMap is to make the call below.. Try pasting the URL into your browser’s address bar (using your own API key, of course):

http://api.openweathermap.org/data/2.5/weather?APPID=API_KEY&lat=27.9506&lon=-82.4572

We’re going to make some additional to our weather app so that it can do this programatically.

Updating WeatherGetter

Here’s an updated version of the WeatherGetter class, which we use to connect to OpenWeatherMap and get weather data:

import Foundation


// MARK: WeatherGetterDelegate
// ===========================
// WeatherGetter should be used by a class or struct, and that class or struct
// should adopt this protocol and register itself as the delegate.
// The delegate's didGetWeather method is called if the weather data was
// acquired from OpenWeatherMap.org and successfully converted from JSON into
// a Swift dictionary.
// The delegate's didNotGetWeather method is called if either:
// - The weather was not acquired from OpenWeatherMap.org, or
// - The received weather data could not be converted from JSON into a dictionary.
protocol WeatherGetterDelegate {
  func didGetWeather(weather: Weather)
  func didNotGetWeather(error: NSError)
}


// MARK: WeatherGetter
// ===================

class WeatherGetter {
  
  private let openWeatherMapBaseURL = "http://api.openweathermap.org/data/2.5/weather"
  private let openWeatherMapAPIKey = "06db44f389d2172e9b1096cdce7b051c"
 
  private var delegate: WeatherGetterDelegate
  
  
  // MARK: -
  
  init(delegate: WeatherGetterDelegate) {
    self.delegate = delegate
  }
  
  func getWeatherByCity(city: String) {
    let weatherRequestURL = NSURL(string: "\(openWeatherMapBaseURL)?APPID=\(openWeatherMapAPIKey)&q=\(city)")!
    getWeather(weatherRequestURL)
  }
  
  func getWeatherByCoordinates(latitude latitude: Double, longitude: Double) {
    let weatherRequestURL = NSURL(string: "\(openWeatherMapBaseURL)?APPID=\(openWeatherMapAPIKey)&lat=\(latitude)&lon=\(longitude)")!
    getWeather(weatherRequestURL)
  }
  
  private func getWeather(weatherRequestURL: NSURL) {
    
    // This is a pretty simple networking task, so the shared session will do.
    let session = NSURLSession.sharedSession()
    session.configuration.timeoutIntervalForRequest = 3
    
    // The data task retrieves the data.
    let dataTask = session.dataTaskWithURL(weatherRequestURL) {
      (data: NSData?, response: NSURLResponse?, error: NSError?) in
      if let networkError = error {
        // Case 1: Error
        // An error occurred while trying to get data from the server.
        self.delegate.didNotGetWeather(networkError)
      }
      else {
        // Case 2: Success
        // We got data from the server!
        do {
          // Try to convert that data into a Swift dictionary
          let weatherData = try NSJSONSerialization.JSONObjectWithData(
            data!,
            options: .MutableContainers) as! [String: AnyObject]
          
          // If we made it to this point, we've successfully converted the
          // JSON-formatted weather data into a Swift dictionary.
          // Let's now used that dictionary to initialize a Weather struct.
          let weather = Weather(weatherData: weatherData)
          
          // Now that we have the Weather struct, let's notify the view controller,
          // which will use it to display the weather to the user.
          self.delegate.didGetWeather(weather)
        }
        catch let jsonError as NSError {
          // An error occurred while trying to convert the data into a Swift dictionary.
          self.delegate.didNotGetWeather(jsonError)
        }
      }
    }
    
    // The data task is set up...launch it!
    dataTask.resume()
  }
  
}

We’ve made a couple of changes:

  • We’ve added two new methods:
    • getWeatherByCity is called when we want to get the weather for that city. It accepts a String containing the name of a city, which it uses to form an URL, which it then passes to getWeather.
    • getWeatherByCoordinates is called when we want to get the weather for a set of coordinates. It accepts two Doubles representing the latitude and longitude components of the coordinates, which it uses to form an URL, which it then passes to getWeather.
  • We’ve also changed an existing method, getWeather. It used to be public and accept a city as a parameter; now, it’s private and accepts an URL as a parameter. It’s now called indirectly; getWeatherByCity and getWeatherByCoordinates take city or coordinate data, convert it into an URL, and then call getWeather. Aside from this change, the rest of its code is the same.

Updating the UI
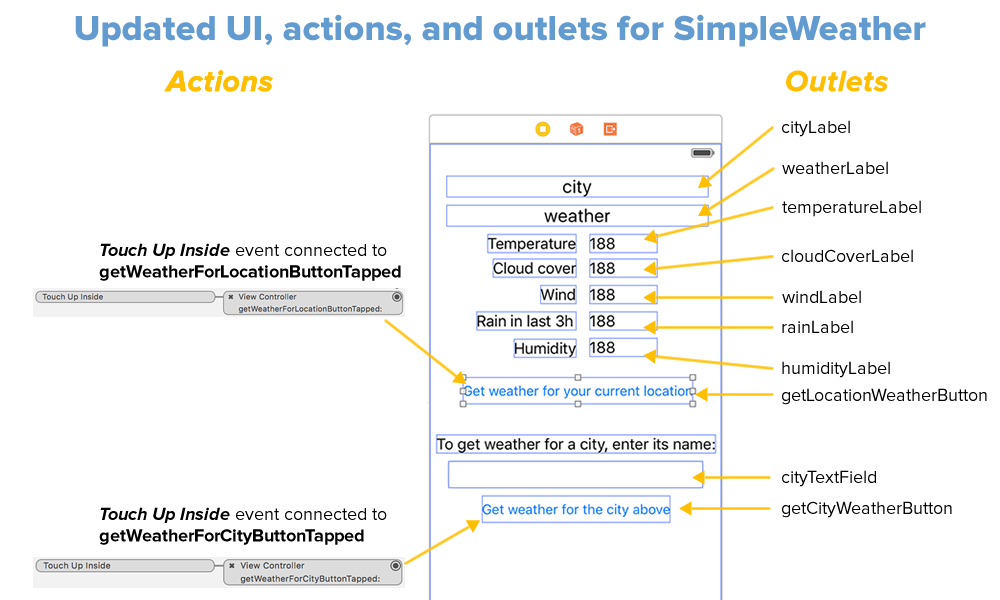
updated ui for simpleweather

We’ve added one button with the title Get weather for your current location and put it between the weather data labels and the controls for entering a city’s name. It’s assigned the following:

  • The outlet getLocationWeatherButton
  • The action getWeatherForLocationButtonTapped, which is connected to a Touch Up Inside event

Updating the view controller

We’ve also updated the view controller code:

import UIKit
import CoreLocation

class ViewController: UIViewController,
                      WeatherGetterDelegate,
                      CLLocationManagerDelegate,
                      UITextFieldDelegate
{
  @IBOutlet weak var cityLabel: UILabel!
  @IBOutlet weak var weatherLabel: UILabel!
  @IBOutlet weak var temperatureLabel: UILabel!
  @IBOutlet weak var cloudCoverLabel: UILabel!
  @IBOutlet weak var windLabel: UILabel!
  @IBOutlet weak var rainLabel: UILabel!
  @IBOutlet weak var humidityLabel: UILabel!
  @IBOutlet weak var getLocationWeatherButton: UIButton!
  @IBOutlet weak var cityTextField: UITextField!
  @IBOutlet weak var getCityWeatherButton: UIButton!
  
  let locationManager = CLLocationManager()
  var weather: WeatherGetter!
  
  
  // MARK: -
  
  override func viewDidLoad() {
    super.viewDidLoad()
    weather = WeatherGetter(delegate: self)
    
    // Initialize UI
    // -------------
    cityLabel.text = "simple weather"
    weatherLabel.text = ""
    temperatureLabel.text = ""
    cloudCoverLabel.text = ""
    windLabel.text = ""
    rainLabel.text = ""
    humidityLabel.text = ""
    cityTextField.text = ""
    cityTextField.placeholder = "Enter city name"
    cityTextField.delegate = self
    cityTextField.enablesReturnKeyAutomatically = true
    getCityWeatherButton.enabled = false
    
    getLocation()
  }
  
  override func didReceiveMemoryWarning() {
    super.didReceiveMemoryWarning()
  }
  
  
  // MARK: - Button events and states
  // --------------------------------
  
  @IBAction func getWeatherForLocationButtonTapped(sender: UIButton) {
    setWeatherButtonStates(false)
    getLocation()
  }
  
  @IBAction func getWeatherForCityButtonTapped(sender: UIButton) {
    guard let text = cityTextField.text where !text.trimmed.isEmpty else {
      return
    }
    setWeatherButtonStates(false)
    weather.getWeatherByCity(cityTextField.text!.urlEncoded)
  }
  
  func setWeatherButtonStates(state: Bool) {
    getLocationWeatherButton.enabled = state
    getCityWeatherButton.enabled = state
  }
  

  // MARK: - WeatherGetterDelegate methods
  // -----------------------------------
  
  func didGetWeather(weather: Weather) {
    // This method is called asynchronously, which means it won't execute in the main queue.
    // All UI code needs to execute in the main queue, which is why we're wrapping the code
    // that updates all the labels in a dispatch_async() call.
    dispatch_async(dispatch_get_main_queue()) {
      self.cityLabel.text = weather.city
      self.weatherLabel.text = weather.weatherDescription
      self.temperatureLabel.text = "\(Int(round(weather.tempCelsius)))°"
      self.cloudCoverLabel.text = "\(weather.cloudCover)%"
      self.windLabel.text = "\(weather.windSpeed) m/s"
      
      if let rain = weather.rainfallInLast3Hours {
        self.rainLabel.text = "\(rain) mm"
      }
      else {
        self.rainLabel.text = "None"
      }
      
      self.humidityLabel.text = "\(weather.humidity)%"
      self.getLocationWeatherButton.enabled = true
      self.getCityWeatherButton.enabled = self.cityTextField.text?.characters.count > 0
    }
  }
  
  func didNotGetWeather(error: NSError) {
    // This method is called asynchronously, which means it won't execute in the main queue.
    // All UI code needs to execute in the main queue, which is why we're wrapping the call
    // to showSimpleAlert(title:message:) in a dispatch_async() call.
    dispatch_async(dispatch_get_main_queue()) {
      self.showSimpleAlert(title: "Can't get the weather",
                           message: "The weather service isn't responding.")
      self.getLocationWeatherButton.enabled = true
      self.getCityWeatherButton.enabled = self.cityTextField.text?.characters.count > 0
    }
    print("didNotGetWeather error: \(error)")
  }
  
  
  // MARK: - CLLocationManagerDelegate and related methods
  
  func getLocation() {
    guard CLLocationManager.locationServicesEnabled() else {
      showSimpleAlert(
        title: "Please turn on location services",
        message: "This app needs location services in order to report the weather " +
                 "for your current location.\n" +
                 "Go to Settings → Privacy → Location Services and turn location services on."
      )
      getLocationWeatherButton.enabled = true
      return
    }
    
    let authStatus = CLLocationManager.authorizationStatus()
    guard authStatus == .AuthorizedWhenInUse else {
      switch authStatus {
        case .Denied, .Restricted:
          let alert = UIAlertController(
            title: "Location services for this app are disabled",
            message: "In order to get your current location, please open Settings for this app, choose \"Location\"  and set \"Allow location access\" to \"While Using the App\".",
            preferredStyle: .Alert
          )
          let cancelAction = UIAlertAction(title: "Cancel", style: .Cancel, handler: nil)
          let openSettingsAction = UIAlertAction(title: "Open Settings", style: .Default) {
            action in
            if let url = NSURL(string: UIApplicationOpenSettingsURLString) {
              UIApplication.sharedApplication().openURL(url)
            }
          }
          alert.addAction(cancelAction)
          alert.addAction(openSettingsAction)
          presentViewController(alert, animated: true, completion: nil)
          getLocationWeatherButton.enabled = true
          return
          
        case .NotDetermined:
          locationManager.requestWhenInUseAuthorization()
          
        default:
          print("Oops! Shouldn't have come this far.")
      }
      
      return
    }
  
    locationManager.delegate = self
    locationManager.desiredAccuracy = kCLLocationAccuracyThreeKilometers
    locationManager.requestLocation()
  }
  
  func locationManager(manager: CLLocationManager, didUpdateLocations locations: [CLLocation]) {
    let newLocation = locations.last!
    weather.getWeatherByCoordinates(latitude: newLocation.coordinate.latitude,
                                    longitude: newLocation.coordinate.longitude)
  }
  
  func locationManager(manager: CLLocationManager, didFailWithError error: NSError) {
    // This method is called asynchronously, which means it won't execute in the main queue.
    // All UI code needs to execute in the main queue, which is why we're wrapping the call
    // to showSimpleAlert(title:message:) in a dispatch_async() call.
    dispatch_async(dispatch_get_main_queue()) {
      self.showSimpleAlert(title: "Can't determine your location",
                           message: "The GPS and other location services aren't responding.")
    }
    print("locationManager didFailWithError: \(error)")
  }
  
  
  // MARK: - UITextFieldDelegate and related methods
  // -----------------------------------------------
  
  // Enable the "Get weather for the city above" button
  // if the city text field contains any text,
  // disable it otherwise.
  func textField(textField: UITextField,
                 shouldChangeCharactersInRange range: NSRange,
                                               replacementString string: String) -> Bool {
    let currentText = textField.text ?? ""
    let prospectiveText = (currentText as NSString).stringByReplacingCharactersInRange(
      range,
      withString: string).trimmed
    getCityWeatherButton.enabled = prospectiveText.characters.count > 0
    return true
  }
  
  // Pressing the clear button on the text field (the x-in-a-circle button
  // on the right side of the field)
  func textFieldShouldClear(textField: UITextField) -> Bool {
    // Even though pressing the clear button clears the text field,
    // this line is necessary. I'll explain in a later blog post.
    textField.text = ""
    
    getCityWeatherButton.enabled = false
    return true
  }
  
  // Pressing the return button on the keyboard should be like
  // pressing the "Get weather for the city above" button.
  func textFieldShouldReturn(textField: UITextField) -> Bool {
    textField.resignFirstResponder()
    getWeatherForCityButtonTapped(getCityWeatherButton)
    return true
  }
  
  // Tapping on the view should dismiss the keyboard.
  override func touchesBegan(touches: Set<UITouch>, withEvent event: UIEvent?) {
    view.endEditing(true)
  }
  
  
  // MARK: - Utility methods
  // -----------------------

  func showSimpleAlert(title title: String, message: String) {
    let alert = UIAlertController(
      title: title,
      message: message,
      preferredStyle: .Alert
    )
    let okAction = UIAlertAction(
      title: "OK",
      style:  .Default,
      handler: nil
    )
    alert.addAction(okAction)
    presentViewController(
      alert,
      animated: true,
      completion: nil
    )
  }
  
}


extension String {
  
  // A handy method for %-encoding strings containing spaces and other
  // characters that need to be converted for use in URLs.
  var urlEncoded: String {
    return self.stringByAddingPercentEncodingWithAllowedCharacters(NSCharacterSet.URLUserAllowedCharacterSet())!
  }
  
  var trimmed: String {
    return self.stringByTrimmingCharactersInSet(NSCharacterSet.whitespaceCharacterSet())
  }
  
}

Let’s take a closer look at the view controller code…

Buttons

Here’s the section of the code for the buttons:

// MARK: - Button events and states
// --------------------------------

@IBAction func getWeatherForLocationButtonTapped(sender: UIButton) {
  setWeatherButtonStates(false)
  getLocation()
}

@IBAction func getWeatherForCityButtonTapped(sender: UIButton) {
  guard let text = cityTextField.text where !text.trimmed.isEmpty else {
    return
  }
  setWeatherButtonStates(false)
  weather.getWeatherByCity(cityTextField.text!.urlEncoded)
}

func setWeatherButtonStates(state: Bool) {
  getLocationWeatherButton.enabled = state
  getCityWeatherButton.enabled = state
}

The getWeatherForLocationButtonTapped method handles the case when the user presses the Get weather for your current location button, while the getWeatherForCityButtonTapped method handles the case when the user presses the Get weather for the city above button. Both methods disable both buttons when pressed by calling the setWeatherButtonStates method, and the buttons are re-enabled once either a weather report or error message has been obtained.

WeatherGetterDelegate methods

Here’s the section for the WeatherGetterDelegate methods:

// MARK: - WeatherGetterDelegate methods
// -----------------------------------

func didGetWeather(weather: Weather) {
  // This method is called asynchronously, which means it won't execute in the main queue.
  // All UI code needs to execute in the main queue, which is why we're wrapping the code
  // that updates all the labels in a dispatch_async() call.
  dispatch_async(dispatch_get_main_queue()) {
    self.cityLabel.text = weather.city
    self.weatherLabel.text = weather.weatherDescription
    self.temperatureLabel.text = "\(Int(round(weather.tempCelsius)))°"
    self.cloudCoverLabel.text = "\(weather.cloudCover)%"
    self.windLabel.text = "\(weather.windSpeed) m/s"
    
    if let rain = weather.rainfallInLast3Hours {
      self.rainLabel.text = "\(rain) mm"
    }
    else {
      self.rainLabel.text = "None"
    }
    
    self.humidityLabel.text = "\(weather.humidity)%"
    self.getLocationWeatherButton.enabled = true
    self.getCityWeatherButton.enabled = self.cityTextField.text?.characters.count > 0
  }
}

func didNotGetWeather(error: NSError) {
  // This method is called asynchronously, which means it won't execute in the main queue.
  // All UI code needs to execute in the main queue, which is why we're wrapping the call
  // to showSimpleAlert(title:message:) in a dispatch_async() call.
  dispatch_async(dispatch_get_main_queue()) {
    self.showSimpleAlert(title: "Can't get the weather",
                         message: "The weather service isn't responding.")
    self.getLocationWeatherButton.enabled = true
    self.getCityWeatherButton.enabled = self.cityTextField.text?.characters.count > 0
  }
  print("didNotGetWeather error: \(error)")
}

The view controller adopts the WeatherGetterDelegate protocol, which has two required methods:

  • didGetWeather, which is called when the WeatherGetter instance successfully retrieves weather data from OpenWeatherMap and manages to parse its JSON data into a Swift dictionary, and
  • didNotGetWeather, which is called when WeatherGetter either fails to retrieve weather data from OpenWeatherMap or parse its JSON data into a Swift dictionary

Both methods are called from the closure provided to the data task defined in WeatherGetter‘s getWeather method. This means that they’re not being executed in the main queue. Both methods’ primary function is to make changes to the UI, which must be done in the main queue. That’s why I put the UI code in these methods into a dispatch_async block specifying that the block must be executed in the main queue.

Location-related methods

Here’s the code for the CLLocationManagerDelegate and related methods:

// MARK: - CLLocationManagerDelegate and related methods

func getLocation() {
  guard CLLocationManager.locationServicesEnabled() else {
    showSimpleAlert(
      title: "Please turn on location services",
      message: "This app needs location services in order to report the weather " +
               "for your current location.\n" +
               "Go to Settings → Privacy → Location Services and turn location services on."
    )
    getLocationWeatherButton.enabled = true
    return
  }
  
  let authStatus = CLLocationManager.authorizationStatus()
  guard authStatus == .AuthorizedWhenInUse else {
    switch authStatus {
      case .Denied, .Restricted:
        let alert = UIAlertController(
          title: "Location services for this app are disabled",
          message: "In order to get your current location, please open Settings for this app, choose \"Location\"  and set \"Allow location access\" to \"While Using the App\".",
          preferredStyle: .Alert
        )
        let cancelAction = UIAlertAction(title: "Cancel", style: .Cancel, handler: nil)
        let openSettingsAction = UIAlertAction(title: "Open Settings", style: .Default) {
          action in
          if let url = NSURL(string: UIApplicationOpenSettingsURLString) {
            UIApplication.sharedApplication().openURL(url)
          }
        }
        alert.addAction(cancelAction)
        alert.addAction(openSettingsAction)
        presentViewController(alert, animated: true, completion: nil)
        getLocationWeatherButton.enabled = true
        return
        
      case .NotDetermined:
        locationManager.requestWhenInUseAuthorization()
        
      default:
        print("Oops! Shouldn't have come this far.")
    }
    
    return
  }

  locationManager.delegate = self
  locationManager.desiredAccuracy = kCLLocationAccuracyThreeKilometers
  locationManager.requestLocation()
}

func locationManager(manager: CLLocationManager, didUpdateLocations locations: [CLLocation]) {
  let newLocation = locations.last!
  weather.getWeatherByCoordinates(latitude: newLocation.coordinate.latitude,
                                  longitude: newLocation.coordinate.longitude)
}

func locationManager(manager: CLLocationManager, didFailWithError error: NSError) {
  // This method is called asynchronously, which means it won't execute in the main queue.
  // All UI code needs to execute in the main queue, which is why we're wrapping the call
  // to showSimpleAlert(title:message:) in a dispatch_async() call.
  dispatch_async(dispatch_get_main_queue()) {
    self.showSimpleAlert(title: "Can't determine your location",
                         message: "The GPS and other location services aren't responding.")
  }
  print("locationManager didFailWithError: \(error)")
}

Most of getLocation() is concerned with ruling out cases where we can’t get the user’s location. Only the last three lines of the method deal with getting location updates from locationManager.

  • The first guard statement allows control to pass to the next line if and only if location services are enabled for the device. If location services are disabled, we display a simple “Location services are disabled on your device” alert, and getLocation() is exited.
  • The second guard statement allows control to pass to the next line if and only if the app is authorized to use location services when it is in use (i.e., its authorization status is .AuthorizedWhenInUse). A switch statement in the guard block determines the specific reason why the app isn’t authorized:
    • If the app explicitly does not have permission to use location services (i.e., its authorization status is either .Denied or .Restricted), we display a “This app is not authorized to use your location” alert, which presents the use with the option to open the Settings for this app and authorize it to use location services.
    • If the app has not explicitly been given or denied permission to use location services (i.e., its authorization status is .NotDetermined), the location manager’s requestWhenInUseAuthorization() method is called, which displays the alert asking the user if s/he wants to give the app permission to use location services.
    • The default case is the remaining authorization status, .AuthorizedAlways. There’s no way to get to this point, and I included this case only because the switch statement requires that all cases to be covered.

If control made it past the first two guard statements, it means that location services has been activated for the device and the user has given our app permission to use location services while the app is active. The following happens:

  • It sets the view controller as the location manager’s delegate, which means that it can receive and respond to location and heading updates from the location manager.
  • It requests the lowest possible location accuracy from the location manager: kCLLocationAccuracyThreeKilometers, which can pinpoint your device’s coordinates within 3 kilometers (about 1.86 miles). I’m doing this for two reasons:
    • Weather is a large-area phenomenon and weather stations are far apart, so 3-kilometer accuracy is more than plenty for our needs.
    • 3-kilometer accuracy, as a function of being the lowest-accuracy setting, is also the least power-draining.
  • In earlier versions of this app, we made a call to locationManager.startUpdatingLocation, which requested that the location manager start sending location update notifications, typically at the rate of once per second. This works, but it’s overkill for the purposes of a weather app. Instead, we’re using a new method introduced with iOS 9: requestLocation, which sends a single location notification once Core Location has determined the current location to the specified accuracy.

Once requestLocation is called, one of two methods will be called as a result:

  • locationManager(_:didUpdateLocations:) is called if the location manager managed to get the current location.
  • locationManager(_:didFailWithError:) is called if the location manager failed to get the current location.

UTTextFieldDelegate and related methods

// MARK: - UITextFieldDelegate and related methods
// -----------------------------------------------

// Enable the "Get weather for the city above" button
// if the city text field contains any text,
// disable it otherwise.
func textField(textField: UITextField,
               shouldChangeCharactersInRange range: NSRange,
                                             replacementString string: String) -> Bool {
  let currentText = textField.text ?? ""
  let prospectiveText = (currentText as NSString).stringByReplacingCharactersInRange(
    range,
    withString: string).trimmed
  getCityWeatherButton.enabled = prospectiveText.characters.count > 0
  return true
}

// Pressing the clear button on the text field (the x-in-a-circle button
// on the right side of the field)
func textFieldShouldClear(textField: UITextField) -> Bool {
  // Even though pressing the clear button clears the text field,
  // this line is necessary. I'll explain in a later blog post.
  textField.text = ""
  
  getCityWeatherButton.enabled = false
  return true
}

// Pressing the return button on the keyboard should be like
// pressing the "Get weather for the city above" button.
func textFieldShouldReturn(textField: UITextField) -> Bool {
  textField.resignFirstResponder()
  getWeatherForCityButtonTapped(getCityWeatherButton)
  return true
}

// Tapping on the view should dismiss the keyboard.
override func touchesBegan(touches: Set<UITouch>, withEvent event: UIEvent?) {
  view.endEditing(true)
}

A quick explanation of each of these methods:

  • textField(_:shouldChangeCharactersInRange:replacementString:) — This method is called whenever the contents of a text field in a view that adopts the TextFieldDelegate protocol change. We’re using this to enable the Get weather for the city above button when the “city name” text field contains any text, and disable the button when the “city name” text field is empty.
  • textFieldShouldClear(_:) — This method is called when the user taps the “clear text field” button. We use this to disable the Get weather for the city above button since pressing this button clears the “city name” text field.
  • textFieldShouldReturn(_:) — We capture this event so that pressing the Return key is like pressing the Get weather for the city above button.
  • touchesBegan(_:withEvent:) — We capture this event so that tapping on the background view dismisses the keyboard.

And finally, the utility methods…

// MARK: - Utility methods
// -----------------------

func showSimpleAlert(title title: String, message: String) {
  let alert = UIAlertController(
    title: title,
    message: message,
    preferredStyle: .Alert
  )
  let okAction = UIAlertAction(
    title: "OK",
    style:  .Default,
    handler: nil
  )
  alert.addAction(okAction)
  presentViewController(
    alert,
    animated: true,
    completion: nil
  )
}


extension String {
  
  // A handy method for %-encoding strings containing spaces and other
  // characters that need to be converted for use in URLs.
  var urlEncoded: String {
    return self.stringByAddingPercentEncodingWithAllowedCharacters(NSCharacterSet.URLUserAllowedCharacterSet())!
  }

  // Trim excess whitespace from the start and end of the string.
  var trimmed: String {
    return self.stringByTrimmingCharactersInSet(NSCharacterSet.whitespaceCharacterSet())
  }

}

These methods, explained:

  • showSimpleAlert(title:message:) — This method allows us to display a simple alert with a single OK button with a single line of code.
  • String.urlencoded — We use this to encode city names provided by the user into a format that can be used in the query we send to OpenWeatherMap.
  • String.trimmed — This handy utility function removes whitespace from the beginning and ending of strings.

A working weather app

Once again, the app should look like the screenshot above when run.

sunny sky

At this point, we have a basic, working weather app. Given the name of a city or your current location from your iDevice’s location services, it displays the current weather conditions for that location. There’s still plenty of opportunities for features and improvements, some of which are:

  • Forecasts for future weather: tomorrow’s weather, the forecast for the next few days, or a long-range forecast.
  • Graphics. Yahoo!’s weather app  shows pictures of the cities that it’s giving forecasts for, and most weather apps provide pictures or pictograms that match their forecasts.
  • Sound. I’m not aware of any weather apps that make particularly good use of sound. Maybe you can make one!
  • Personality. Take a look at Carrot Weather, which has a snarky sense of humor.

Download the project files
xcode download

You can download the project files for this article (53KB zipped) here.

Categories
Uncategorized

How to build an iOS weather app in Swift, part 4: Introducing geolocation

geolocation

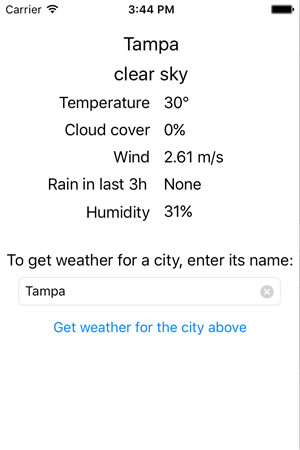
At the end of the last article in this series, we had a weather app that looked like this:

tampa forecast

The user enters the name of a city, presses the Get weather for the city above button, and gets the current weather conditions shortly afterward.

In this article, we’re going to learn the basics of programming a feature that most iOS weather apps have: geolocation. We’ll build a simple geolocation app, and we’ll eventually give our weather app the ability to display weather information about the user’s current location without requiring the user to enter the name of that location.

To do this, we’ll make use of location services, which we’ll access through the Core Location framework, and the CLLocationManager and CLLocation classes in particular.

In case you missed the earlier installments in this series, here are part one, part two, and part three.

A slight detour: the GeoExample app

Our weather app already has a fair bit of stuff in it, so we’ll cover Core Location by starting with a simple new app that reports the latitude and longitude of the user’s current location. It’s pretty simple, and we’ll roll its code into our weather app in the end.

Open Xcode, create a new single view application for the iPhone, and give it the name GeoExample.

Setting up to ask the users’ permission to use their location in Info.plist

Each app that makes use of the user’s location need to ask the user for permission to do so. This permission is recorded on a per-app basis; a user can grant one app permission to use his/her location, and deny that permission to another app.

iOS users can grant two different kinds of permission to use their location:

  • Permission to use the user’s location only when the app is in use (that is, when it’s the one shown on the screen).
  • Permission to use the user’s location both when the app is in use and when it’s running in the background.

For this example app, as well as our weather app (when we add geolocation to it), we just want the user’s permission to use location services only when the app is in use.

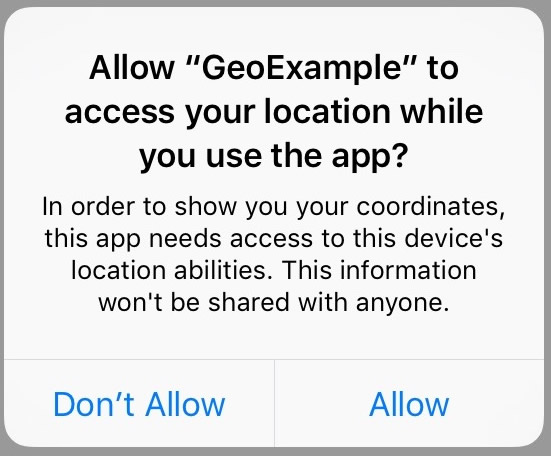
iOS has a built-in facility for asking both kinds of permission with an alert view. To ask for the user’s permission to use location services only when the app is in use, we use the CLLocationManager instance method requestWhenInUseAuthorization(). When called, it causes an alert view like the one below to appear:

permission dialog

The title, Allow “GeoExample” to access your location while you use the app?, is automatically generated by iOS, which inserts the app’s name (GeoExample, in this case) into a preset string. You can’t change it.

However, the message below the title is customizable and set in the app’s Info.plist. The message we’ll use is: In order to show you your coordinates, this app needs access to this device’s location abilities. This information won’t be shared with anyone. This message is stored in Info.plist under the key NSLocationWhenInUseUsageDescription.

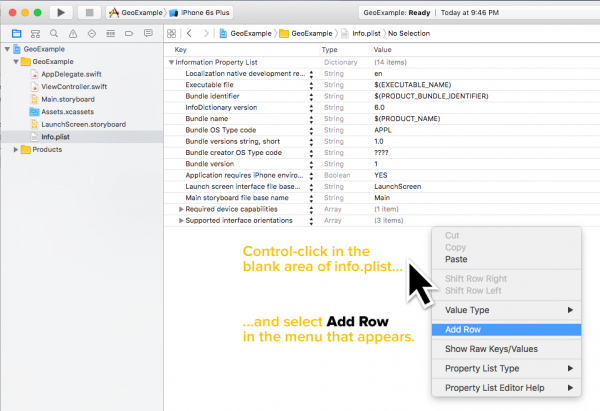
Let’s set that message right now. Open Info.plist (the project file that contains a number of settings for your app) and add a new row to it. If you’re not familiar with adding new rows to Info.plist, follow the instructions below:

info plist geolocation setup 1

  • Control-click in the blank area of Info.plist located below its rows.
  • A menu will appear. Select Add Row from that menu.

info plist geolocation setup 2

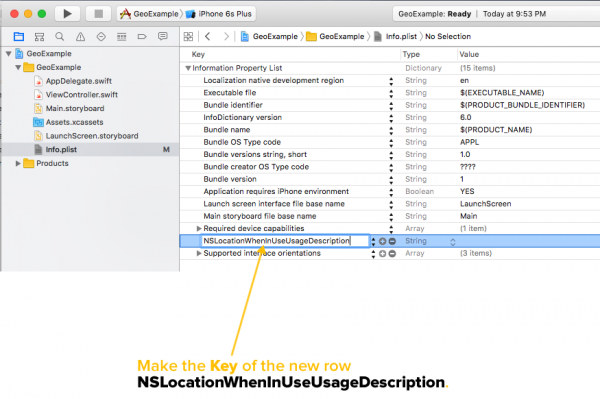
  • In that newly-created row, change the contents of the Key column (the leftmost column) to NSLocationWhenInUseUsageDescription. This specifies that the row will contain the message text for the alert view asking the user for permission to access his/her location while the app is in use.

info plist geolocation setup 3

  • Now change the contents of the Value column (the rightmost column) to the message text that will go in the alert view: In order to show you your coordinates, this app needs access to this device’s location abilities. This information won’t be shared with anyone.

Next stop: Main.storyboard, to draw the user interface

ui

Draw a button on the view, give it the title Get current location, and assign it a Touch Up Inside action with the name getCurrentLocationButtonPressed.

And finally, ViewController.swift for the code

Here’s the view controller code:

import UIKit
import CoreLocation

class ViewController: UIViewController,
                      CLLocationManagerDelegate
{
  
  let locationManager = CLLocationManager()
  

  override func viewDidLoad() {
    super.viewDidLoad()
    getLocation()
  }

  override func didReceiveMemoryWarning() {
    super.didReceiveMemoryWarning()
  }
  
  @IBAction func getCurrentLocationButtonPressed() {
    getLocation()
  }
  
  func getLocation() {
    guard CLLocationManager.locationServicesEnabled() else {
      print("Location services are disabled on your device. In order to use this app, go to " +
            "Settings → Privacy → Location Services and turn location services on.")
      return
    }
    
    let authStatus = CLLocationManager.authorizationStatus()
    guard authStatus == .AuthorizedWhenInUse else {
      switch authStatus {
        case .Denied, .Restricted:
          print("This app is not authorized to use your location. In order to use this app, " +
            "go to Settings → GeoExample → Location and select the \"While Using " +
            "the App\" setting.")
          
        case .NotDetermined:
          locationManager.requestWhenInUseAuthorization()
          
        default:
          print("Oops! Shouldn't have come this far.")
      }
      
      return
    }
    
    locationManager.delegate = self
    locationManager.desiredAccuracy = kCLLocationAccuracyBest
    locationManager.startUpdatingLocation()
  }
  
  
  // MARK: - CLLocationManagerDelegate methods
  
  // This is called if:
  // - the location manager is updating, and
  // - it was able to get the user's location.
  func locationManager(manager: CLLocationManager, didUpdateLocations locations: [CLLocation]) {
    let newLocation = locations.last!
    print(newLocation)
  }
  
  // This is called if:
  // - the location manager is updating, and
  // - it WASN'T able to get the user's location.
  func locationManager(manager: CLLocationManager, didFailWithError error: NSError) {
    print("Error: \(error)")
  }

}

The view controller code, explained

Near the beginning of the file, we have these lines:

import CoreLocation

class ViewController: UIViewController,
                      CLLocationManagerDelegate

import CoreLocation makes the Core Location library available to all code in the file.

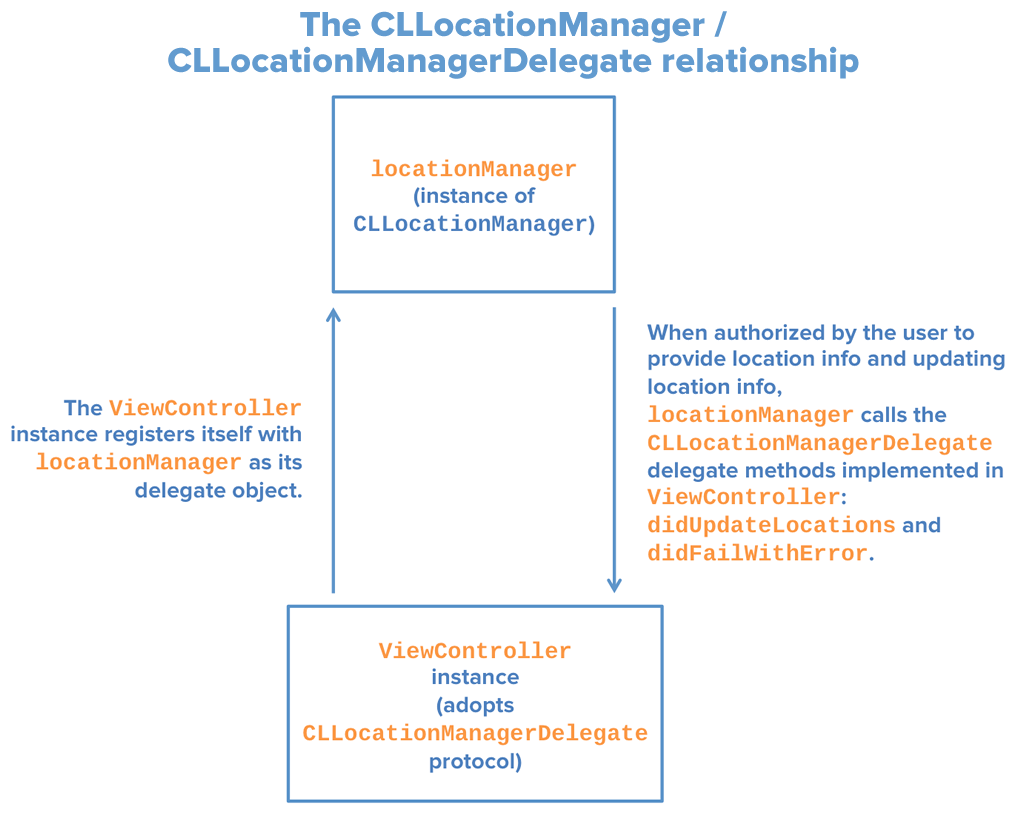
The class declaration line shows that the ViewController, like all view controllers, inherits from UIViewController, but also adopts the CLLocationManagerDelegate protocol. Adopting CLLocationManagerDelegate gives the view controller the ability to respond to all kinds of location and heading updates from a CLLocationManager instance.

Here’s a diagram showing the relationship between the CLLocationManager instance and the view controller:

cllocationmanager - cllocationmanagerdelegate

Here’s the first line of the view controller class:

let locationManager = CLLocationManager()

It defines ViewController’s single property, locationManager, the instance of CLLocationManager that provides the location updates.

The next notable part of the view controller is the getLocation() method, which performs a series of checks, and if they pass, it tells the location Manager to start sending location events. It’s called when the view controller is loaded, and when the Get current location button is pressed:

func getLocation() {
  guard CLLocationManager.locationServicesEnabled() else {
    print("Location services are disabled on your device. In order to use this app, go to " +
          "Settings → Privacy → Location Services and turn location services on.")
    return
  }
  
  let authStatus = CLLocationManager.authorizationStatus()
  guard authStatus == .AuthorizedWhenInUse else {
    switch authStatus {
      case .Denied, .Restricted:
        print("This app is not authorized to use your location. In order to use this app, " +
          "go to Settings → GeoExample → Location and select the \"While Using " +
          "the App\" setting.")
        
      case .NotDetermined:
        locationManager.requestWhenInUseAuthorization()
        
      default:
        print("Oops! This case should never be reached.")
    }
    return
  }
  
  locationManager.delegate = self
  locationManager.desiredAccuracy = kCLLocationAccuracyBest
  locationManager.startUpdatingLocation()
}

Most of getLocation() is concerned with ruling out cases where we can’t get the user’s location. Only the last three lines of the method deal with getting location updates from locationManager; they’re preceded by a couple of “bouncers” in the form of guard statements to keep invalid cases out.

  • The first guard statement allows control to pass to the next line if and only if location services are enabled for the device. If location services are disabled, the “Location services are disabled on your device” message is printed to the debug console, and getLocation() is exited.
  • The second guard statement allows control to pass to the next line if and only if the app is authorized to use location services when it is in use (i.e., its authorization status is .AuthorizedWhenInUse). A switch statement in the guard block determines the specific reason why the app isn’t authorized:
    • If the app explicitly does not have permission to use location services (i.e., its authorization status is either .Denied or .Restricted), the “This app is not authorized to use your location” message is printed to the debug console.
    • If the app has not explicitly been given or denied permission to use location services (i.e., its authorization status is .NotDetermined), the location manager’s requestWhenInUseAuthorization() method is called, which displays the alert asking the user if s/he wants to give the app permission to use location services.
    • The default case is the remaining authorization status, .AuthorizedAlways. There’s no way to get to this point because locationManager.requestAlwaysAuthorization(), which presents the user with an alert asking to use location services when the app is in use or running in the background, doesn’t appear anywhere in the code. I include this case only because the switch statement requires that all cases to be covered.

If control made it past the first two guard statements, it means that locations services has been activated for the device and the user has given our app permission to use location services while the app is active. The following happens:

  • It sets the view controller as the location manager’s delegate, which means that it can receive and respond to location and heading updates from the location manager.
  • It requests the best possible location accuracy from the location manager, which can pinpoint your device’s coordinates within 5 meters (16.4 feet).
  • It tells the location manager to start sending regular location updates, typically at a rate of once per second.

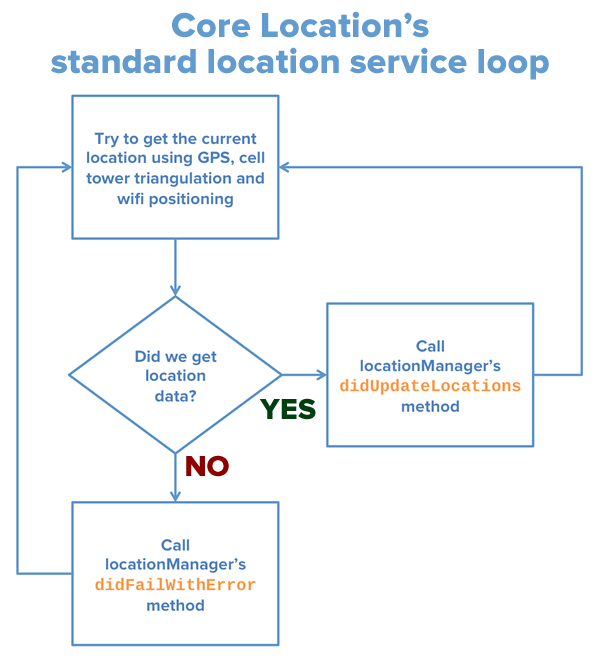
Once the location manager starts sending updates, it runs this loop until told to stop:

core location standard location service loop

The loop is pretty simple:

  • Try to get the current location, usually using some combination of GPS, cellular tower triangulation, and wifi positioning depending on the location accuracy setting.
  • If location results were obtained, call the location manager’s delegate’s locationManager(_:didUpdateLocations:) method, providing the location results as a parameter for the call.
  • If location results were not obtained, call the location manager’s delegate’s locationManager(_:didFailWithError:) method, providing the error object as a parameter for the call.
  • Go back to the first step.

Here’s some sample output from my debug console when I ran the app on my iPhone:
<+28.06456694,-82.50014378> +/- 5.00m (speed 0.00 mps / course -1.00) @ 5/12/16, 10:33:13 PM Eastern Daylight Time
<+28.06456694,-82.50014378> +/- 5.00m (speed 0.00 mps / course -1.00) @ 5/12/16, 10:33:14 PM Eastern Daylight Time
<+28.06456694,-82.50014378> +/- 5.00m (speed 0.00 mps / course -1.00) @ 5/12/16, 10:33:15 PM Eastern Daylight Time
<+28.06456694,-82.50014378> +/- 5.00m (speed 0.00 mps / course -1.00) @ 5/12/16, 10:33:16 PM Eastern Daylight Time
<+28.06456694,-82.50014378> +/- 5.00m (speed 0.00 mps / course -1.00) @ 5/12/16, 10:33:17 PM Eastern Daylight Time
<+28.06456694,-82.50014378> +/- 5.00m (speed 0.00 mps / course -1.00) @ 5/12/16, 10:33:18 PM Eastern Daylight Time

With this, we’ve got the basics of iOS geolocation. In the next installment, we’ll add a few niceties to our geolocation code and add it to our weather app.

Download the project files

xcode download

You can download the project files for this article (29KB zipped) here.
Categories
Uncategorized

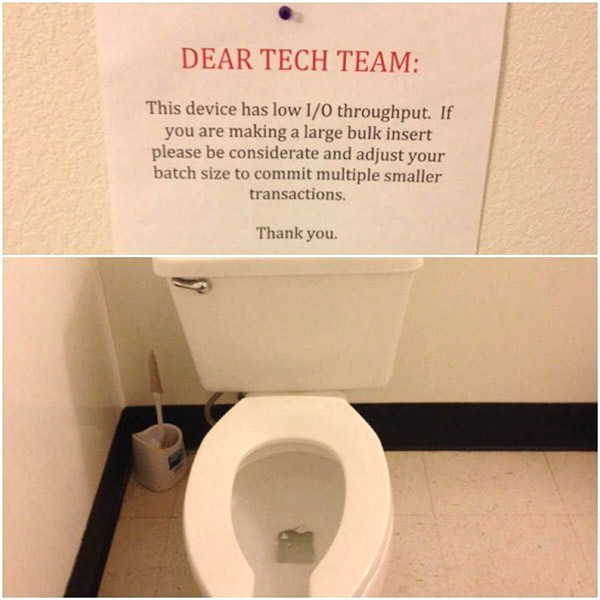
Always keep an eye on your throughput

this device has low io throughput

Categories
Uncategorized

How to build an iOS weather app in Swift, part 3: Giving the app a user interface

weather

The story so far

In the first article in this series, we introduced the OpenWeatherMap service and showed you how to send it a request for the current weather in a specified city and get a JSON response back, first manually, then programmatically. We expanded on this in the second article, where we gave the app the ability to convert that JSON into a dictionary from which Swift can easily extract data.

In both articles, the weather information wasn’t being presented in the user interface. All output was printed out to the debug console. It’s now time to make our app display information to the user. By the end of this article, we want our app to look like this:

tampa forecast

Let’s get started!

The WeatherGetter class

So far, we’ve spent most of our time working on the WeatherGetter class, which connects to OpenWeatherMap.org, provides it with a city name, and retrieves the current weather for that city.

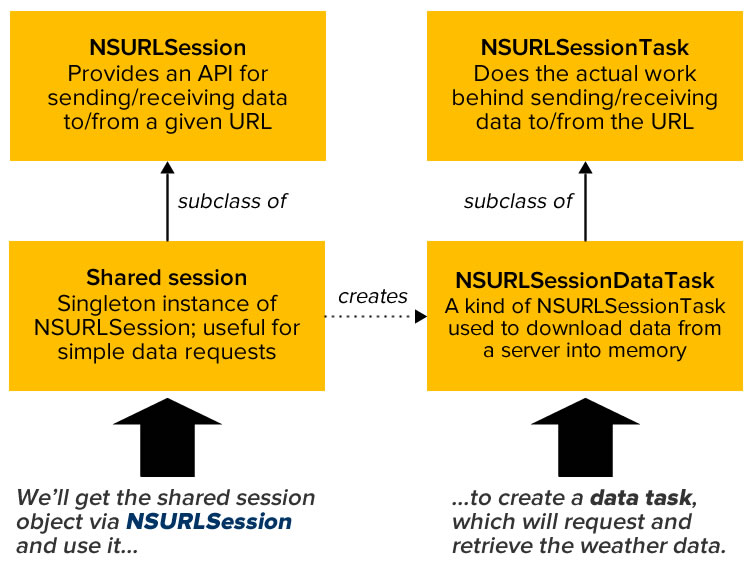
WeatherGetter makes use of:

  • the Shared Session instance of the NSURLSession class (which provides an API for sending and receiving data to and from a given URL), and
  • an instance of NSURLSessionDataTask, which downloads data from a specified URL into memory.

Here’s how these classes relate to each other:

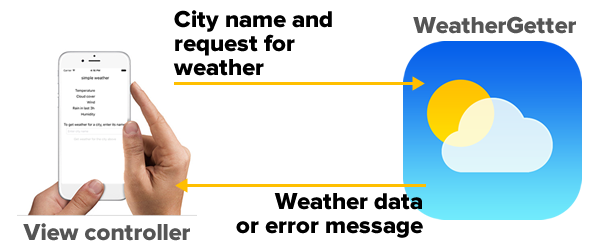
The user interface lives in the view controller, while the weather networking apparatus lives in WeatherGetter. Here’s the setup we’re aiming for:

view controller - weathergetter relationship 1

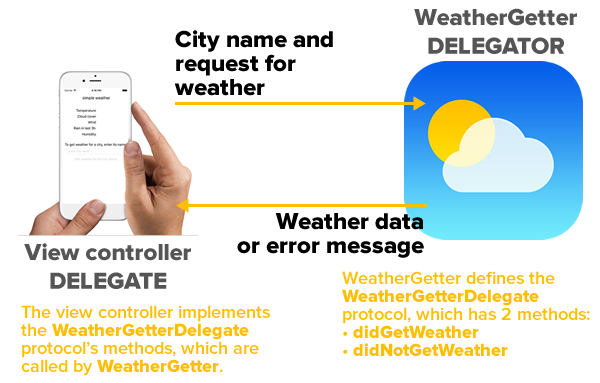
We create this setup using delegation, a design pattern that you’ll often see in iOS programming when one object coordinates its activities with another object:

view controller - weathergetter relationship 2

We’ll add a protocol definition to WeatherGetter:

protocol WeatherGetterDelegate {
  func didGetWeather(weather: Weather)
  func didNotGetWeather(error: NSError)
}

This definition specifies the interface for two methods:

  • didGetWeather, which we’ll call if we were able to retrieve the weather data from OpenWeatherMap and parse its contents. It will provide the weather data in the form of a Weather struct, which we’ll talk about in a moment.
  • didNotGetWeather, which we’ll call if we were not able to retrieve the weather data from OpenWeatherMap or if we weren’t able parse its contents. It will provide an error object that will explain what kind of error occurred.

We’ll have the view controller register itself with WeatherGetter, and both didGetWeather and didNotGetWeather will be implemented in the view controller.

Here’s the complete WeatherGetterDelegate.swift file:

import Foundation


// MARK: WeatherGetterDelegate
// ===========================
// WeatherGetter should be used by a class or struct, and that class or struct
// should adopt this protocol and register itself as the delegate.
// The delegate's didGetWeather method is called if the weather data was
// acquired from OpenWeatherMap.org and successfully converted from JSON into
// a Swift dictionary.
// The delegate's didNotGetWeather method is called if either:
// - The weather was not acquired from OpenWeatherMap.org, or
// - The received weather data could not be converted from JSON into a dictionary.
protocol WeatherGetterDelegate {
  func didGetWeather(weather: Weather)
  func didNotGetWeather(error: NSError)
}


// MARK: WeatherGetter
// ===================

class WeatherGetter {
  
  private let openWeatherMapBaseURL = "http://api.openweathermap.org/data/2.5/weather"
  private let openWeatherMapAPIKey = "YOUR API CODE HERE"
 
  private var delegate: WeatherGetterDelegate
  
  
  // MARK: -
  
  init(delegate: WeatherGetterDelegate) {
    self.delegate = delegate
  }
  
  func getWeatherByCity(city: String) {
    let weatherRequestURL = NSURL(string: "\(openWeatherMapBaseURL)?APPID=\(openWeatherMapAPIKey)&q=\(city)")!
    getWeather(weatherRequestURL)
  }
  
  private func getWeather(weatherRequestURL: NSURL) {
    
    // This is a pretty simple networking task, so the shared session will do.
    let session = NSURLSession.sharedSession()
    
    // The data task retrieves the data.
    let dataTask = session.dataTaskWithURL(weatherRequestURL) {
      (data: NSData?, response: NSURLResponse?, error: NSError?) in
      if let networkError = error {
        // Case 1: Error
        // An error occurred while trying to get data from the server.
        self.delegate.didNotGetWeather(networkError)
      }
      else {
        // Case 2: Success
        // We got data from the server!
        do {
          // Try to convert that data into a Swift dictionary
          let weatherData = try NSJSONSerialization.JSONObjectWithData(
            data!,
            options: .MutableContainers) as! [String: AnyObject]

          // If we made it to this point, we've successfully converted the
          // JSON-formatted weather data into a Swift dictionary.
          // Let's now used that dictionary to initialize a Weather struct.
          let weather = Weather(weatherData: weatherData)
          
          // Now that we have the Weather struct, let's notify the view controller,
          // which will use it to display the weather to the user.
          self.delegate.didGetWeather(weather)
        }
        catch let jsonError as NSError {
          // An error occurred while trying to convert the data into a Swift dictionary.
          self.delegate.didNotGetWeather(jsonError)
        }
      }
    }
    
    // The data task is set up...launch it!
    dataTask.resume()
  }
  
}

The Weather struct

In order to more easily send the weather data from WeatherGetter to the view controller, I created a struct called Weather. It lives in a file called Weather.swift, and it’s shown in its entirety below:

import Foundation

struct Weather {
  
  let dateAndTime: NSDate
  
  let city: String
  let country: String
  let longitude: Double
  let latitude: Double
  
  let weatherID: Int
  let mainWeather: String
  let weatherDescription: String
  let weatherIconID: String
  
  // OpenWeatherMap reports temperature in Kelvin,
  // which is why we provide celsius and fahrenheit
  // computed properties.
  private let temp: Double
  var tempCelsius: Double {
    get {
      return temp - 273.15
    }
  }
  var tempFahrenheit: Double {
    get {
      return (temp - 273.15) * 1.8 + 32
    }
  }
  let humidity: Int
  let pressure: Int
  let cloudCover: Int
  let windSpeed: Double
  
  // These properties are optionals because OpenWeatherMap doesn't provide:
  // - a value for wind direction when the wind speed is negligible 
  // - rain info when there is no rainfall
  let windDirection: Double?
  let rainfallInLast3Hours: Double?
  
  let sunrise: NSDate
  let sunset: NSDate
  
  init(weatherData: [String: AnyObject]) {
    dateAndTime = NSDate(timeIntervalSince1970: weatherData["dt"] as! NSTimeInterval)
    city = weatherData["name"] as! String
    
    let coordDict = weatherData["coord"] as! [String: AnyObject]
    longitude = coordDict["lon"] as! Double
    latitude = coordDict["lat"] as! Double
    
    let weatherDict = weatherData["weather"]![0] as! [String: AnyObject]
    weatherID = weatherDict["id"] as! Int
    mainWeather = weatherDict["main"] as! String
    weatherDescription = weatherDict["description"] as! String
    weatherIconID = weatherDict["icon"] as! String
    
    let mainDict = weatherData["main"] as! [String: AnyObject]
    temp = mainDict["temp"] as! Double
    humidity = mainDict["humidity"] as! Int
    pressure = mainDict["pressure"] as! Int
    
    cloudCover = weatherData["clouds"]!["all"] as! Int
    
    let windDict = weatherData["wind"] as! [String: AnyObject]
    windSpeed = windDict["speed"] as! Double
    windDirection = windDict["deg"] as? Double
    
    if weatherData["rain"] != nil {
      let rainDict = weatherData["rain"] as! [String: AnyObject]
      rainfallInLast3Hours = rainDict["3h"] as? Double
    }
    else {
      rainfallInLast3Hours = nil
    }
    
    let sysDict = weatherData["sys"] as! [String: AnyObject]
    country = sysDict["country"] as! String
    sunrise = NSDate(timeIntervalSince1970: sysDict["sunrise"] as! NSTimeInterval)
    sunset = NSDate(timeIntervalSince1970:sysDict["sunset"] as! NSTimeInterval)
  }
  
}

When initializing the Weather struct, you pass it the [String: AnyObject] dictionary created by parsing the JSON from OpenWeatherMap. Weather then takes that data from that dictionary and uses it to initialize its properties.

The Weather struct does a number of useful things:

  • It turns the dictionary-of-dictionaries structure of the data from OpenWeatherMap into a nice, flat set of weather properties,
  • it provides the date/time values provided by OpenWeatherMap in iOS’ native NSDate format rather than in Unix time (an integer specifying time in seconds after January 1, 1970), and
  • it uses computed properties to report temperatures in degrees Celsius and Fahrenheit rather than Kelvin.

You may notice that the windDirection and rainfallInLast3Hours properties are optionals. That’s because OpenWeatherMap doesn’t always provide those values. It reports a wind direction if and only if the wind speed is greater than zero, and it reports rain information if and only if it’s raining.

The view controller

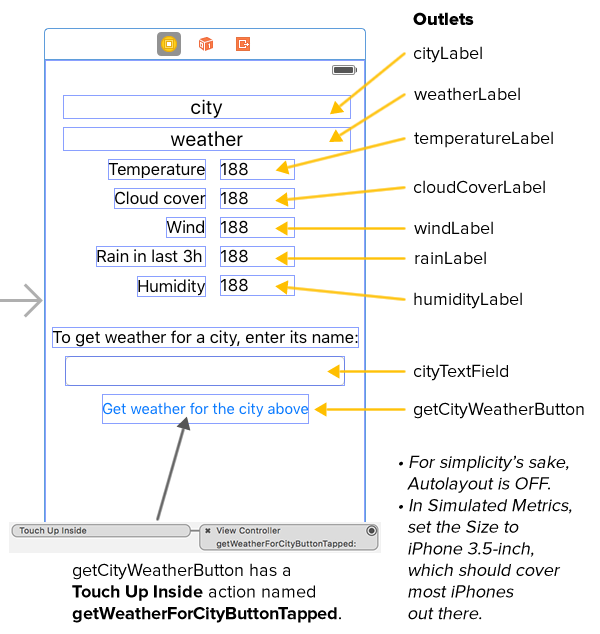
Here are the controls I put on the view, along with the names of their outlets:

view controller layout

I also created a Touch Up Inside action for the Get weather for the city above button called getWeatherForCityButtonTapped.

Here’s the code for ViewController.swift:

import UIKit

class ViewController: UIViewController,
                      WeatherGetterDelegate,
                      UITextFieldDelegate
{
  @IBOutlet weak var cityLabel: UILabel!
  @IBOutlet weak var weatherLabel: UILabel!
  @IBOutlet weak var temperatureLabel: UILabel!
  @IBOutlet weak var cloudCoverLabel: UILabel!
  @IBOutlet weak var windLabel: UILabel!
  @IBOutlet weak var rainLabel: UILabel!
  @IBOutlet weak var humidityLabel: UILabel!
  @IBOutlet weak var cityTextField: UITextField!
  @IBOutlet weak var getCityWeatherButton: UIButton!
  
  var weather: WeatherGetter!
  
  
  // MARK: -
  
  override func viewDidLoad() {
    super.viewDidLoad()
    weather = WeatherGetter(delegate: self)
    
    // Initialize UI
    // -------------
    cityLabel.text = "simple weather"
    weatherLabel.text = ""
    temperatureLabel.text = ""
    cloudCoverLabel.text = ""
    windLabel.text = ""
    rainLabel.text = ""
    humidityLabel.text = ""
    cityTextField.text = ""
    cityTextField.placeholder = "Enter city name"
    cityTextField.delegate = self
    cityTextField.enablesReturnKeyAutomatically = true
    getCityWeatherButton.enabled = false
  }
  
  override func didReceiveMemoryWarning() {
    super.didReceiveMemoryWarning()
  }
  
  
  // MARK: - Button events
  // ---------------------
  
  @IBAction func getWeatherForCityButtonTapped(sender: UIButton) {
    guard let text = cityTextField.text where !text.isEmpty else {
      return
    }
    weather.getWeather(cityTextField.text!.urlEncoded)
  }
  
  
  // MARK: -
  
  // MARK: WeatherGetterDelegate methods
  // -----------------------------------
  
  func didGetWeather(weather: Weather) {
    // This method is called asynchronously, which means it won't execute in the main queue.
    // ALl UI code needs to execute in the main queue, which is why we're wrapping the code
    // that updates all the labels in a dispatch_async() call.
    dispatch_async(dispatch_get_main_queue()) {
      self.cityLabel.text = weather.city
      self.weatherLabel.text = weather.weatherDescription
      self.temperatureLabel.text = "\(Int(round(weather.tempCelsius)))°"
      self.cloudCoverLabel.text = "\(weather.cloudCover)%"
      self.windLabel.text = "\(weather.windSpeed) m/s"
      
      if let rain = weather.rainfallInLast3Hours {
        self.rainLabel.text = "\(rain) mm"
      }
      else {
        self.rainLabel.text = "None"
      }
      
      self.humidityLabel.text = "\(weather.humidity)%"
    }
  }
  
  func didNotGetWeather(error: NSError) {
    // This method is called asynchronously, which means it won't execute in the main queue.
    // ALl UI code needs to execute in the main queue, which is why we're wrapping the call
    // to showSimpleAlert(title:message:) in a dispatch_async() call.
    dispatch_async(dispatch_get_main_queue()) {
      self.showSimpleAlert(title: "Can't get the weather",
                           message: "The weather service isn't responding.")
    }
    print("didNotGetWeather error: \(error)")
  }
  
  
  // MARK: - UITextFieldDelegate and related methods
  // -----------------------------------------------

  // Enable the "Get weather for the city above" button
  // if the city text field contains any text,
  // disable it otherwise.
  func textField(textField: UITextField,
                 shouldChangeCharactersInRange range: NSRange,
                 replacementString string: String) -> Bool {
    let currentText = textField.text ?? ""
    let prospectiveText = (currentText as NSString).stringByReplacingCharactersInRange(
                            range,
                            withString: string)
    getCityWeatherButton.enabled = prospectiveText.characters.count > 0
    print("Count: \(prospectiveText.characters.count)")
    return true
  }
  
  // Pressing the clear button on the text field (the x-in-a-circle button
  // on the right side of the field)
  func textFieldShouldClear(textField: UITextField) -> Bool {
    // Even though pressing the clear button clears the text field,
    // this line is necessary. I'll explain in a later blog post.
    textField.text = ""
    
    getCityWeatherButton.enabled = false
    return true
  }
  
  // Pressing the return button on the keyboard should be like
  // pressing the "Get weather for the city above" button.
  func textFieldShouldReturn(textField: UITextField) -> Bool {
    textField.resignFirstResponder()
    getWeatherForCityButtonTapped(getCityWeatherButton)
    return true
  }
  
  // Tapping on the view should dismiss the keyboard.
  override func touchesBegan(touches: Set<UITouch>, withEvent event: UIEvent?) {
    view.endEditing(true)
  }
  
  
  // MARK: - Utility methods
  // -----------------------

  func showSimpleAlert(title title: String, message: String) {
    let alert = UIAlertController(
      title: title,
      message: message,
      preferredStyle: .Alert
    )
    let okAction = UIAlertAction(
      title: "OK",
      style:  .Default,
      handler: nil
    )
    alert.addAction(okAction)
    presentViewController(
      alert,
      animated: true,
      completion: nil
    )
  }
  
}


extension String {
  
  // A handy method for %-encoding strings containing spaces and other
  // characters that need to be converted for use in URLs.
  var urlEncoded: String {
    return self.stringByAddingPercentEncodingWithAllowedCharacters(NSCharacterSet.URLUserAllowedCharacterSet())!
  }
  
}

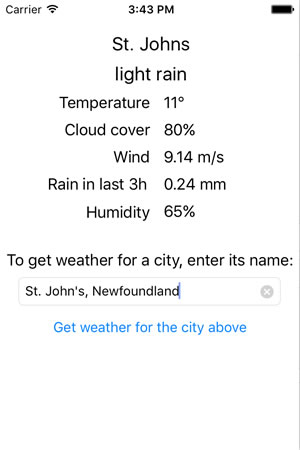
If you run the app, you should get results similar to this:

tampa forecast

st. johns forecast

If the temperatures seem a little chilly to you, it’s because you’re probably expecting them in Fahrenheit and I’m currently displaying them in Celsius. You can change this by changing the line in the didGetWeather method from

self.temperatureLabel.text = "\(Int(round(weather.tempCelsius)))°"

to

self.temperatureLabel.text = "\(Int(round(weather.tempFahrenheit)))°"

Take a good look at the code for the view controller — I’ve included a couple of tricks that I think improve the UI. I’ll explain them in greater detail in posts to follow.

web horizontal rule

In the next installment in this series, we’ll add geolocation capability to the app, so that the user can get the weather at his/her current location without having to type it in.

Download the project files

xcode download

You can download the project files for this article (51KB zipped) here.