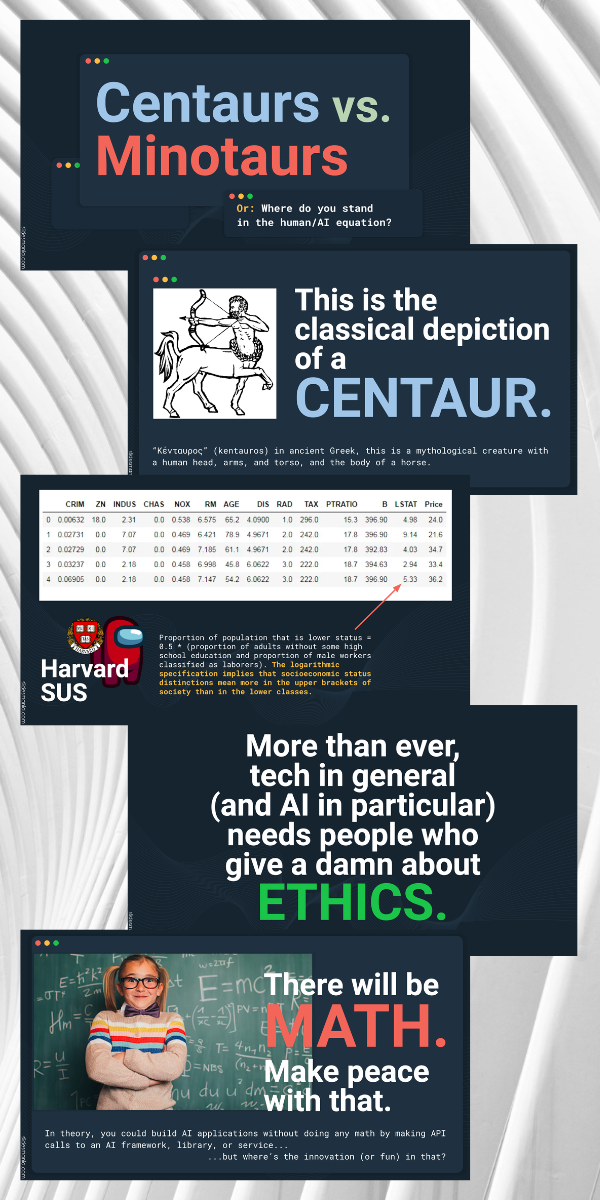
Thanks to everyone who came to The SocialCode x Tampa: Embracing the AI Evolution event last Thursday (September 7, 2023) for an evening of presentations and discussion about AI! As promised, here’s a link to the slides for my presentation, Centaurs vs. Minotaurs:
Today, August 19th, is “whyday.” It’s been a while since anybody’s made a fuss about this day (as far as I know), but I still think it’s a day worth celebrating, even in little ways. I’m performing a couple of whyday rituals today, and perhaps after reading this, you will too.
It’s called “whyday” after the programmer / artist / author / musician who went by the name “why the lucky stiff.”why the lucky stiff is a long name to keep saying (or typing) over and over, so we referred to him as why in spoken word, or _why (and yes, the leading underscore is intentional) in writing.
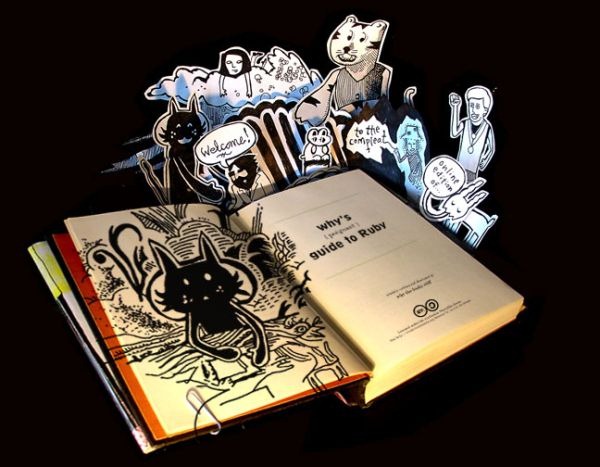
In the book’s first page with text, _why explained why the word “poignant” — which means “creating a sense of regret or sadness” — is included in the title:
I’ll be straight with you. I want you to cry. To weep. To whimper sweetly. This book is a poignant guide to Ruby. That means code so beautiful that tears are shed. That means gallant tales and somber truths that have you waking up the next morning in the arms of this book. Hugging it tightly to you all the day long. If necessary, fashion a makeshift hip holster for Why’s (Poignant) Guide to Ruby, so you can always have this book’s tender companionship.
And immediately after that, he tells the story of Bigelow, an apparently abandoned dog he found on the street, adopted, which then ran away five minutes later. This story takes up five paragraphs, none of which make any mention or Ruby, or even programming.
But it was all preamble:
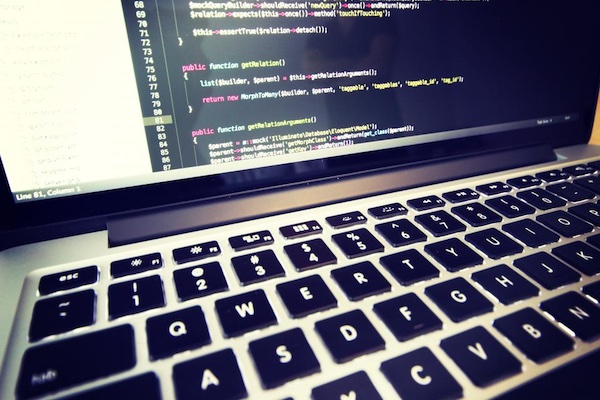
It wasn’t much later that I pulled my own Bigelow. I printed out a bunch of pages on Ruby. Articles found around the Web. I scanned through them on a train ride home one day. I flipped through them for five minutes and then gave up. Not impressed.
I sat, staring out the window at the world, a life-sized blender mixing graffiti and iron smelts before my eyes. This world’s too big for such a a little language, I thought. Poor little thing doesn’t stand a chance. Doesn’t have legs to stand on. Doesn’t have arms to swim.
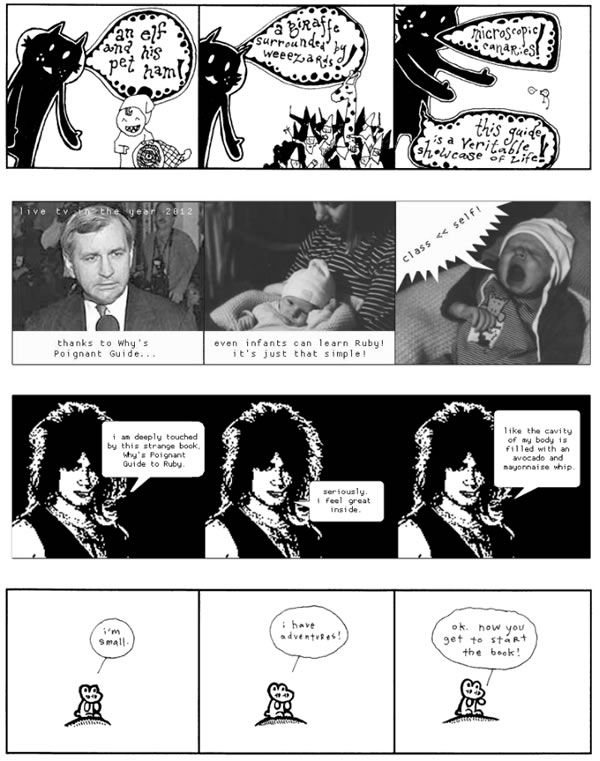
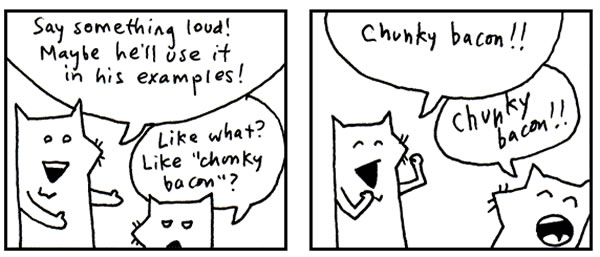
The intro was weird. It rambled and went into precisely the kinds of tangents that you weren’t supposed to put into a technical book. It was packed with comics featuring foxes lost in a large city, yelling out nonsense that — for a little while, at least — became catchphrases amongst Ruby developers:
If you were the kind of person who always wanted their tech reading to just get to the damned point, you’d find reading the poignant guide an exercise in absurdity and frustration. But if you were new to programming, it was a friendly guide that didn’t look as intimidating as your standard programming book.
The foxes would go on crazy adventurers, and when they weren’t dynamiting retirement homes, they somehow managed to cover the teach you the basics of Ruby (and even programming in general).
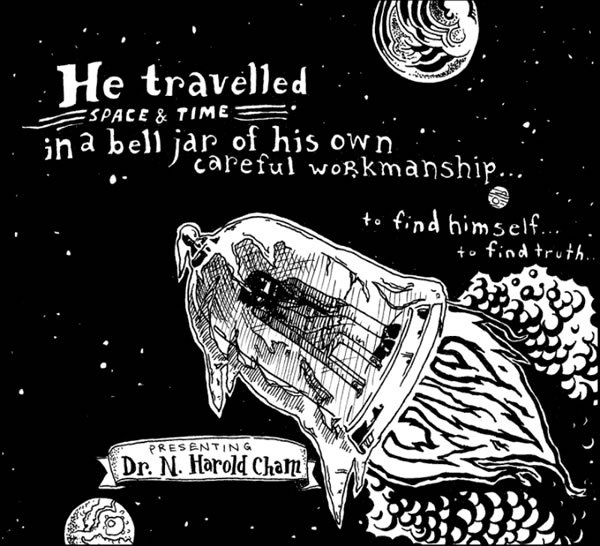
The “Dr. Cham” chapter featured this illustration…
…and this example of Ruby’s case statement in action:
def dr_chams_timeline( year )
  case year
  when 1894
    "Born."
  when 1895..1913
    "Childhood in Lousville, Winston Co., Mississippi."
  when 1914..1919
    "Worked at a pecan nursery; punched a Quaker."
  when 1920..1928
    "Sailed in the Brotherhood of River Wisdomming, which journeyed \
     the Mississippi River and engaged in thoughtful self-improvement, \
     where he finished 140 credit hours from their Oarniversity."
  when 1929
    "Returned to Louisville to pen a novel about time-travelling pheasant hunters."
  when 1930..1933
    "Took up a respectable career insuring pecan nurseries.  Financially stable, he \
     spent time in Brazil and New Mexico, buying up rare paper-shell pecan trees.  Just \
     as his notoriety came to a crescendo: gosh, he tried to buried himself alive."
  when 1934
    "Went back to writing his novel.  Changed the hunters to insurance tycoons and the \
     pheasants to Quakers."
  when 1935..1940
    "Took Arthur Cone, the Headmaster of the Brotherhood of River Wisdomming, as a \
     houseguest.  Together for five years, engineering and inventing."
  when 1941
    "And this is where things got interesting."
  end
end
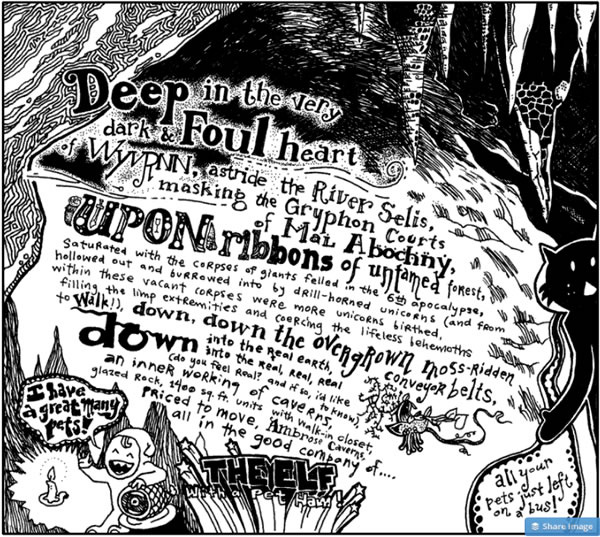
And let’s not forget the elf with a pet ham and the cat:
For new programmers, the poignant guide was an approachable book that didn’t try to bury you with jargon. For experienced developers, it provided a refreshing take on programming concepts. If you were looking for a Ruby reference, you were reading the wrong book. But whether you’d been a programmer for 20 minutes or 20 years, it was a fascinating, engrossing read that made you think about programming differently.
If that wasn’t enough, the book came with its own soundtrack. In addition to being a programmer and illustrator, _why was also a musician with a tendency towards the “indie rock”-style, and he wrote a song for each chapter.
In addition to the poignant guide, _why also wrote a fair bit of code, some of which became de facto or even de jure Ruby standards:
Hpricot, an HTML parser that became the Ruby de facto standard for a while. The current de facto standard parser (at least I still think it is; it’s been a while since I’ve done anything in Ruby) is Aaron Patterson’s Nokogiri, which uses Hpricot’s syntax.
Markaby — short for “markup as Ruby — which was a DSL to generate valid HTML using Ruby blocks and methods instead of tags.
Camping, a Markaby-based microframework inspired by Rails. Its code amount to less than 4 kilobytes.
Hobix, a YAML-based weblog application written in Ruby.
MouseHole, a personal web proxy that can rewrite the web à laGreasemonkey
Syck, a YAML library for C, Ruby, and several other languages. For a time, Syck was a part of Ruby’s standard libraries. It’s still available as a gem.
unHoly, which converted Ruby bytecode to Python bytecode, which made it possible to run your Ruby applications on the Google Application Engine.
bloopsaphone, a crossplatform chiptune-like synth, based on PortAudio with a Ruby frontend.
Of his creations, my favorites were the ones that were part of his mission to solve what he called “The Little Coder’s Predicament,” which is that in spite of the fact that we had better computers, software, and networks in the 2000s, the barrier to entry for programming — especially for kids — had become much higher:
In the 1980s, you could look up from your Commodore 64, hours after purchasing it, with a glossy feeling of empowerment, achieved by the pattern of notes spewing from the speaker grille in an endless loop. You were part of the movement to help machines sing! You were a programmer! The Atari 800 people had BASIC. They know what I’m talking about. And the TI-994A guys don’t need to say a word, because the TI could say it for them!
The old machines don’t compare to the desktops of today, or to the consoles of today. But, sadly, current versions of Windows have no immediately accessible programming languages. And what’s a kid going to do with Visual Basic? Build a modal dialog? Forget coding for XBox. Requires registration in the XBox Developer Program. Otherwise, you gotta crack the sucker open. GameCube? GameBoy? Playstation 2?
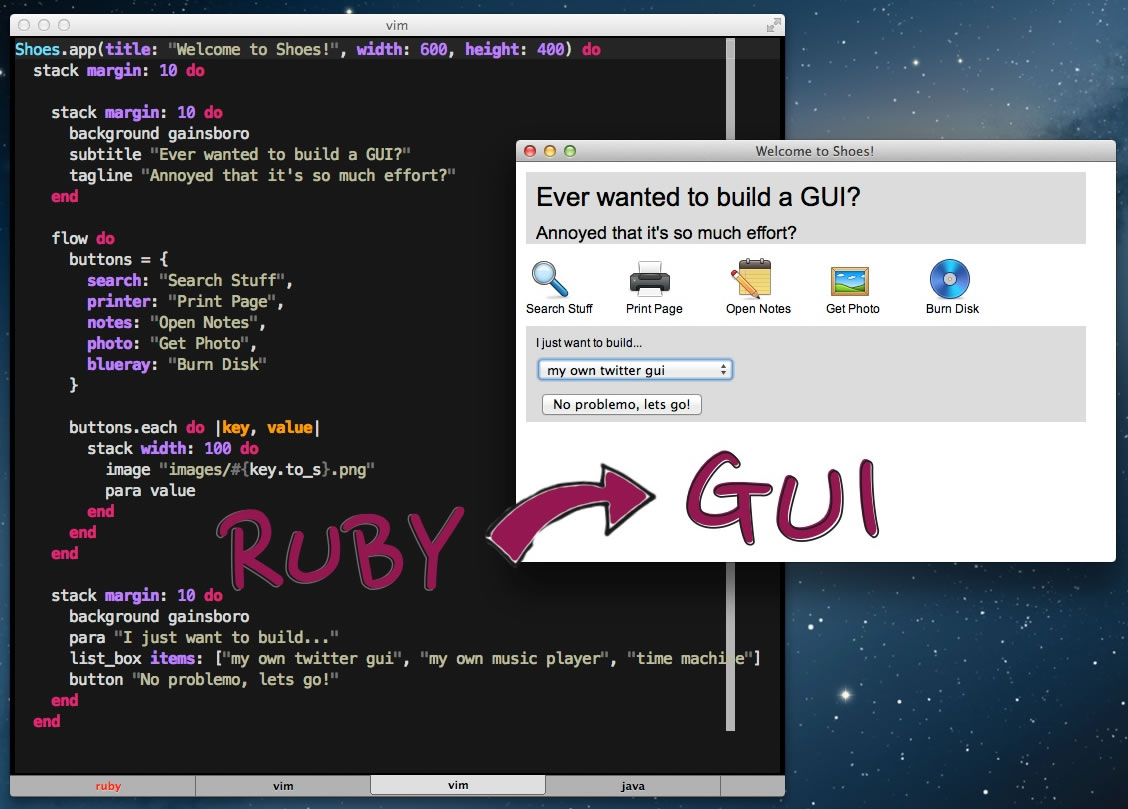
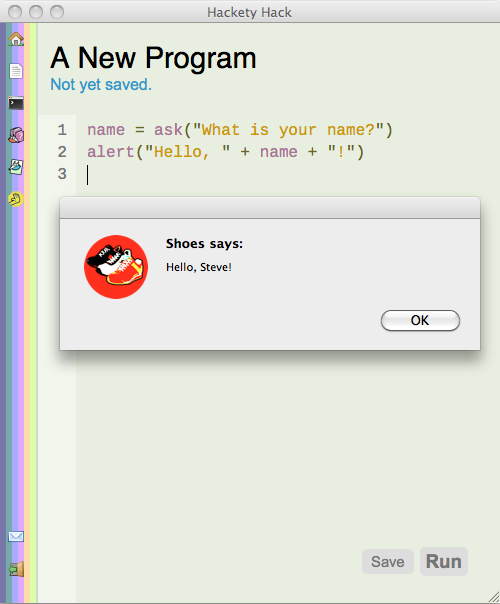
His solution to the Predicament was to first write Shoes, a simple toolkit for Ruby that use web page concepts to build desktop GUI apps for macOS, Windows, and Linux:
Shoes formed the basis of Hackety Hack, an IDE combined with a tutorials system that was a lot of fun to use. Here’s a screenshot of Hackery Hack in action, being used to write a “Hello, World!” program:
Since _why was developing this tool for children, he went straight to the subject matter experts: 25 children and their parents, whom he consulted and used as testers as he worked on the project.
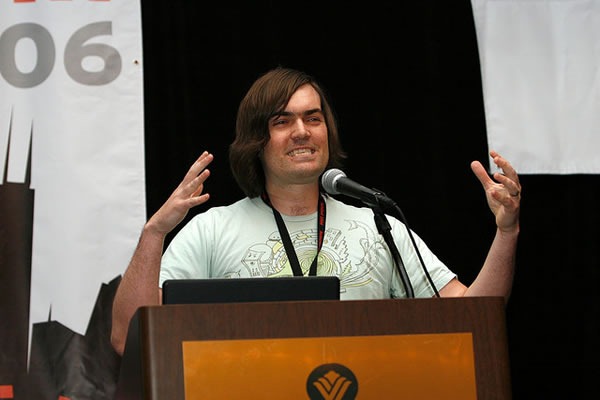
I was at RailsConf 2006, where _why gave a multimedia extravaganza of an evening keynote presentation. It was something I’d never seen before or since at a keynote: Part programming lecture, part video show, part concert complete with his band, the Thirsty Cups. You either left this performance either scratching your head or wanting to take programming to strange new heights.
After the show, I had a chance to hang out in an unexpected gathering of people that included both _why and Martin Fowler, which was an amusing, enlightening, and amazing experience.
Why’s performance at RailsConf 2006 probably opened the door to my own performance during RailsConf 2007’s evening keynote with Chad Fowler on ukulele:
_why’s disappearance
As you were reading this article, you may have noticed that I have only referred to its subject as “why the lucky stiff” or “_why”.
You may have wondered — quite fittingly — why?
There’s no definitive answer, but there are some hints.
Like a lot of creatives, the person behind the “why the lucky stiff” persona is an intensely private person. _why could be the out-there guy performing songs about how Ruby’s error handling just sounded so much more capable and effective with its rescue statement versus other languages’ try and catch (“try to catch me, I’m falling!” he’d joke), but the person lurking behind the mask wanted privacy during his downtime.
_why made it a point to reveal as little about himself as possible, and most of us were happy to indulge him. Most people were happy to simply know and address him as “why”, and in the community, it was a point of etiquette to not try and dig too deeply.
Of course, even in those pre-GamerGate, pre-“shitposting”, pre-chan-ruining-lots-of-the-net times, _why’s secrecy didn’t sit well with some people, who for some reason, just had to know the name of the person behind the _why identity was. So in 2009, they dug deep, and eventually found his name (as well as his wife’s) and publicized it.
_why may have also been a victim of Open Source Success, when a little project that you worked on in order to scratch a creative itch becomes so popular that many other projects depend on it. Suddenly, your project is no longer just a little thing you worked on, but a big thing that people expect you to maintain and upgrade. I’m reminded of a line from Byrne Hobart’s article, Working in Public and the Economics of Free, and it’s simultaneously hilarious and sad:
Running a successful open source project is just Good Will Hunting in reverse, where you start out as a respected genius and end up being a janitor who gets into fights.
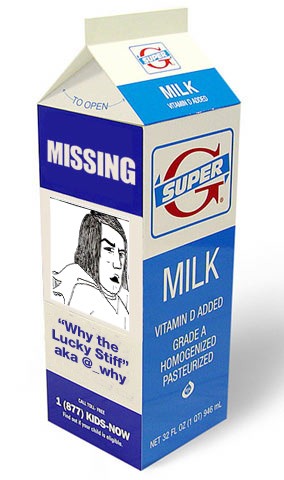
As a result of the factors listed above, plus some others probably known to no one else but _why, the internet presence of Why the Lucky Stiff vanished on August 19, 2009. His sites, blogs, social media, and code repositories all vanished. I wrote about it the day after it happened.
Luckily for us, all of his work — well, the work that he’d released to the public, anyway — was open source, and with the effort of some dedicated Ruby and Rails developers, his projects were saved. Some people even took them over and expanded on them. Other projects became the basis of newer, improved projects.
On August 19, 2009, Why the Lucky Stiff withdrew from the online community. We in the Ruby community wish him well, but we really miss him.
Why gave us a lot of cool software and other things, but what he really gave to the Ruby community was a spirit of freedom, whimsy, and creativity. When Why took the stage at the first RailsConf, in 2006, he strapped on his guitar, walked to the microphone, and yelled “Put your best practices away!”
Discipline, care, and responsibility are important; we owe our customers, employers, team members, and families to take our work seriously. At the same time, though, we need to play. If we don’t occasionally break out of the mold of our “best practices,” we can easily miss many wonderful ideas, some of which can bear rich fruit (just as Camping and Hpricot led to Sinatra and Nokogiri).
On Whyday, we’re encouraged to borrow a page from _why’s book and creative, instructive, collaborative, and crazy. The site suggested doing things such as:
See how far you can push some weird corner of Ruby (or some other language).
Choose a tight constraint (for example, 4 kilobytes of source code) and see what you can do with it.
Try that wild idea you’ve been sitting on because it’s too crazy.
You can work to maintain some of the software Why left us (although Why is more about creating beautiful new things than polishing old things).
On the other hand, Why is passionate about teaching programming to children. So improvements to Hackety Hack would be welcome.
Or take direct action along those lines, and teach Ruby to a child.
The Whyday site lives on, but it’s been a while since I’ve seen anyone make a fuss about Whyday.
I thought that given that we’re in the middle of a pandemic and that we’re all spending more time at home (at least I hope we are), there’s no better time that now to bring back the spirit of Whyday.
Today, on this Whyday, I’m celebrating by working on a creative project that involves a mishmash of technology, comics, and possibly music. If you can, you should start one, too!
Recommended reading and viewing
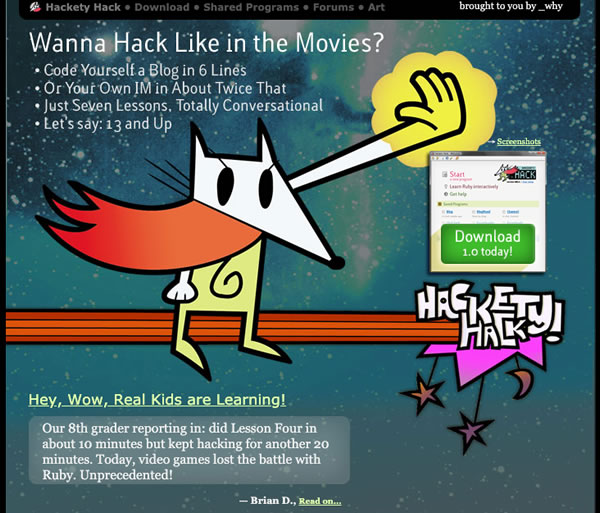
Got eighteen and a half minutes? Then you’ll want to watch this documentary on Why the Lucky Stiff and how he inspired the Ruby developer community:
Don’t worry, this isn’t mandatory, but if you’re new to Xcode (or new-ish), you might want to try out this simple app exercise beforehand, just to get comfortable with the tools.
Once you’ve installed Xcode, launch it and follow the steps below. The app you’ll make is simple, but the exercise will get you used to working with the tools.
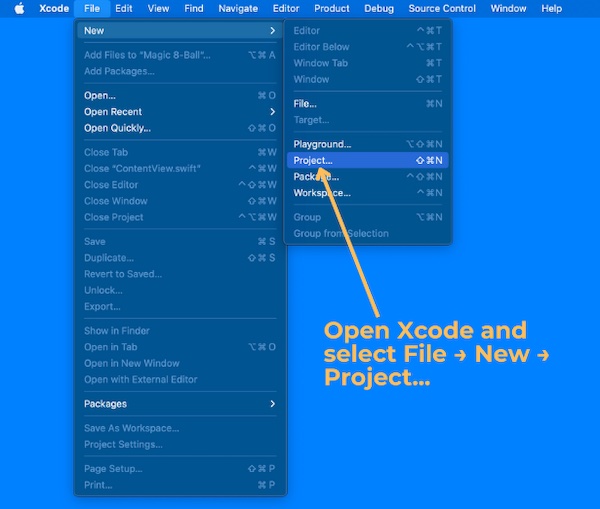
Create a new project
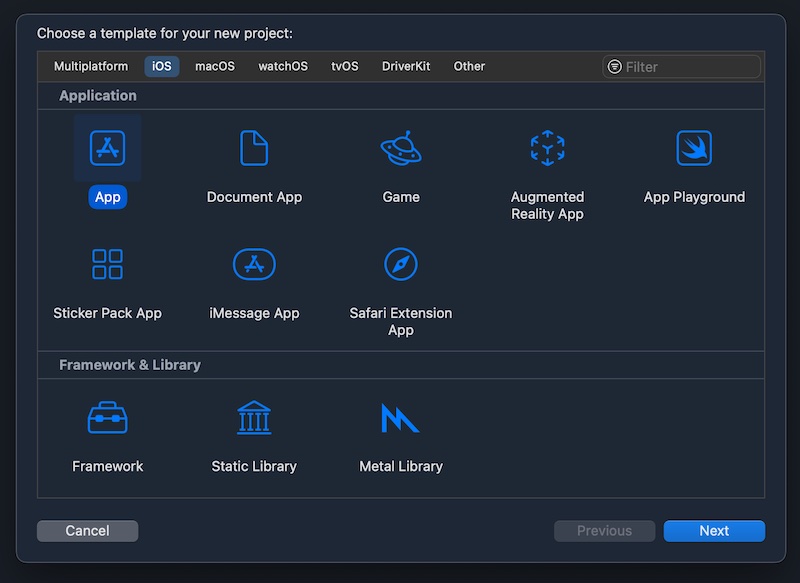
Open Xcode. From the File menu, select New, then Project.
You’ll see this window pop up:
This window lists templates for the different kinds of projects that you can build using Xcode. Templates are starting points for projects that contain just enough code to actually work, but they do little more than display a blank (or mostly blank) screen.
Make sure that the selected template category near the top of the window is iOS and that App is the selected template. Then click the Next button.
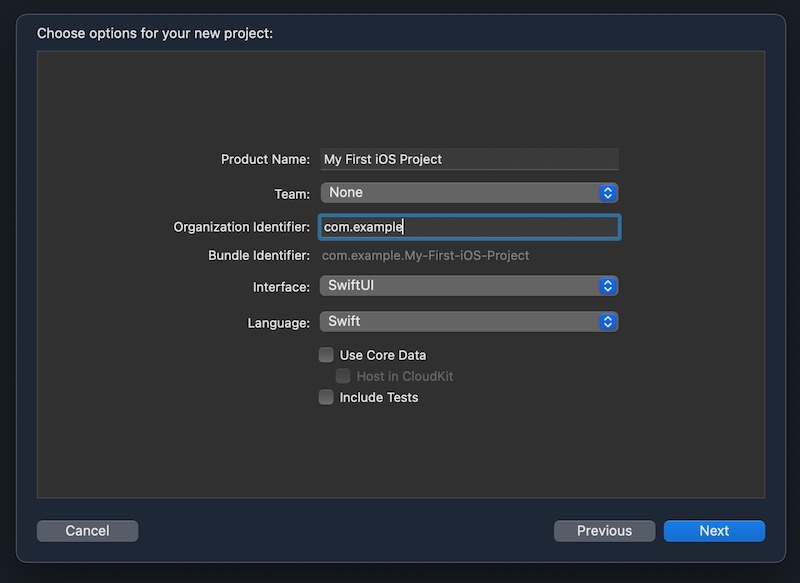
The contents of the window will change to this:
This window lets you choose options for the project you’re creating. For simplicity’s sake, we’ll take the approach you might take if you’d just installed Xcode and don’t have an Apple Developer account. Here’s how you should fill out this screen:
Product Name:My First iOS Project
Team: Select None.
Organization Identifier: Use com.example (or, if you own your own domain, use it, but in reverse — for example, if you own the domain abcde.net, you’d enter net.abcde into this field).
Interface: Go with the default SwiftUI.
Language: Go with the default Swift.
Leave the Use Core Data and Include Tests checkboxes unchecked.
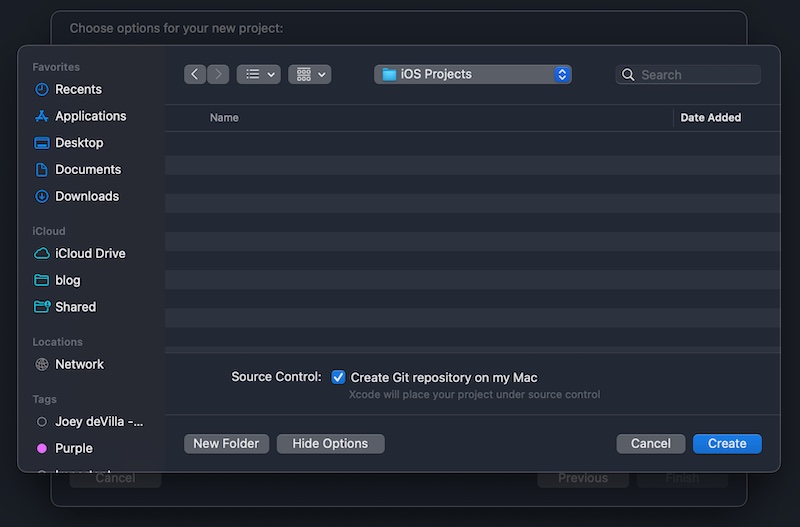
Click the Next button, and you’ll see this:
Select a place to save the project, then click Create.
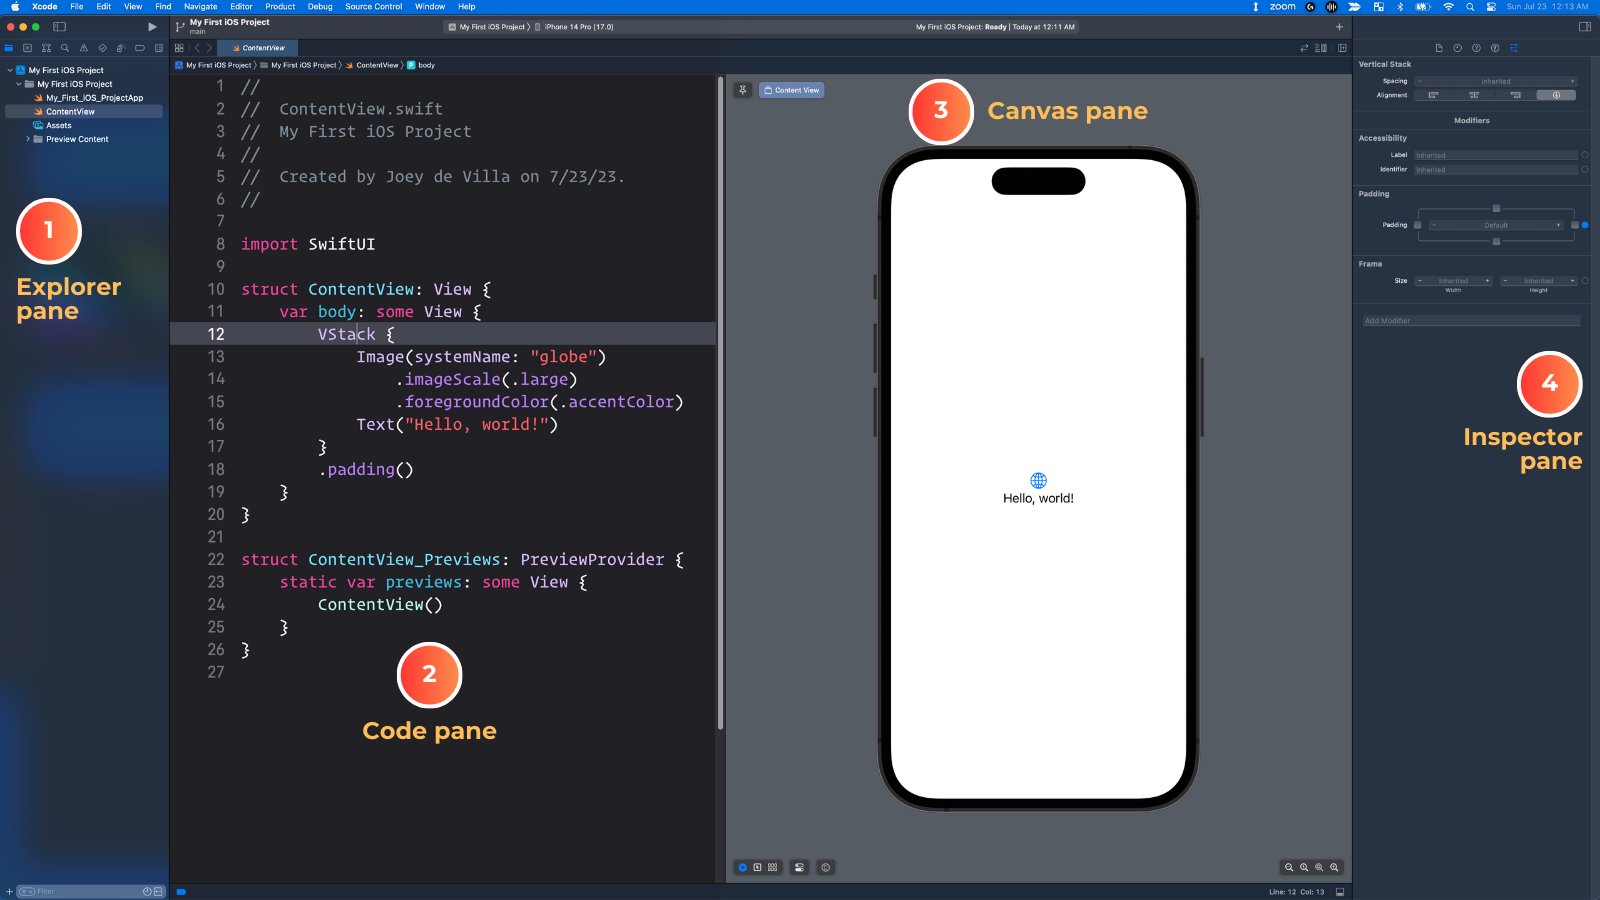
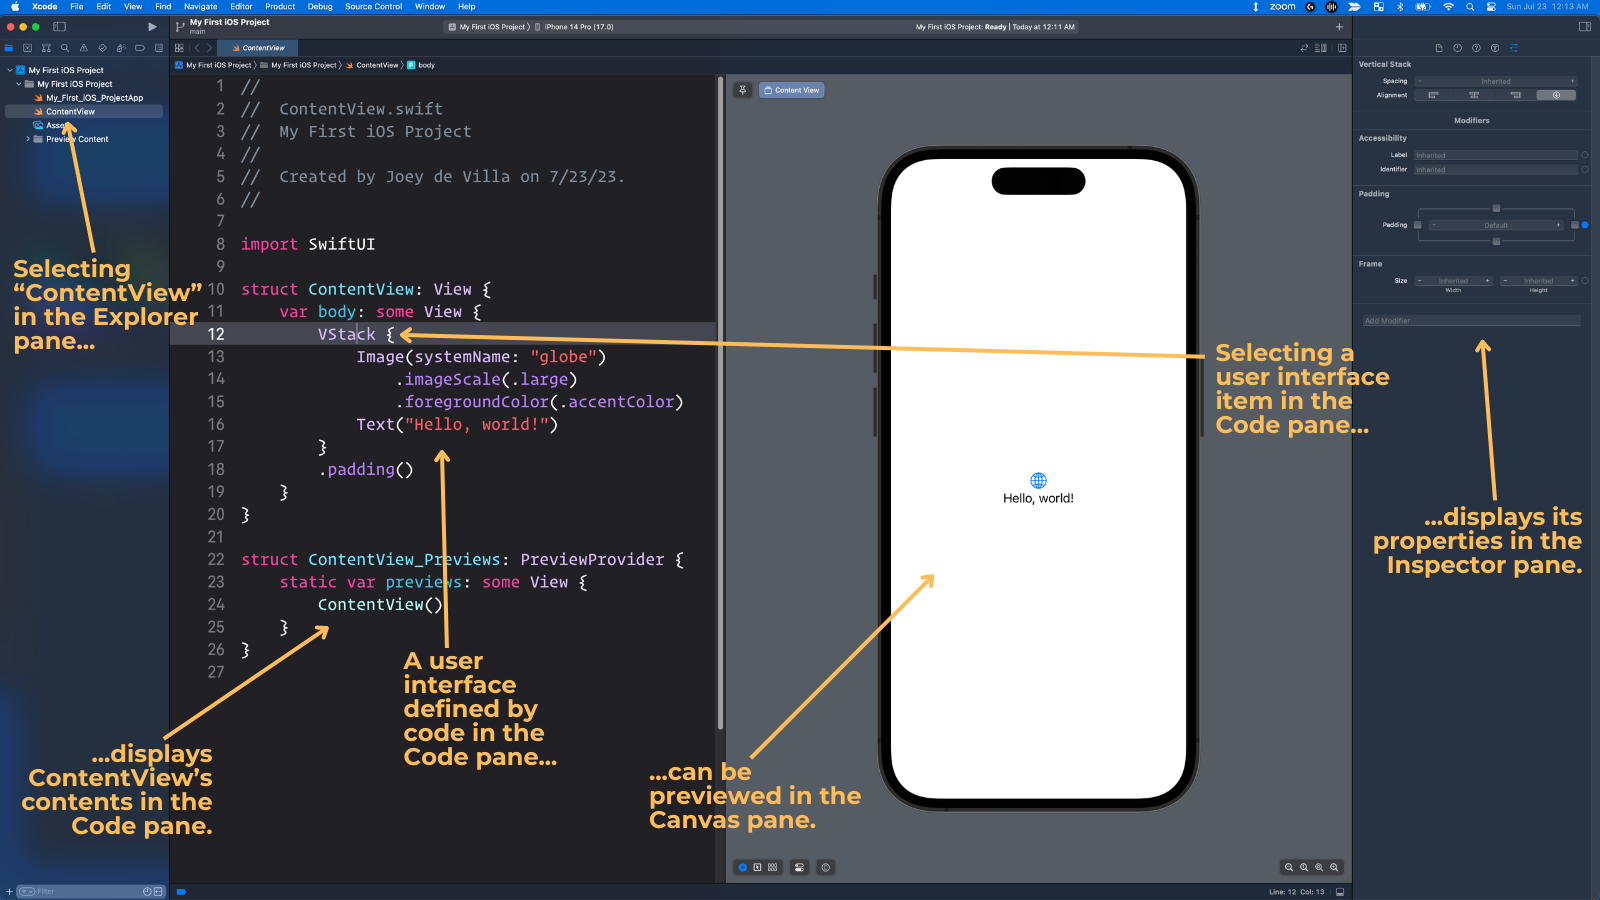
Xcode now has all the information it needs to build a basic iOS app project. It will build this project and then present the full Xcode interface, as shown below:
The Xcode window has four general areas, which I’ve numbered in the screenshot above:
The Explorer pane. The leftmost pane of the Xcode window contains a set of Explorers, which is a set of menus that let you look at different aspects of your project. The one you’ll probably use most is the Project Explorer, which lists the project’s files and allows you to select the file you want to view or edit.
The Code pane. This is where you’ll read, enter, and edit code. You’ll use this pane a lot.
The Canvas pane. This pane lets you preview what the user interface will look like in real time, as you enter code that defines the it.
The Inspector pane. The rightmost pane lets you get details about any code or user interface element that you currently have selected.
As I said earlier, when you create a new Xcode project, Xcode builds in enough code for a very bare-bones application.
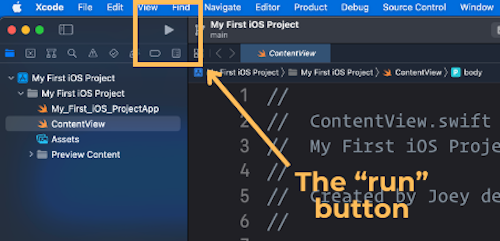
Run the project
Take a look at that application in action — click the Run button (located near the top of the screen; it looks like a ▶️ or “play” button)…
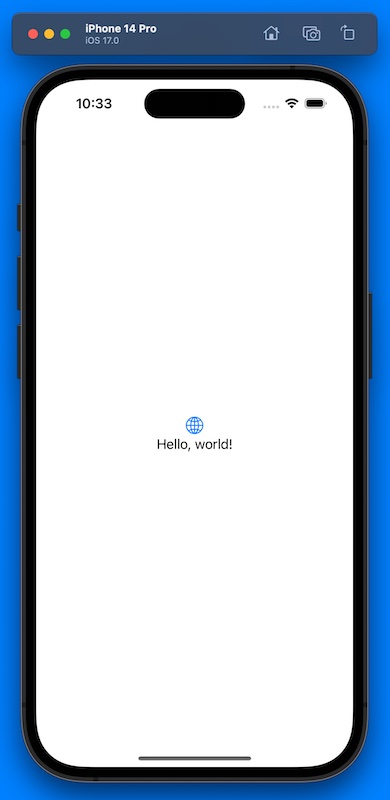
…and Xcode will launch the iOS simulator, which imitates an iOS device. Give it a few seconds to launch, and then you’ll see this:
The app doesn’t do anything other than display a 🌐 icon and the text “Hello, world!” In this exercise, we’ll take this starter app and make it do a little more, adding user interface elements along the way.
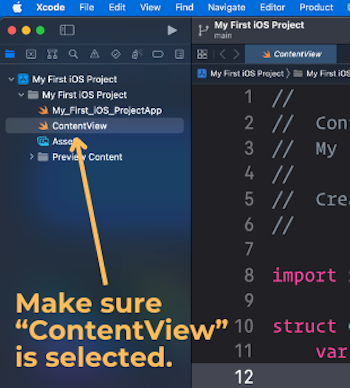
The ContentView file
Let’s take a closer look at the code. First, look at the Explorer pane and make sure that ContentView is selected:
ContentView is a file, and the code inside it defines the app’s one and only screen looks and works.
Here’s the code inside ContentView:
struct ContentView: View {
    var body: some View {
        VStack {
            Image(systemName: "globe")
                .imageScale(.large)
                .foregroundColor(.accentColor)
            Text("Hello, world!")
        }
        .padding()
    }
}

struct ContentView_Previews: PreviewProvider {
    static var previews: some View {
        ContentView()
    }
}
Structs
You’ll see that the code is divided into two blocks, each beginning with a keyword: struct, which is short for “structure.” If you’re familiar with object-oriented programming languages like Python or JavaScript, you should think of Swift’s structs as being like classes: they’re “blueprints” for objects, and can have properties and methods.
There are two structs in the ContentView file:
ContentView, which defines what appears on the screen when you run the app.
ContentView_Previews, which displays ContentView in the Canvas pane, allows you to see what ContentView will look like while you’re coding the app.
For now, let’s just look at ContentView.
The ContentView struct
When you create a new iOS app project in Xcode, Xcode creates a “starter” project for an app with a single screen. Xcode gives this screen a default name: ContentView.
The name ContentView is arbitrary. You could rename it MainScreen or HelloWorldDisplay, and it would still work. Many developers change the name of ContentView immediately after they start a new iOS app project, but for this exercise, we’ll just stick with the name.
Let’s take a look at the first line of ContentView:
struct ContentView: View {
The struct ContentView part of the line declares ContentView as a struct.
The : View part says that ContentViewadopts or conforms to the View protocol:
If you’ve programmed in C#, Go, Java, PHP, or Python 3.8 and later, think of a Swift protocol as being similar to an interface.
If you’re not familiar with interfaces but have programmed in an object-oriented programming language like JavaScript or Python prior to version 3.8, think of protocols as a loose form of inheritance.
You can think of the line struct ContentView: View { as saying “This is a struct named ContentView, which includes the properties and methods of a View object.”
Now let’s look at what’s inside ContentView:
var body: some View {
    VStack {
        Image(systemName: "globe")
            .imageScale(.large)
            .foregroundColor(.accentColor)
        Text("Welcome to the app!")
    }
    .padding()
}
Pay particular attention to that first line:
var body: some View {
ContentView contains just one thing: a variable. That’s it!
The var body part of the line declares body as a variable.
The : some View part says that body contains some kind of object that adopts the View protocol.
You can think of the line var body: some View { as saying “This is a var named body, which contains some kind of View object.”
The View protocol
The term “view” has a specific meaning in non-web GUI programming. It’s used to refer to any of the following:
A user interface element such as static text, a text field, a button, a switch, an image, and so on, or
A container for other user interface elements.
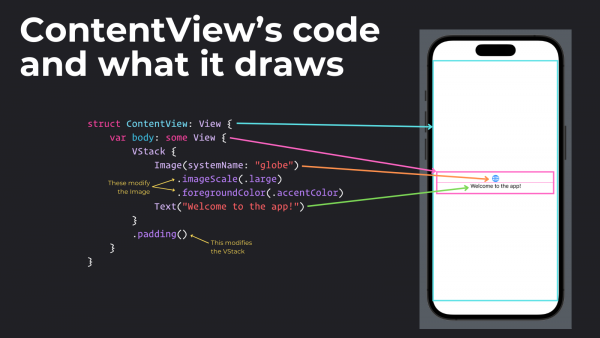
Here’s the code for ContentView and the resulting screen that shows the connections between the code and the views it creates:
Tap to view at full size.
ContentView is a plain View. It functions as the app’s one and only screen, and it contains that screen’s views.
Inside the ContentView is a VStack, which is a kind of View whose name is short for “vertical stack.” Like ContentView, VStack is a view that contains other views, but the views it contains are arranged in…you guessed it: a vertical stack or column.
Inside the VStack are two other views whose purposes you can get from their names:
Image: This view displays images.
Text: This view displays static text — the kind that the user can’t edit.
All of these things listed above adopt the View protocol, which means:
They are either a user interface element or a container for user interface elements, and
They include the properties and methods of a View object.
Let’s talk about that second point: that in order to adopt the View protocol (or more loosely, to be a kind of View), a struct includes the properties and methods of a View object.
There’s only one required property an object needs to adopt the View protocol: it just needs to have a variable named body, whose type is some View. body is a property that contains some kind of user interface element or a container for user interface elements.
In the case of ContentView, which adopts the View protocol, its body property contains a VStack. That VStack contains an Image view and a Text view.
The Text view
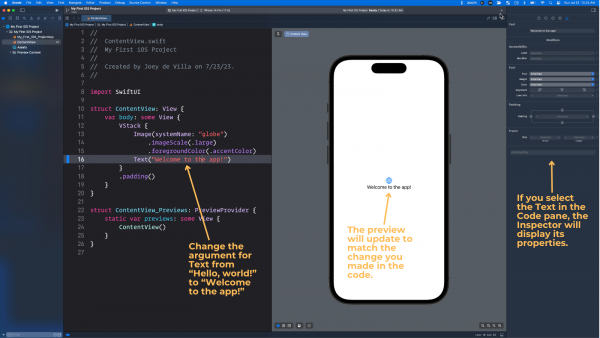
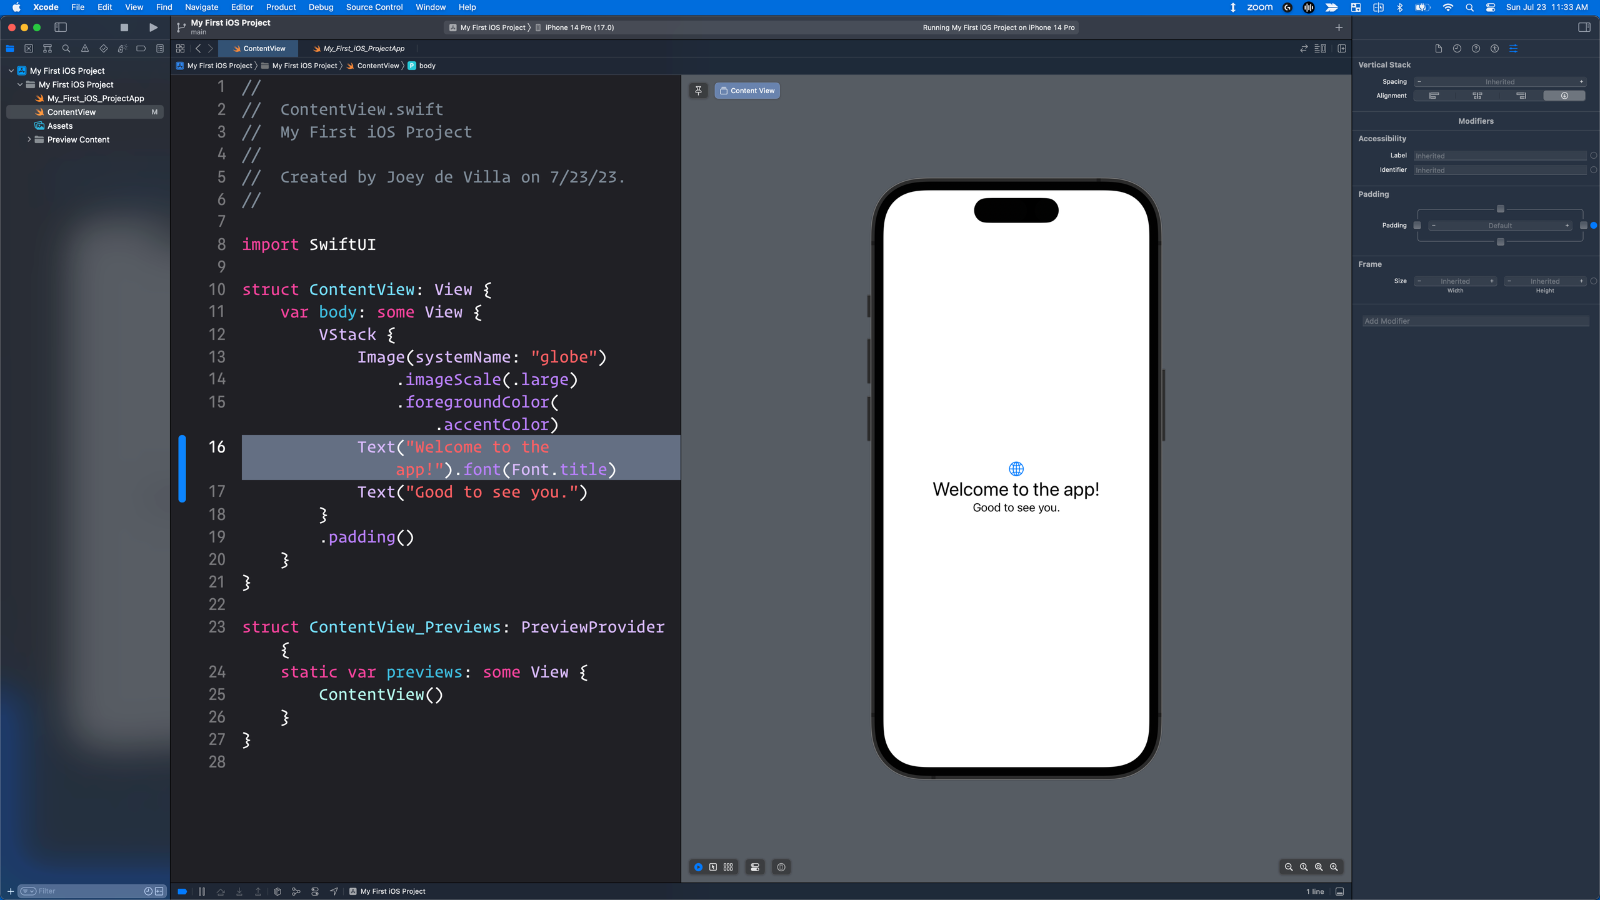
Let’s play around with the Text view first. Find the line inside ContentView that looks like this:
Text("Hello, world!")
And change it to this:
Text("Welcome to the app!")
You should see the preview in the Canvas pane update to match the change you made:
Tap to view at full size.
If for some reason the preview didn’t update, look for the text “Preview paused” at the top of the preview and click the “refresh” icon to “un-pause” it:
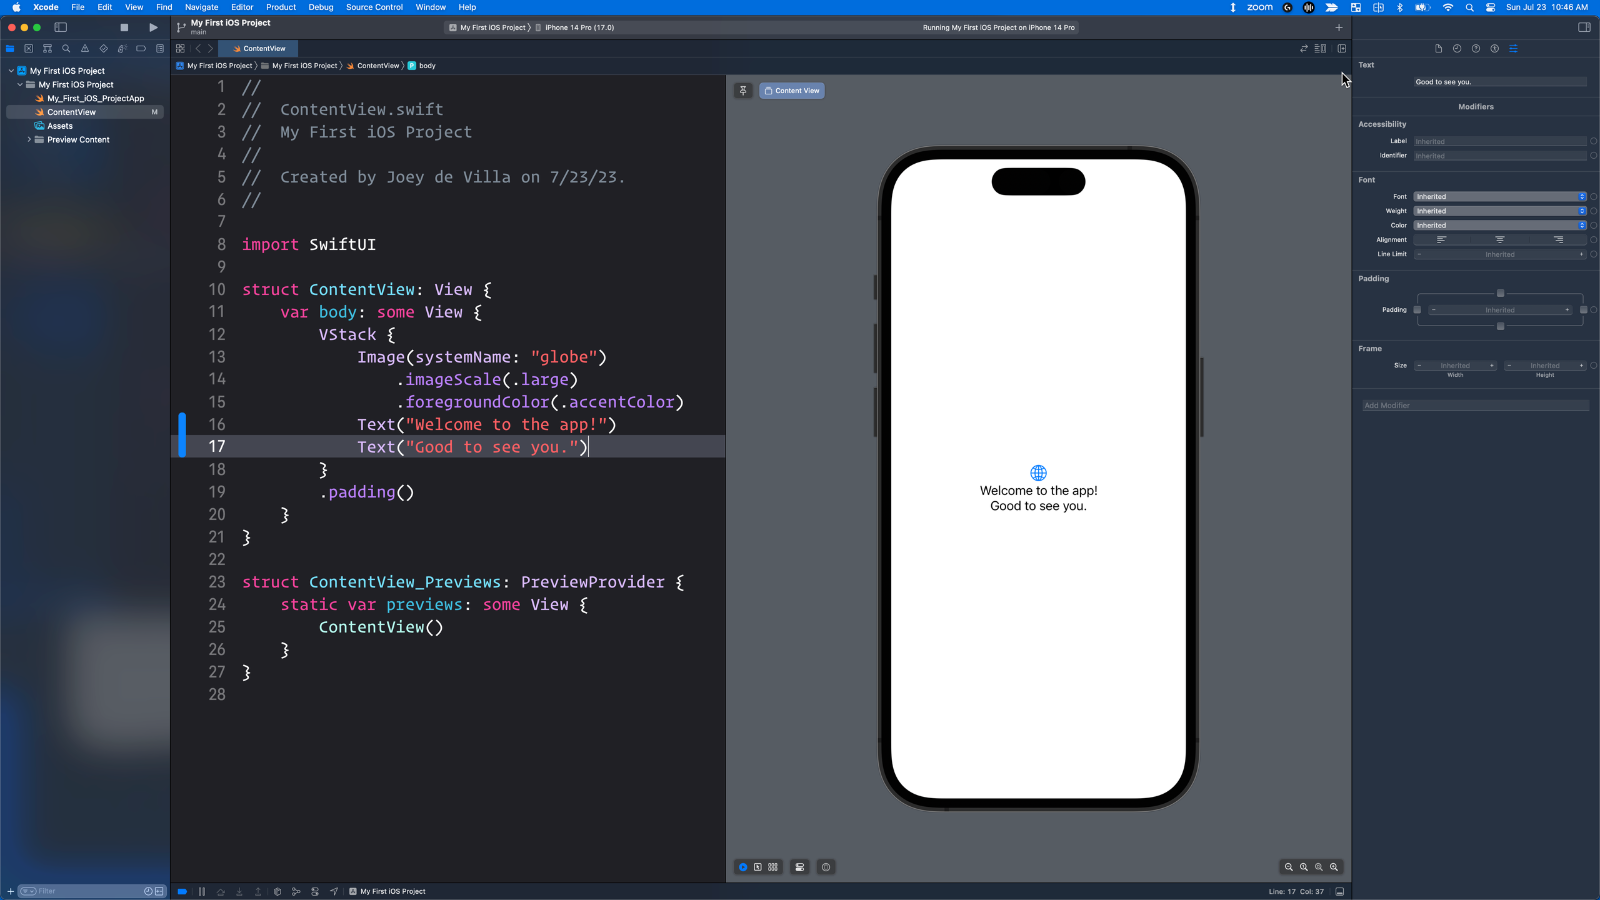
Add a new line after the Text:
Text("Good to see you.")
This should add a new Text view to ContentView, and Xcode’s preview should update to reflect the change:
Tap to view at full size.
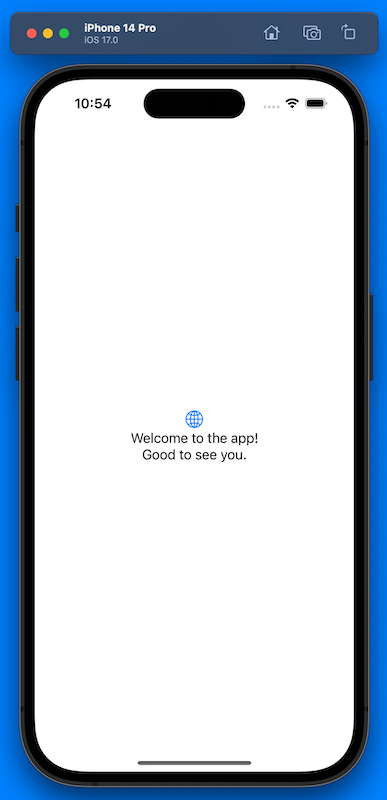
Run the app. The preview will pause and the Simulator will start up and launch the app, which will look like this:
Notice that running the app in the Simulator pauses the preview. Running the app in the Simulator or making big changes to the code causes the preview to pause, but you can always restart it by either:
Clicking on the “refresh” icon at the top of the preview, or
Using the keyboard shortcut command + option + p
Text view modifiers
Let’s make the “Welcome to the app!” message on the screen larger — it should be the size of a title. Do this by changing the line that creates that Text view to the following:
Text("Welcome to the app!").font(Font.title)
Run the app or restart the preview — it should look like this:
I’ll cover more in Monday’s session, but feel free to experiment!
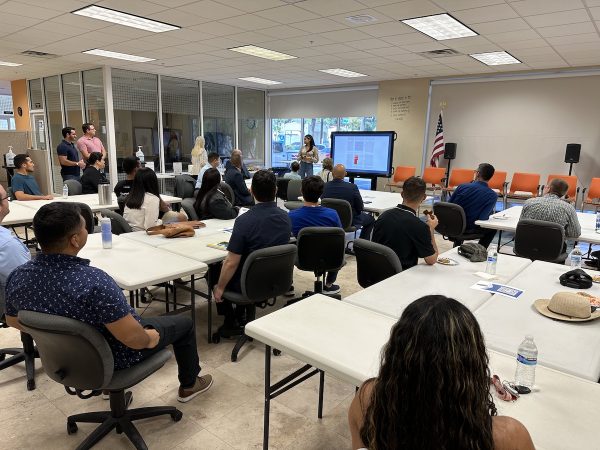
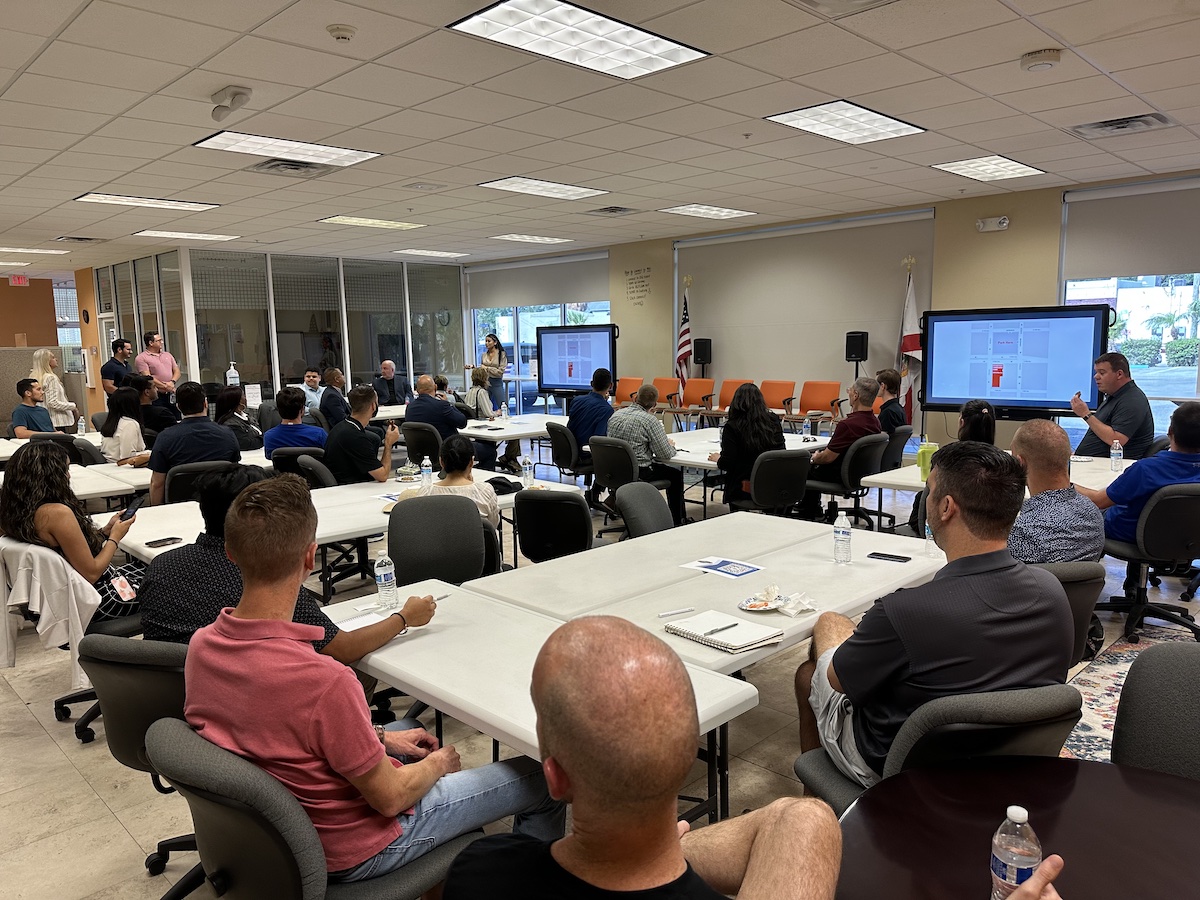
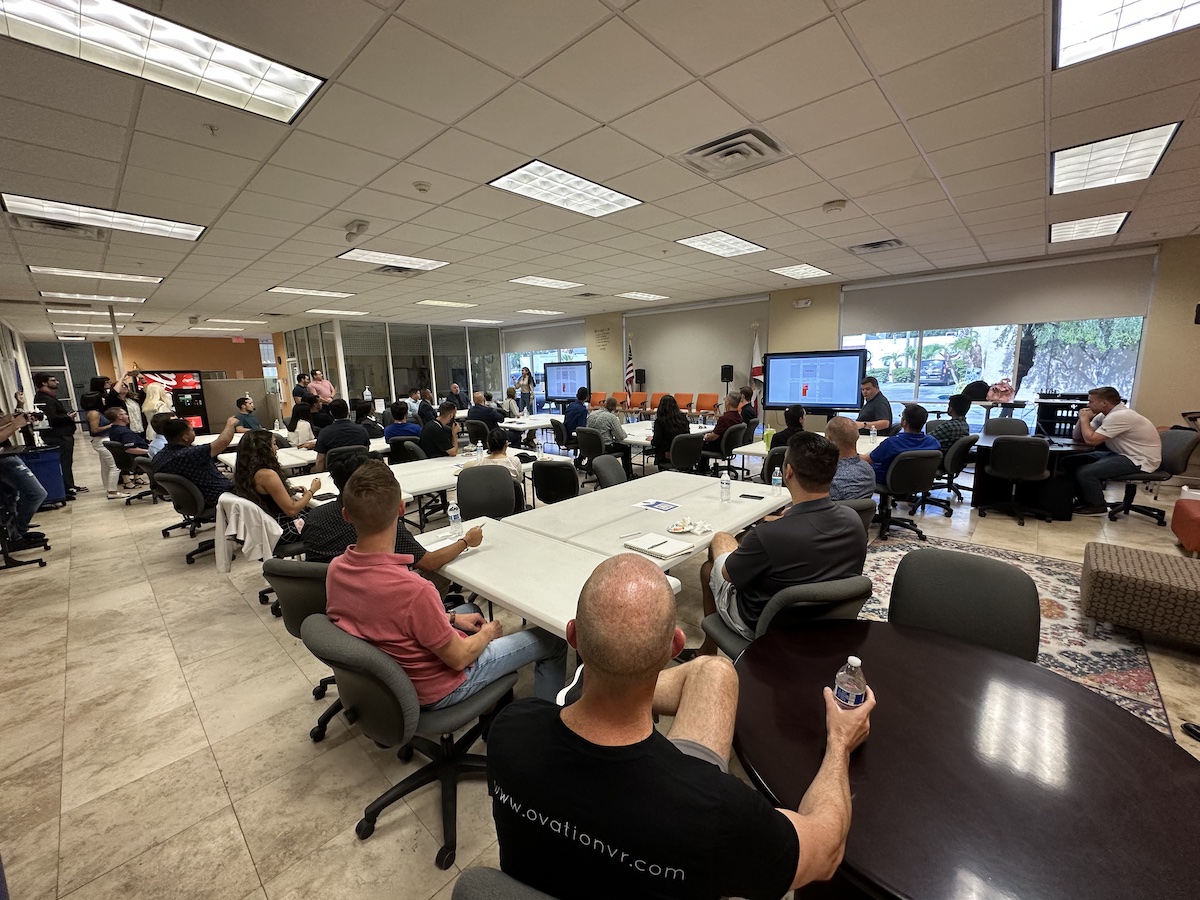
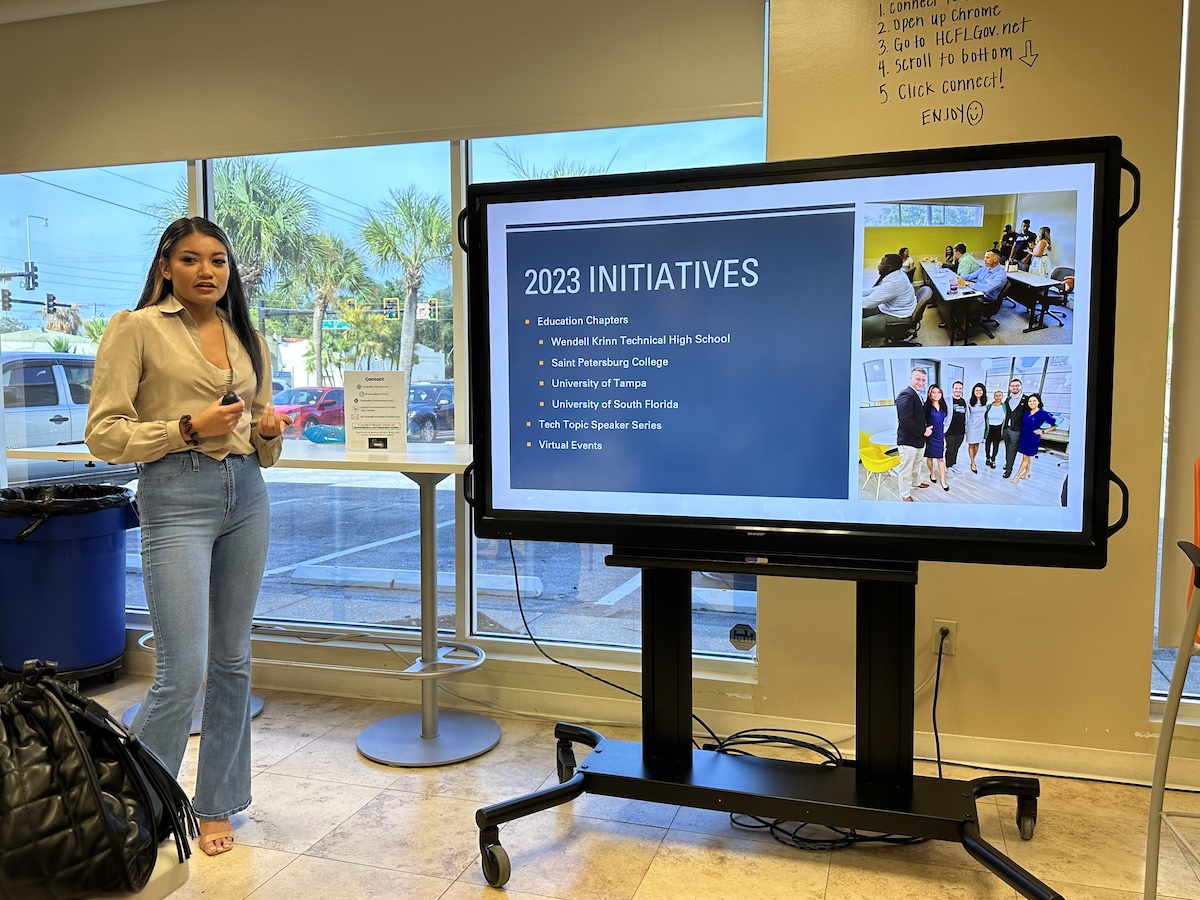
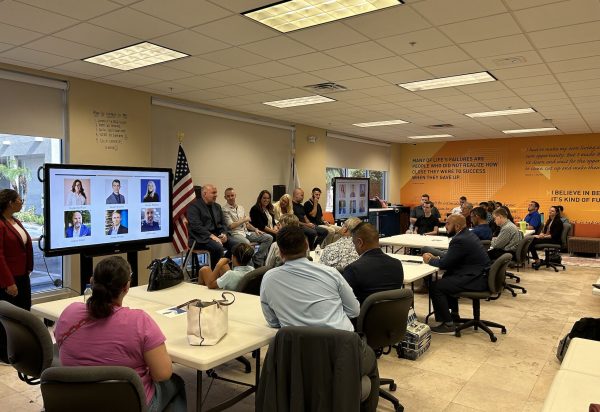
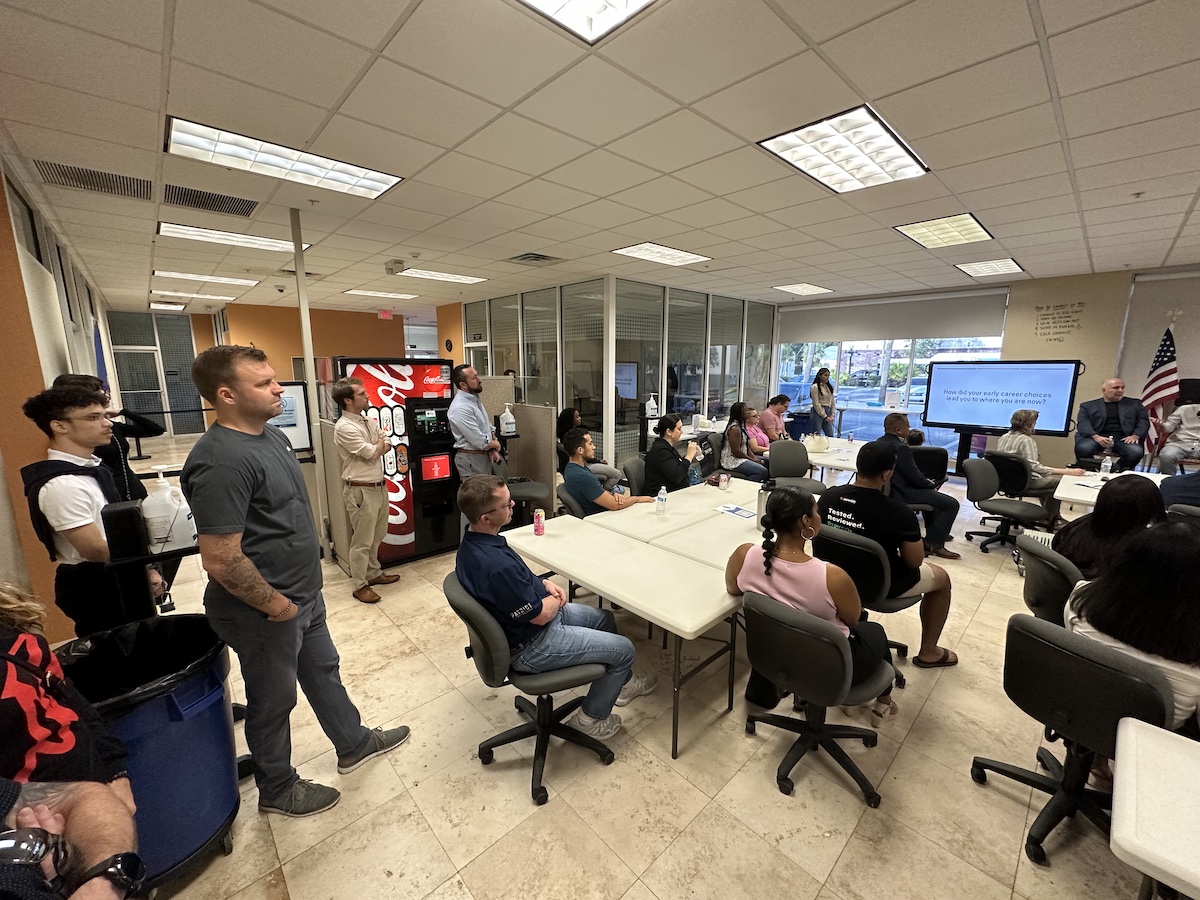
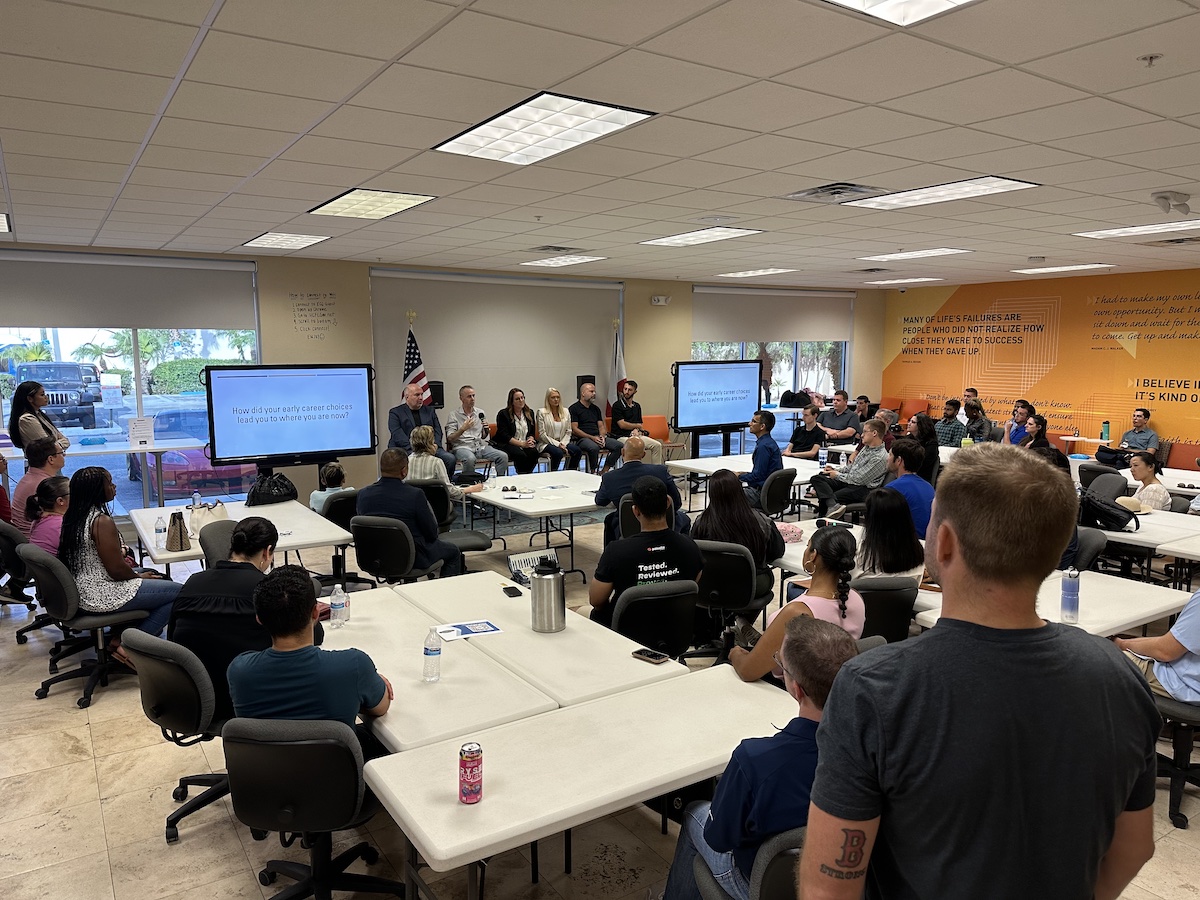
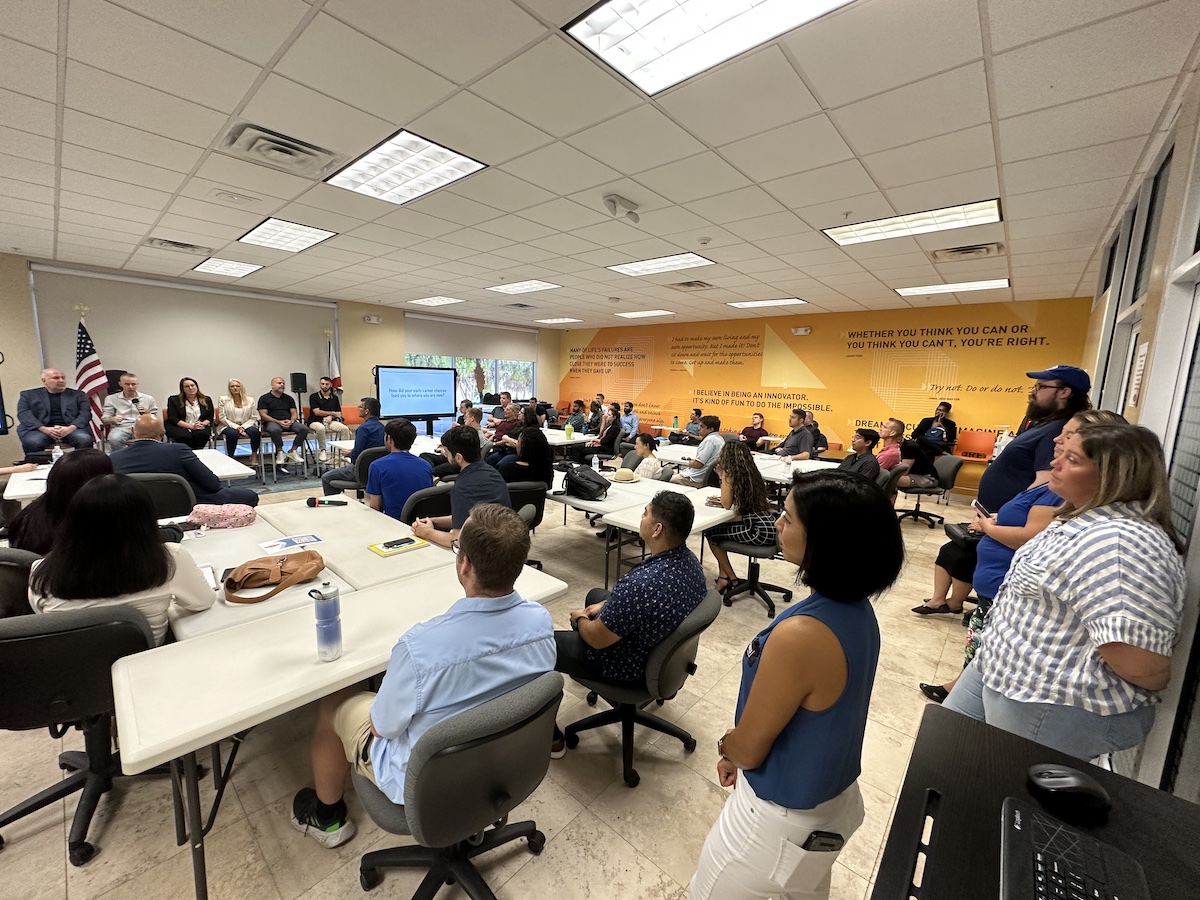
On Tuesday, July 25th at the Entrepreneur Collaborative Center, Tampa Bay Techies held their “Breaking into Tech” event that featured a panel of successful and interesting local techies sharing their advice and experience for people who want to get into the technology industry.
It was standing room only at the event, and it looks like a lot of people here in Tampa Bay are looking to break into tech or like me, want to enable their fellow techies land a job in our exciting field.
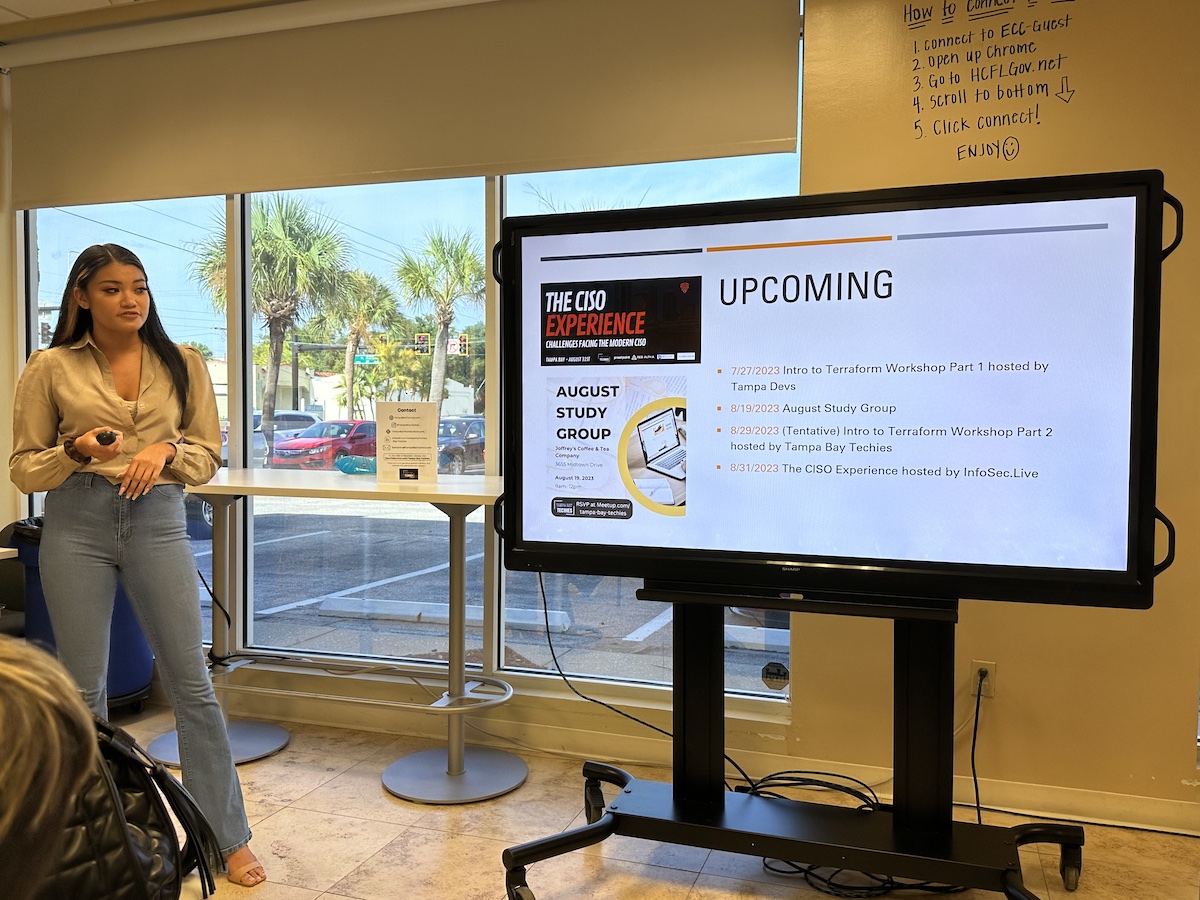
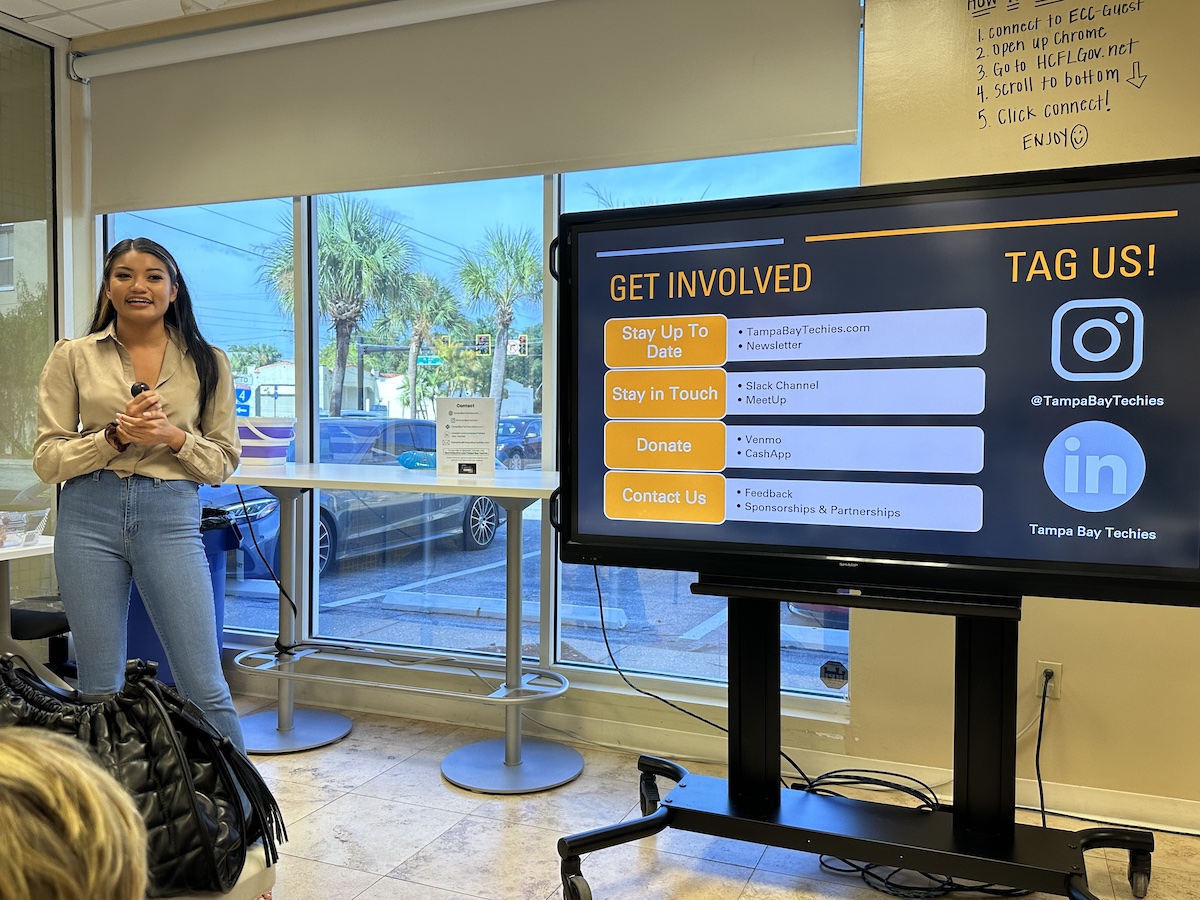
The intro
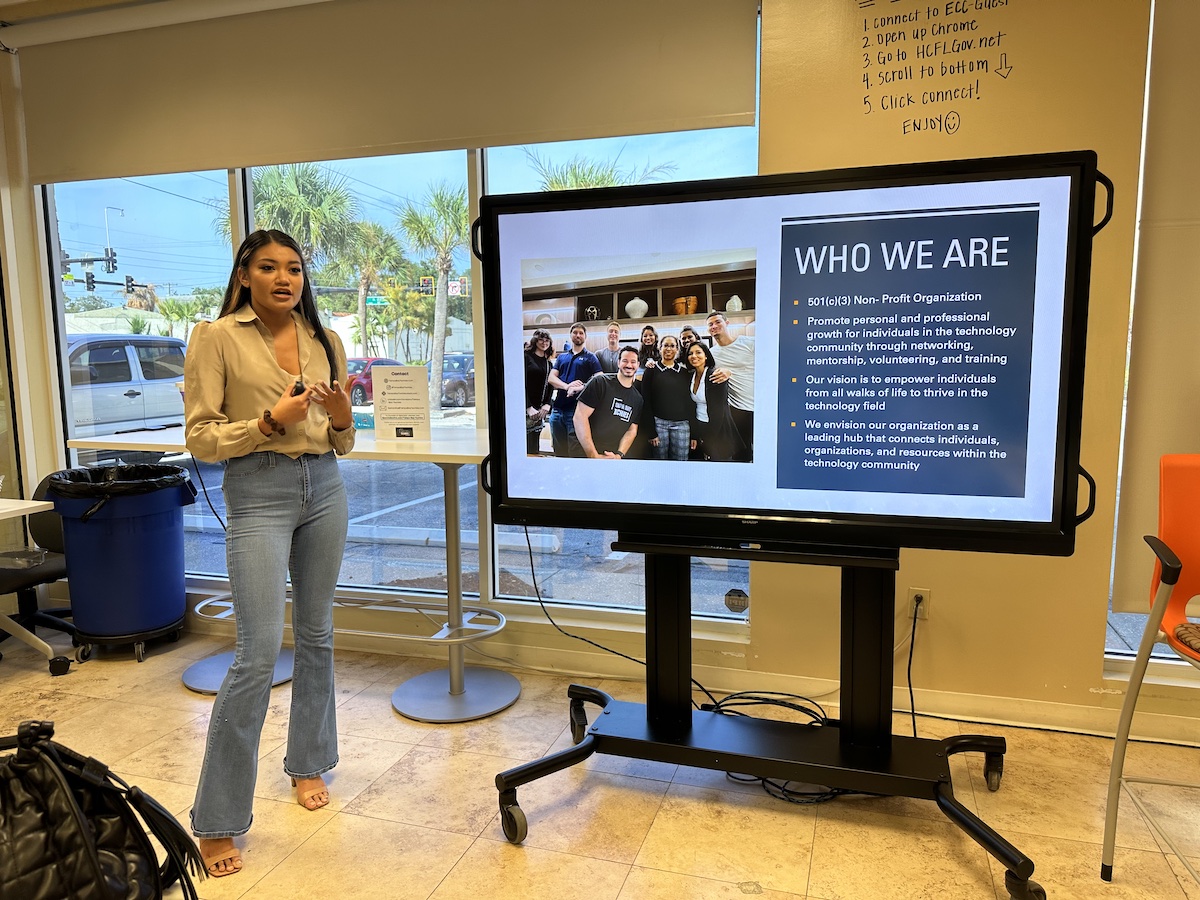
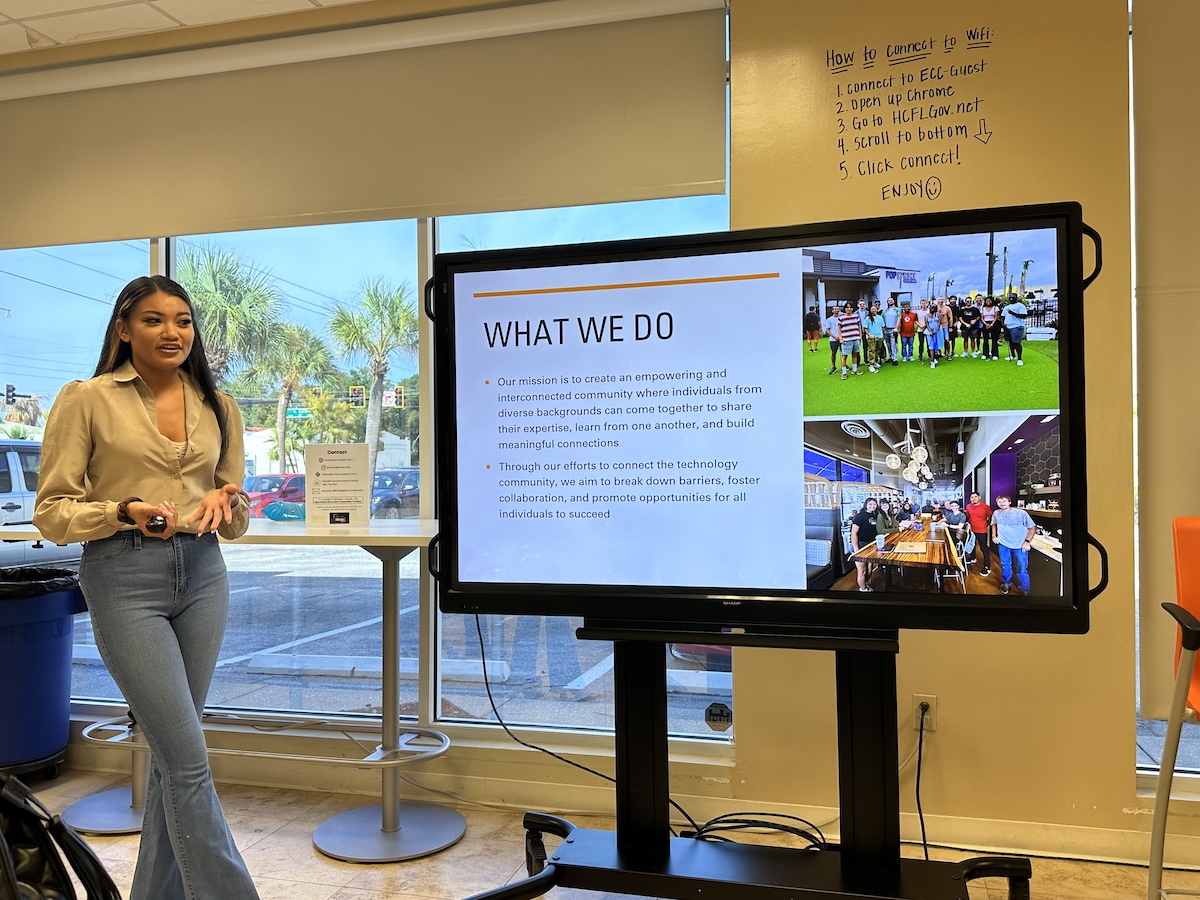
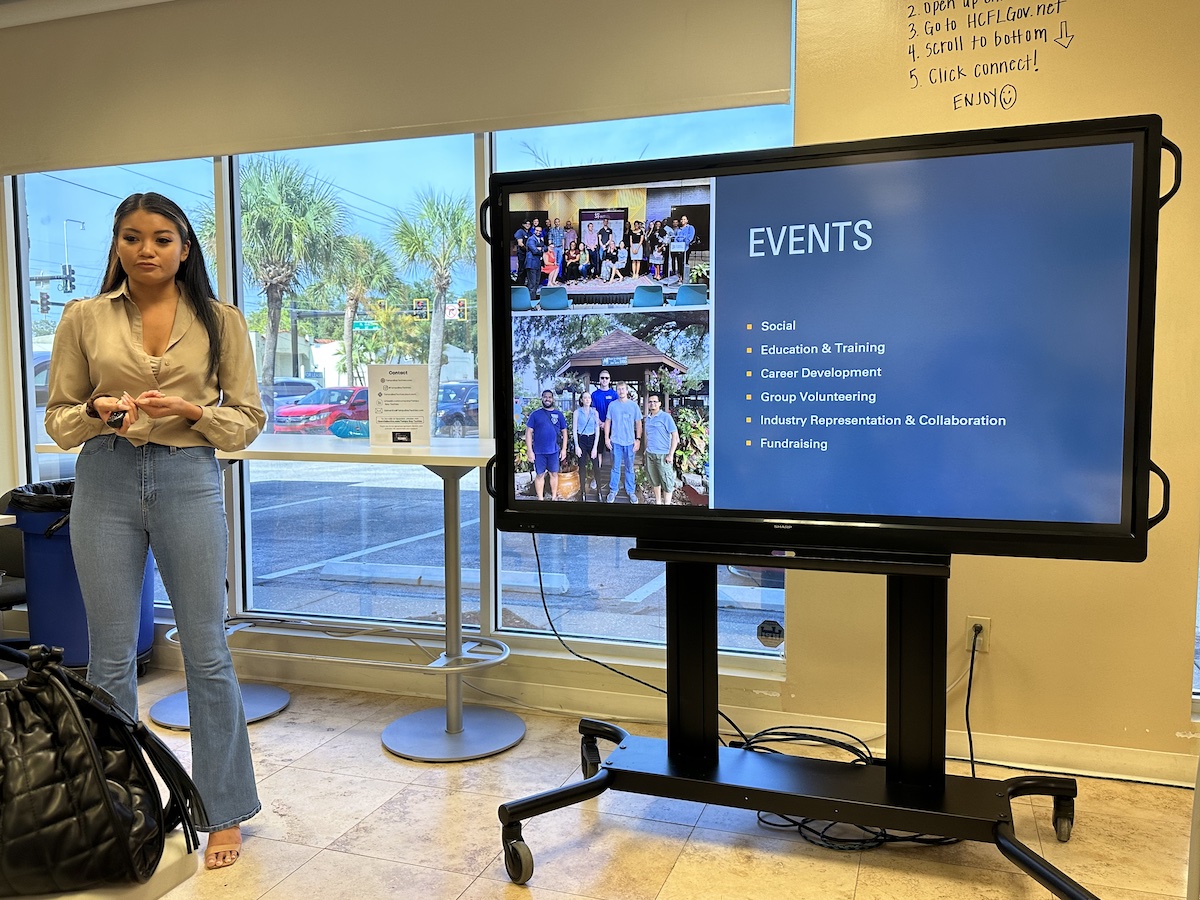
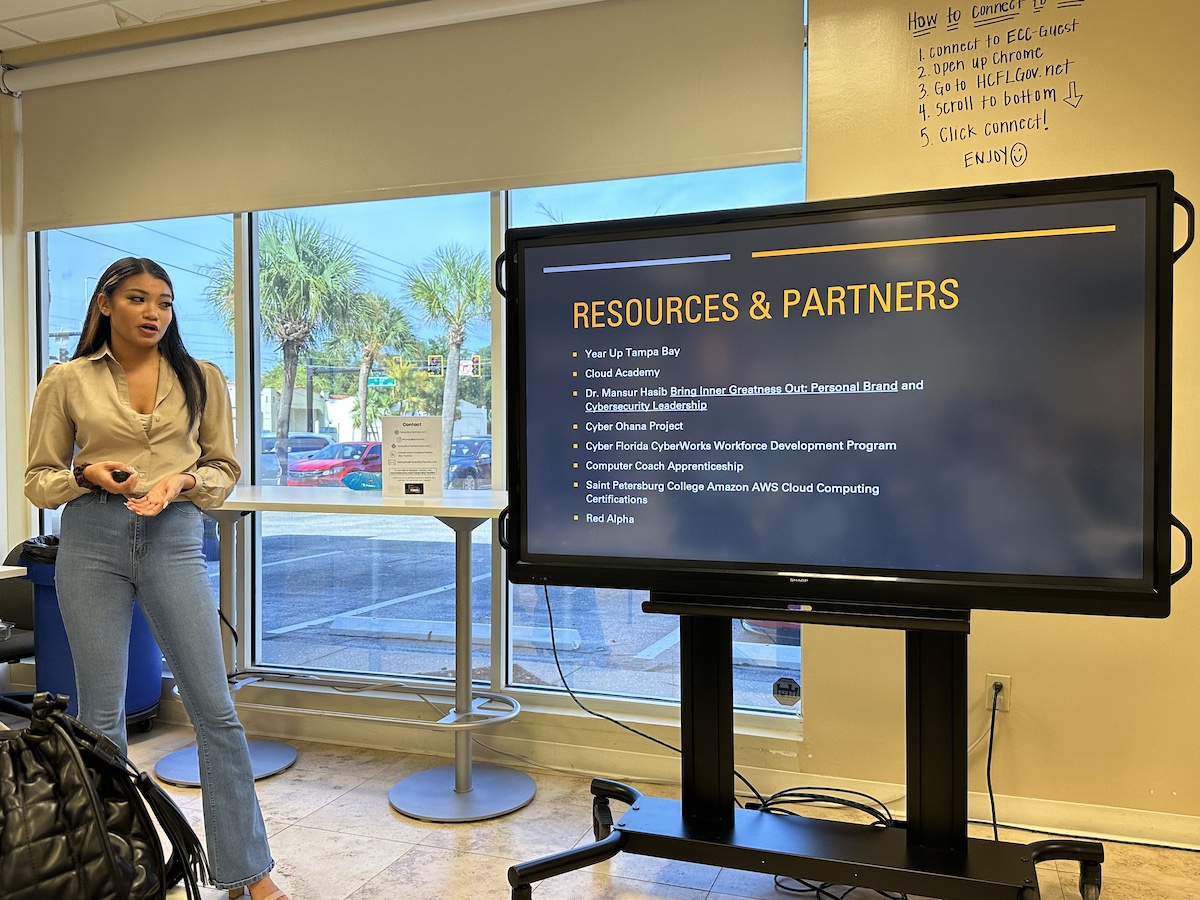
The session opened with founder Samantha Ramos talking about Tampa Bay Techies, which has only been around a few months but has already made a considerable positive impact on the Tampa Bay tech community.
with a mission to promote personal and professional growth for individuals in the technology community through networking, mentorship, volunteering, and training
whose vision is to empower individuals from all walks of life to thrive in the technology field
and aim to be a leading hub that connects individuals, organizations, and resources within our tech community.
The event wouldn’t have been possible without them —thanks so much for your sponsorship!
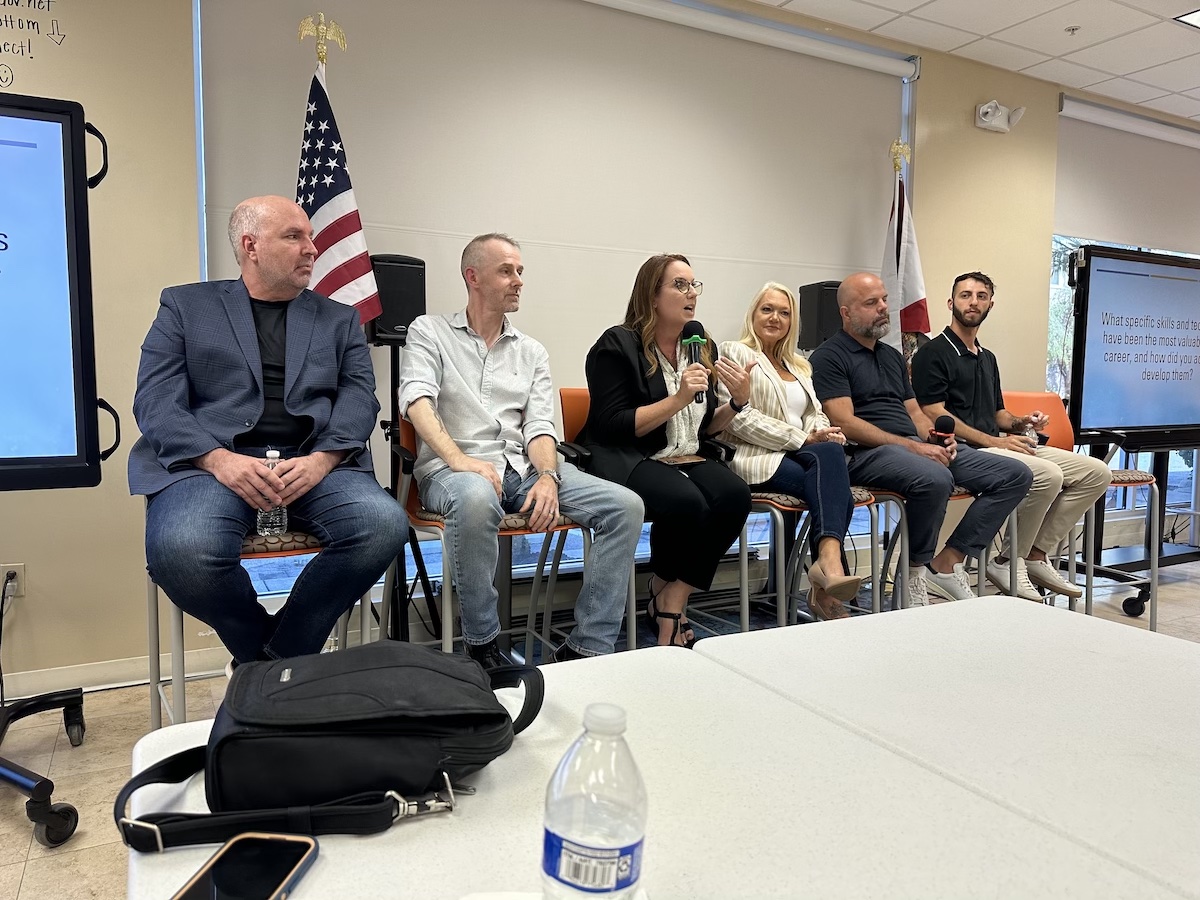
The panel session
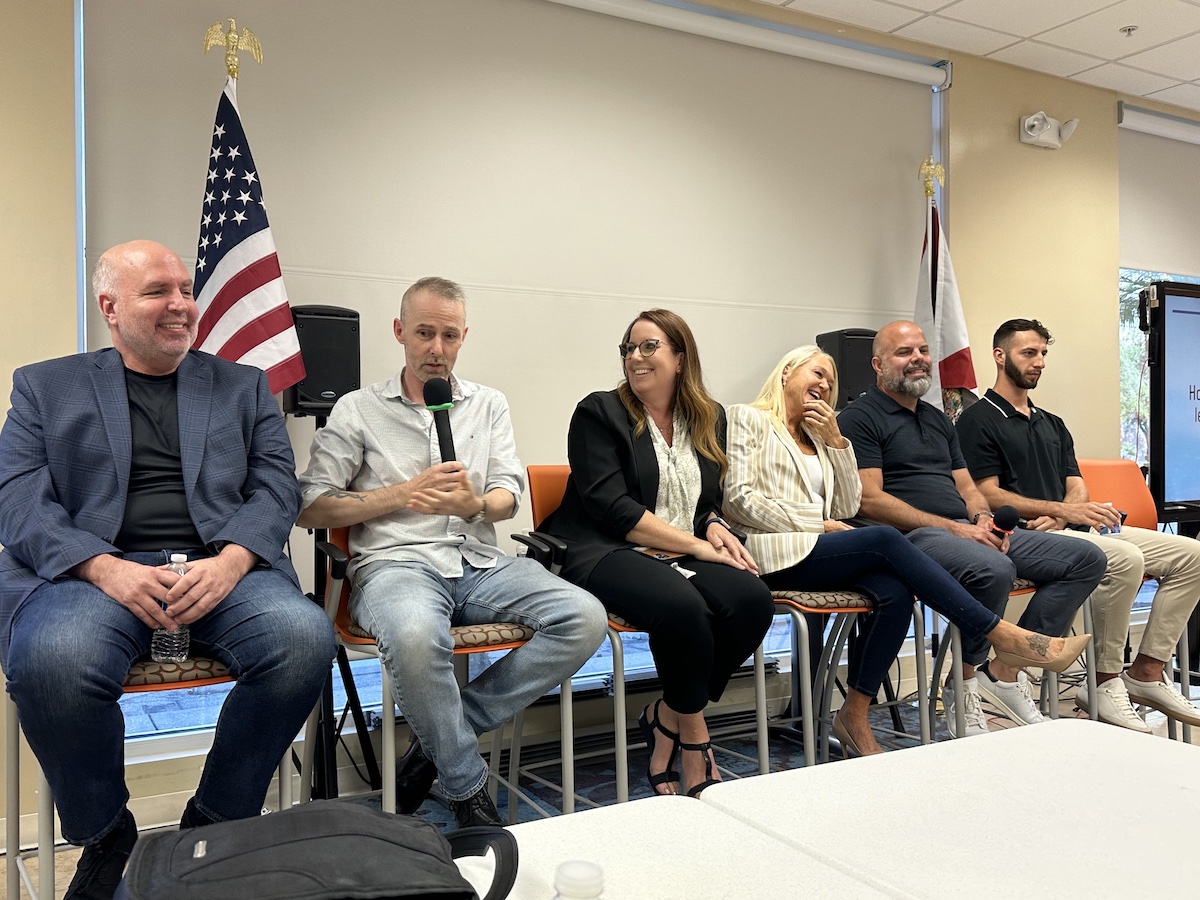
The panel comprised an impressive group with a wide array of experiences in different areas of the local tech industry, listed in alphabetical order by surname:
Here are my (admittedly incomplete) notes from the panel session.
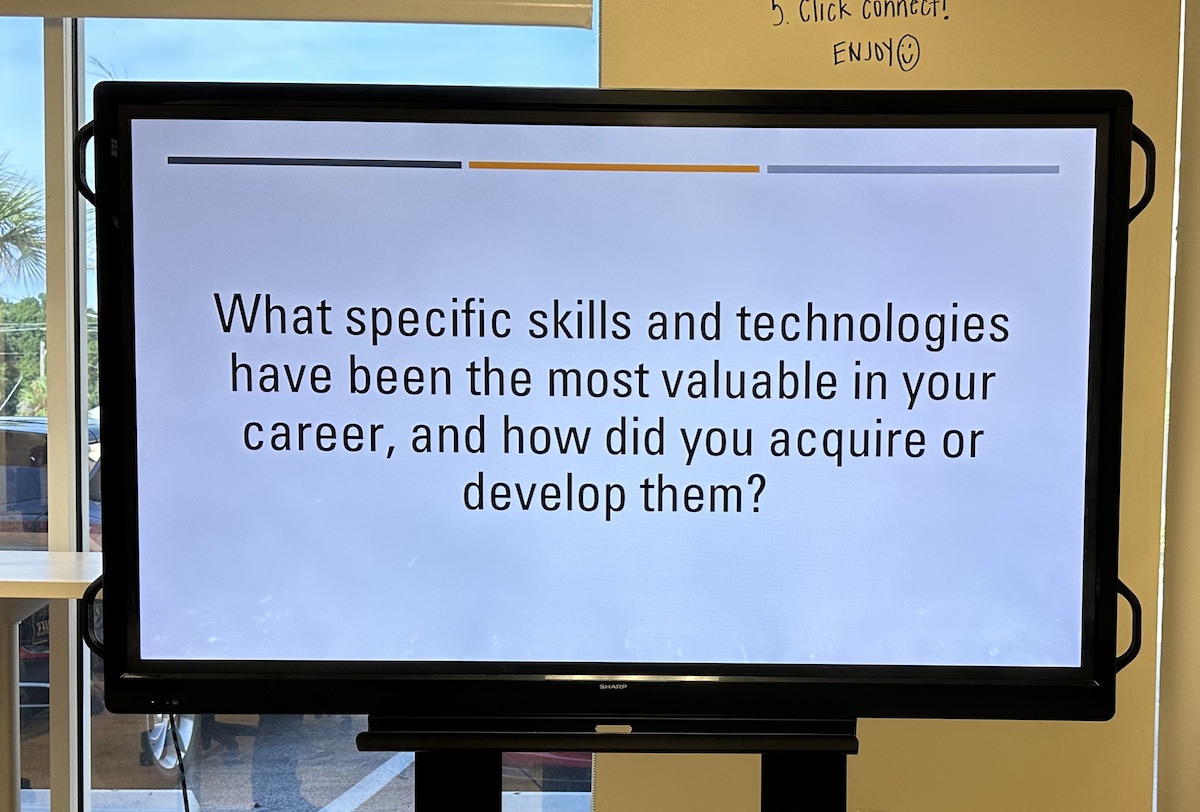
Skills and tech
What specific skills and technologies have been most valuable in your career, and how did you acquire or develop them?
Jeff:
I started as a mainframe developer
While tech skills are important, you need to leverage soft skills, especially empathy and collaboration
You also need to check your biases
Steve:
Know your audience — know who you’re talking to, what they want, and what they’re trying to get done
Know the shifts in the your career — I once transitioned from working on systems to find one of the most prolific serial killers to the Edinburgh Fringe Festival
Understand the business of the people you’re talking to
Suzanne:
I started as a web designer and ended up managing 50 sites for commercial real estate in the era before CRMs
I discovered that I have a passion for teaching, so I made a transition into tech training
Soft skills are important
From left to right: Jeff Fudge, Steve Hindle, Suzanne Ricci, Ashley Putnam, Jason Allen, Austin Eovito.
Ashley:
I didn’t go into tech in the beginning
I ended up in recruiting for mainframe developers to solve the Y2K problem
The number one skill is relationship building
Jason:
At the Future of Work conference held at Stanford just before COVID, I heard a speaker say that 20 years ago, you might expect to change your career once, maybe twice in your lifetime…
…but these days, you can expect to change it four, five, maybe even six times now
You need to build the skill of learning new skills
The fundamentals that will help you as a techie (they helped me):
C programming
SQL
TCP/IP
Austin:
I’m going to echo the “learn how to learn” advice
I was a military brat, moving around a lot, and then I went to Florida State and did “Florida State things”
I started in research and ended up in applied science
Remember that math is never going to go away — it is fundamental to what we do
If you can, learn both low-level and high-level stuff
Also keep in mind that soft skills are criminally underrated
Strength / special ability
[Editor’s note: Somehow, I managed not to write this question down — if you remember what it was, email me, message me on my LinkedIn profile, or let me know in the comments!]
Suzanne:
I read 50 books a year — a lot in audiobook form — physics, career development, self-development
I’m always in some kind of class. I’ve even taken cooking and dog training courses
I maintain a commitment to learning, and I continuously study my industry
Ashley:
[Steve] Ashley’s special ability is her connections!
Jason:
I still code, which allows me to have intelligent discussion with the teams
When you}re in charge, it’s important to understand all facets of the busines
Austin:
I like what I do, which is a great help
I read a lot; it’s how I learn best
I approach my job with a childlike sense of wonderment
I’m relatively driven
I also have decent risk tolerance — I prefer to ask “Why shouldn’t I” over “Why should I?”
Jeff:
My strength is my ability to pivot
Don’t be afraid to take something on
Don’t sell yourself short
Steve:
Wow — everyone on this panel speaks in paragraphs!
I’ll remind everyone of this Ozzy Osbourne quote: “Be kind to people on your way up the ladder, ’cause you’ll meet them on the way down.”
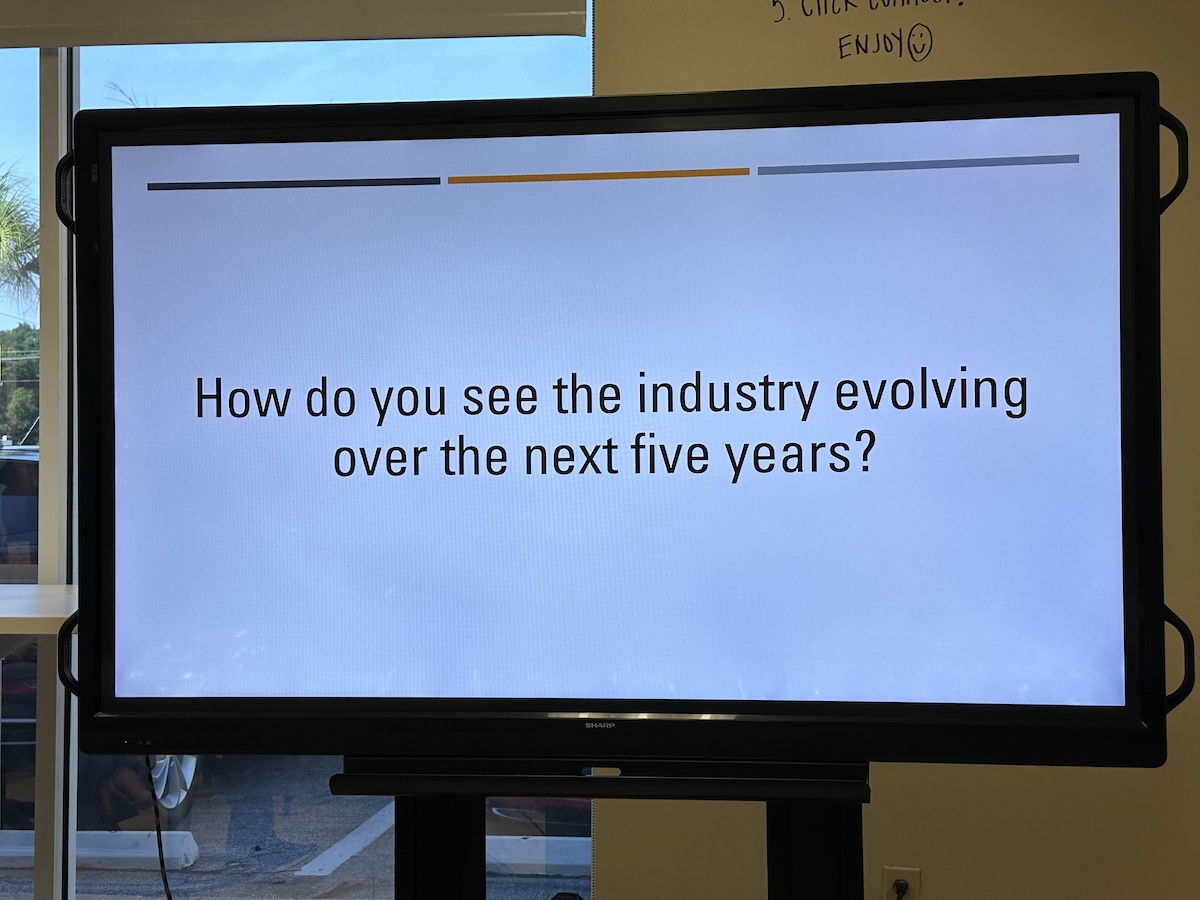
The next five years
How do you see the industry evolving over the next five years?
Austin:
You’ve seen this ChatGPT thing, right? Tech like that is not going away
Basically, any technology that creates the three T’s — time, talent, and treasure — will be seen as valuable
Even with the current wave of fancy AI, the “simpler versions” of AI are still important — for example, scikit-learn
Other things will still be important: security, costs, deployment — they’ll all still be in play
Jason:
We’ve seen so many “once in a thousand years” kinds of events — in the past five years!
The best thing you can do is learn how to learn
You’ll need to anticipate changes and change with them
Keep tabs on new technologies, but through a “suspicious lens”
Learn the basics; you’ll always be able to leverage them
Ashley:
Find the thing you’re passionate about
From left to right: Jeff Fudge, Steve Hindle, Suzanne Ricci, Ashley Putnam, Jason Allen, Austin Eovito.
Suzanne:
Make a plan
Keep in mind that some technologies will affect every career path
Ask yourself: Where do you want to be in five years?
Talk to people who have the job you’d like to have in the future — remember, people love to talk about themselves!
Keep learning, and course-correct along the way
Steve:
I take inspiration from my favorite superhero of all time, Iron Man!
I was a fan of Tony Stark from the comics, even before the Iron Man movie changed superhero movies forever
What I love about Iton Man is that he’s not intrinsically “super,” he’s just a human augmented by technology
What we do is help people become Iron Man in little ways
AI is there to augment people, and it will be a regular part of your everyday life five years from now
Be people-centric in your approach to technology
Jeff:
In five years, I’ll hopefully be retired!
The days of being a generalist are going or gone
People want specialists. Pick a specialty, and if you need to, be prepared to pivot
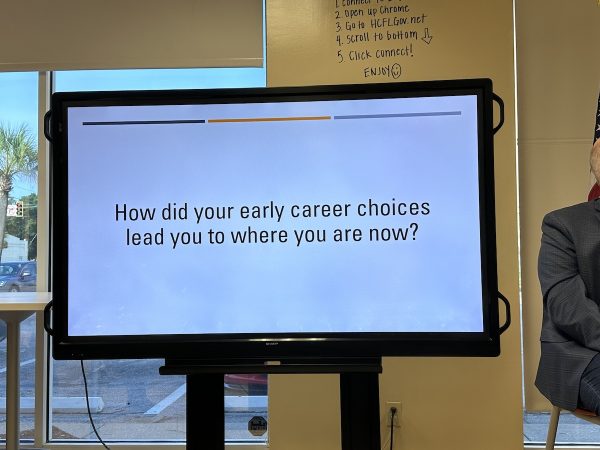
Early career choices
From left to right: Jeff Fudge, Steve Hindle, Suzanne Ricci, Ashley Putnam, Jason Allen, Austin Eovito.
How did your early career choices lead you to where you are now?
Jeff:
Exposure to the right mentors and indviduals
You learn from everyone you work for — some will provide ideas and actions that you’ll want to borrow, some will be anti-examples or show you what not to do
Don’t pick a technology just because it’s “shiny”
Steve:
I wanted to be an accountant because my grandfather was one, but I’m terrible at math
I also wanted to be a pilot — I have family in the Royal Air Force — but I have nerve damage that disqualifies me
My accounting grades were an sign that I was not meant for accounting, but on the strength of what I was good at, it was suggested that I go into IT
You need to be able to see “the fork in the road” ahead of you
Suzanne:
I was an entrepreneur at 24, when I opened my first training center. Computer Coach is my third!
From left to right: Jeff Fudge, Steve Hindle, Suzanne Ricci, Ashley Putnam, Jason Allen, Austin Eovito.
Ashley:
I originally wanted to be a star! I went to New York City and did a lot of auditions
When that didn’t work out, I ended up running the call center for Frontier Airlines in St. Pete, which wasn’t fun. Nobody calls an airline call center unless their trip has gone wrong
I complained about the job, and got the suggestion that I should take an IT recruiter opening. I didn’t even know what that was, but it paid $25K + commission, and I made more than I’d ever made up to that time
Jason:
My plan was to keep learning. My work at the Department of Energy led to my learning about information security and also how to build at scale
And don’t forget to use those connections!
Austin:
I’m still early in my career — I’ve been at it for only four years
A lot of my approach boils down to not giving up and putting in some long nights
What greatly helped me was someone writing a fire letter of recommendation for me
You can greatly affect people when you do well by others
Q & A
The panel ended with a Q&A session — here are my notes summarizing the responses:
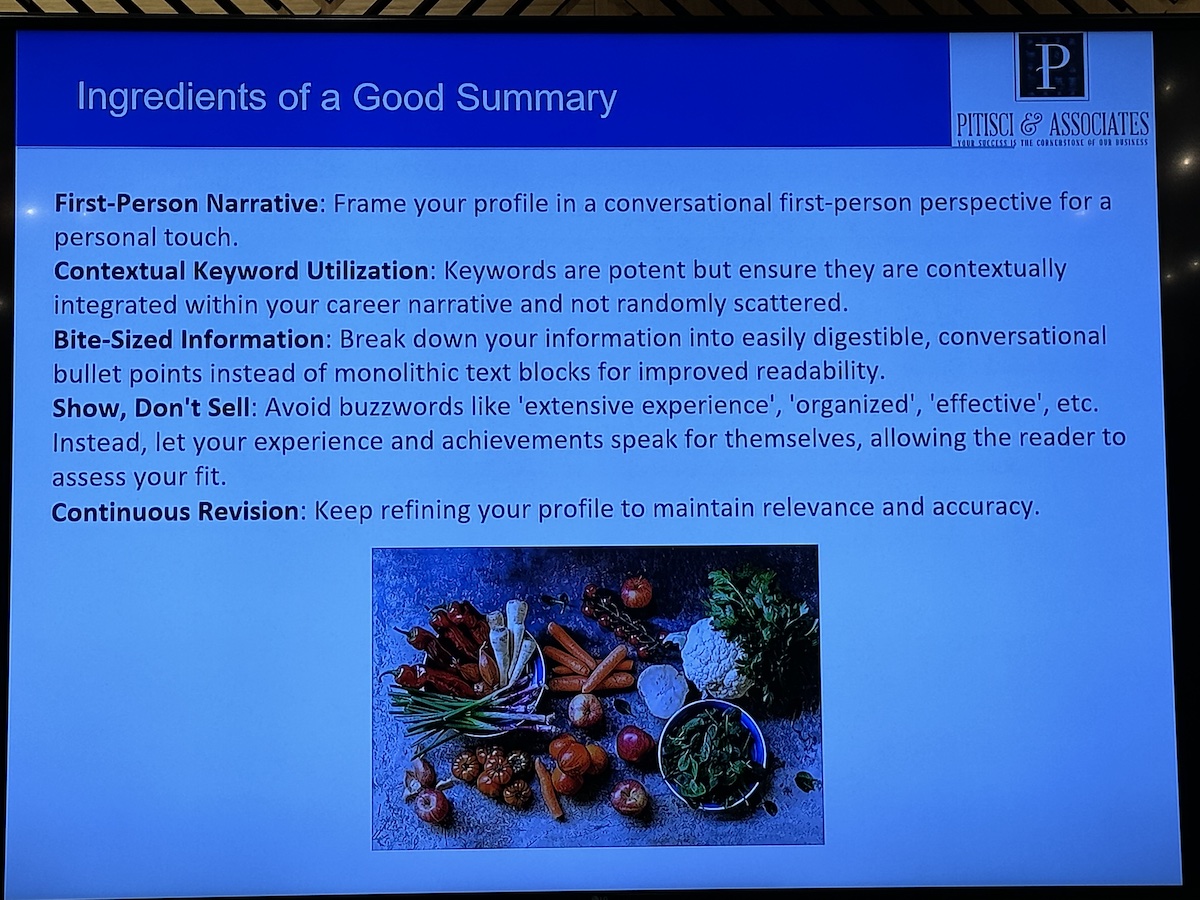
You need to showcase your work in places like:
GitHub — open source contributions can open doors
Passion projects, whether technical or non-
Collaborative projects — the people you collaborate with may end up being your network and references
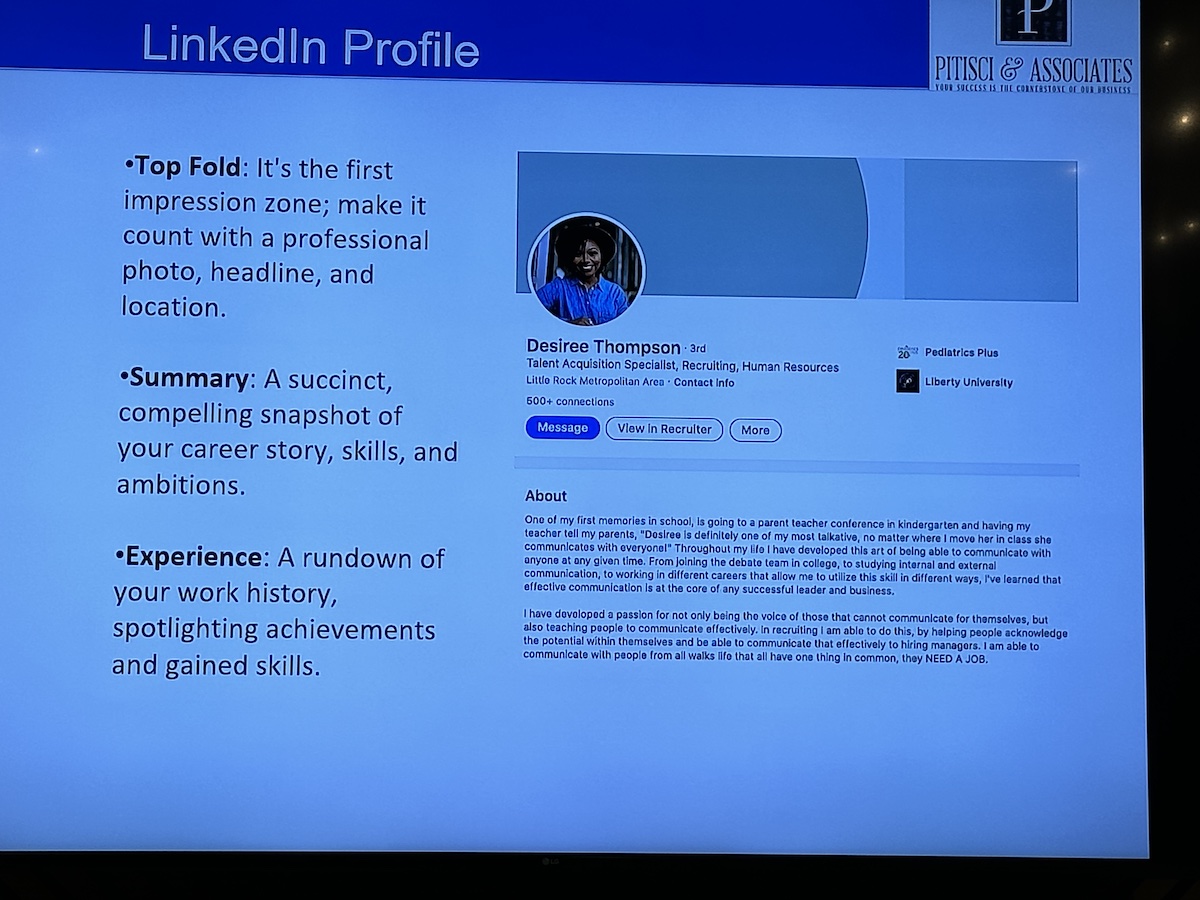
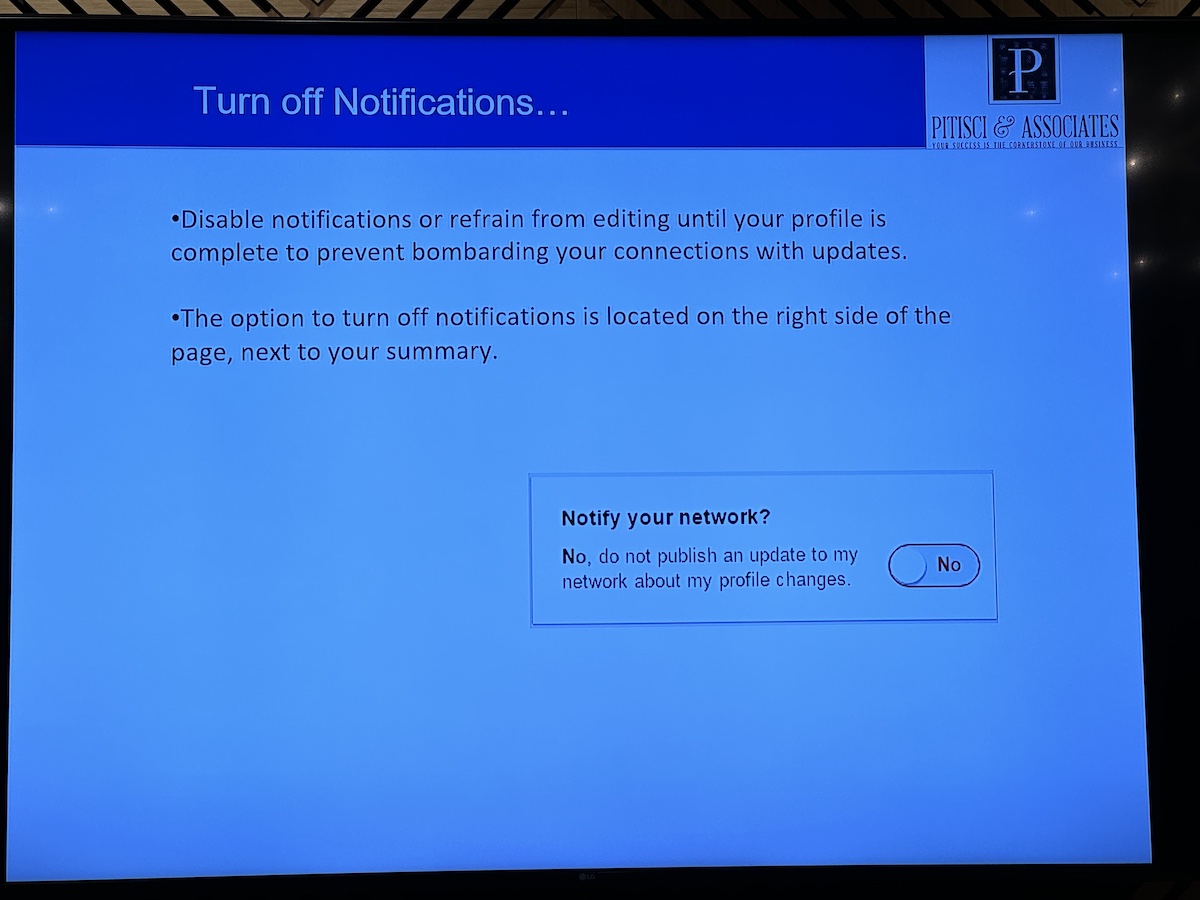
Use LinkedIn
Remember that recruiters pay for the recruiter-specific version of LinkedIn (it costs about $10K a year)
This recruiter-level subscription specifically seeks out people and what they can do by the content they produce
Learn how to use LinkedIn to be noticed by recruiters
Find a mentor
A mentor can help fill in your gaps, especially leadership gaps
Afterward
The panel was followed by the informal networking session, which gave attendees a chance to catch up with old friends and acquaintances and make some new ones. It was great catching up with folks I know, and meeting some people whom I’d never met before.
I’ve made three appearances on Fox 13 News Tampa this year so far. If they call on me to answer more questions or explain some aspect of artificial intelligence, I’ll gladly do so!
My most recent appearance was on June 14, whose topic was all the noise about AI possibly being an existential threat to humanity. This is the one where I reminded the audience that The Terminator was NOT a documentary:
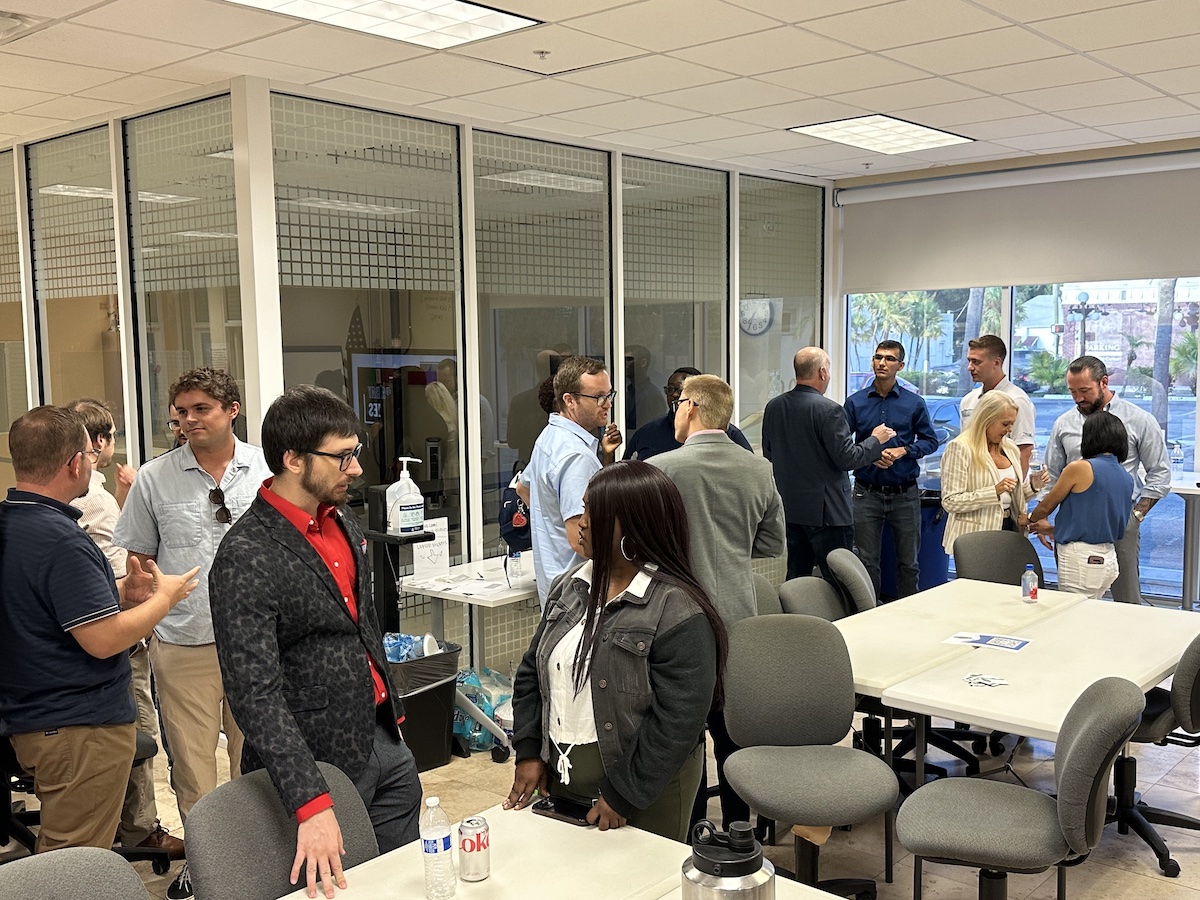
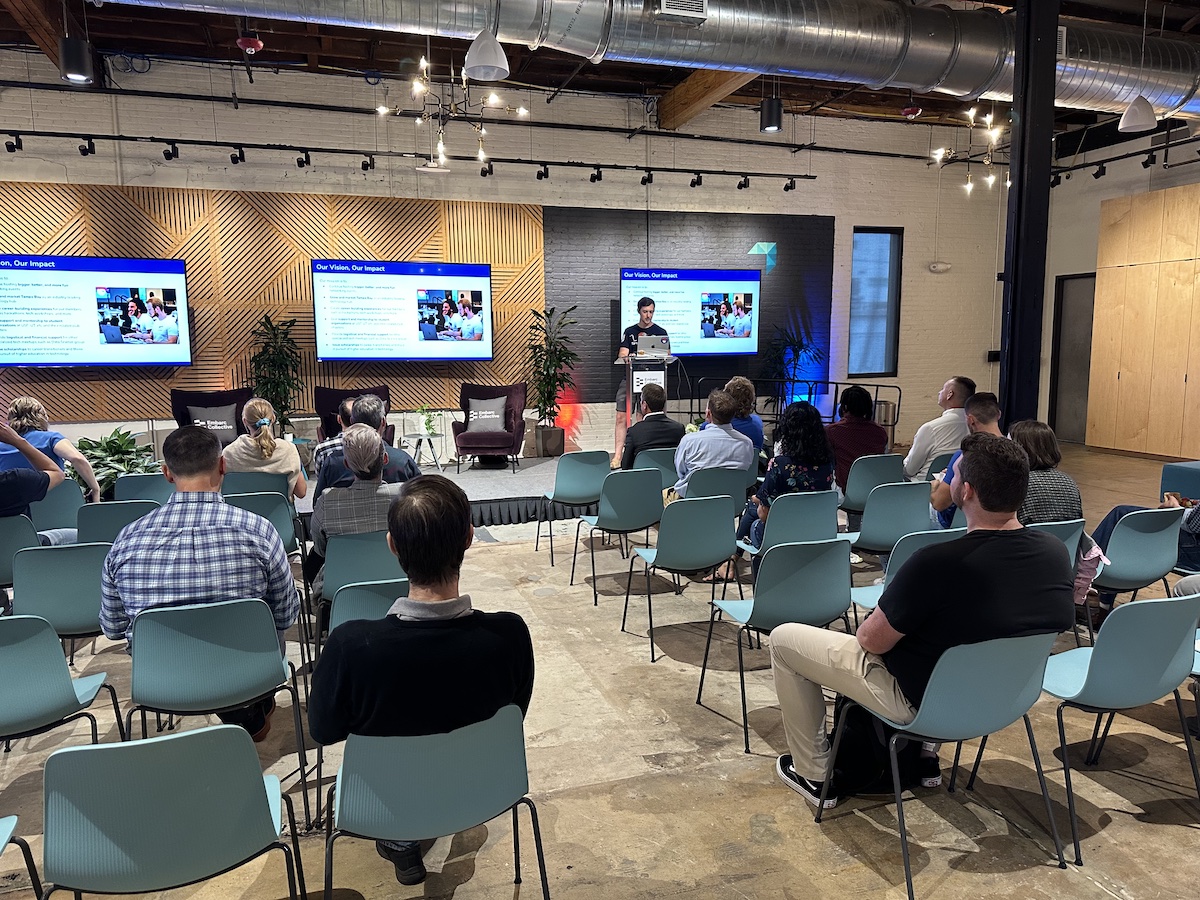
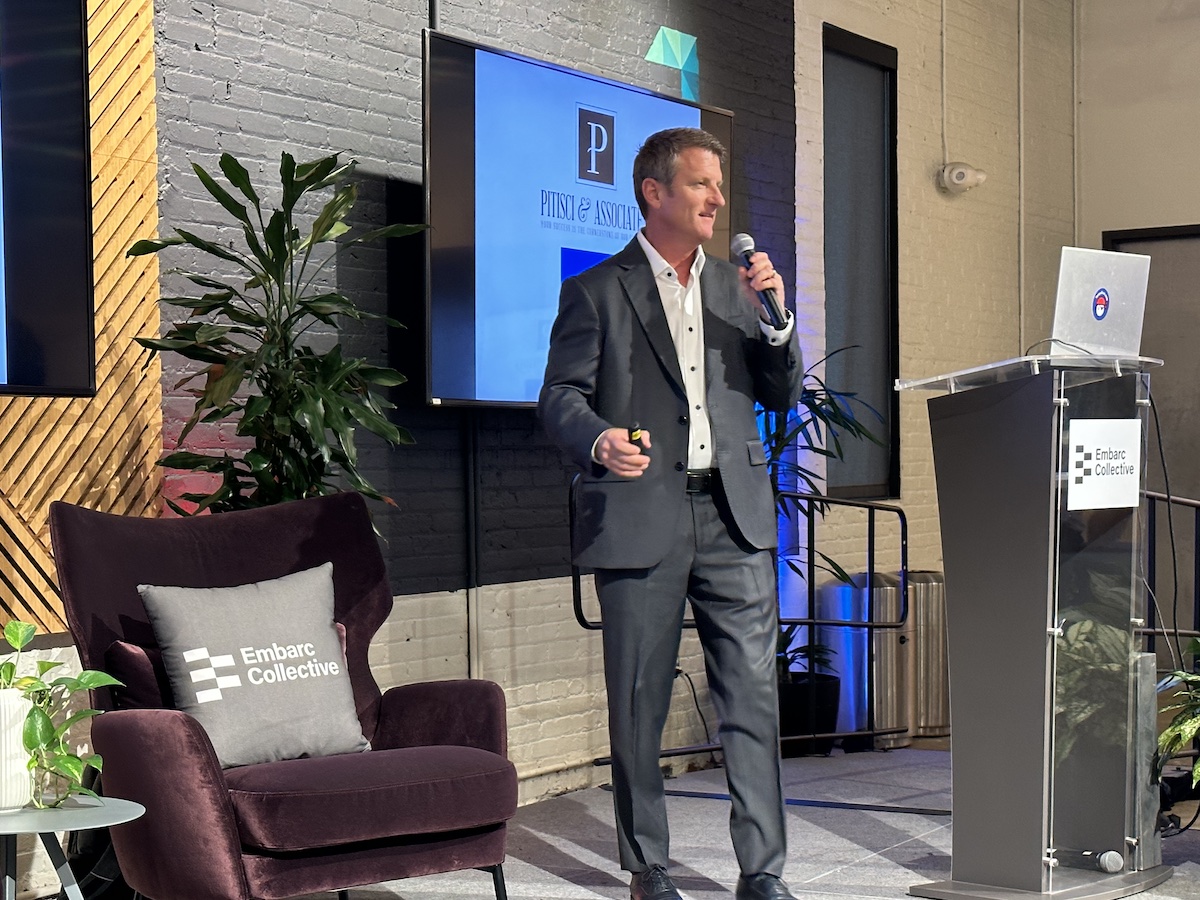
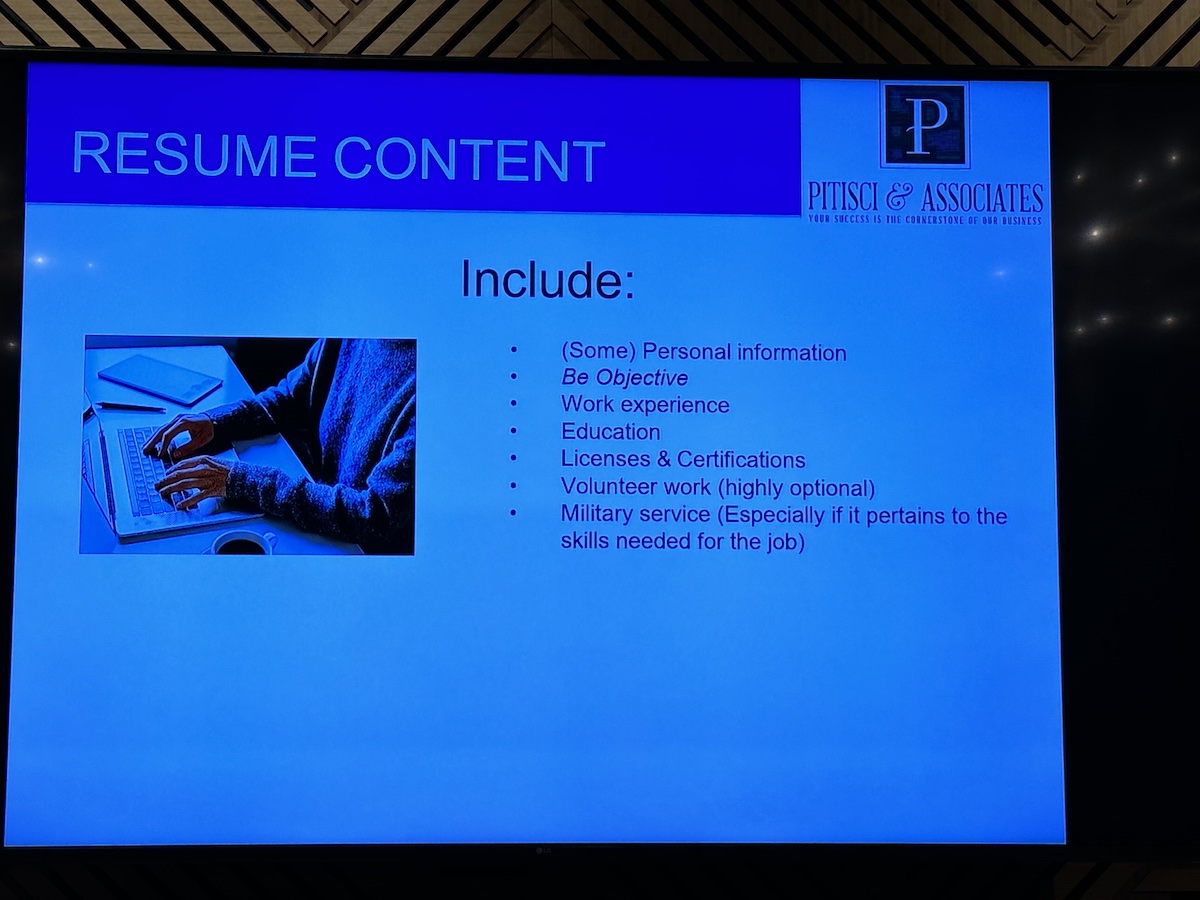
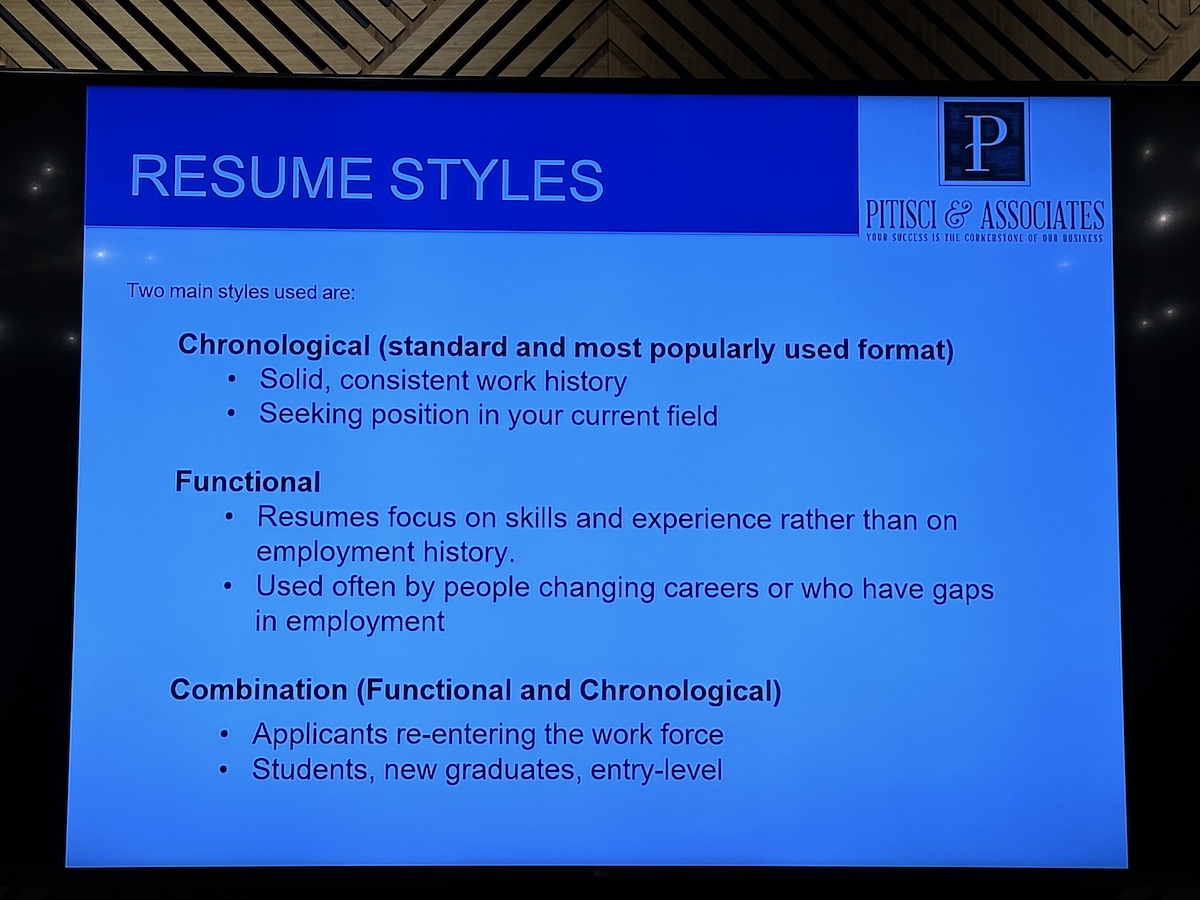
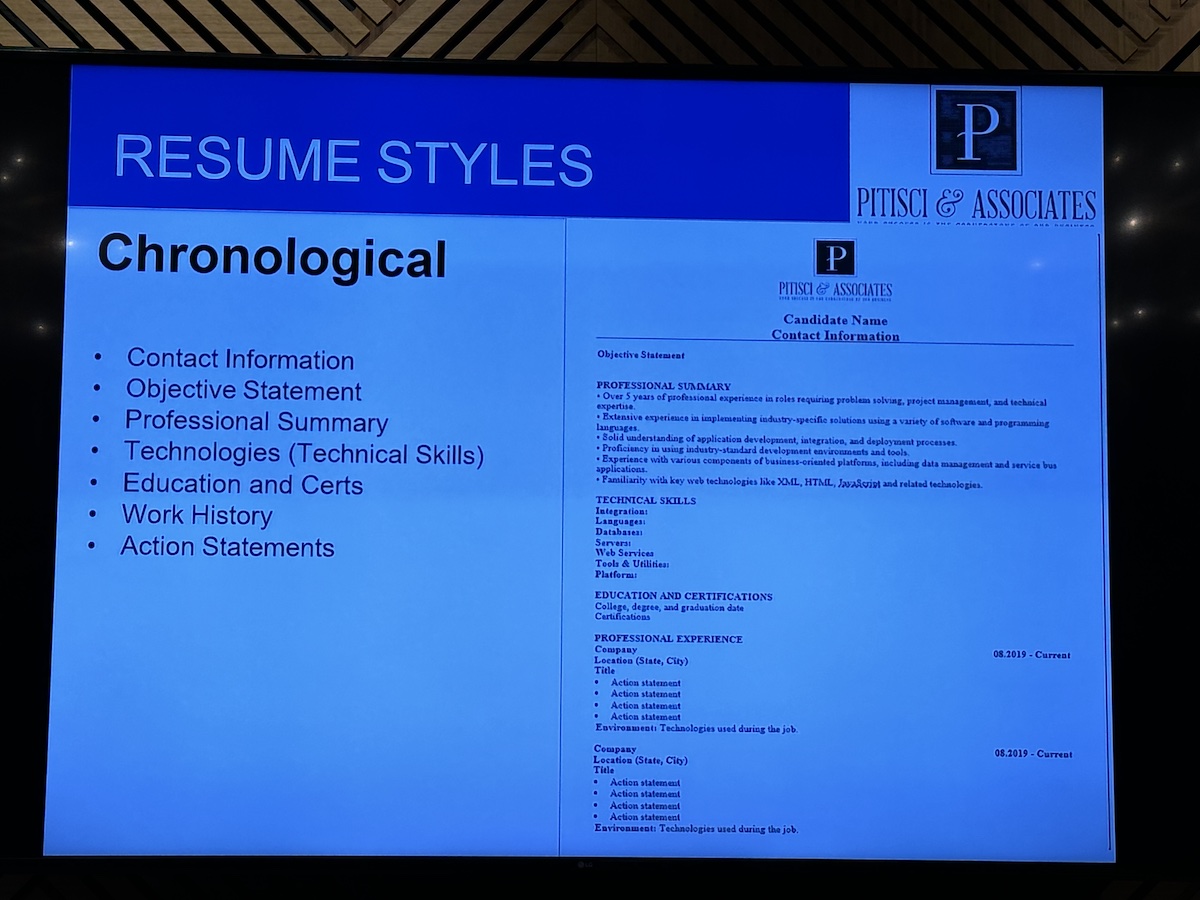
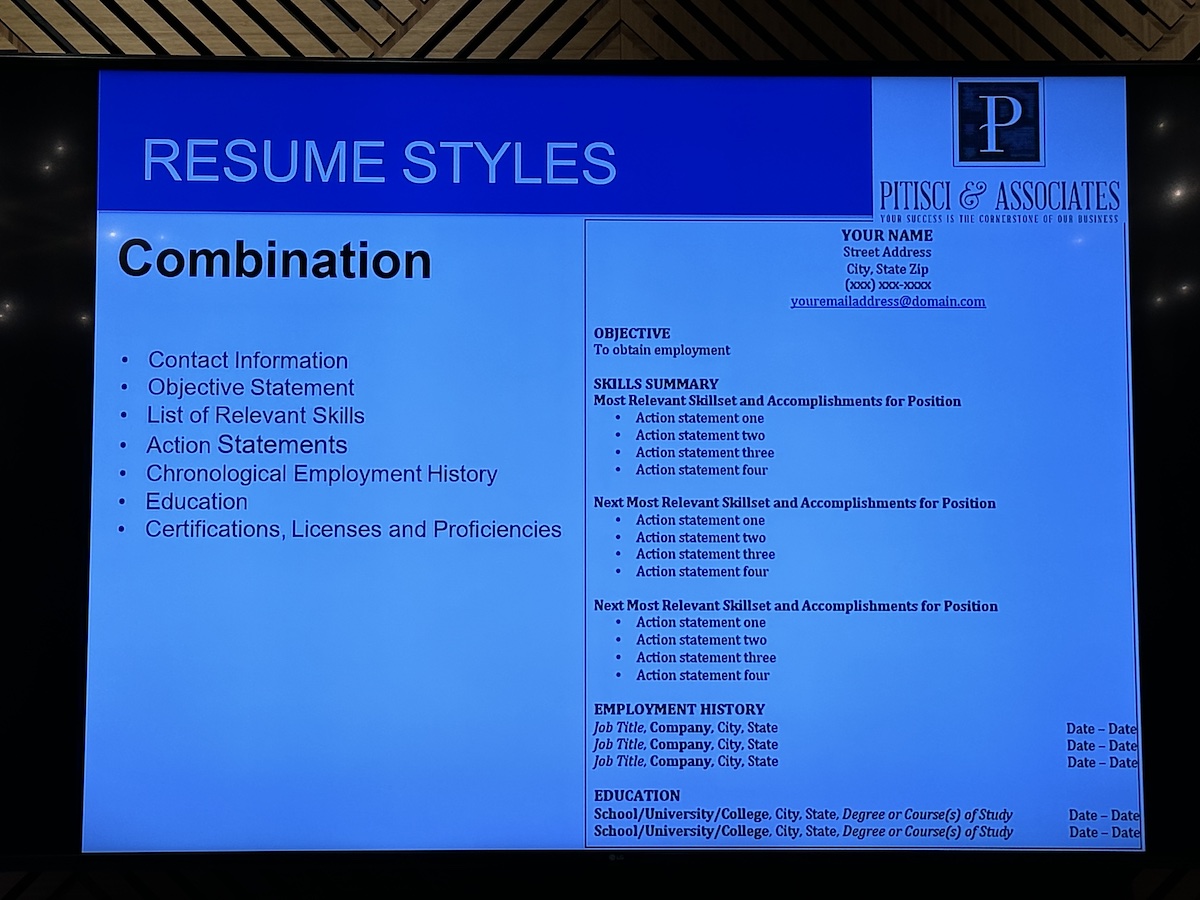
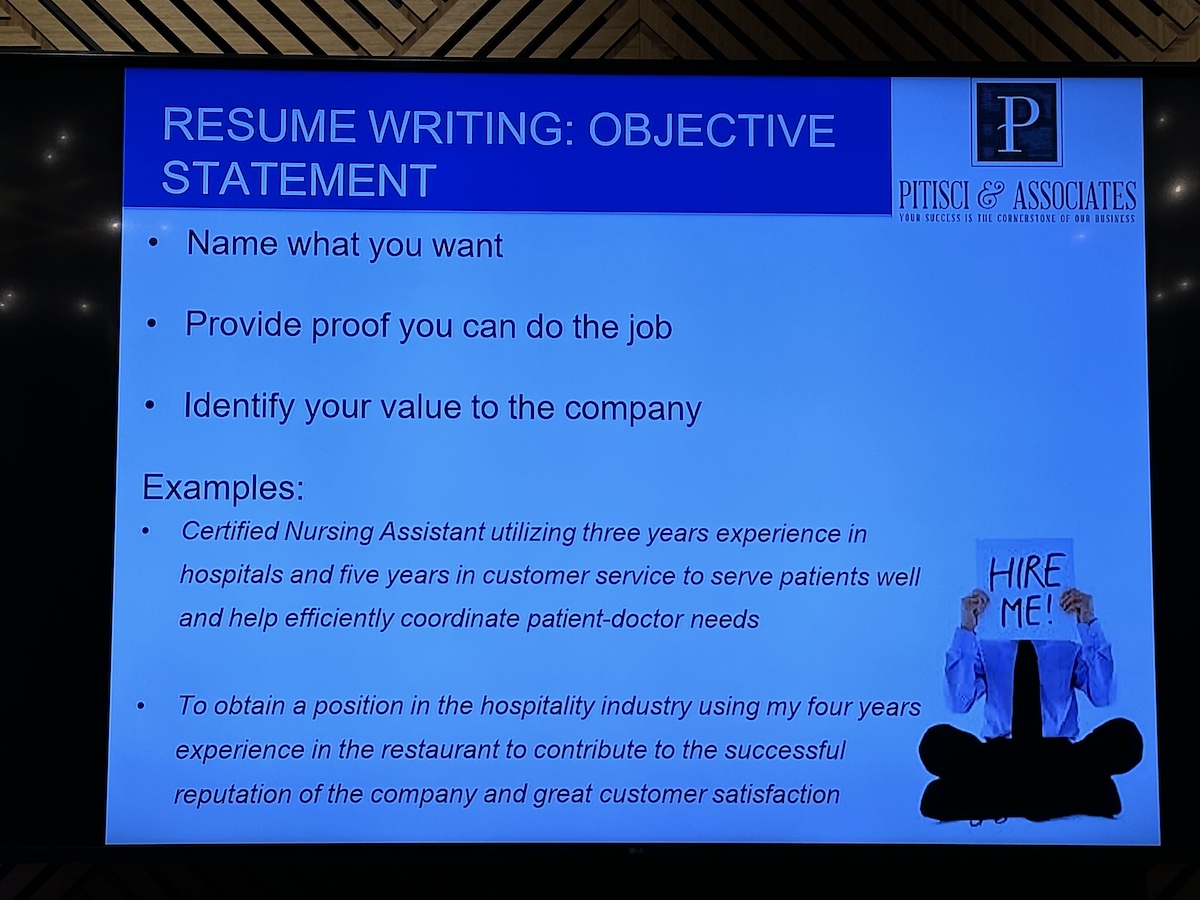
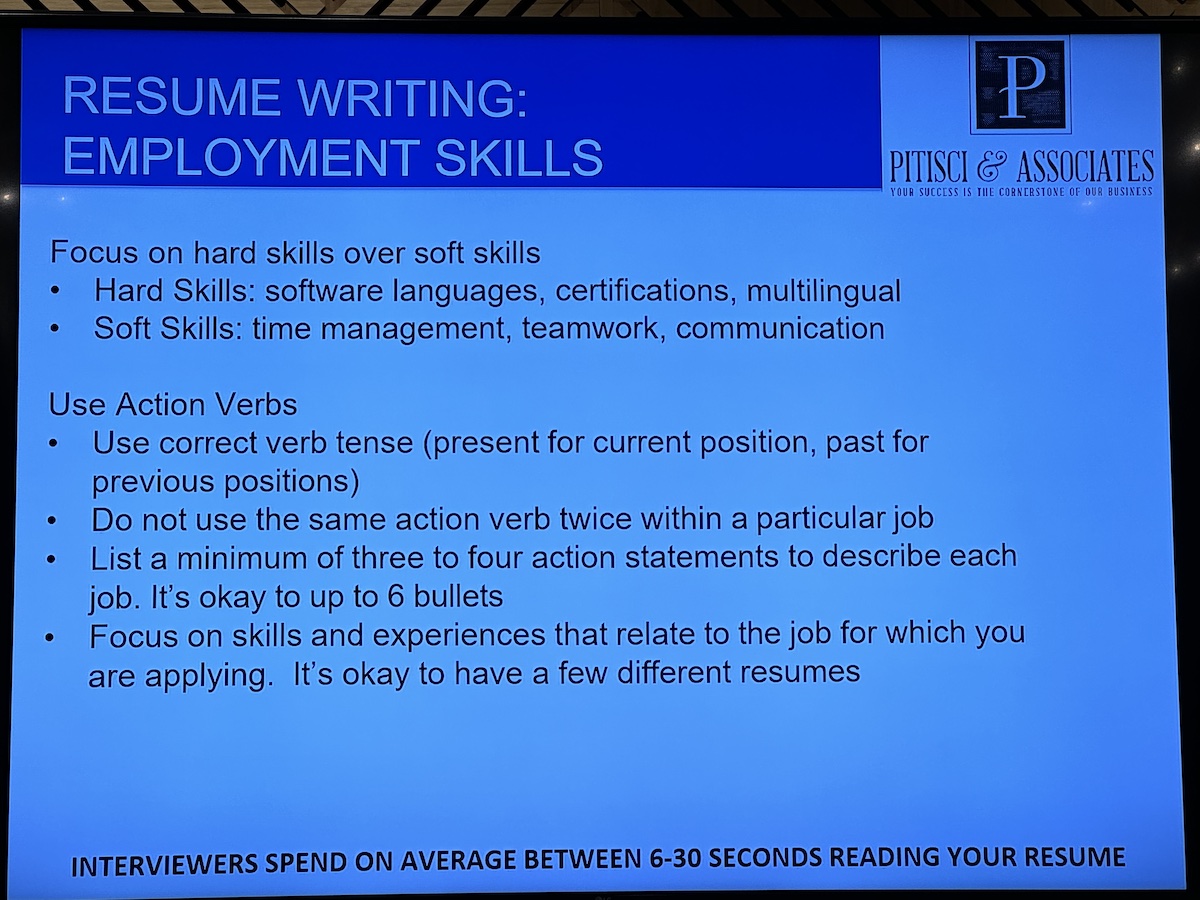
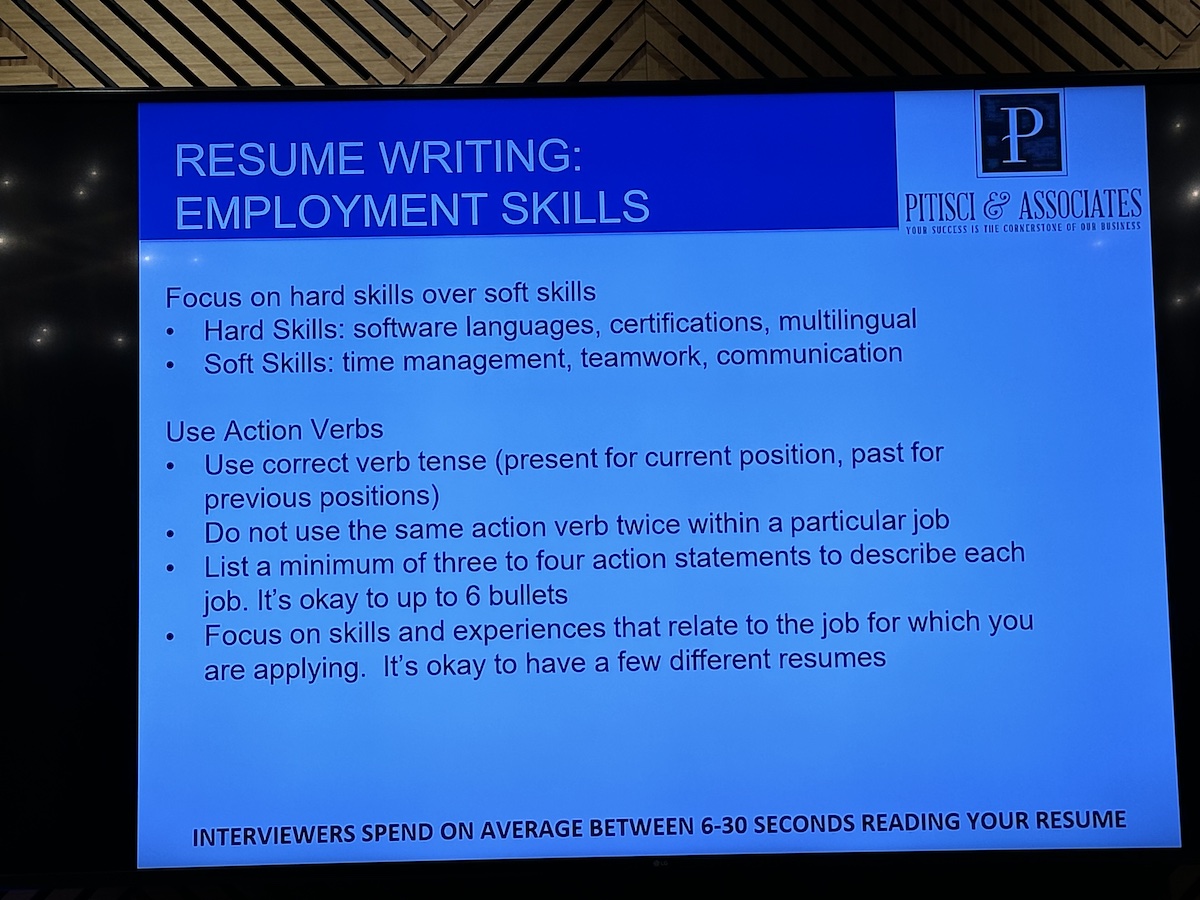
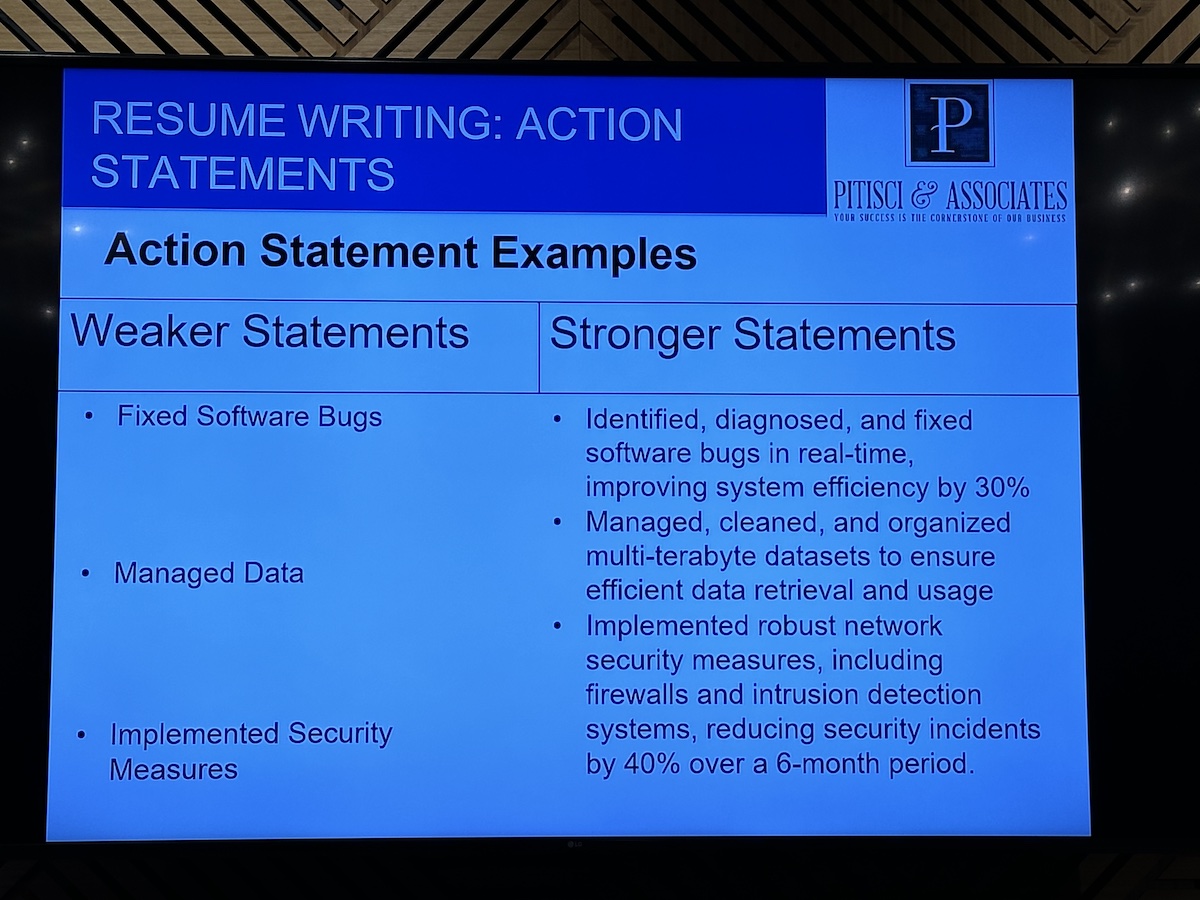
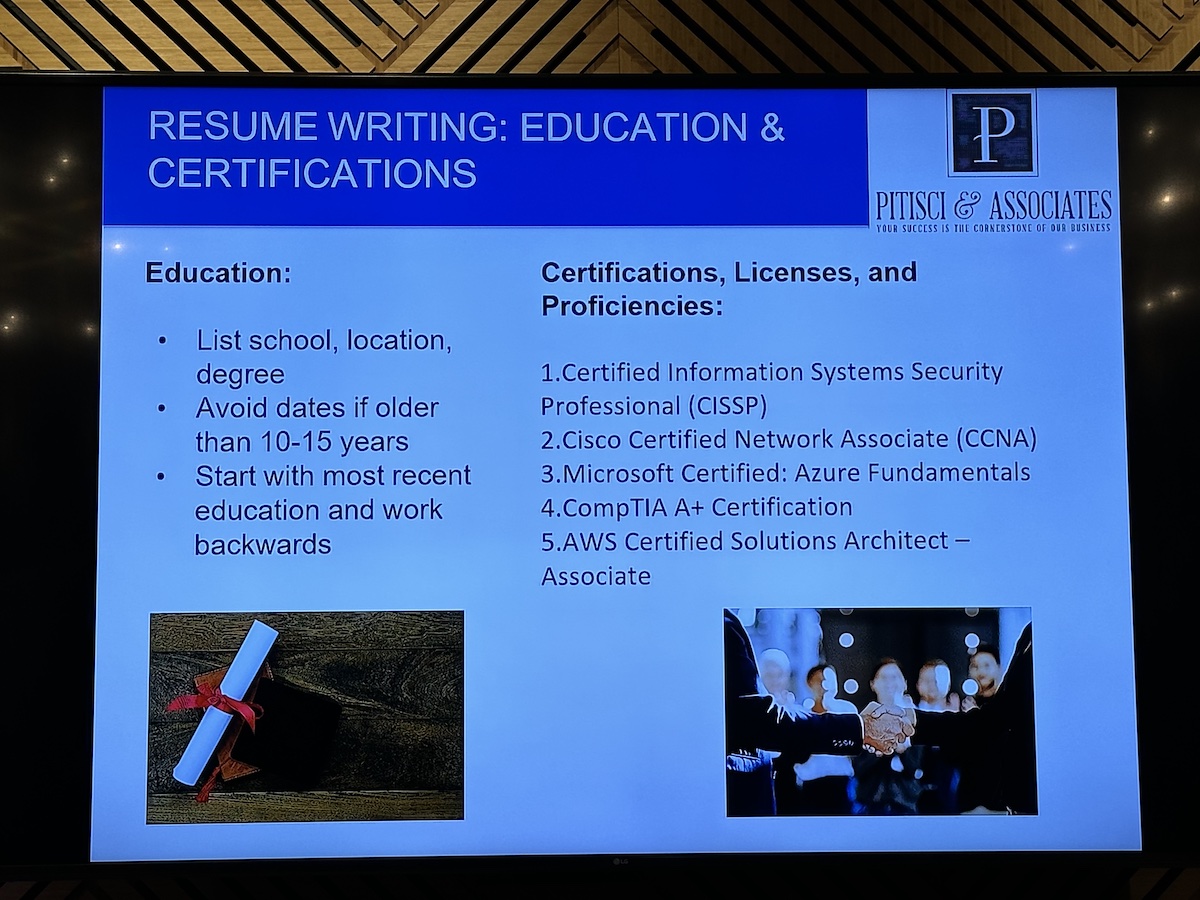
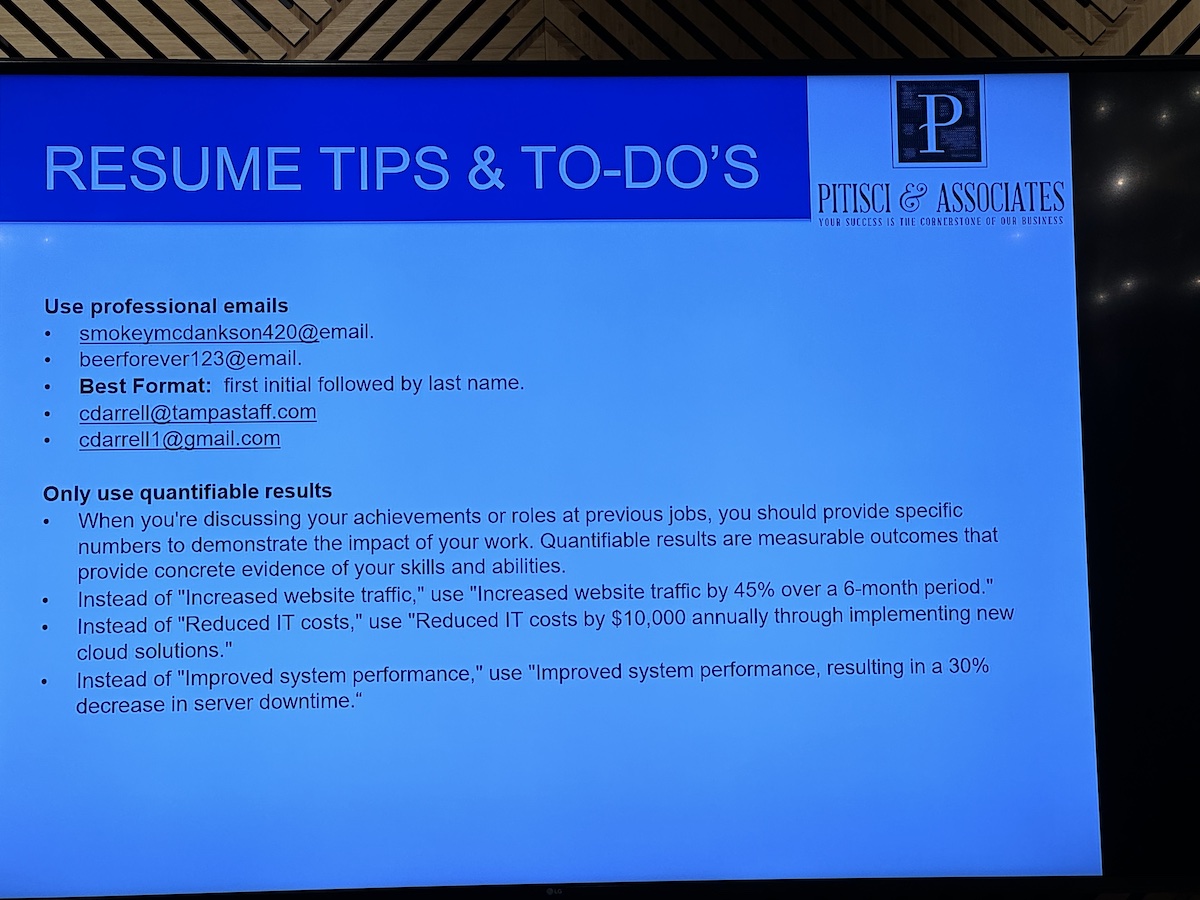
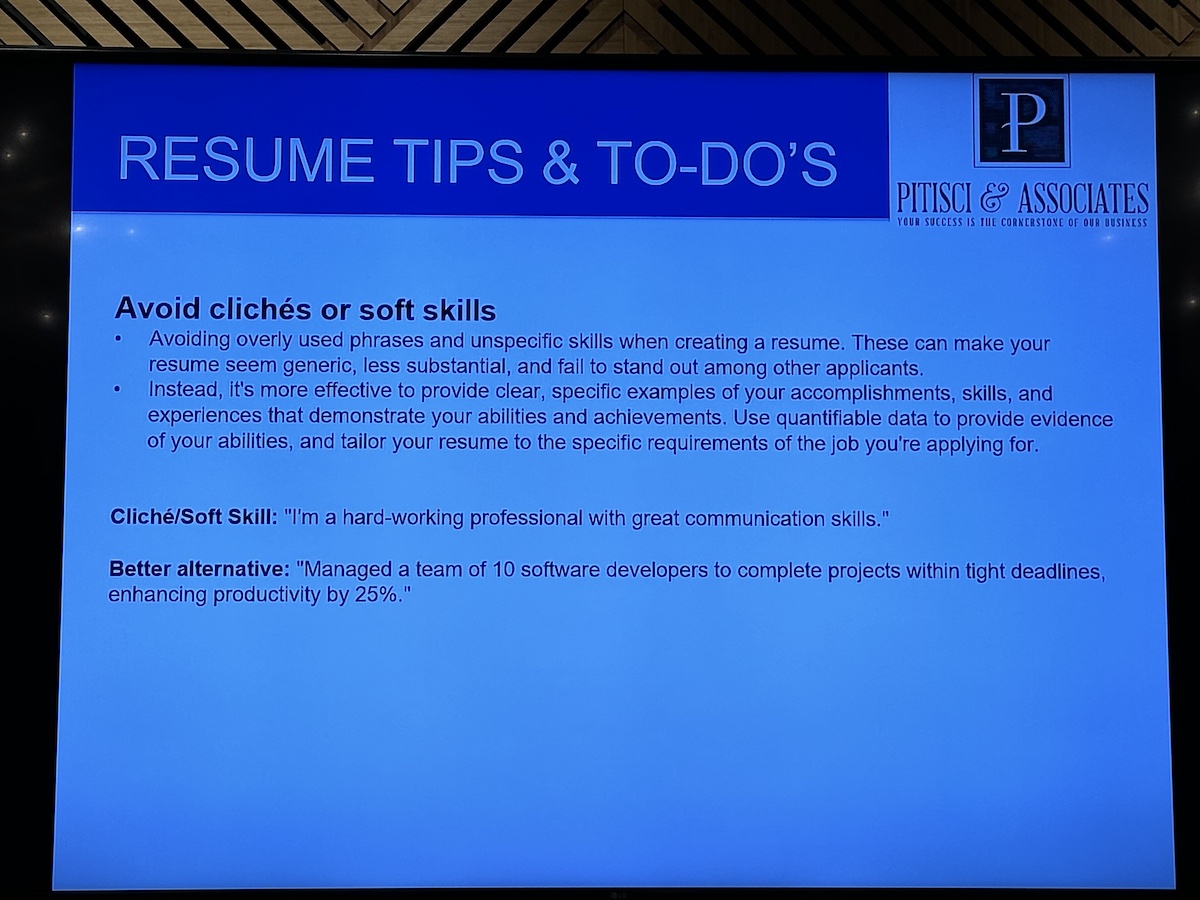
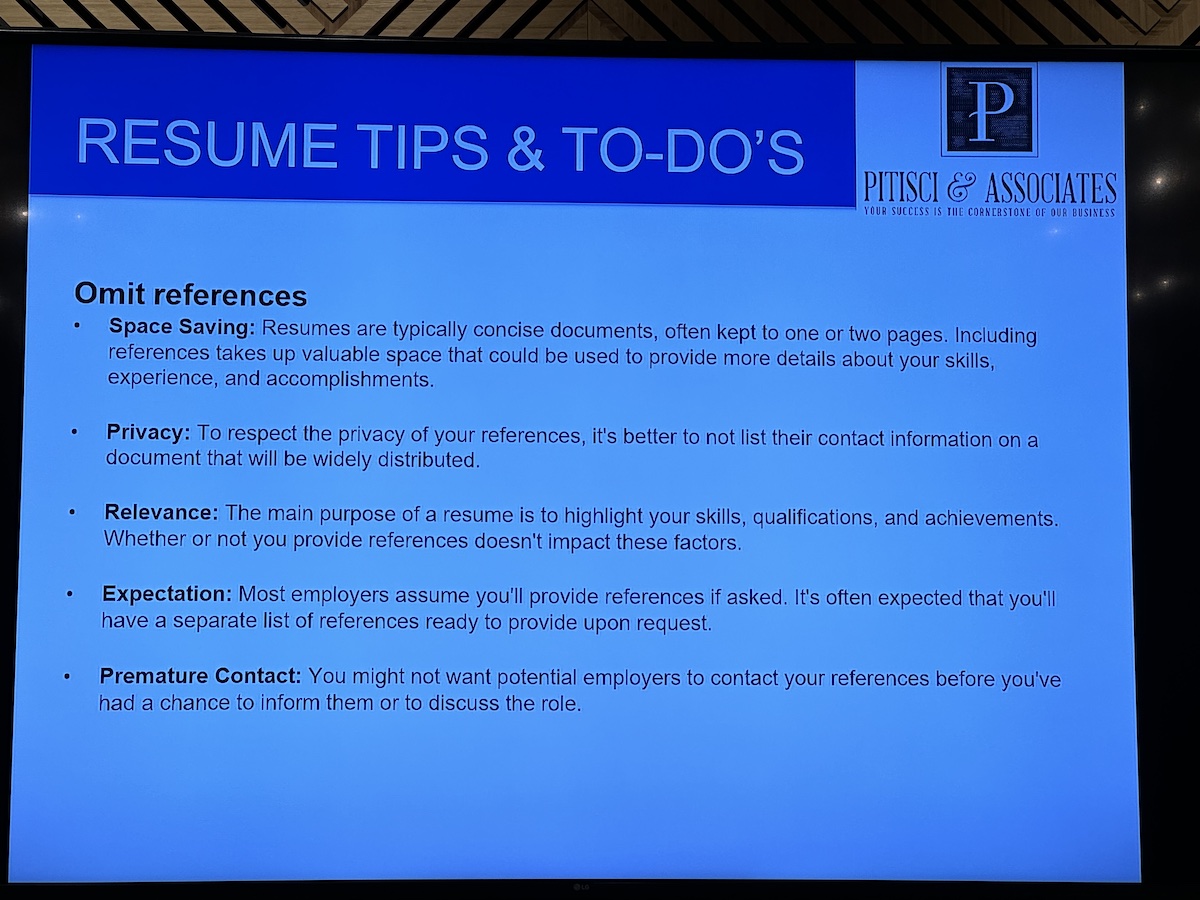
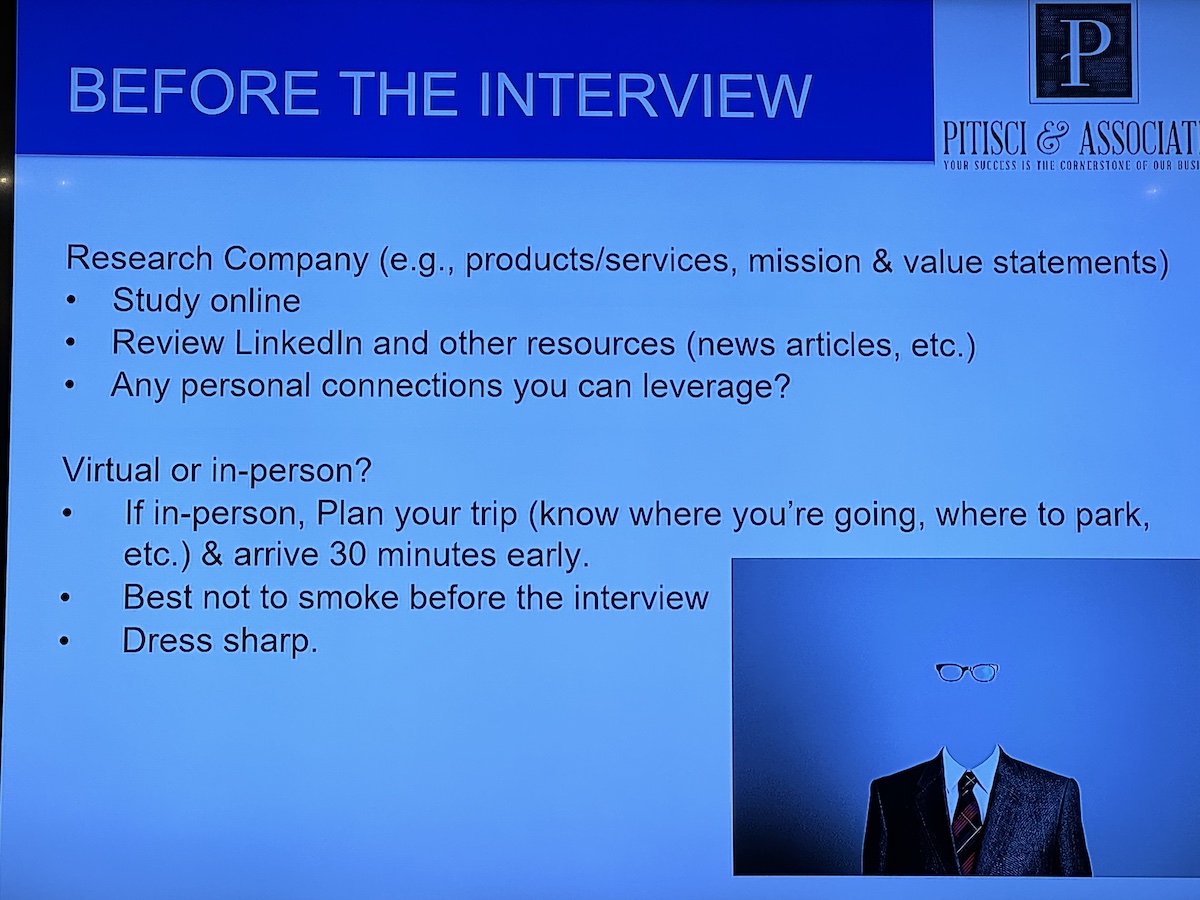
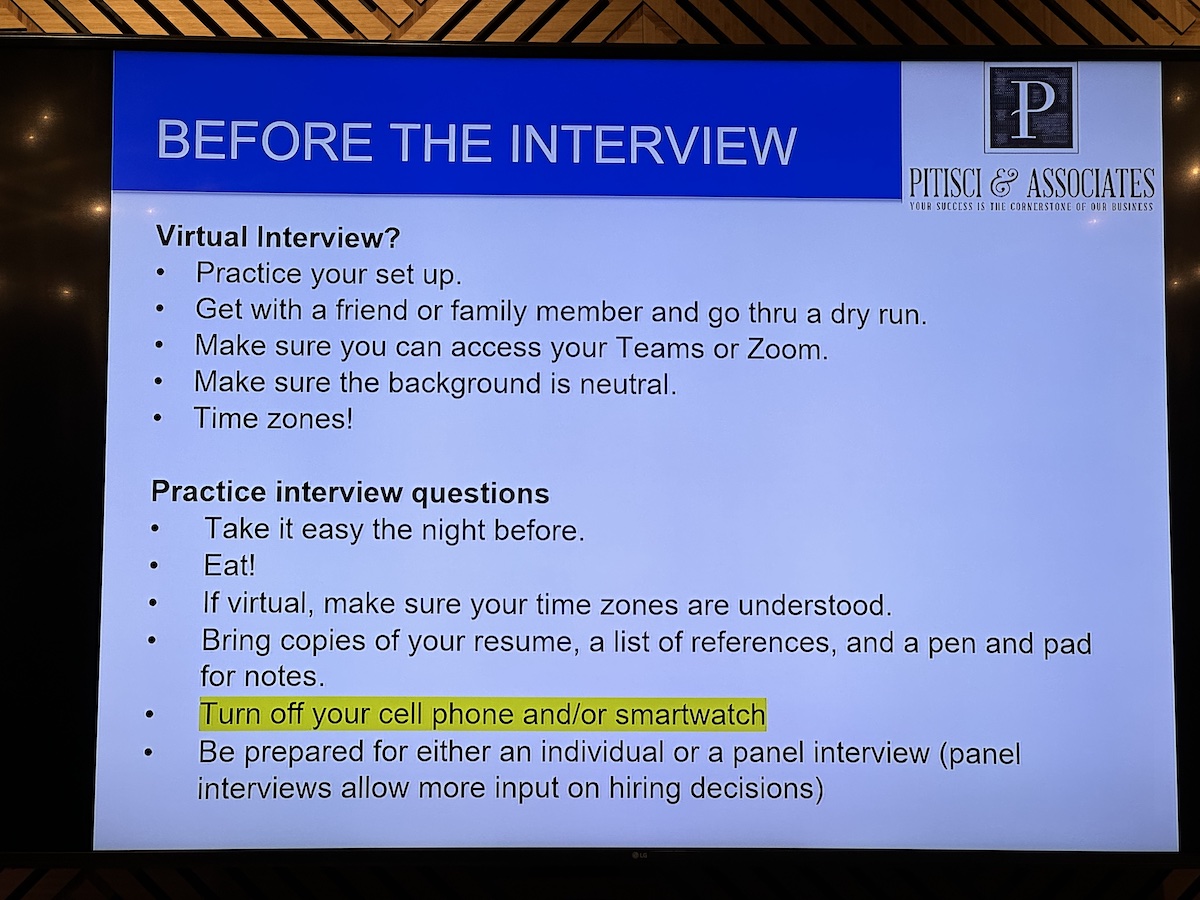
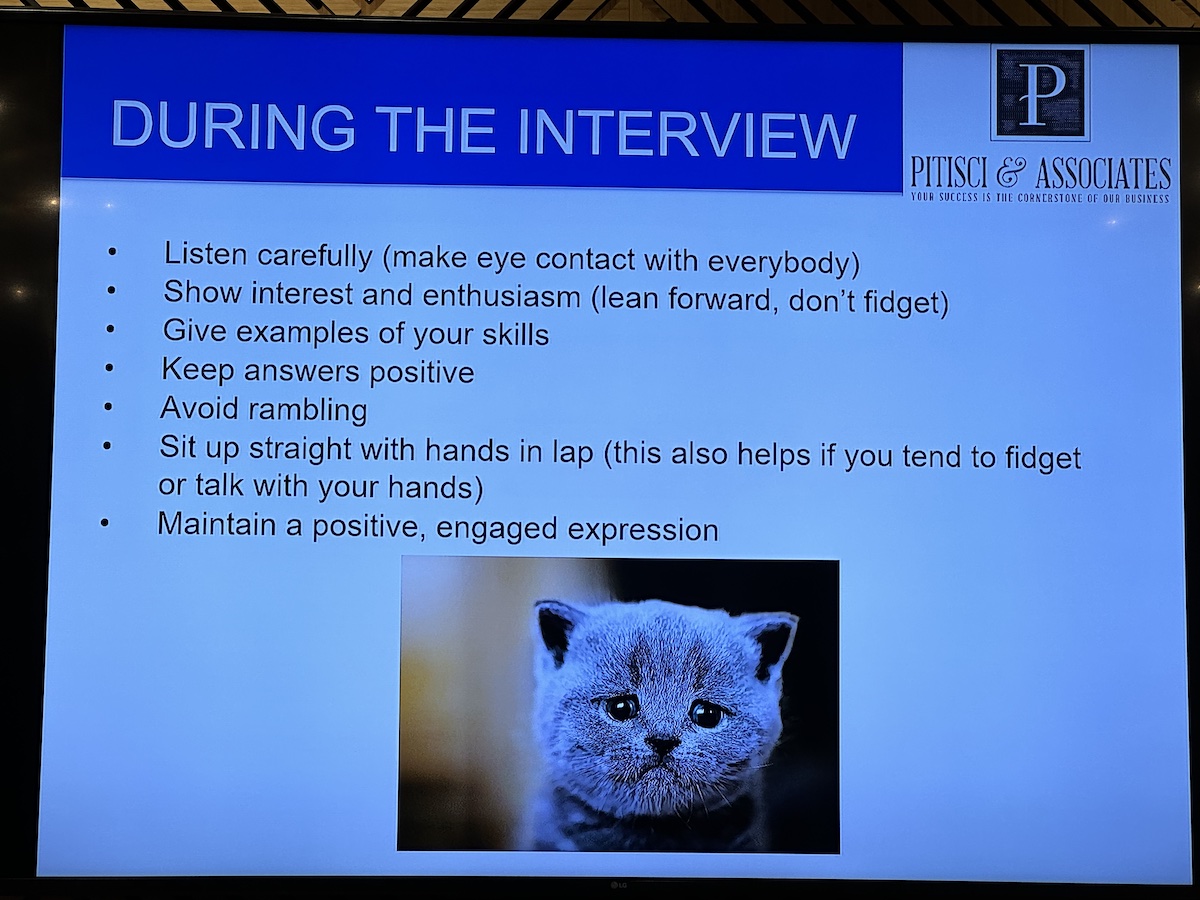
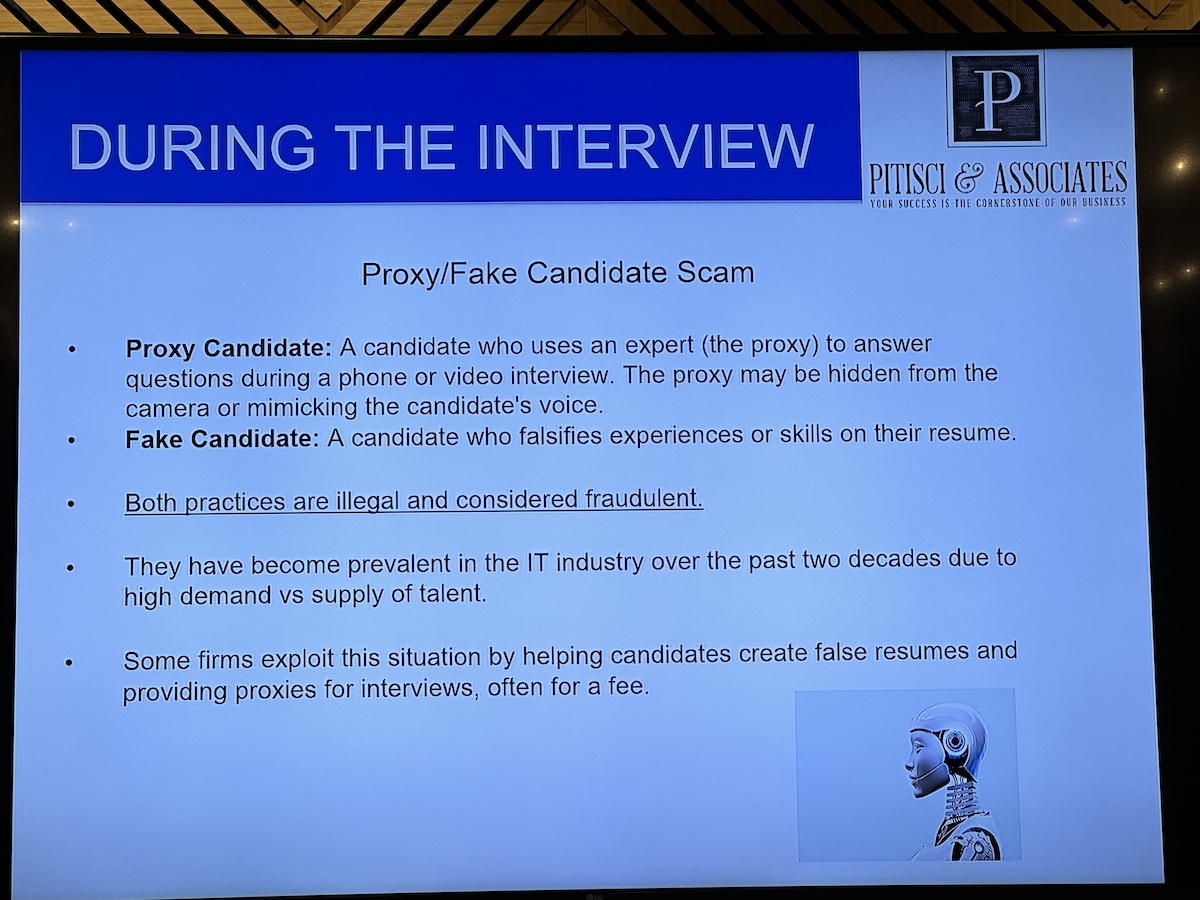
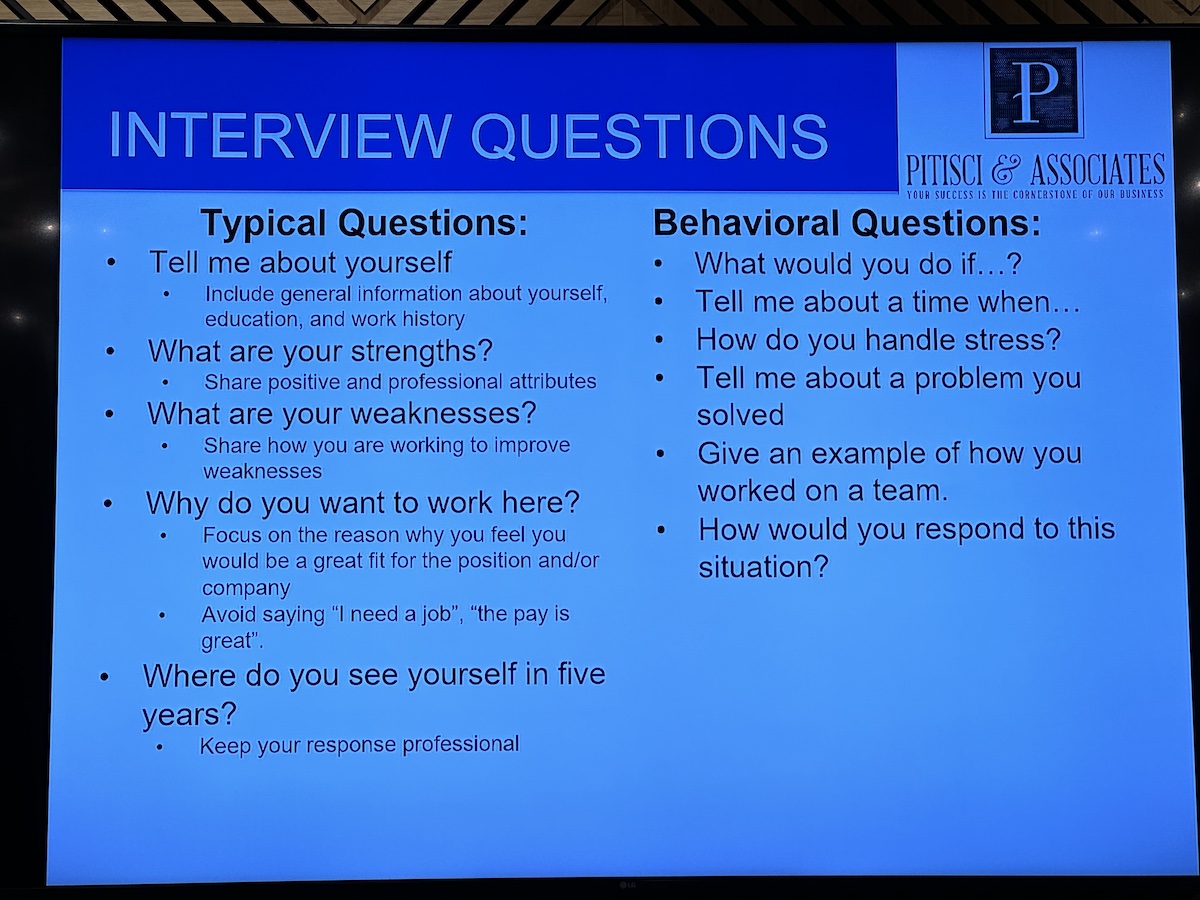
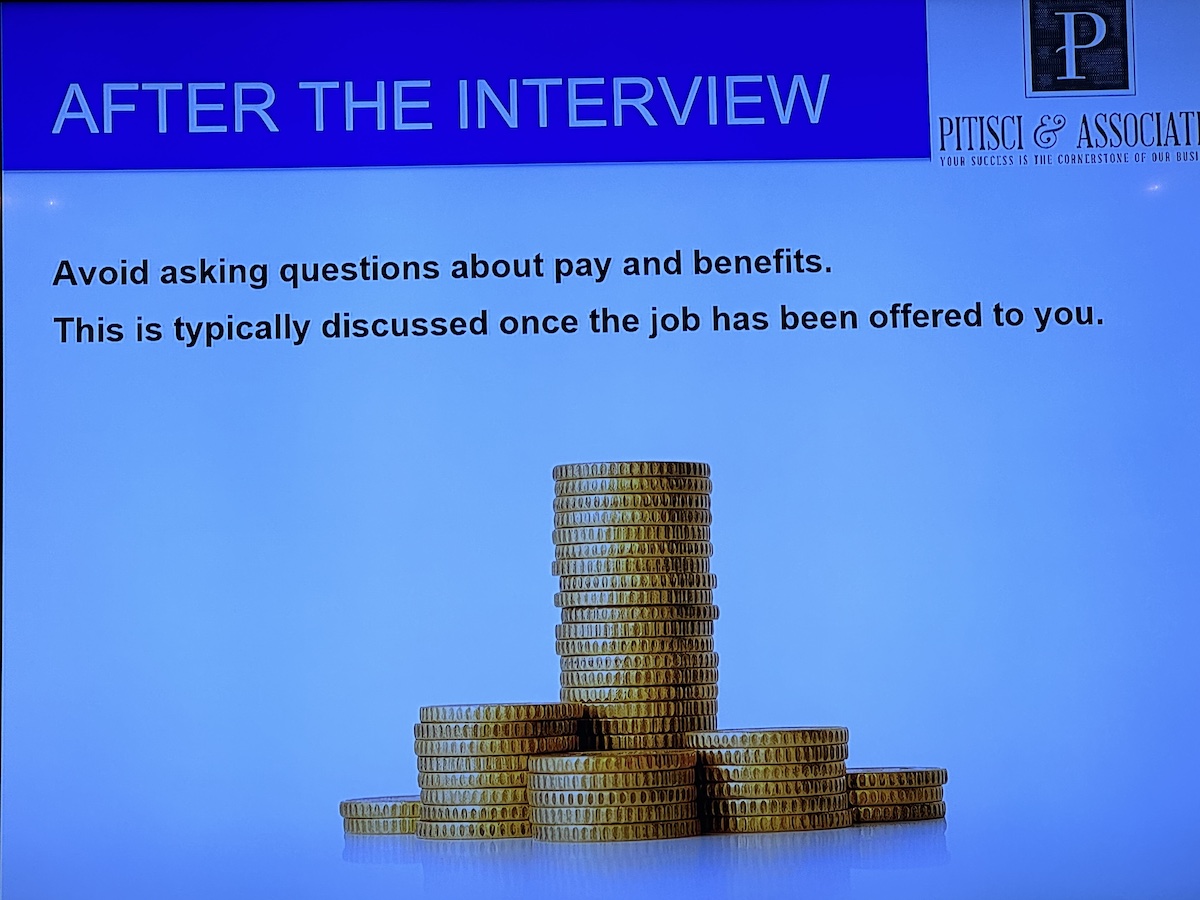
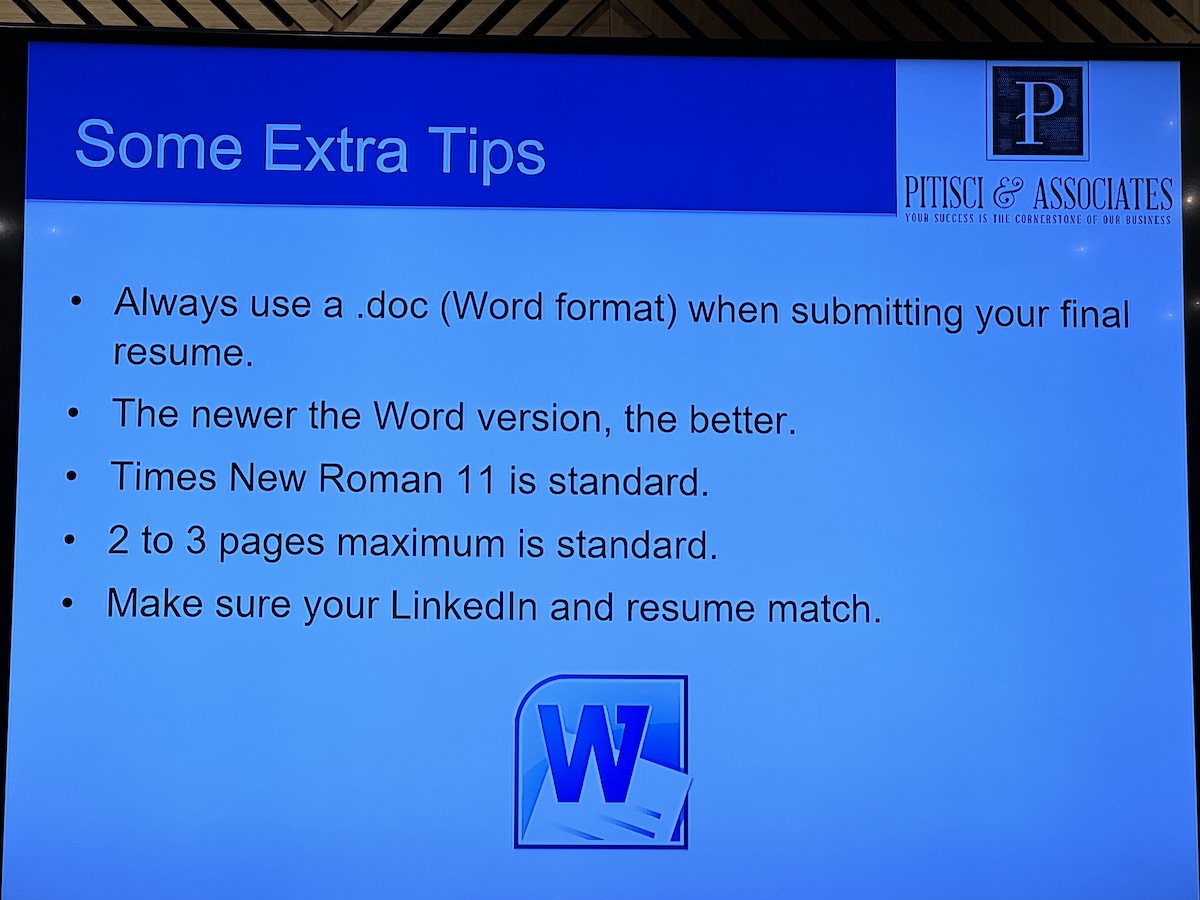
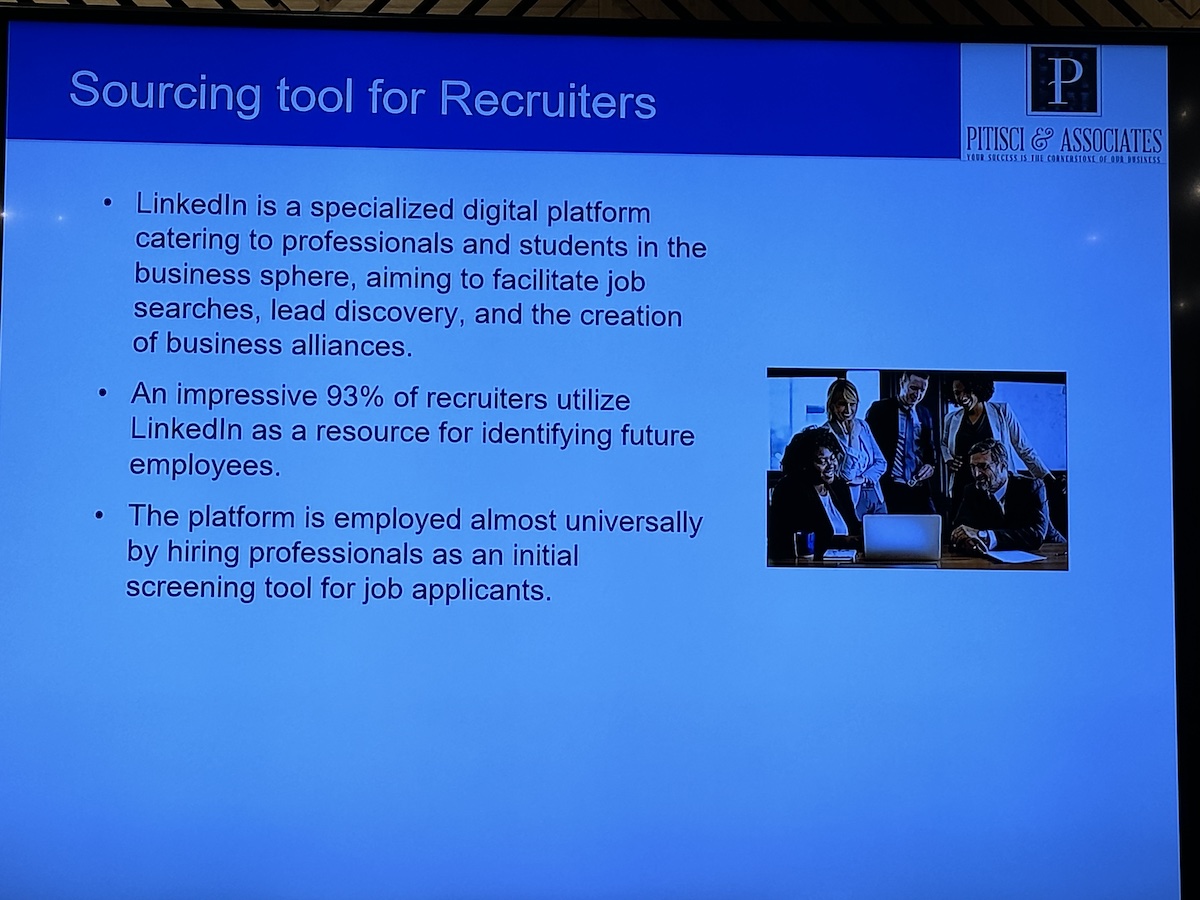
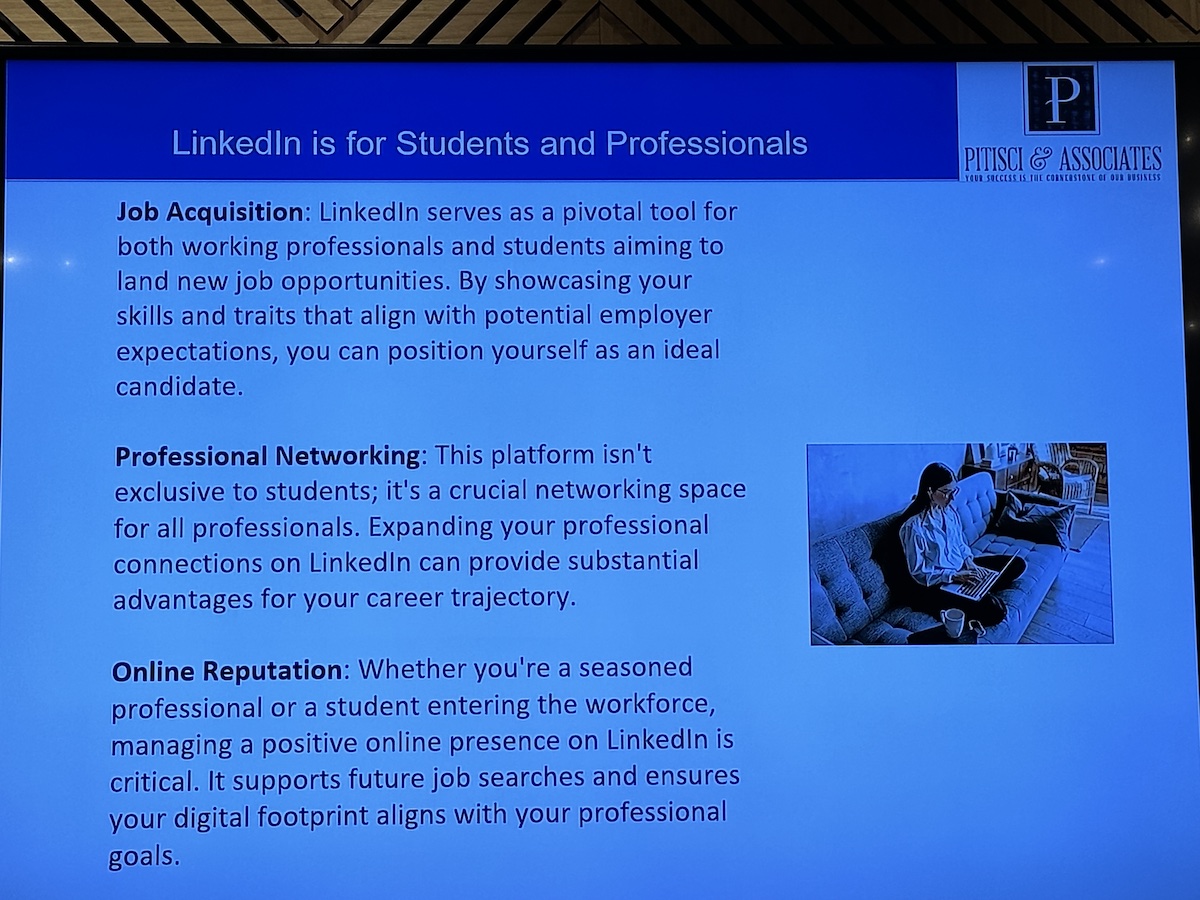
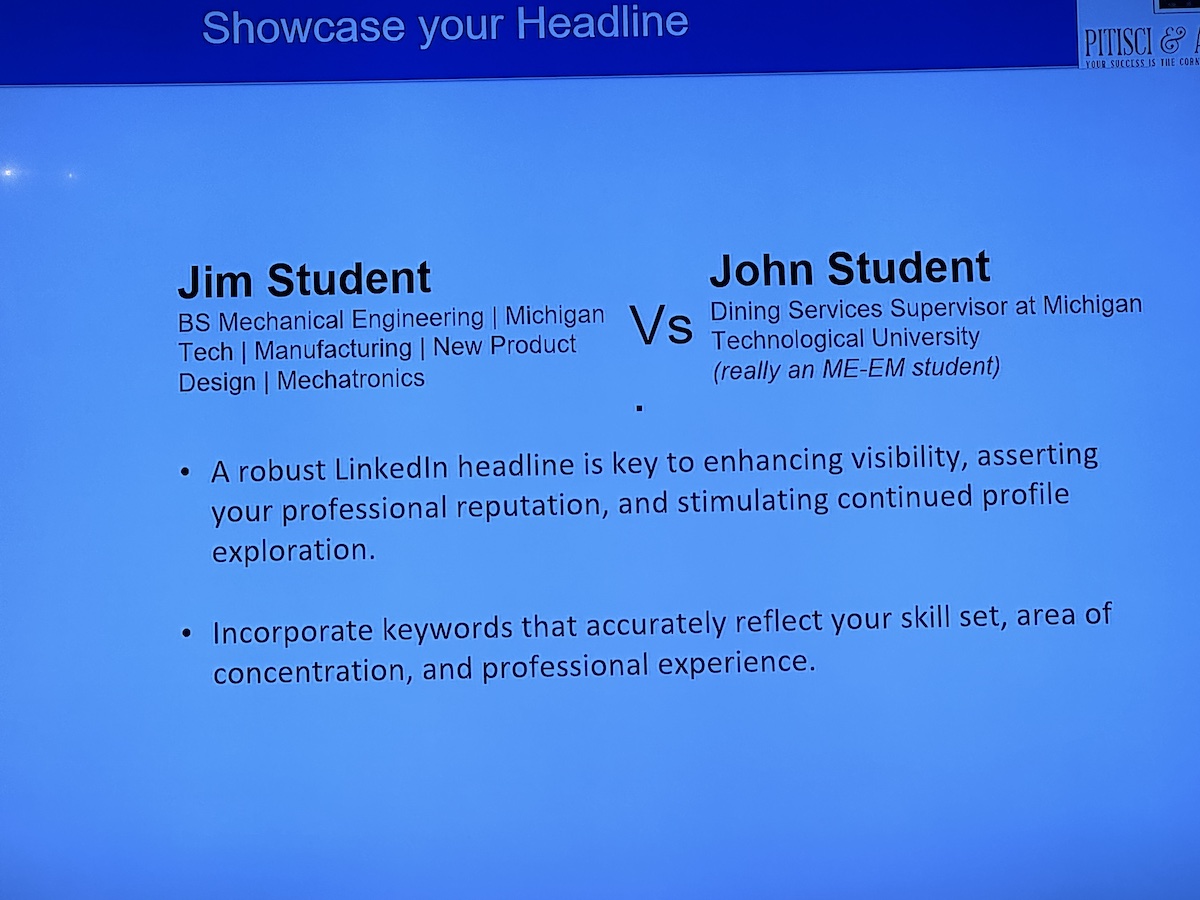
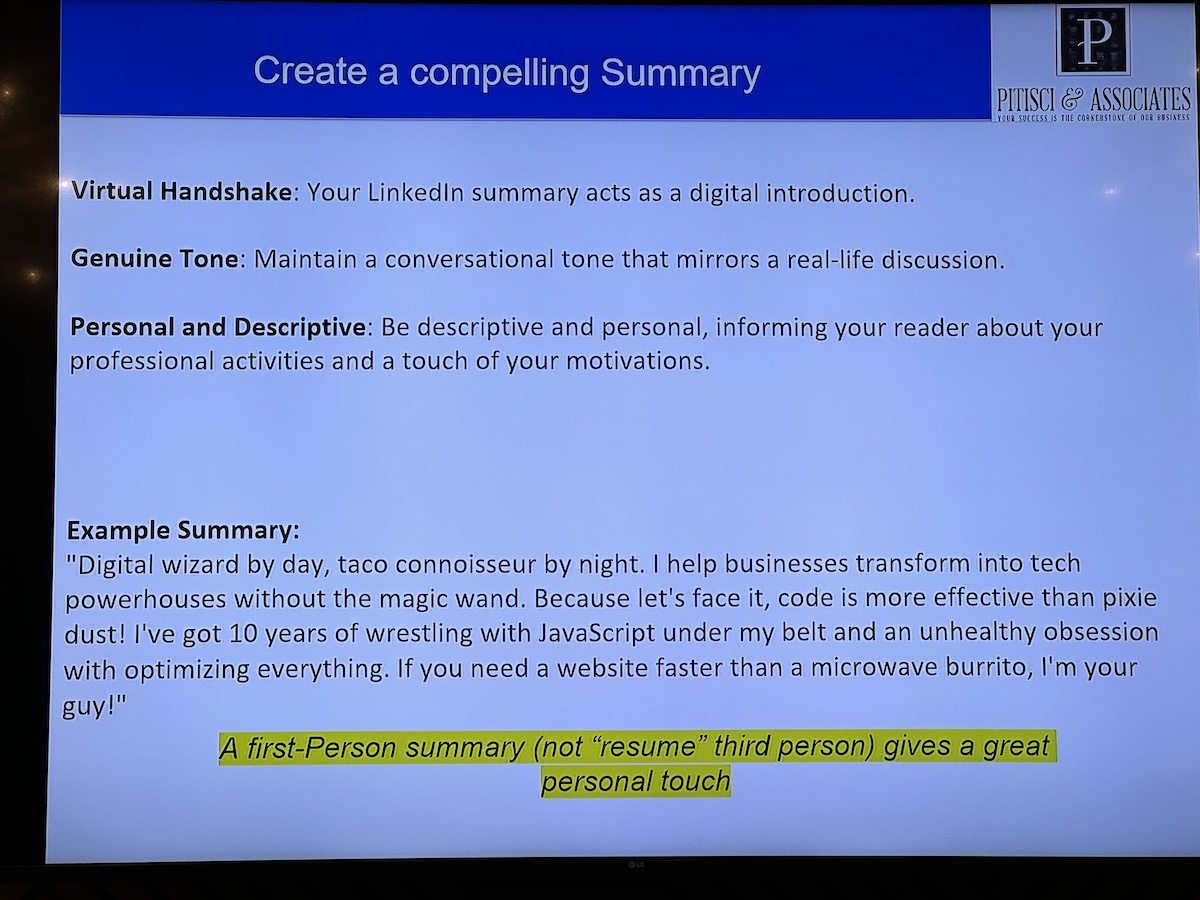
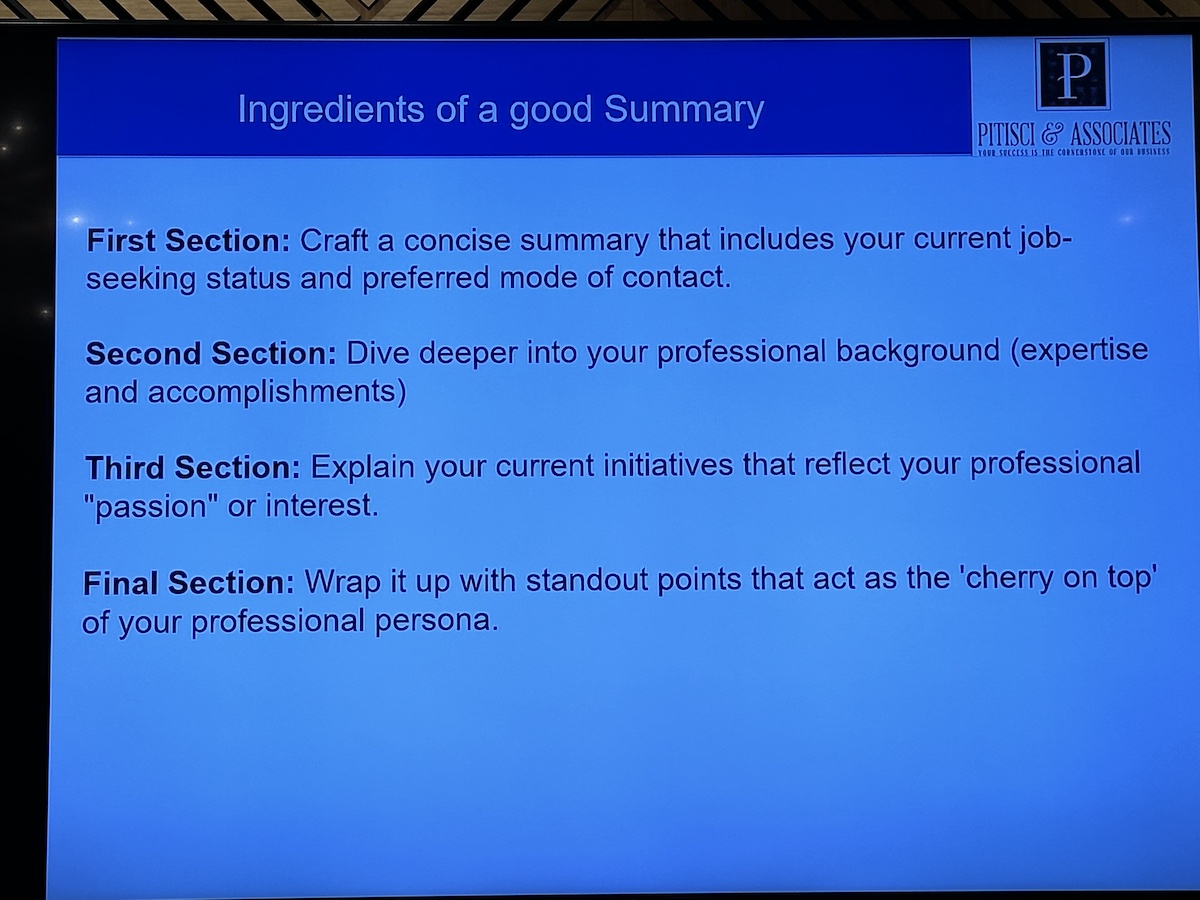
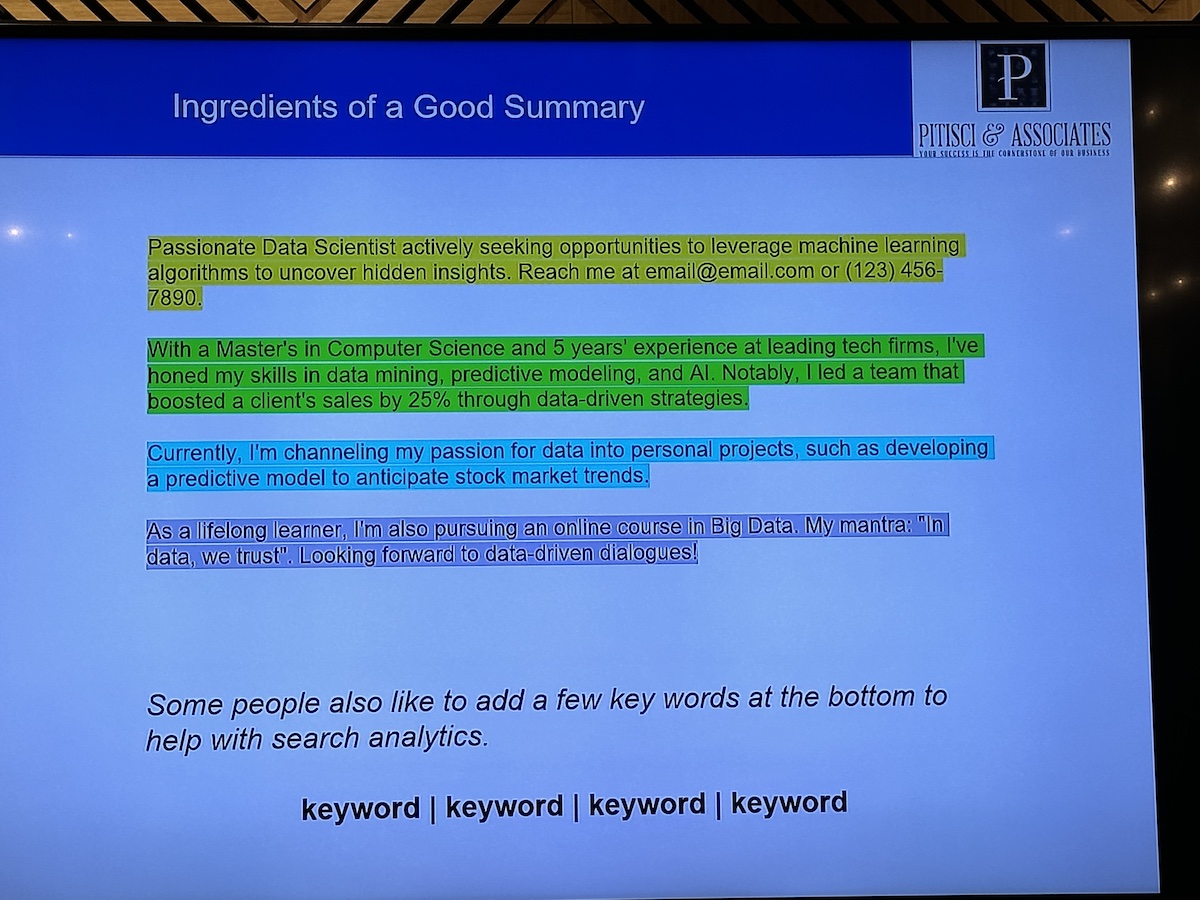
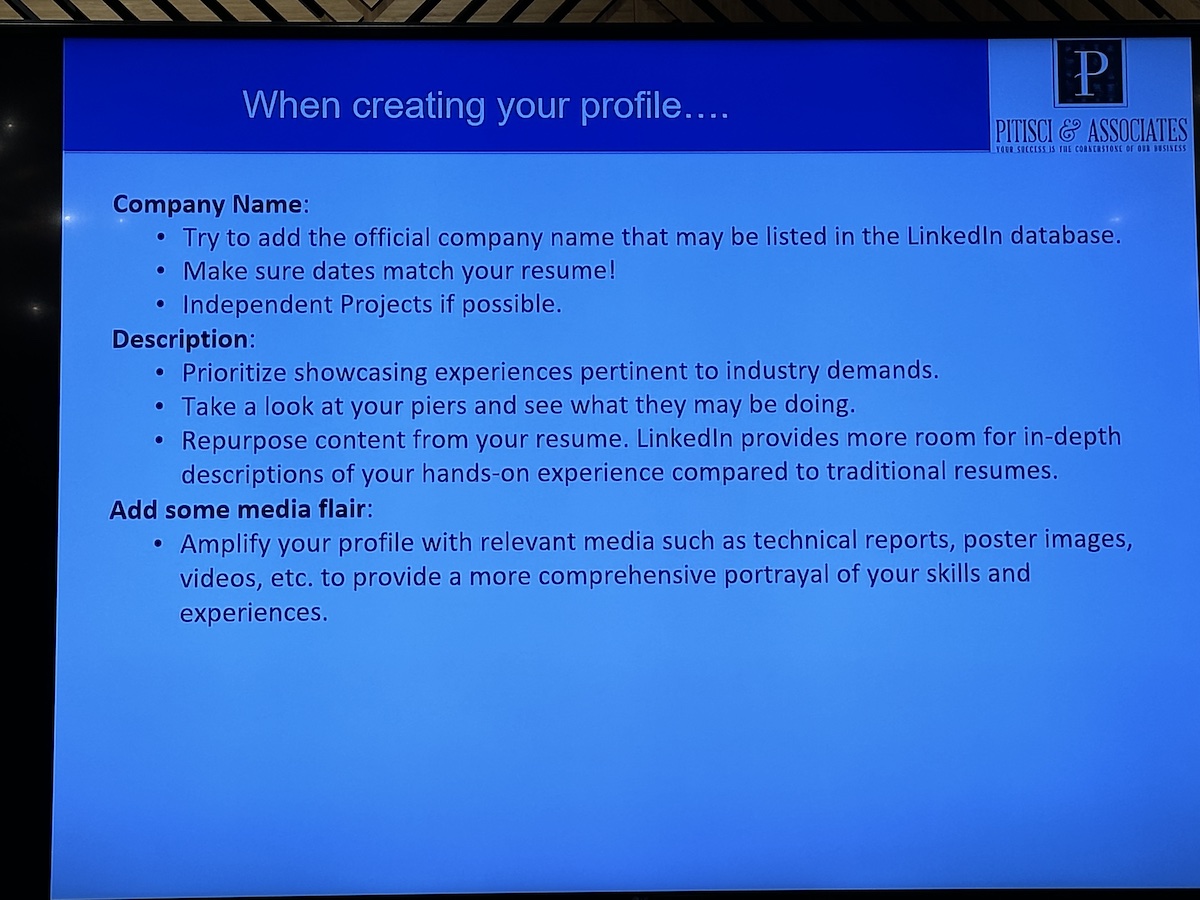
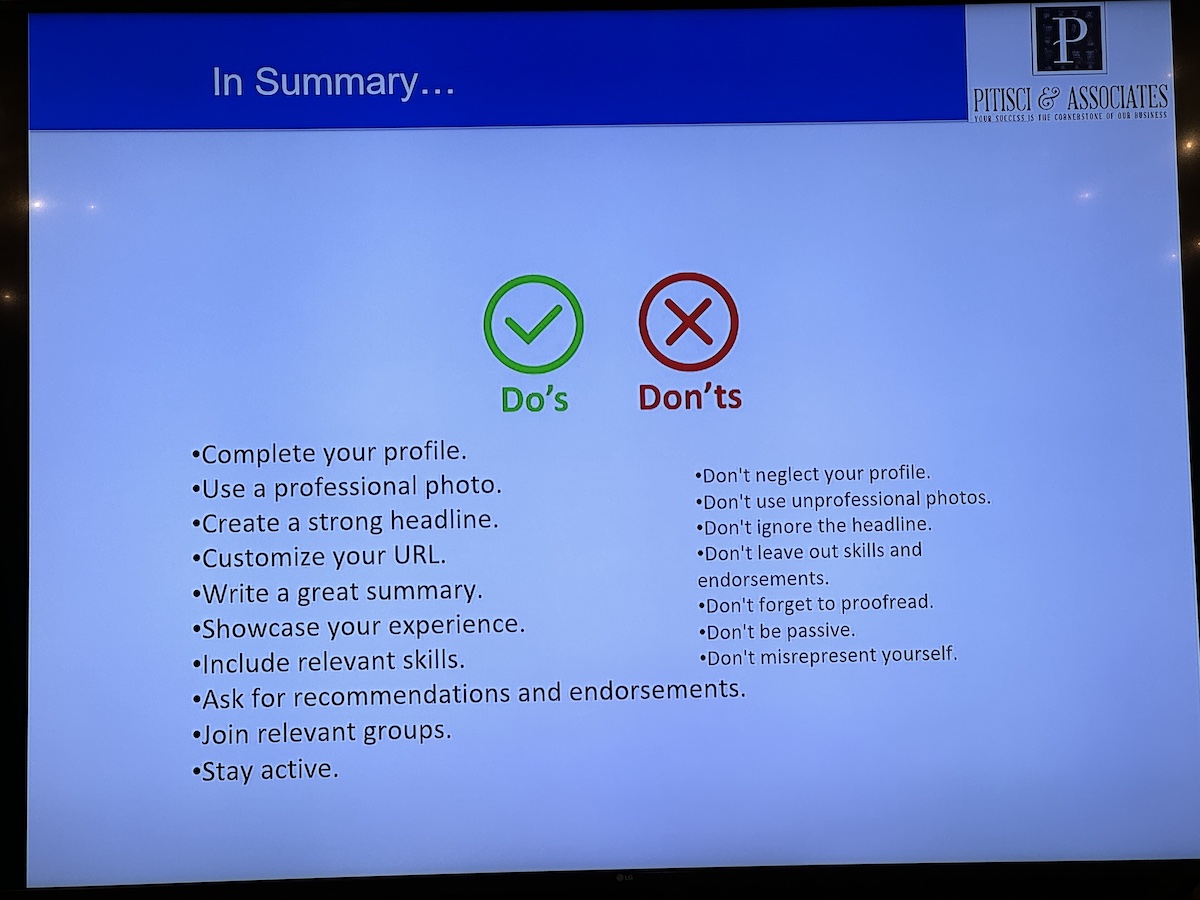
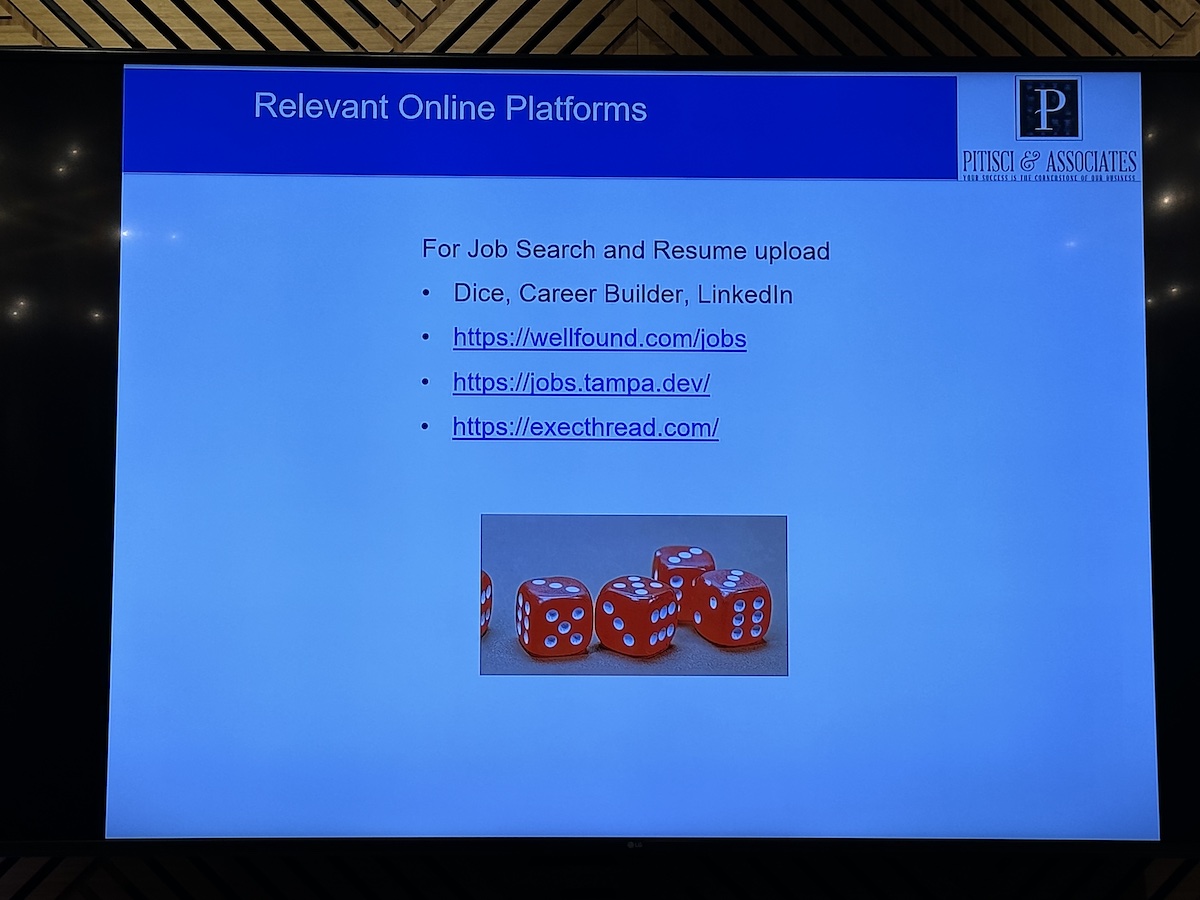
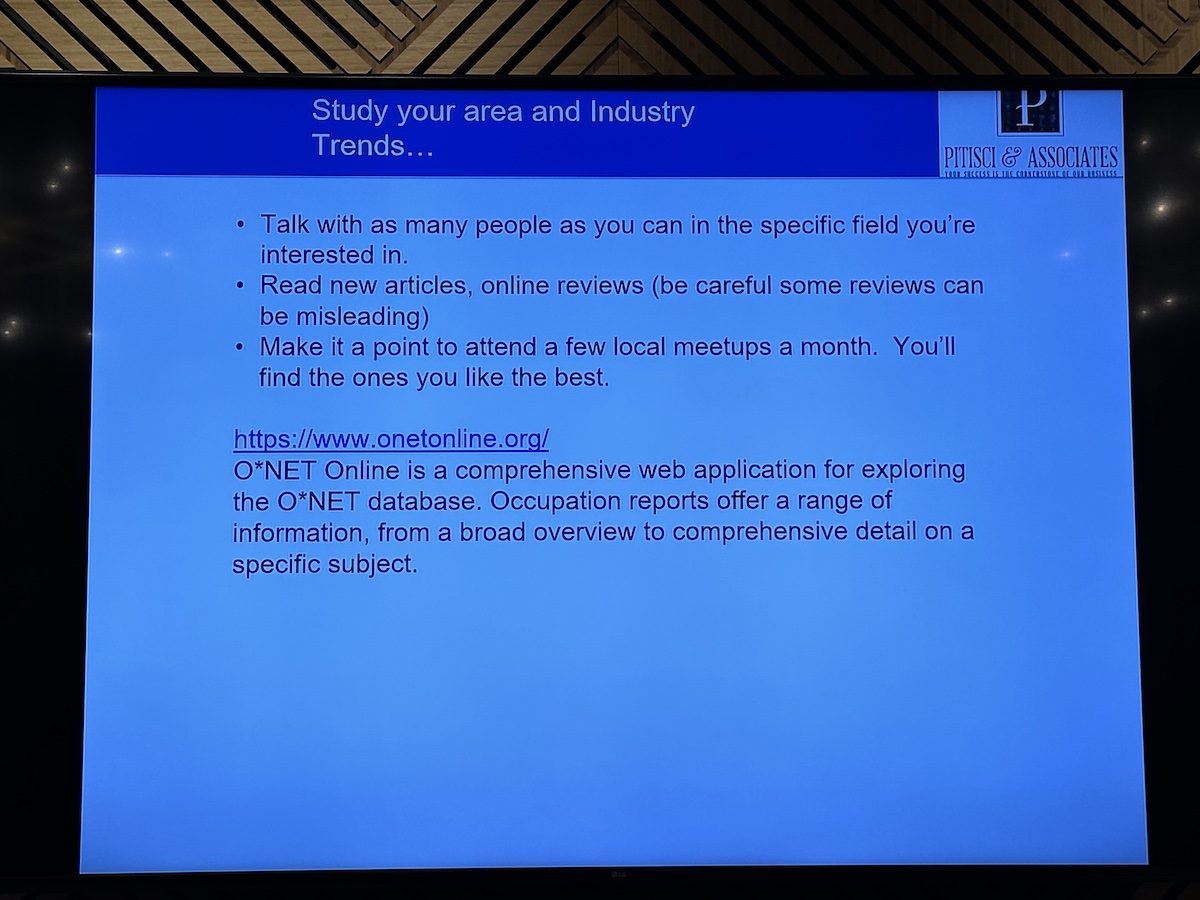
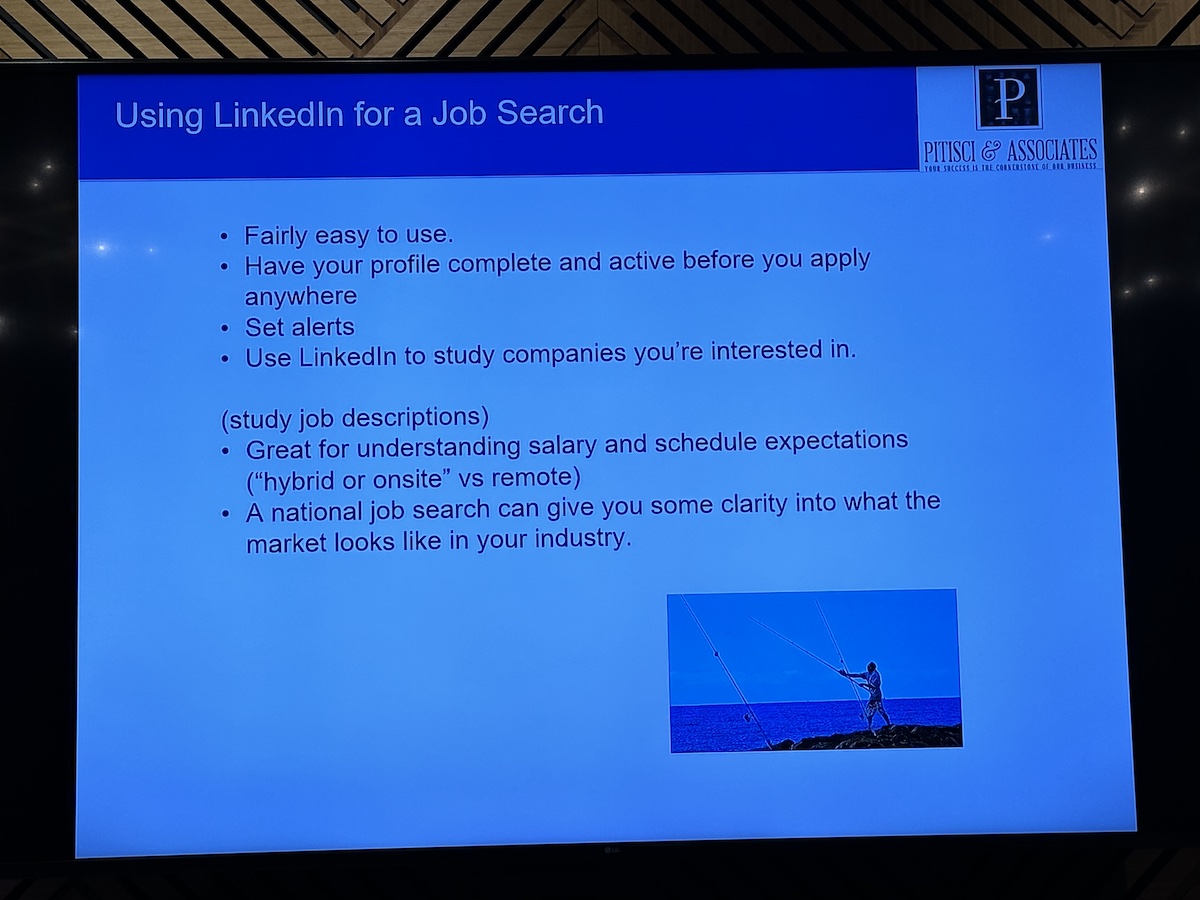
Last night (Wednesday, June 21), Tampa Devs held a meetup at Embarc Collective with a great topic: Selling Yourself: The Art of Interviewing. They brought in some domain experts, who are also friends of this blog: Pitisci & Associates’ Craig Darrell, Brian Dodd, and Stephen Rideout, who were there to show us how to land a job.
Craig gave the presentation, which was eagerly absorbed by the audience, a lot of whom were first-time attendees of a Tampa Devs meetup. This was a crowd that was ready for their first or next job, and they had questions aplenty. Luckily for them, Craig, Brian, and Stever were there to answer them, and it looks like they had even more questions to answer after Craig’s talk.
It’s been a while, so let’s go back to the beginning and build an iOS app!
Join us on Monday, June 26 at 6:00 p.m. at Computer Coach to sit down, fire up Xcode, and write an iOS app. Register here!
It’s been a while since Tampa Bay has had a meetup for Apple platforms — iOS, iPadOS, macOS, watchOS, tvOS, and the upcoming visionOS (as in the OS for Apple’s Vision Pro, a.k.a. “the goggles”). The best way to learn how to develop for all of these platforms is to develop for iOS.
At this meetup, where we’ll build a simple iOS app and get re-acquainted with iOS development with Swift and SwiftUI.
Are you new to iOS development, the Swift programming language, Xcode, SwiftUI, or any combination of these? This meetup session is just for you! You’ll come to the meetup with your Mac with Xcode installed, and you’ll leave with a working app!
This meetup will be a “code along with the presenter” exercise. You’ll fire up Xcode, click File → New, and following the presenter’s work on the big screen, you’ll write code in Swift, build a user interface in SwiftUI, and compile and run the app. If you’ve never built an iOS app before — or it’s been a while — you’ll want to attend this meetup!
You’ll need:
A Mac computer — preferably a laptop, but we’ve had people bring in Mac desktops before.
Xcode 14.3.1. It’s free on the App Store, but it does take a while to download and install. It’s best if you install it in advance.
And because it’s hard to code on an empty stomach, we’ll provide the pizza, courtesy of our sponsor: Okta! We’d also like to thank Computer Coach for the generous use of their space.
Once again: Join us on Monday, June 26 at 6:00 p.m. at Computer Coach to sit down, fire up Xcode, and write an iOS app. Register here!


