If you take The Undercroft’s five-week cybersecurity course, UC Baseline, you will have to absorb a lot of material. Right now, I feel like the cat in the video above.

![]() Last night was the final night of the Intro to Python Coding course that I’ve been teaching on behalf of Computer Coach for the past five weeks — Mondays and Wednesdays, 6:00 p.m. to 10:00 p.m..
Last night was the final night of the Intro to Python Coding course that I’ve been teaching on behalf of Computer Coach for the past five weeks — Mondays and Wednesdays, 6:00 p.m. to 10:00 p.m..
I’d like to congratulate the students! It’s not easy to spend four hours an evening twice a week learning something completely new and unknown to you, but the students did just that. If you’ve ever been in any of my Tampa iOS Meetup sessions, you’ve seen my teaching technique — you’re not passively watching slides, but coding along with me, and even experimenting, just to see what happens. That’s I what I did with the Python class — we entered code and saw what happened, hopefully learning along the way.
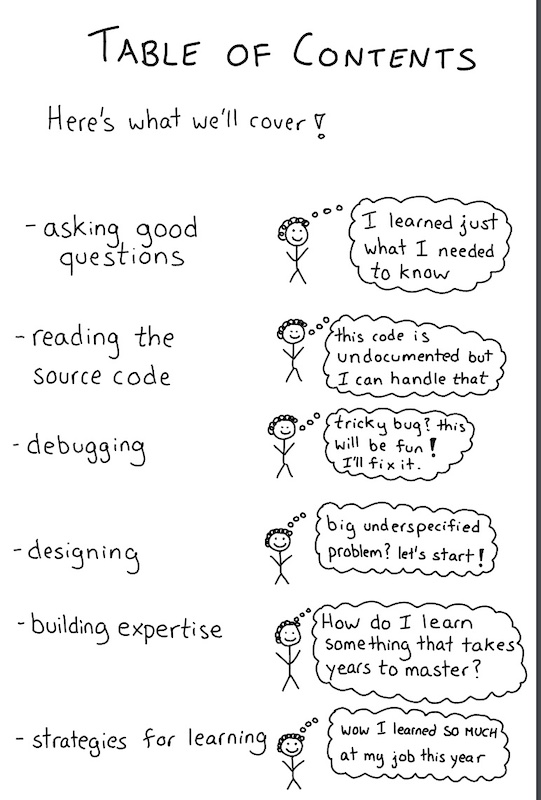
As a farewell present to the students, I sent them a copy of So You Want to be a Wizard, a little “zine” written by Julia “b0rk” Evans for programmers who are starting out that’s full of good advice. I hope it helps them through those moments that every programmer has, when nothing seems to work and all you want to do is throw your computer out the window. I’ve posted it here as well, partly because it’s full of good advice that even experts need to remember, and partly because I want to make sure that everyone knows about Julia’s works.
Even the table of contents lets you that that you’re in for a fun read:
 Julia has a whole set of zines, some of which are free…
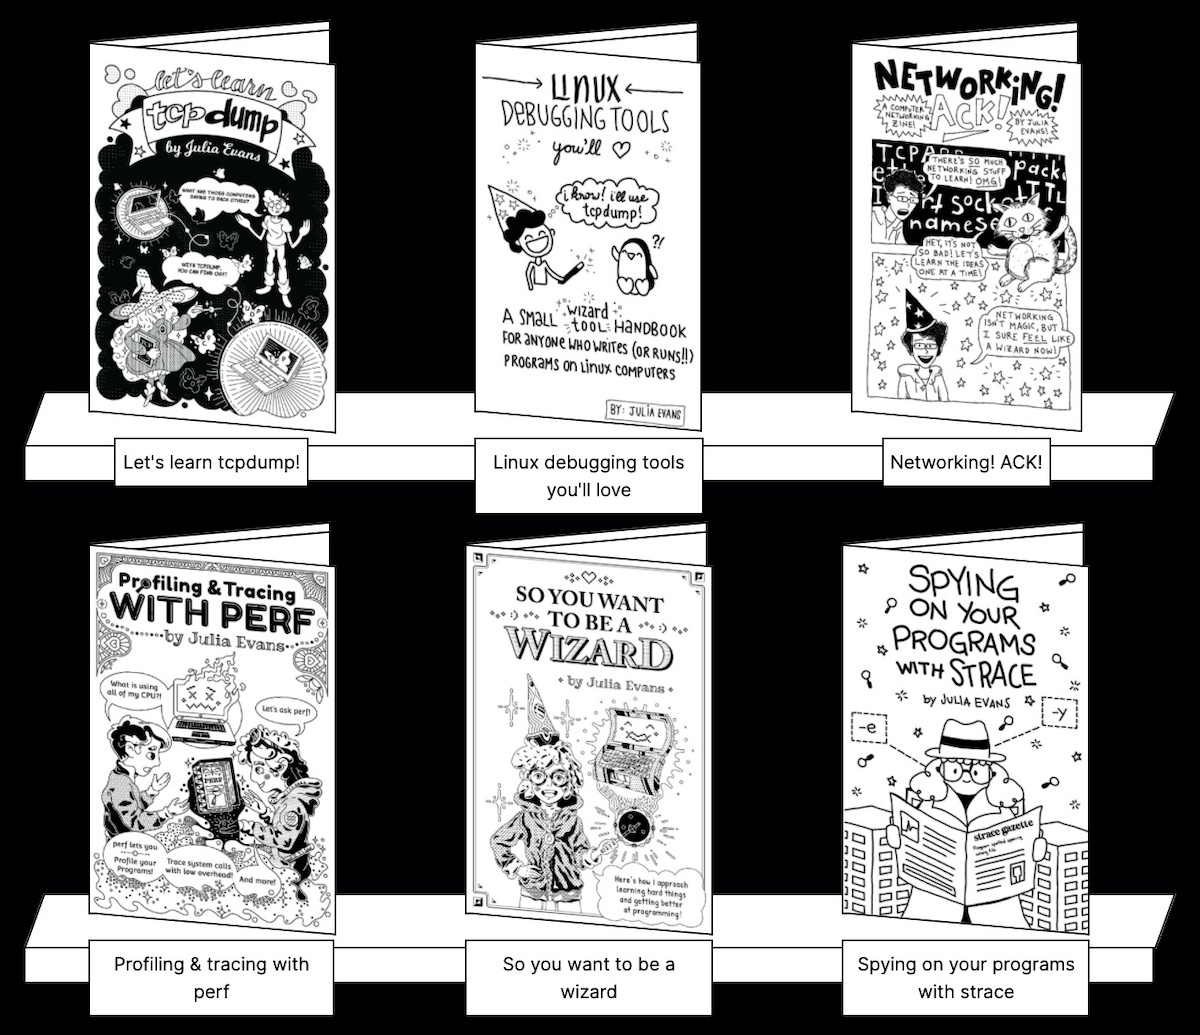 …and some fancier ones, which come at a reasonable price, even for groups:

Once again, congratulations to the Intro to Python Coding students!

Categories
Casing the joint
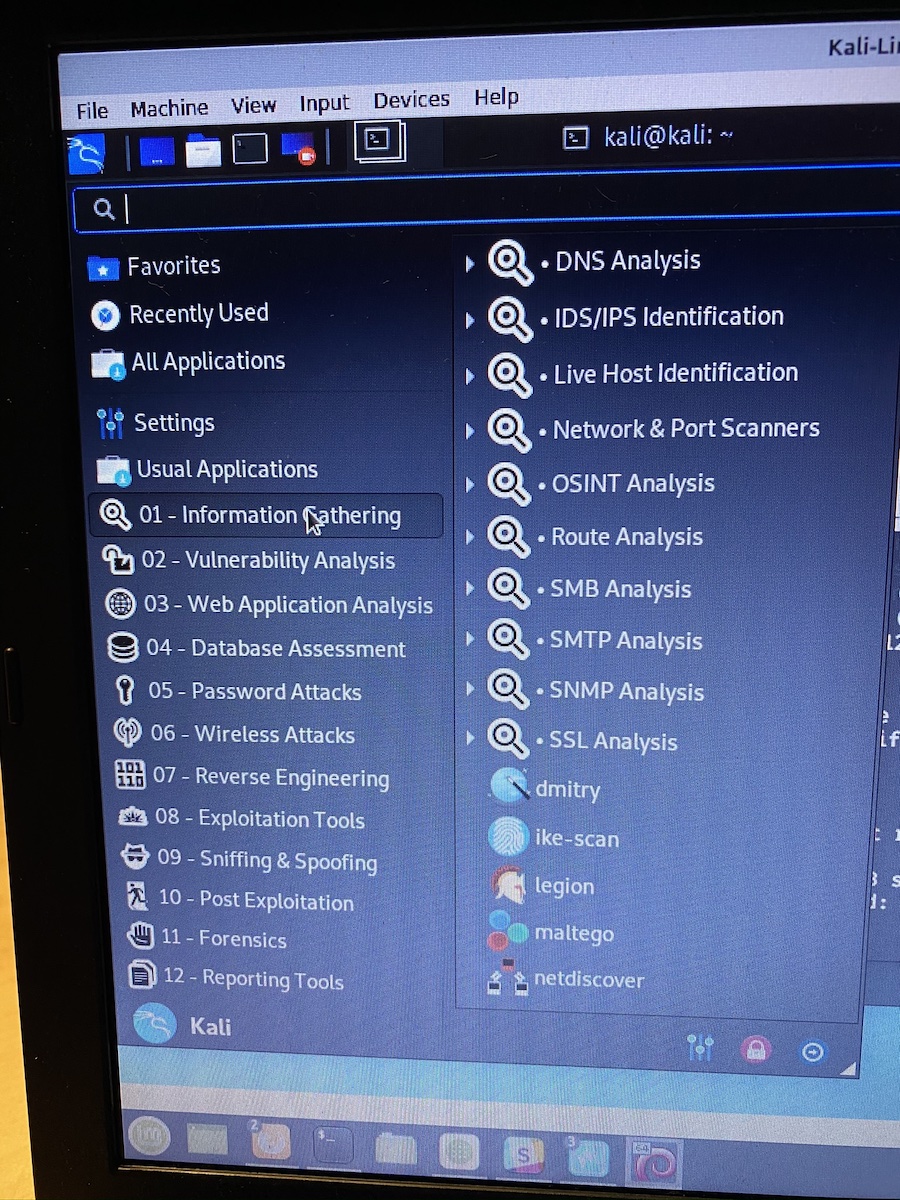
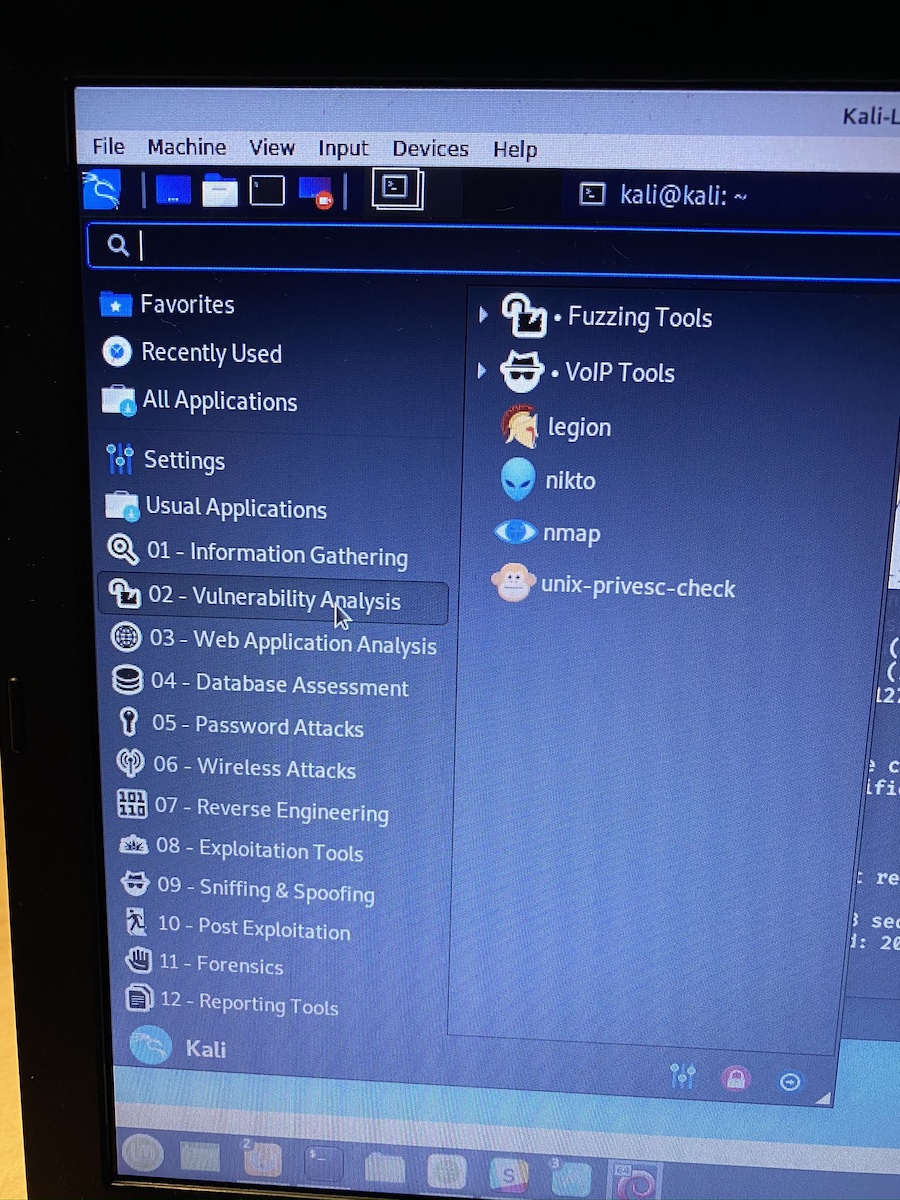
 It’s “Case the Joint Day” at UC Baseline, the cybersecurity training program offered by Tampa Bay’s security guild, The Undercroft. We’ve been provided with two target computers — one on the local network set up in the classroom, and one virtual machine set up remotely in the cloud — to examine via all manner of network analysis programs for weak spots.
Now the fun really begins! I’ll keep you posted, and write a more detailed article later. In the meantime, there’s mischief I have to get to.
It’s Day 2 of InfoSec Week at UC Baseline, the cybersecurity training program offered by Tampa Bay’s security guild, The Undercroft. I’ve fired up Kali — a distribution of Linux made for cybersecurity types and other troublemakers — and am marveling at the hacking goodies contained within.
 I’ll write more as we go through the exercises, which includes fun activities including:
- Networking and IPv4 basics review (easy)
- Scanning and enumeration (I will neither confirm nor deny that I have any experience doing this)
- Breaching a system (Totally new to me)
- Web application vulnerability analysis (I’ve got only a tiny bit of hands-on experience in this area)
Watch this space!
 You really should listen to the “egineering” team, and it wouldn’t hurt for some “egineers” to work on their communications and sales skills.

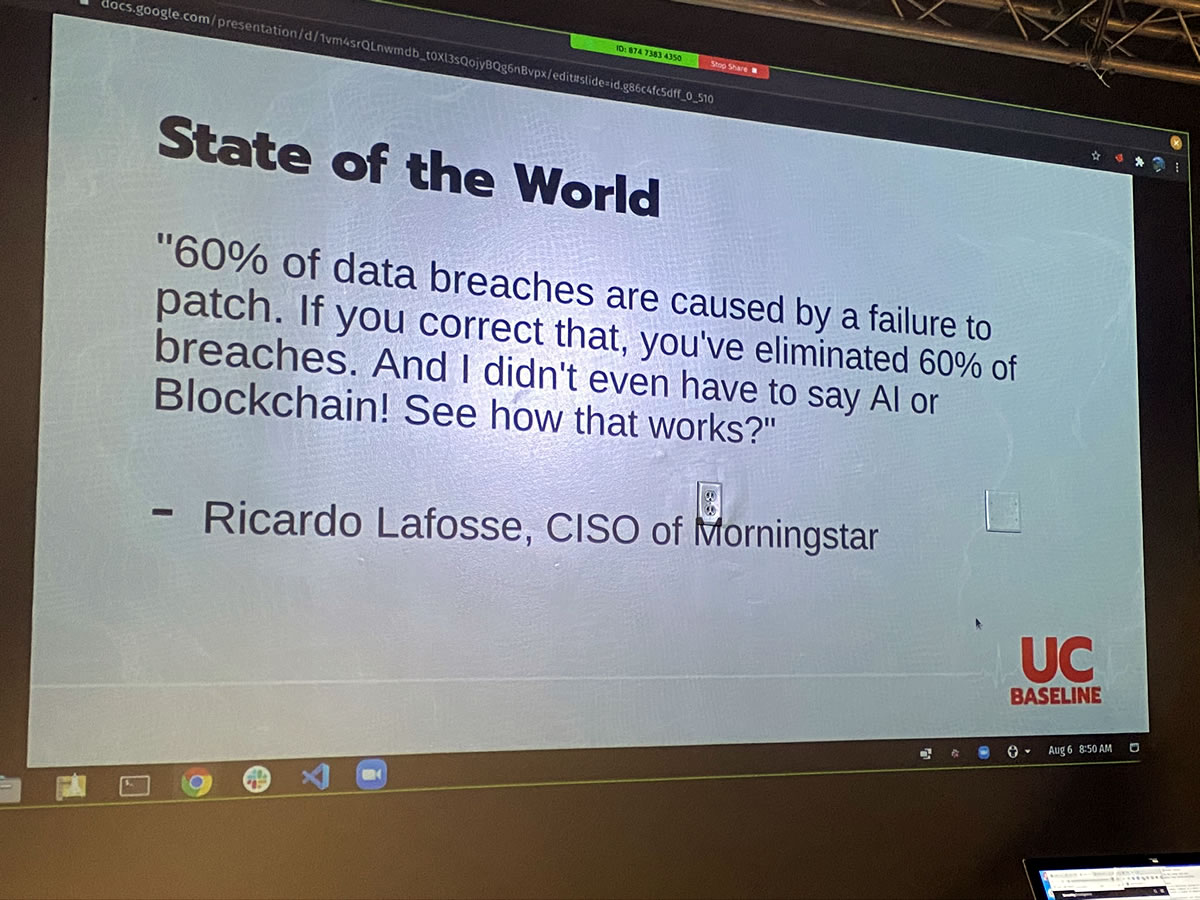
Now begins the fourth week out of five weeks at Tampa Bay security guild The Undercroft, where I’ve been taking part in UC Baseline, their cybersecurity course. This is their inaugural class, and I’ve been documenting my experiences as part of that cohort.
This week is the heart of the course — Information Security 101. The previous three weeks, as instructor Gabrial “Tremere” Hartnett put it, was background material. It’s going to be the most information-dense week of the course — in fact, there’s so much material that class time has been extended by an hour each day. This week, we’re in class from 8 to 5.
(This will be a double-challenge for me as I have to teach two more Python classes on Monday and Wednesday evening, from 6 to 10.)
This should be an interesting week!
In preparation for this week, I’ve been absorbing material from Jayson E. Street, VP of InfoSec at SphereNY, and expert at getting into places that he is absolutely not allowed to be in.
Steal Everything, Kill Everyone, Cause Total Financial Ruin!
(DEF CON 19, 2011)
Why you should watch this talk: It’s a pretty good intro to getting access to places and systems that you shouldn’t be able to access, and with skills that you probably already have. Street says that he doesn’t have amazing programming, lockpicking, or hypnotism skills — all his tricks are about exploiting human weaknesses or making use of tools that you can easily find or purchase. This talk includes the line “The best way to get management about a disaster plan is to burn down the building across the street,” which captures its essence perfectly.
Here’s the abstract for this talk:
This is not a presentation where I talk about how I would get in or the things I might be able to do. This is a talk where I am already in and I show you pictures from actual engagements that I have been on. They say one picture is worth a thousand words I show you how one picture cost a company a million dollars and maybe even a few lives. In a community where we focus so much on the offensive I also make sure with every attack I highlight. I spend time discussing what would have stopped me. We need to know the problems but we need more talks providing solutions and that is what I hope people will get from this. I show the dangers of Social engineering and how even an employee with no SE experience can be an eBay James Bond which can cause total financial ruin to a company. These Security threats are real. So are these stories!
I PWN thee; I PWN thee not
(DEF CON 27, 2019)
Here’s the abstract for this talk:
Attackers love it when defenses fail. Implementing defenses without properly understanding the risks and threats is usually a waste of money and resources. This is a frank discussion of what control failures an attacker looks for when attempting to breach an enterprise, as well as how an effective control can help prevent an attacker from being successful. Jayson will walk through real-world scenarios that have led to successful compromise of different companies through control failures. He will also give detailed analysis of controls that led to his attacks being effectively thwarted. Learn how to understand and assess real-world risks, as well as simple defenses which can be implemented to better protect your organization.
Dissecting the Hack: The F0rbi1dd3n Network /
Dissecting the Hack: The V3rbOt3n Network
(2010 / 2016)
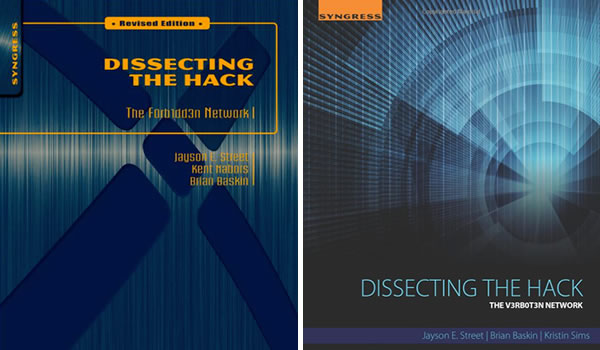
I’ve only started reading the first of these two books, which are probably best described as “hacker spy thriller fiction.” These books are in two parts; the first part is a story in which infosec principles play a key part, and the second part is a great infosec reference.

 Last week was week 3 of the inaugural class of UC Baseline, the 5-week cybersecurity program offered by Tampa Bay’s security guild/coworking space/clubhouse for merry tech pranksters The Undercroft.
This week has been all about operating systems, and Monday to Wednesday were devoted to Linux (which I wrote about earlier). The remainder of the week, Thursday and Friday, were set aside for that contradiction in terms known as Windows security.
Here are some photos from the Windows Security days…
For this class, we moved from the room at the front of The Undercroft to the one in the back. Once again, I took my preferred perch — in the back row, on the left side of the room:
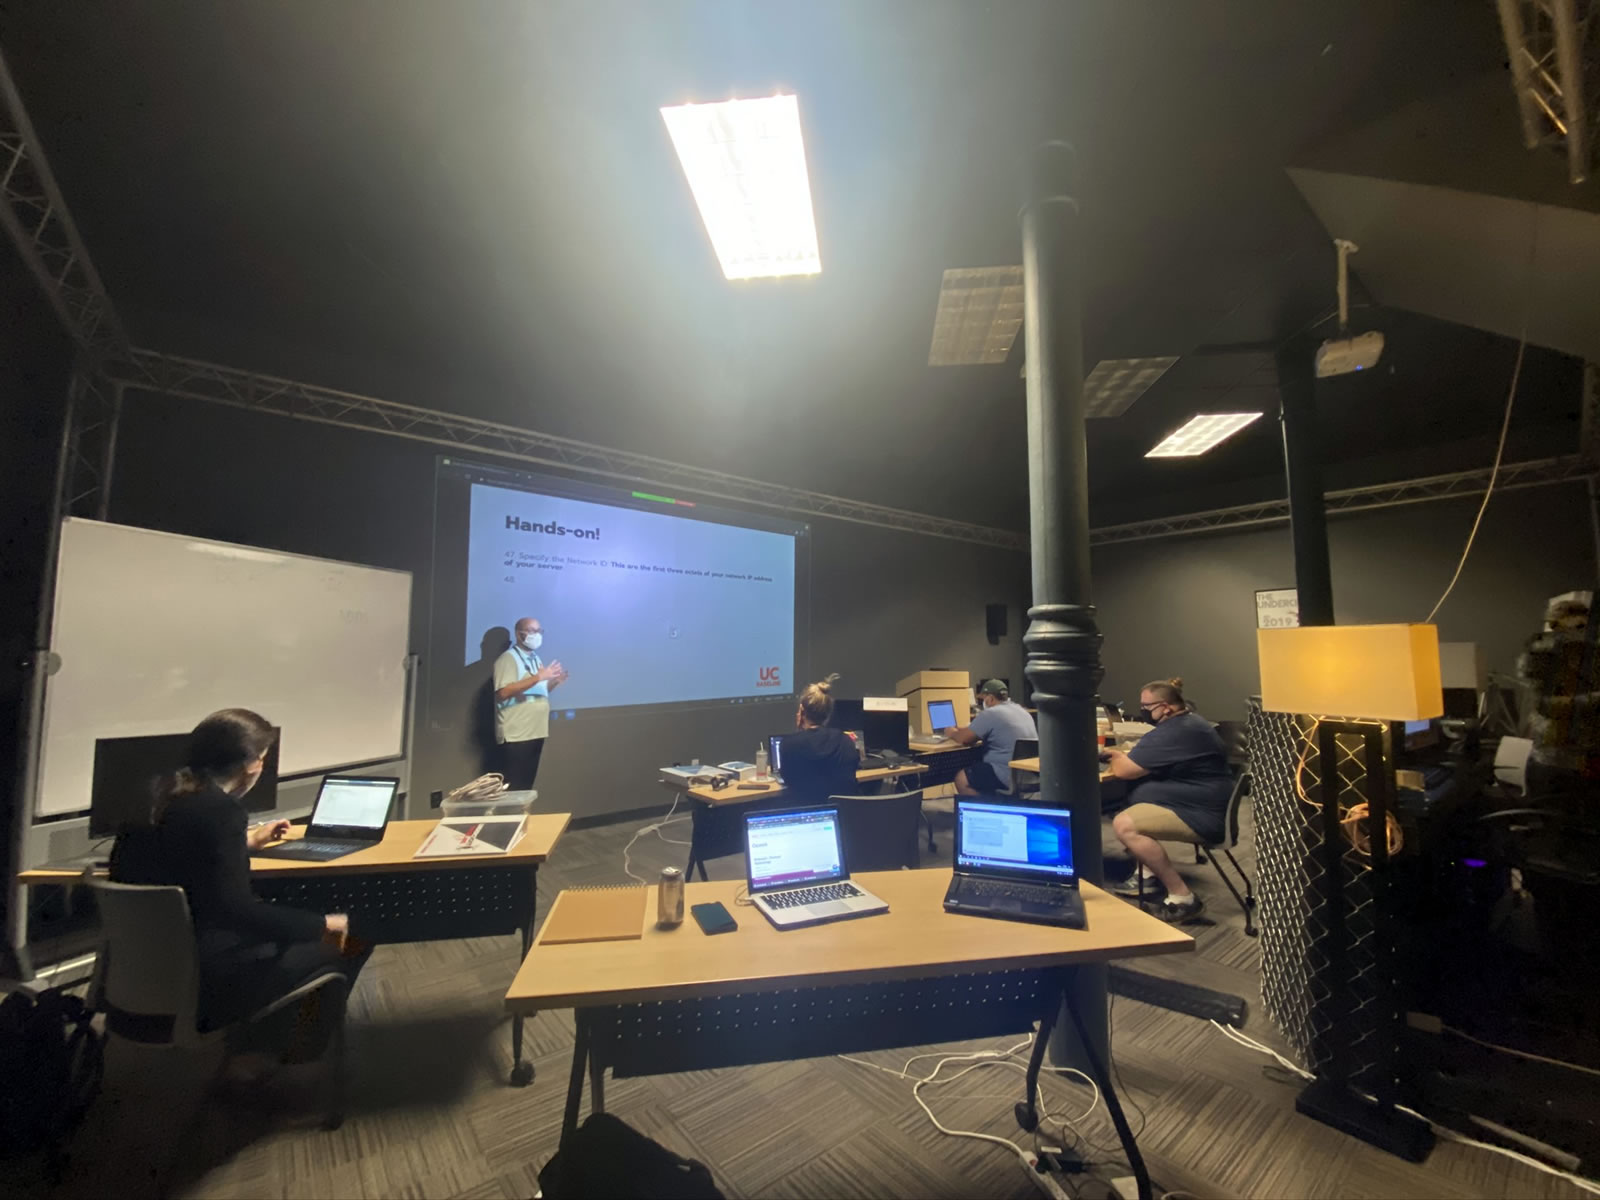
I have good reasons for picking the classroom seat favored by the “bad students”:
- It provides a view of the entire room at a single glance.
- With nobody behind me, only I see what’s on my laptop screen(s).
- It puts me upwind from everyone’s breathing. We are still in a pandemic, after all, and while we’re wearing masks and following precautions as best we can, we’re spending long hours in a classroom. We get tired. We get careless. Our hygiene game is one thing when we arrive fresh and rarin’ to go at 8:00 a.m. and a completely different thing at 4:02 p.m., after absorbing the finer points of processors, or the SYN/ACK/RST dance, or any other concept that the instructors are firehosing at us.
Some of the topics we covered were relatively straightforward and easy enough for laypeople to grasp…
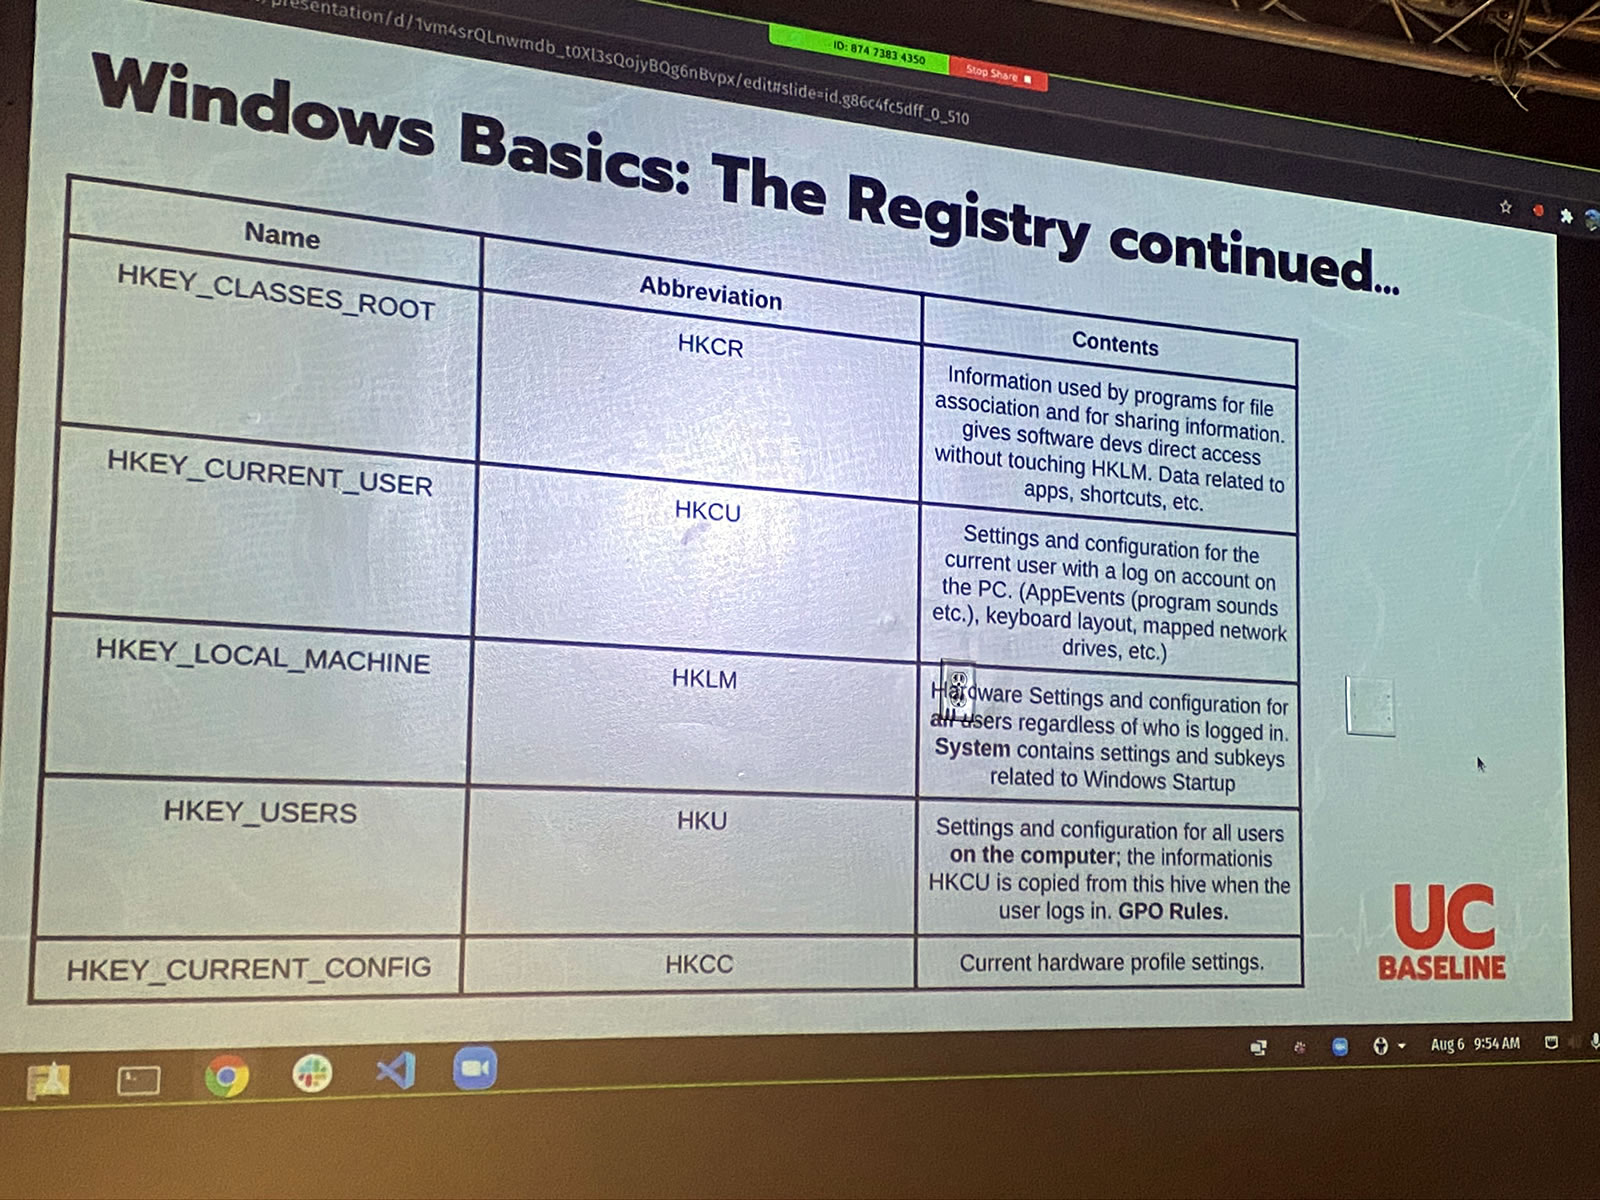
…while others were subjects of Windows arcana that I haven’t dealt with in depth since my time at Microsoft:
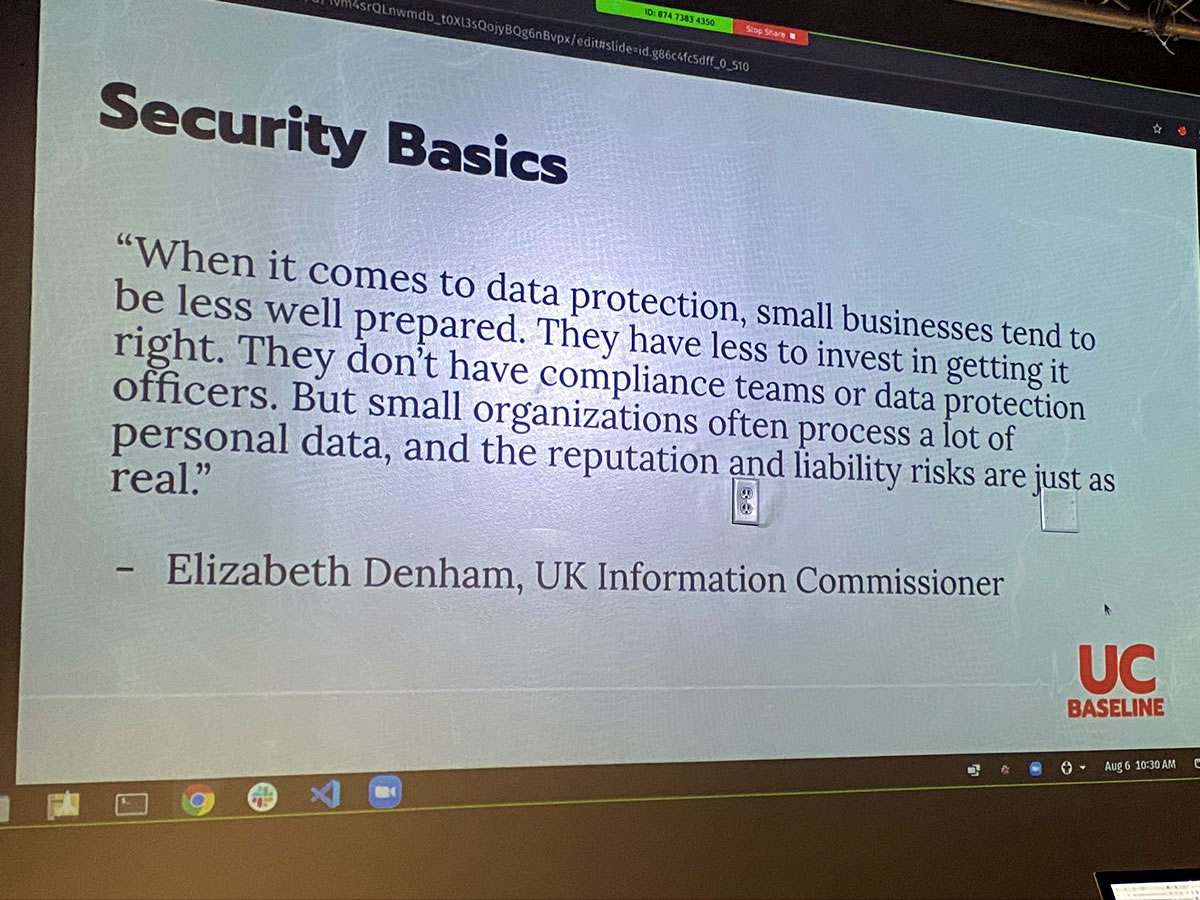
Windows security is much more than just the technology. As the best-known, most-deployed, most-used (and yes, most-pirated) desktop operating system out there, you have to have a clear picture of who the targets are:
Windows Defender — actually, as of May 2020, it’s been going by its new name, Microsoft Defender — was part of the curriculum. It’s come a long way from the Windows XP days.
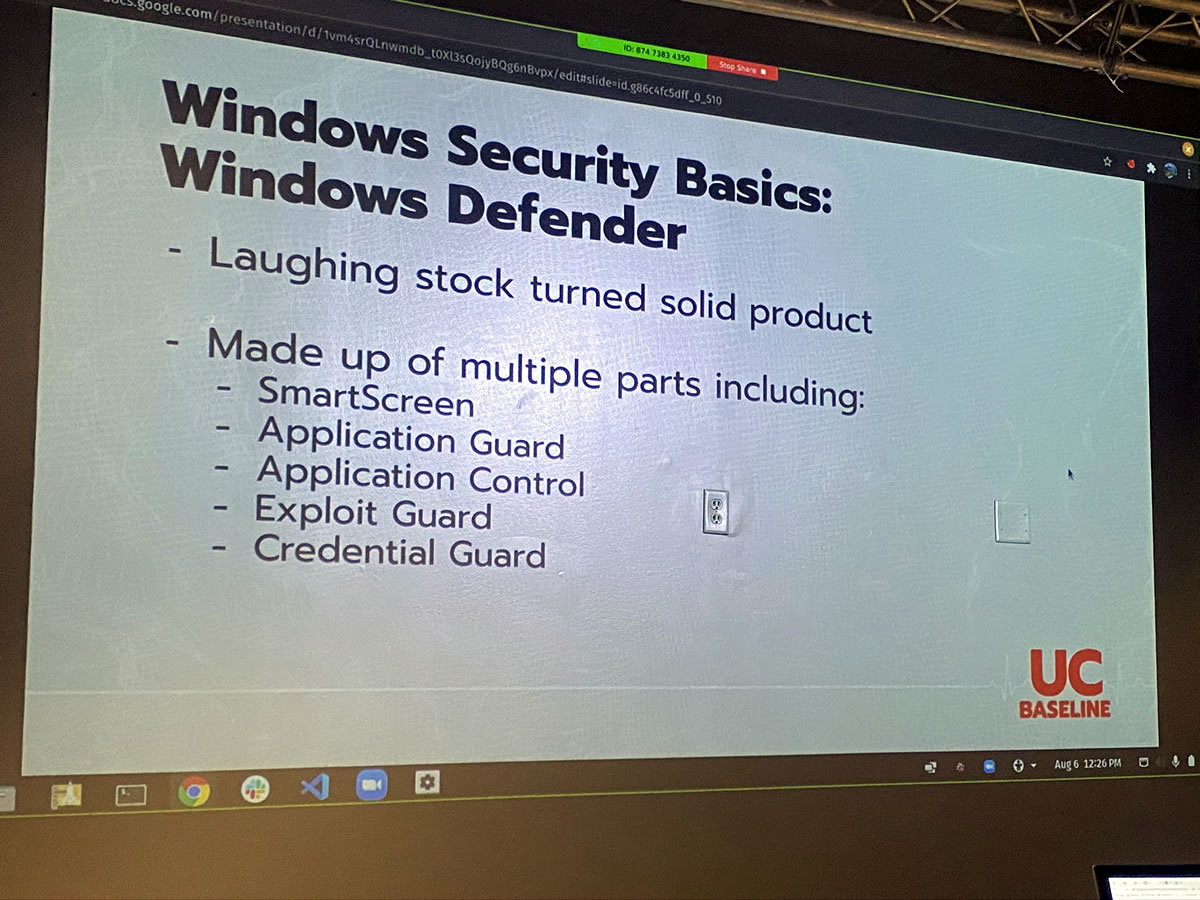
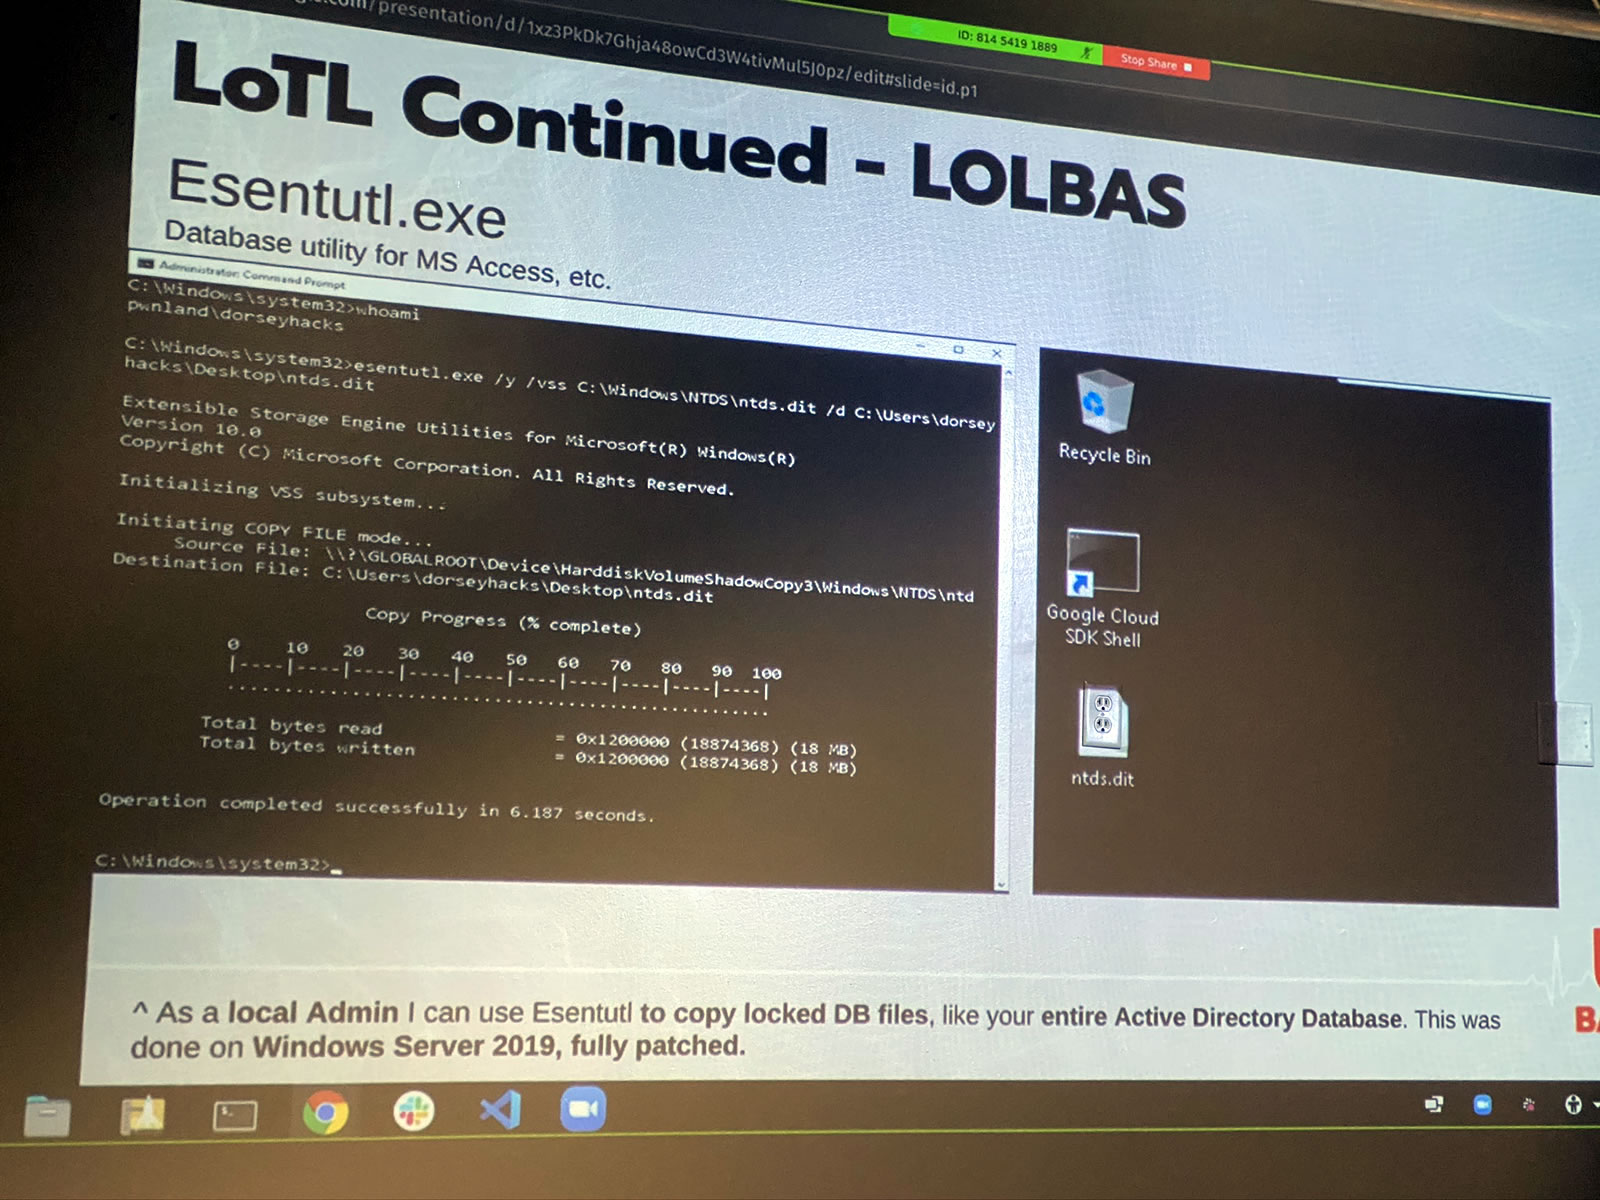
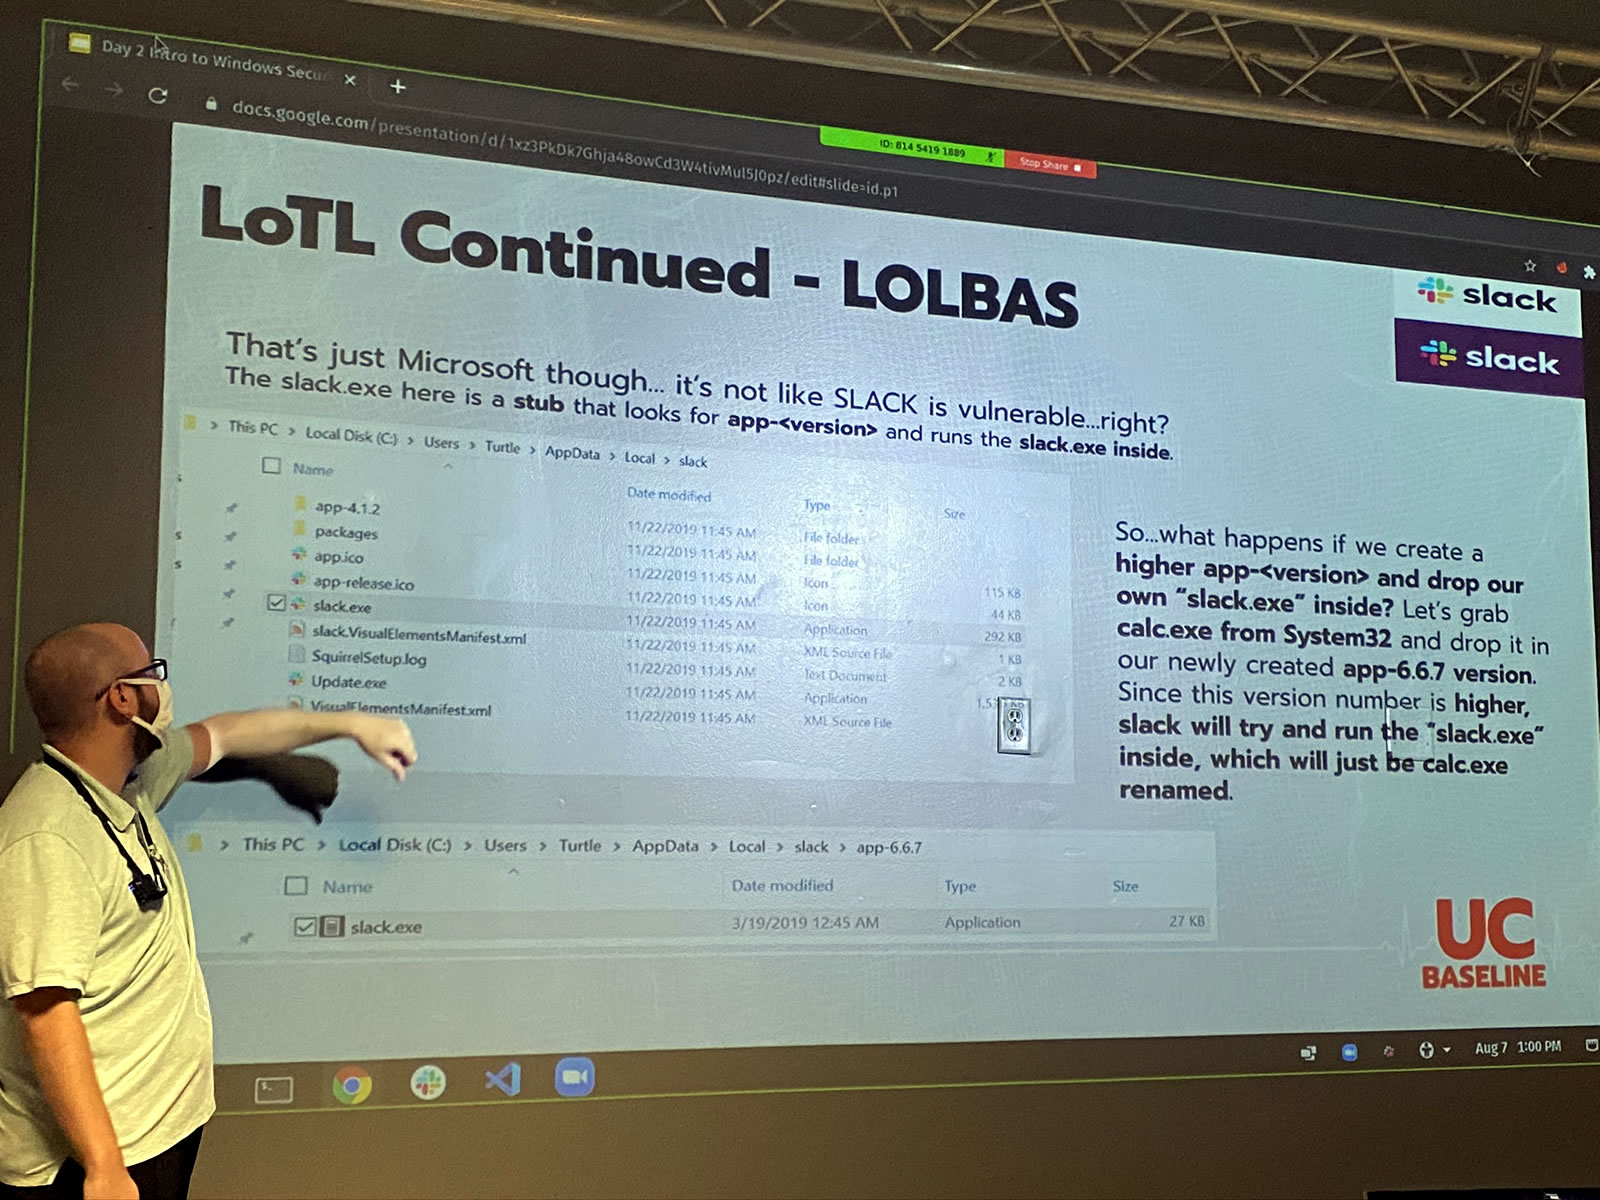
A good chunk of the Windows Security portion of the program was devoted to “living off the land” — LotL for short — which is a great metaphor for a specific type of attack strategy.
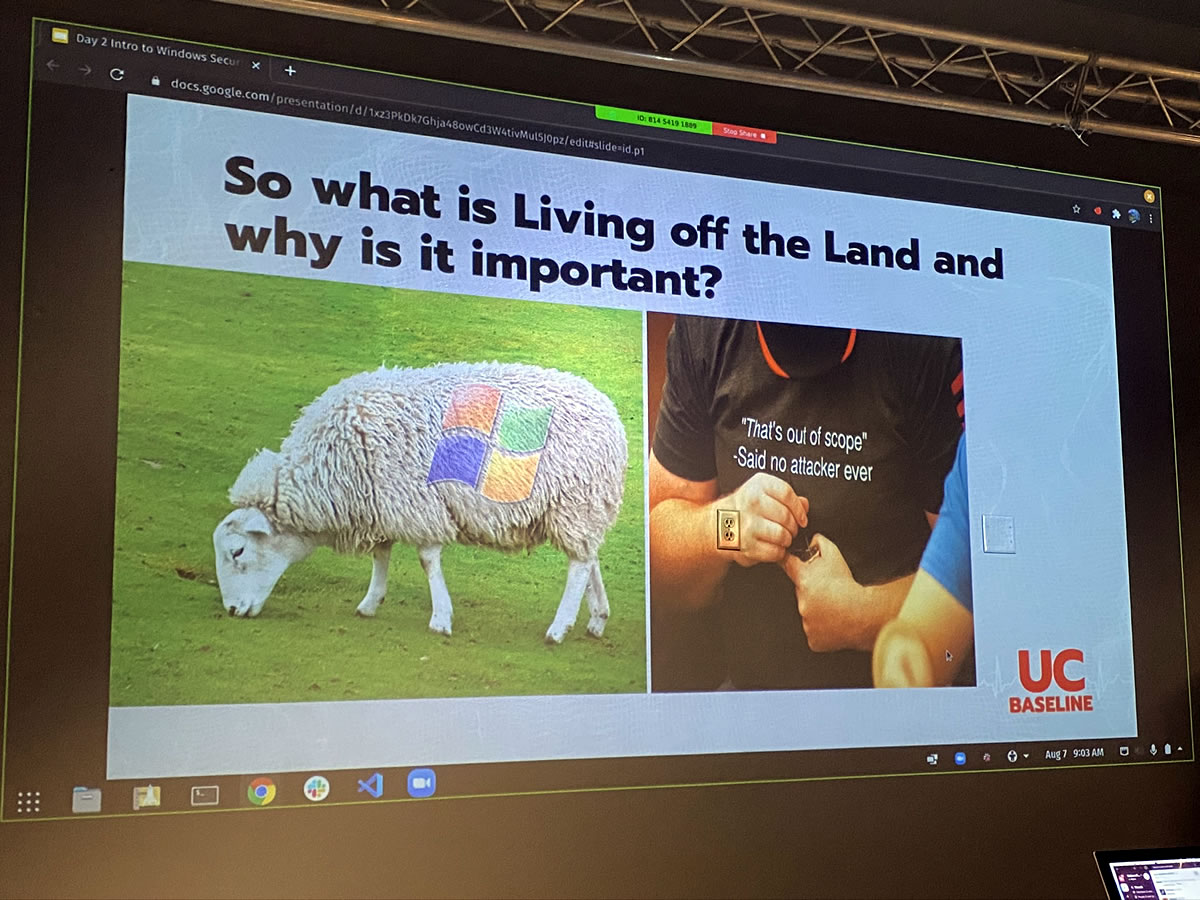
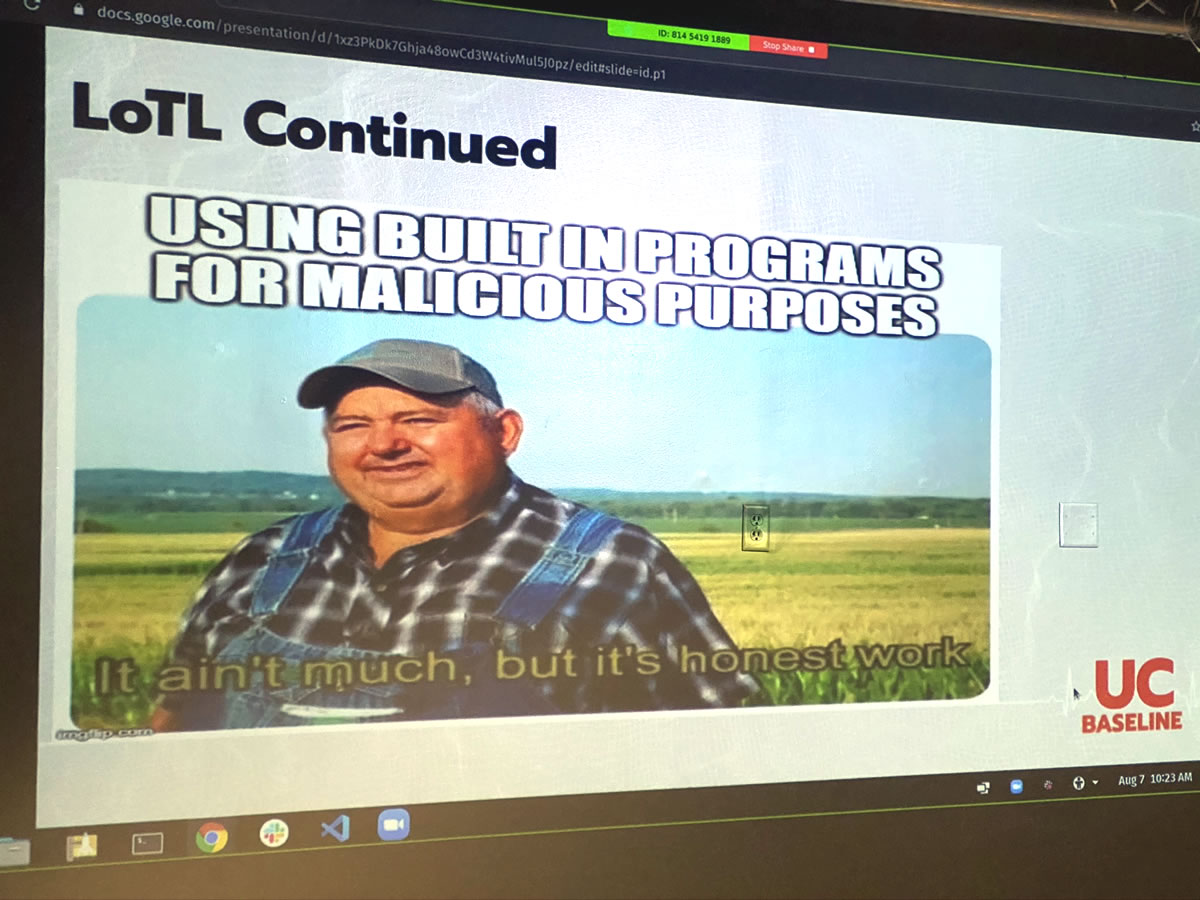
Living off the land is attacking a system by using tools, software, or features that already exist in the target environment. It’s using your victim’s own resources to break into their systems.
Living off the land offers a number of advantages:
- It makes it easier to avoid detection. All software leaves some kind of trace to one degree or another, and unfamiliar software performing unusual tasks usually attracts the attention of sysadmins. Familiar software that’s already on a target system tends to raise less suspicion. If you can harness software that’s already on the target system, it’s like having someone on the inside.
- It can be difficult to install malware on a target system. Even on systems managed by people who aren’t all that careful, it can still be difficult to gain enough access to install applications on a target system without authorization.
- The tools for administering systems are powerful, and they’re often pre-configured for easy access to the systems they’re on. If you’re an administrator, one of your performance metrics is how quickly you solve users’ problems. You’re incentivized to have software and utilities set up in such a way that you can get into their systems and change settings quickly. If you can access these, you’ve got a great attack vector.
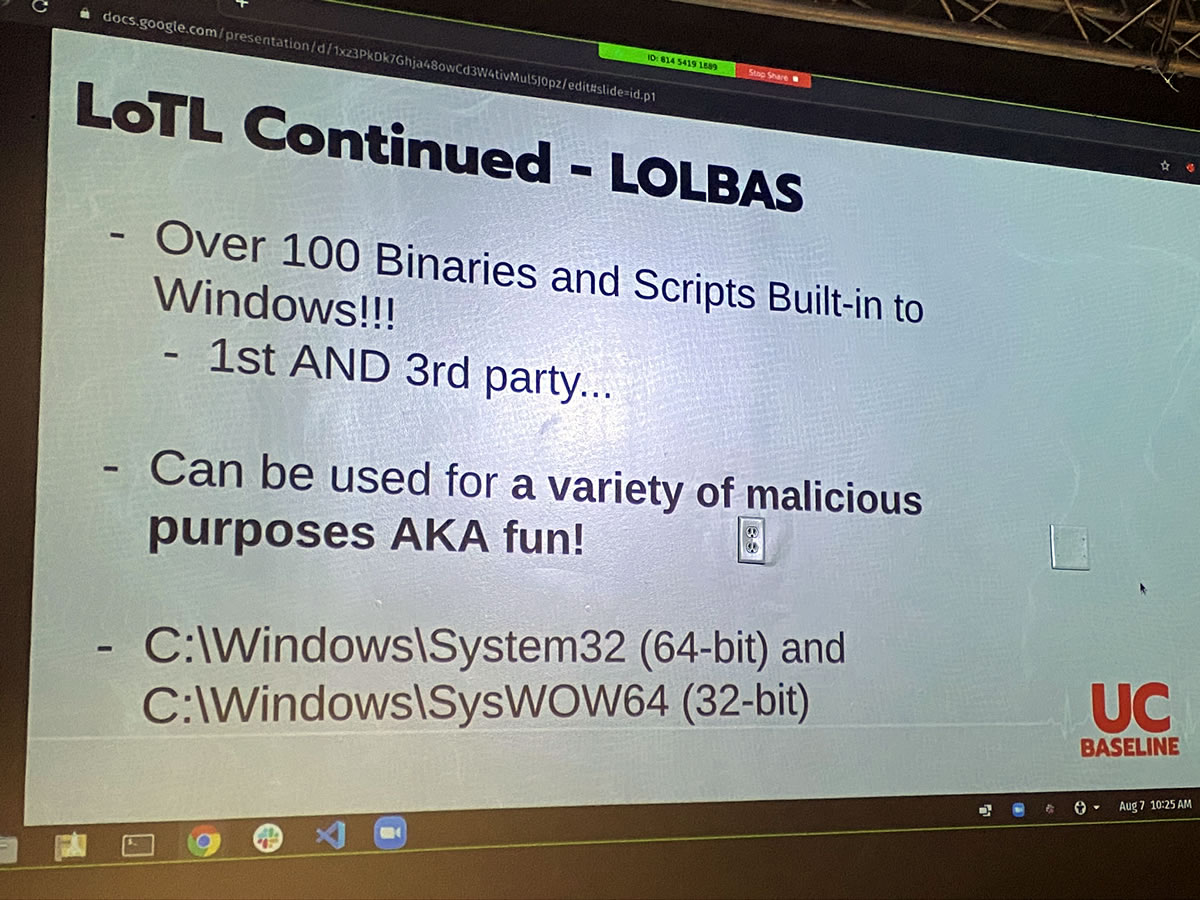
Living off the land is so effective that there’s now an entire suite of tools for it: LOLBAS, which is short for Living off the Land Binaries and Scripts. It’s a set of over 100 tools for living off the land on Windows systems — and ironically enough, it’s hosted on GitHub, which is a Microsoft property.
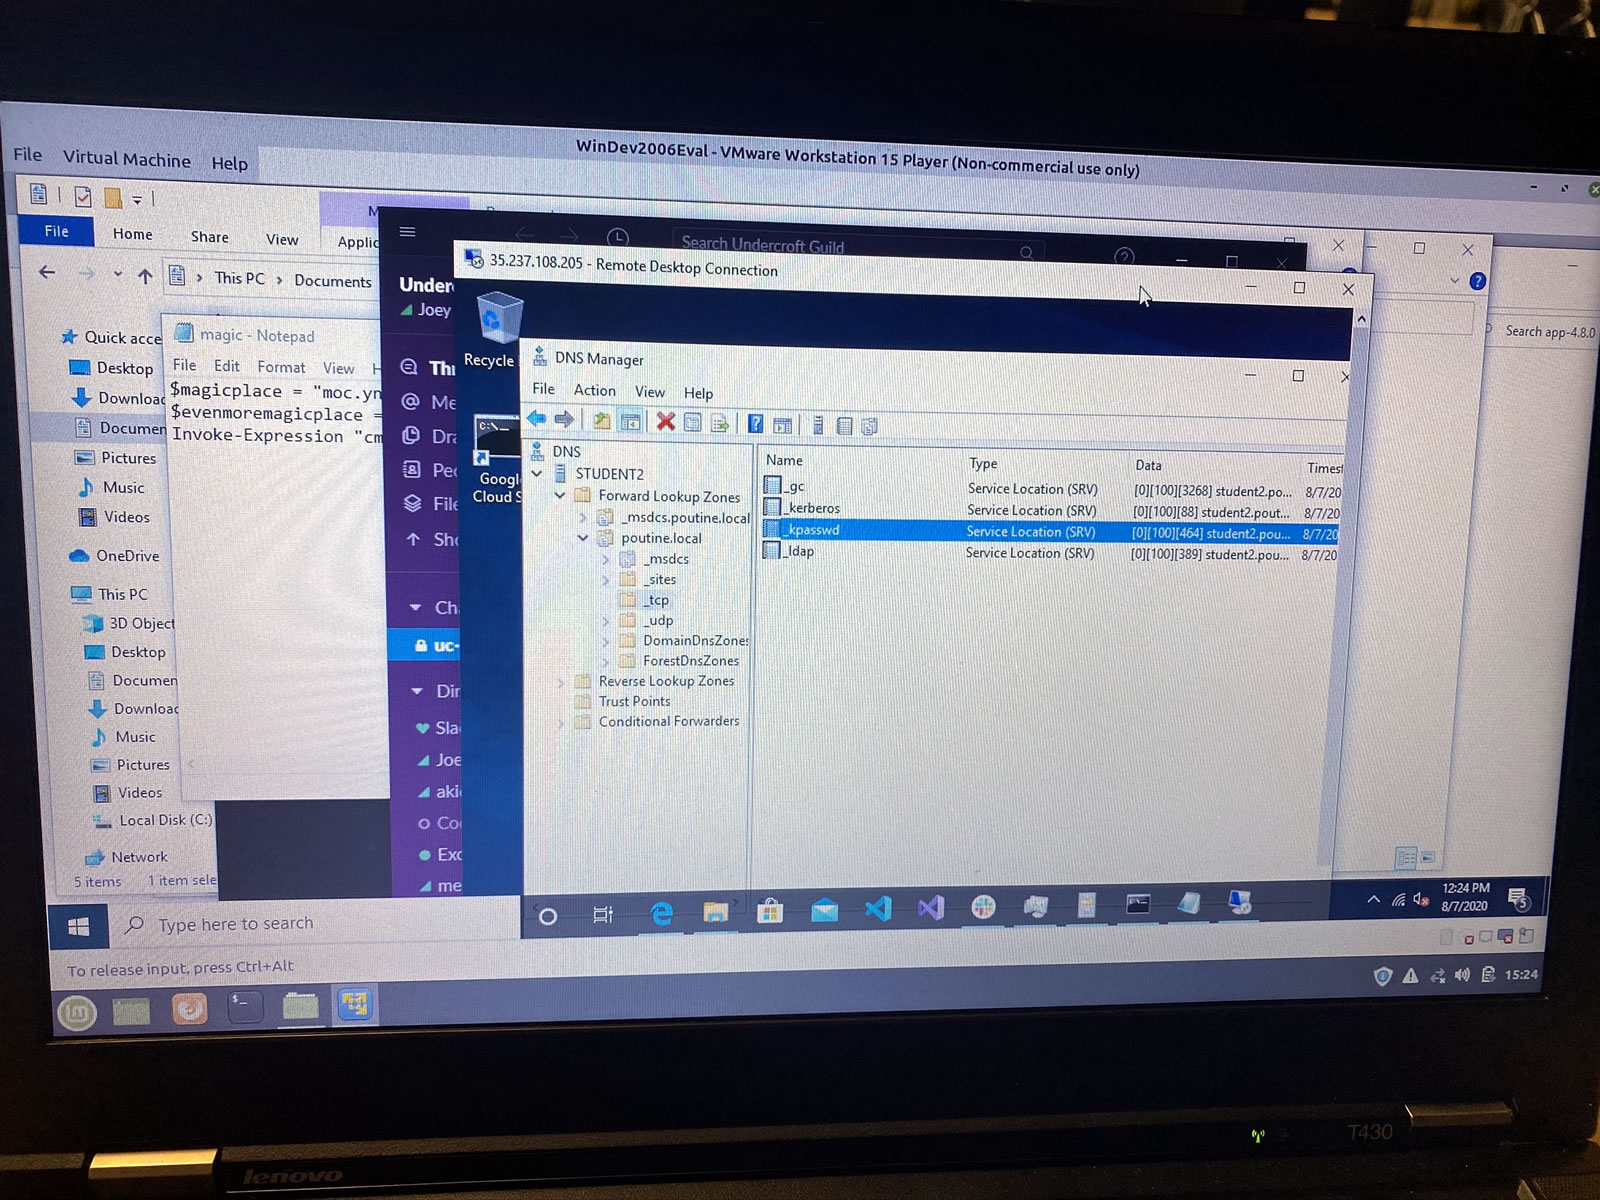
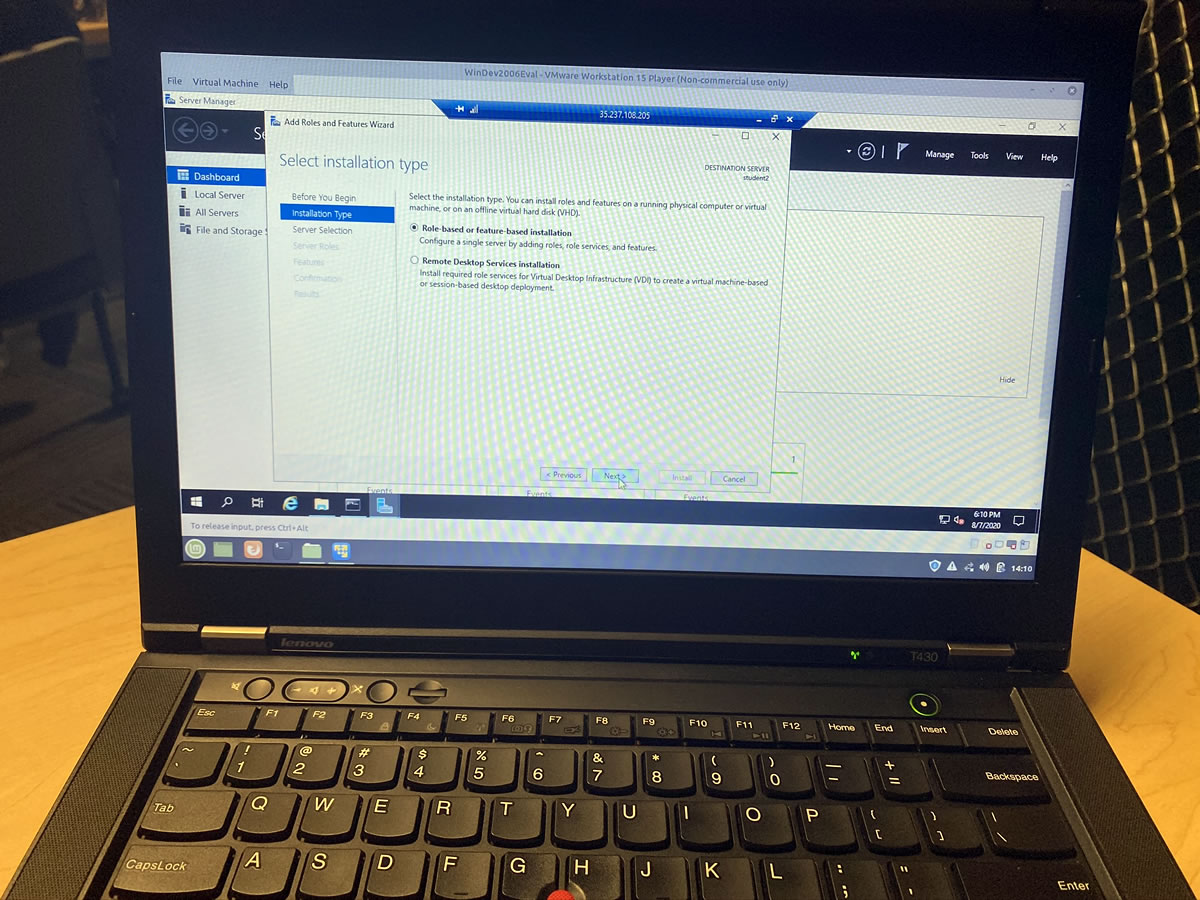
For these two days, we needed to be running Windows. My ThinkPad runs Mint Linux, but with VMWare and a Windows 10 VM, I was running Windows within Mint. And then, we remote desktopped into another Windows machine, which meant I was running Windows from Windows from Linux:
I haven’t done this sort of Windows systems admins since I worked at the Beast of Redmond:
Let’s give this remote system’s domain a proper name…
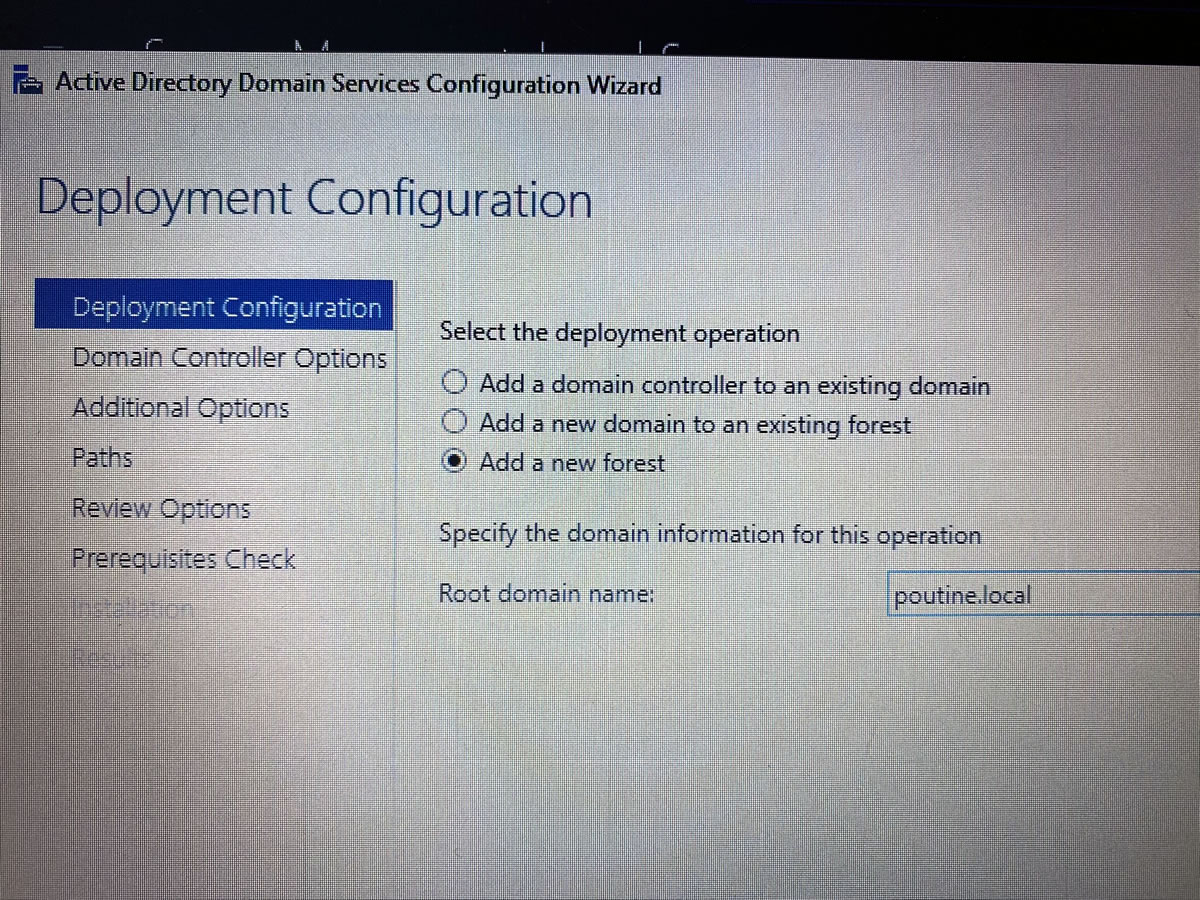
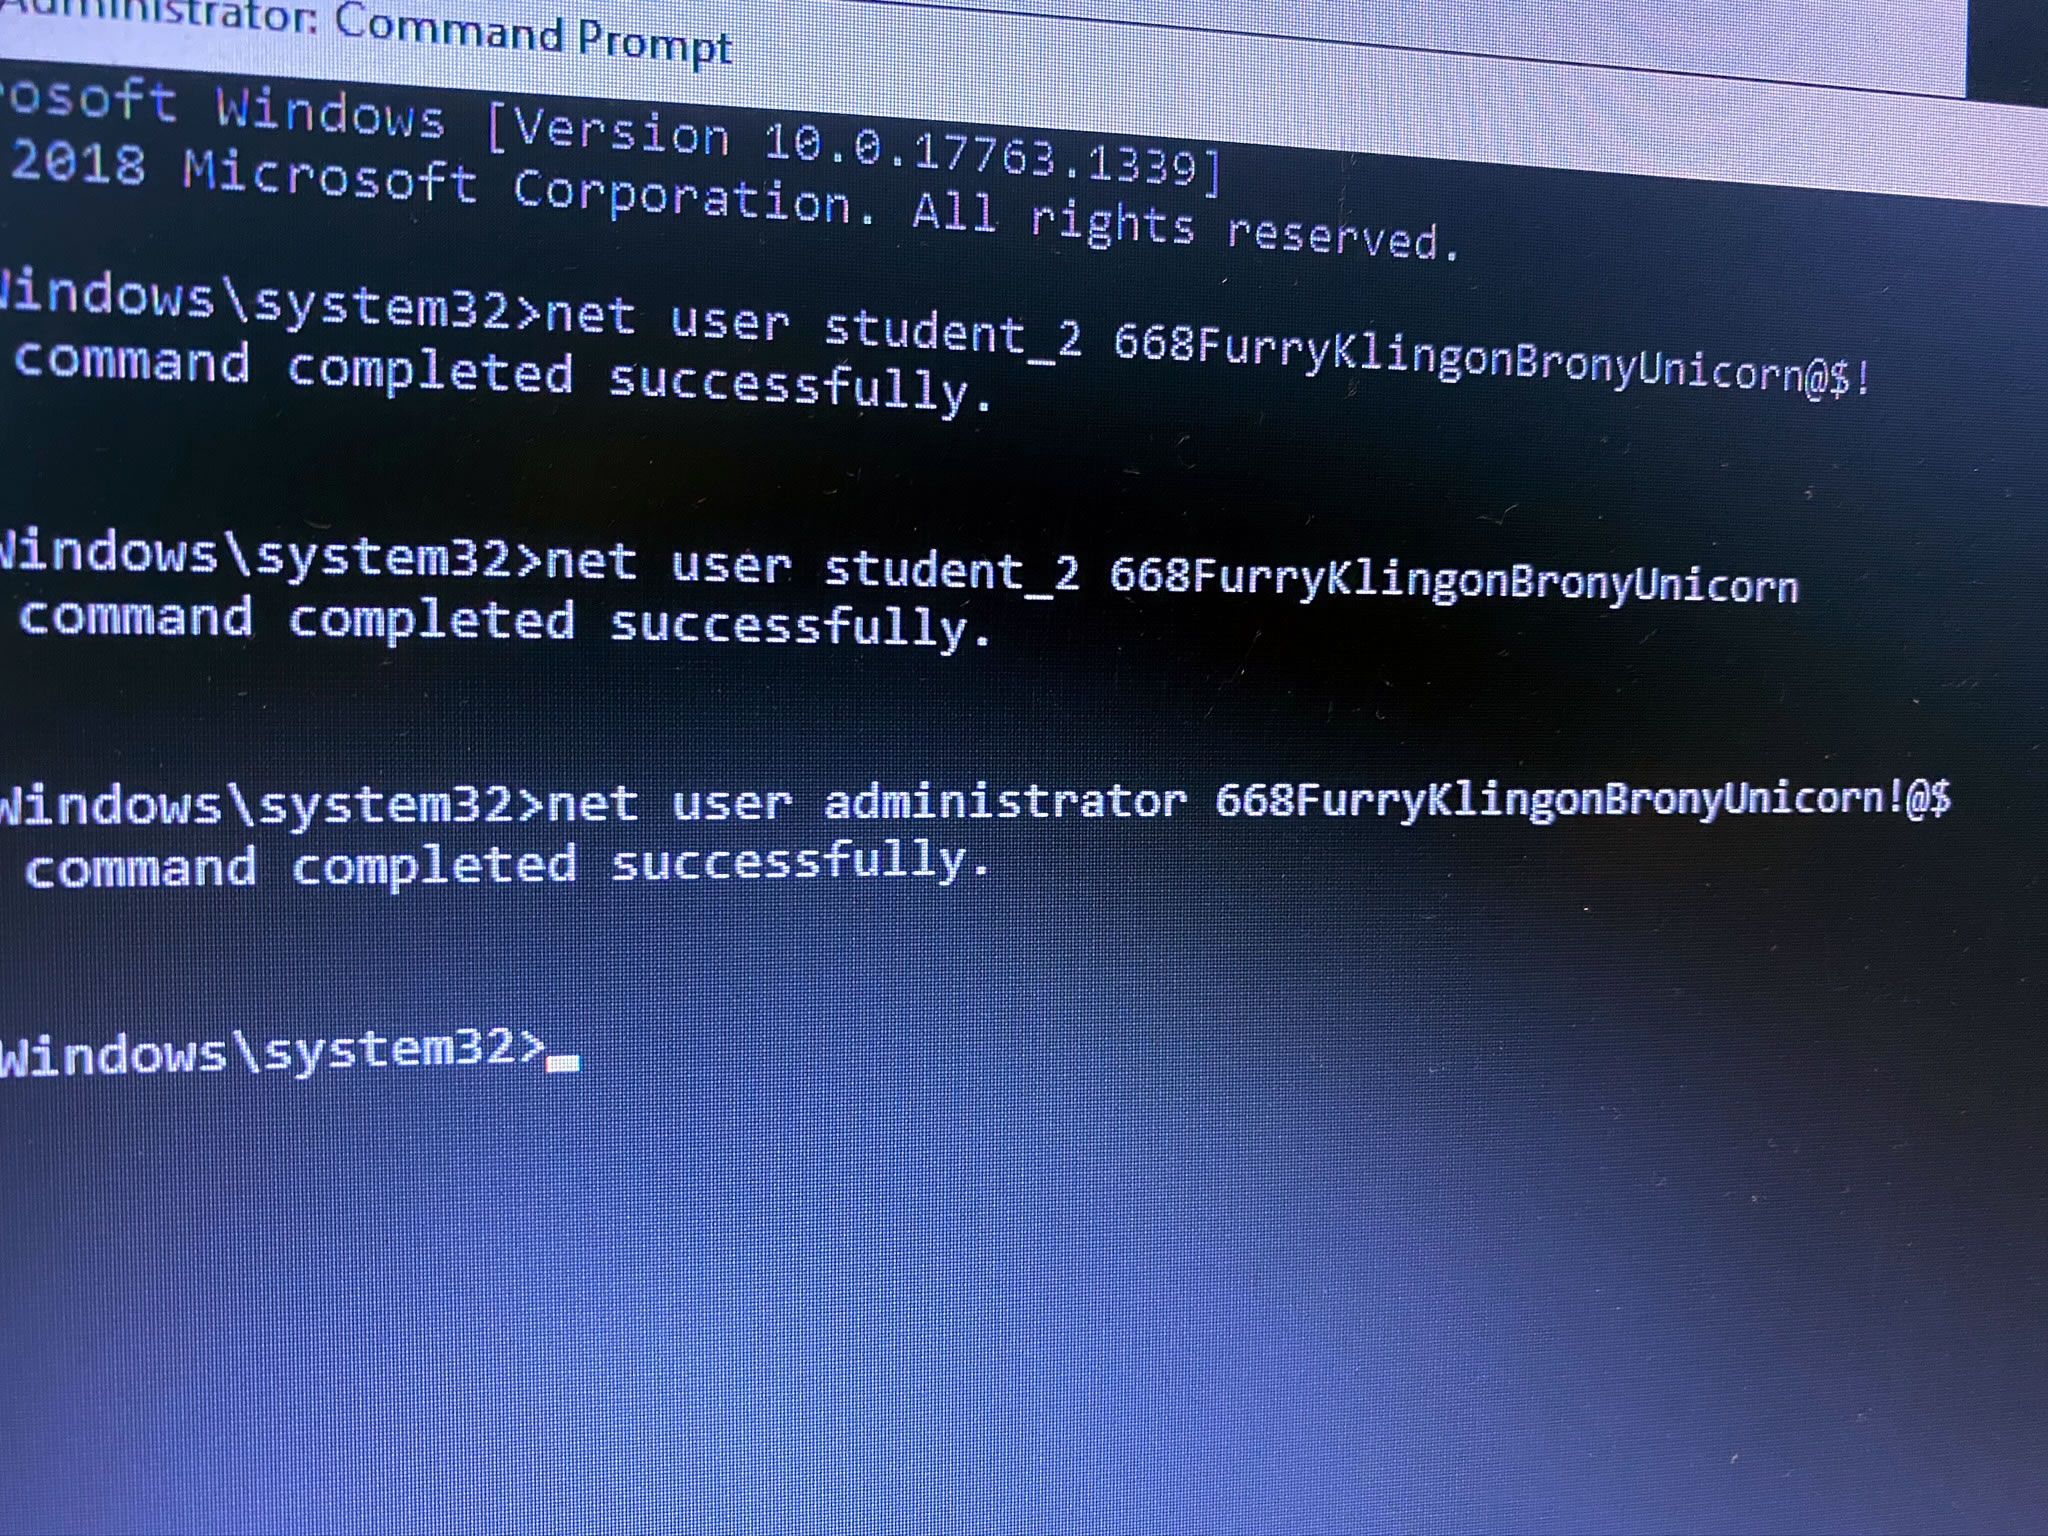
…and a proper admin password as well. Remember, 668 is the Neighbor of the Beast:
Although we were free to play with this remote system, I will still neither confirm nor deny that I may have left little scripts that will automatically and unwillingly take unsuspecting users directly to the My Little Pony site:
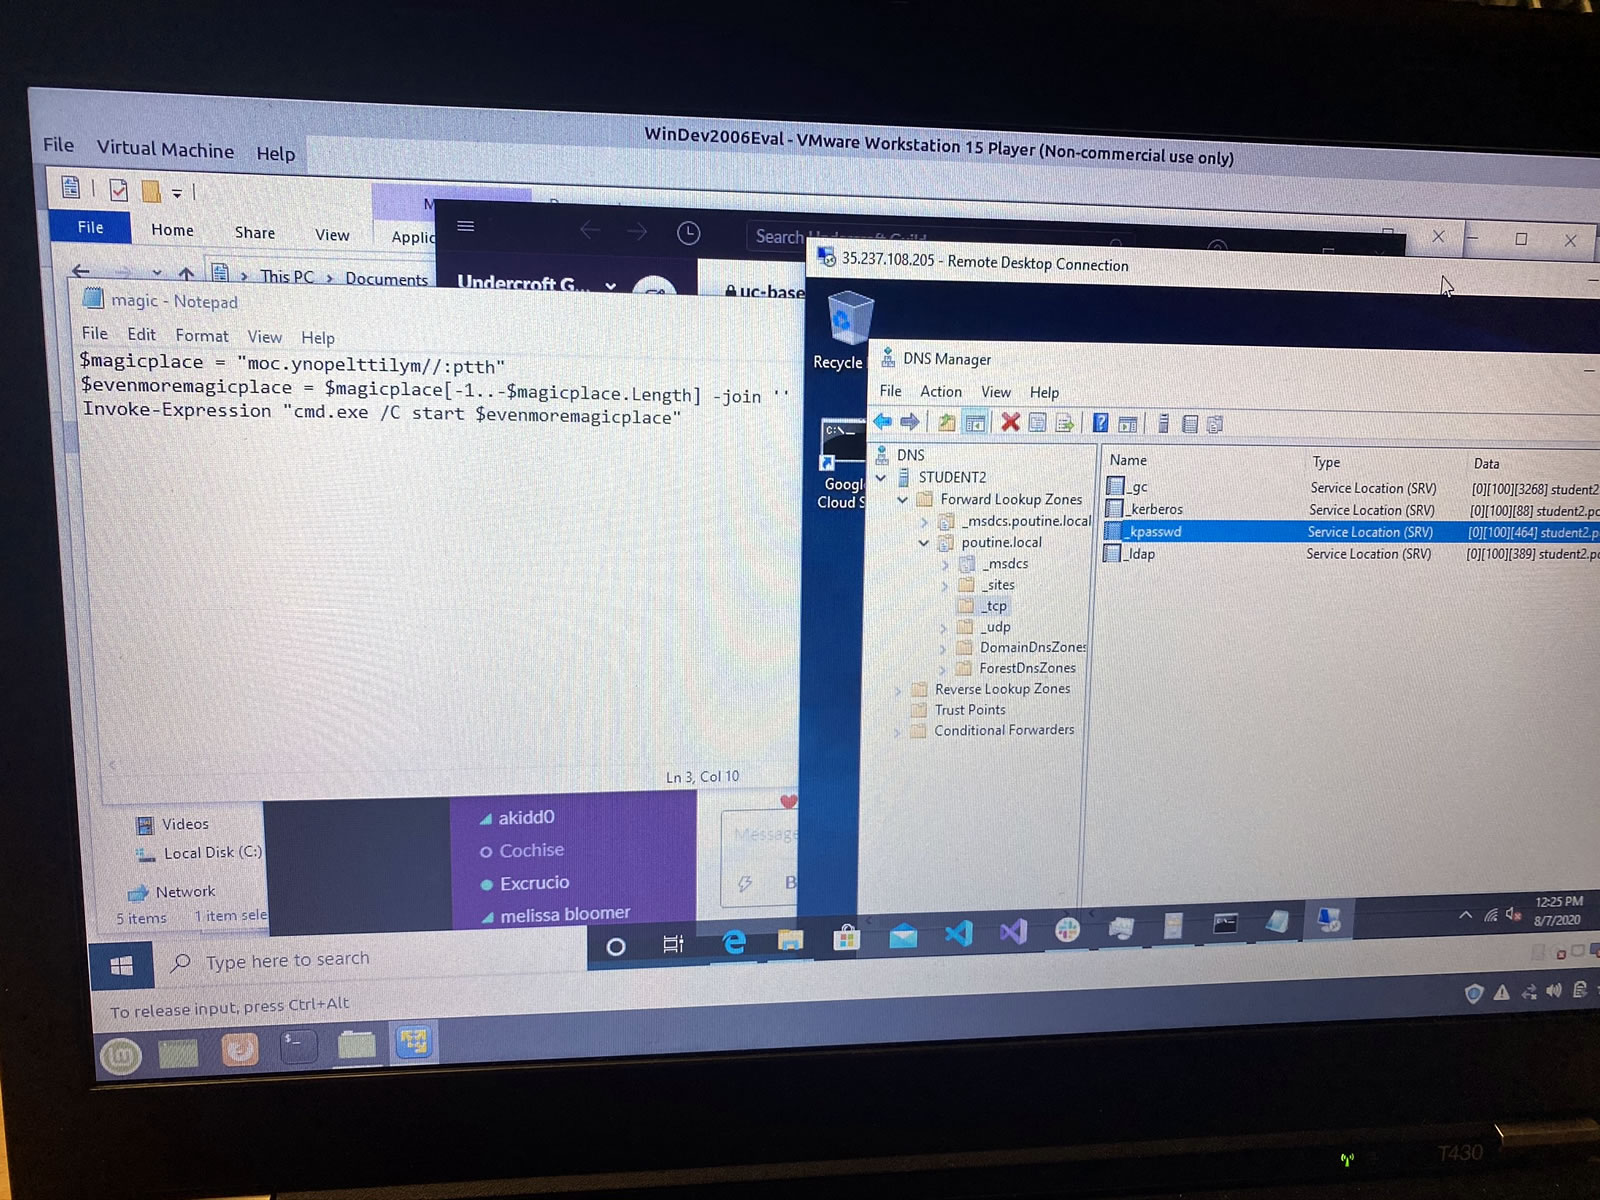
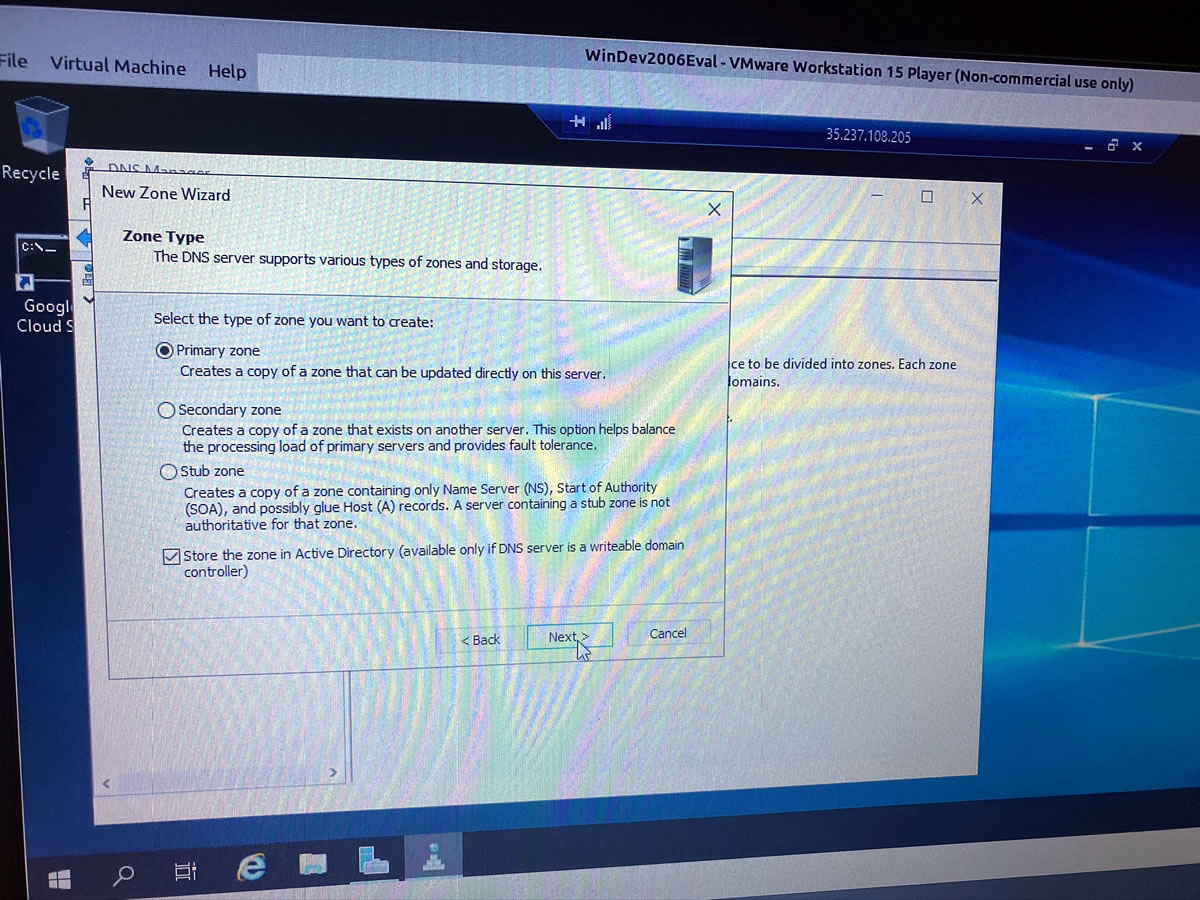
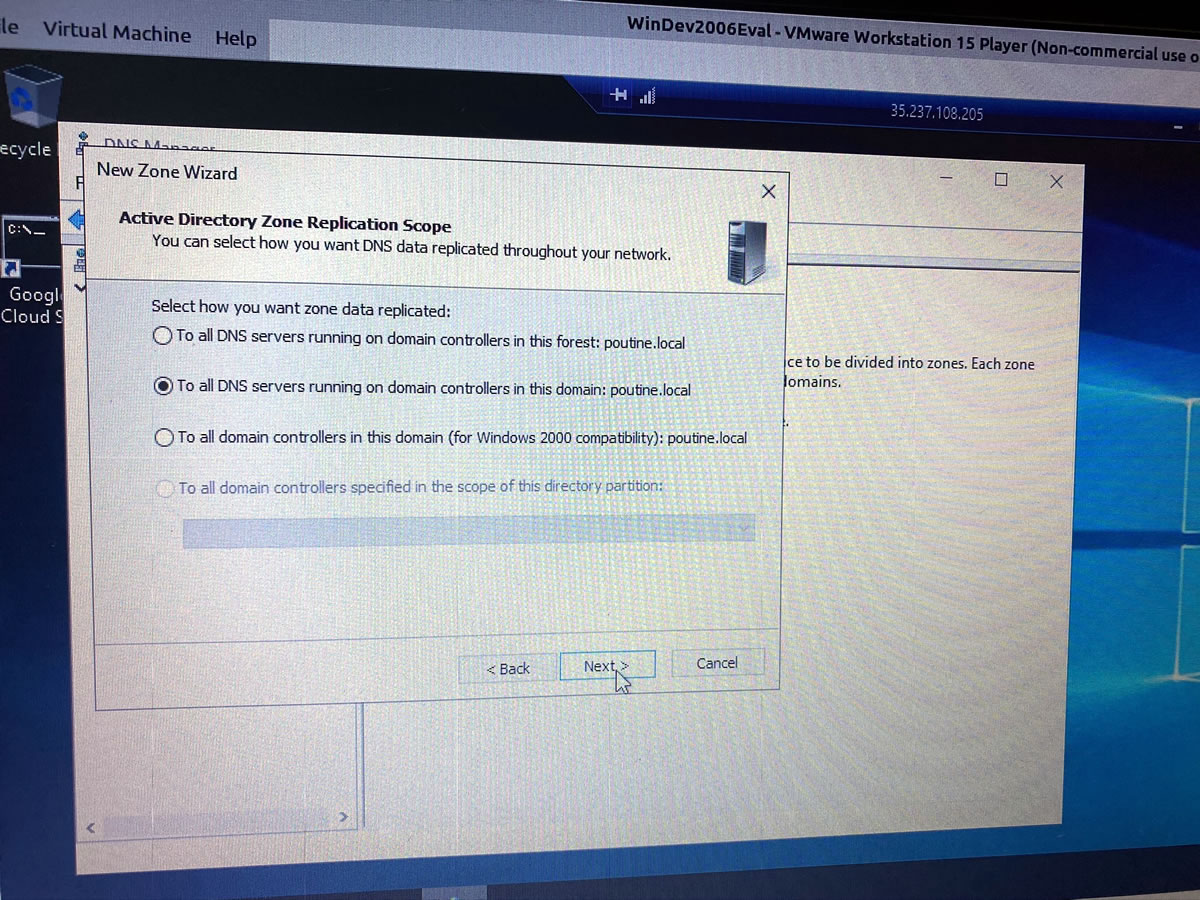
I can’t be as creative when setting up DNS…
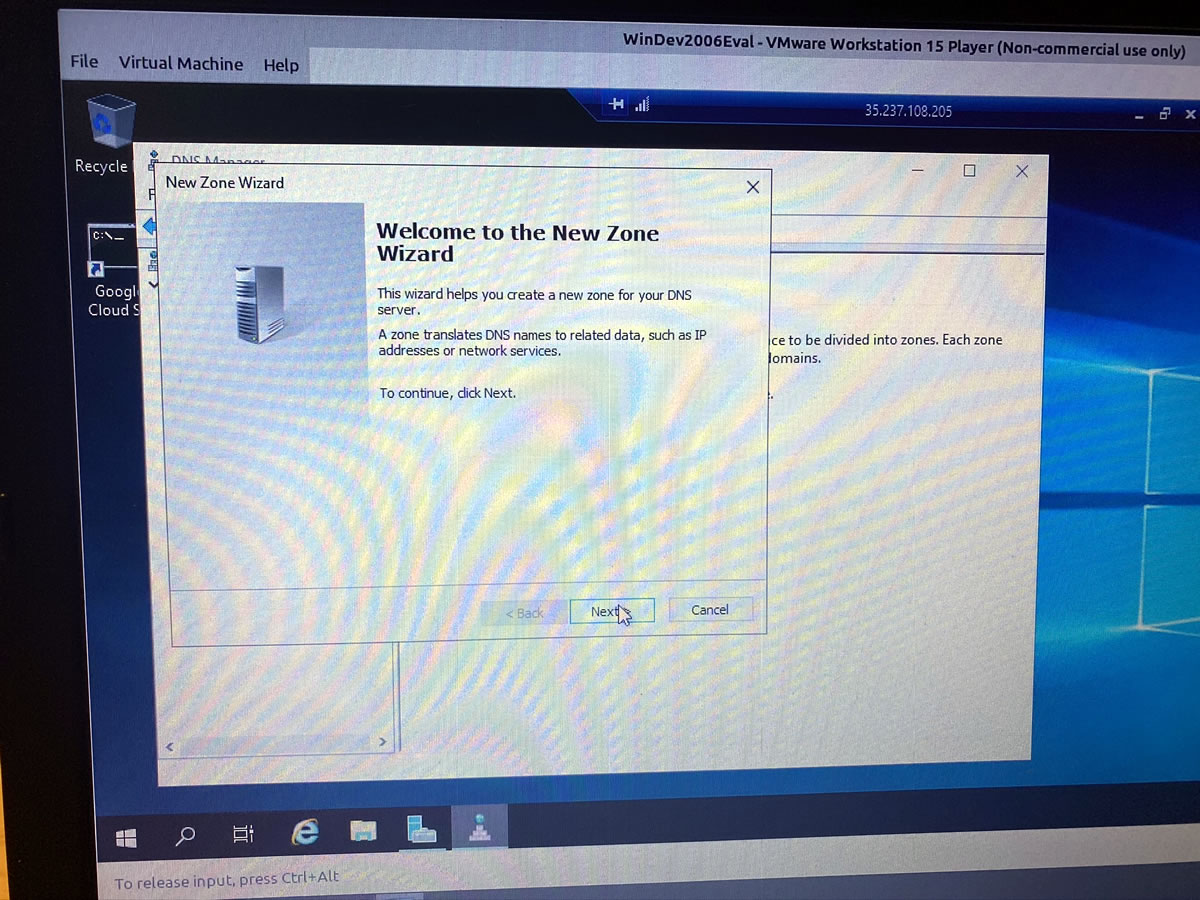
…but I can at least get it up and running:
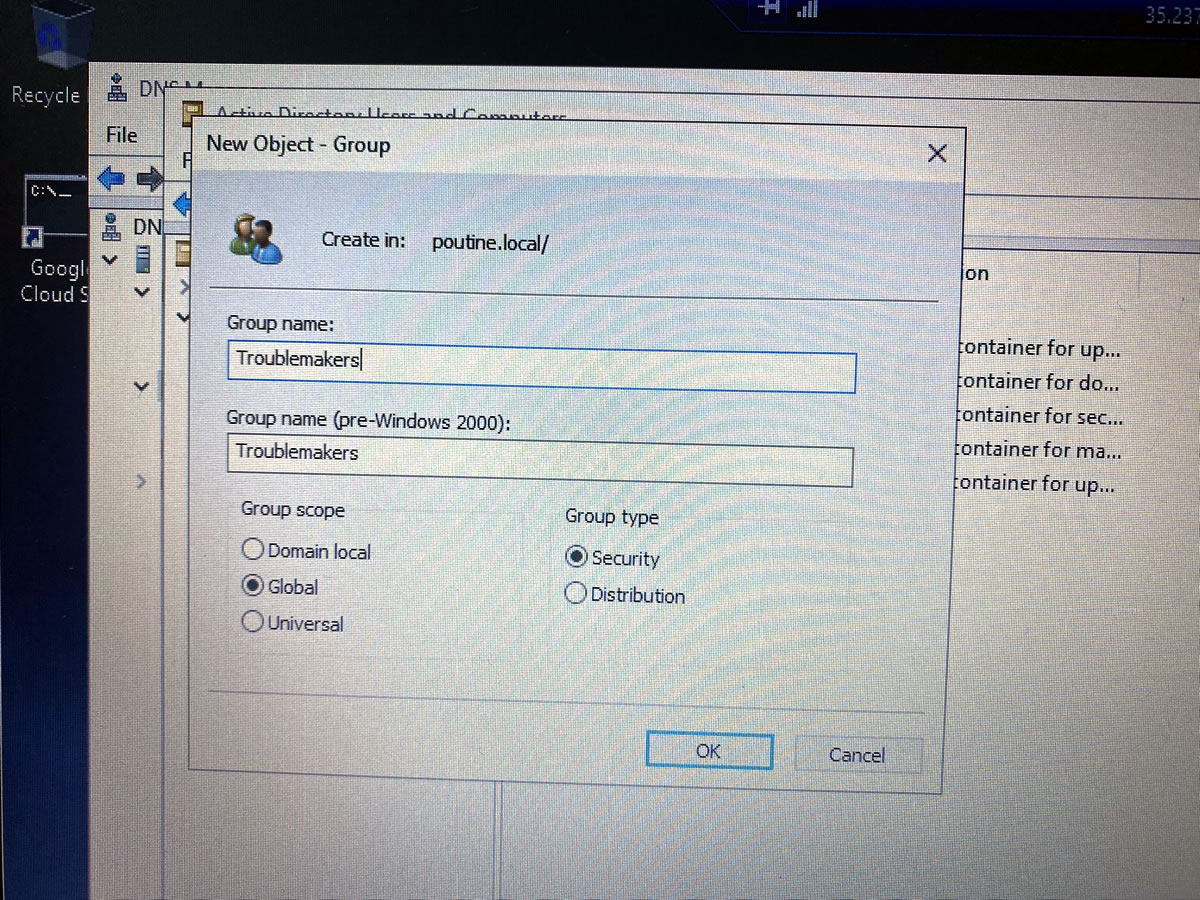
A good sysadmin has their users corralled into the appropriate groups:

On Monday, Week 4 — Information Security — begins. They promise that it’ll be the most intensive part of the course; in fact, they’ve added an extra hour to each day, which means the classes run from 8 to 5 instead of 8 to 4.

This should make Monday and Wednesday interesting, as I’m teaching the final 2 days of a Python course between 6 and 10 p.m. on those evenings.