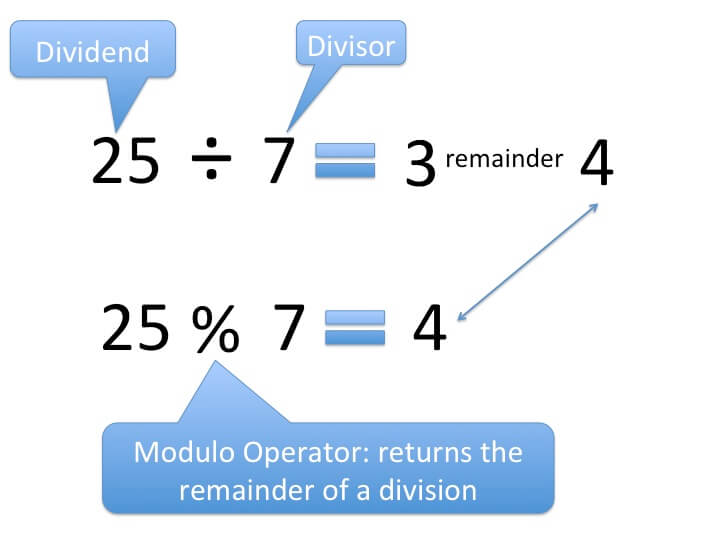
After reading the previous article on FizzBuzz solutions, Reginald “raganwald” Braithwaite, whom I know from my days as part of the Toronto tech scene, tweeted this:
FWIW, I prefer the “grit” solutions. No modulo, no faking/implementing modulo.
Why?
Because the original child’s game isn’t about “if a number is divisible by X.” It’s about “every Xth number.”
And directly implementing “every Xth” is actually interesting.
— Reginald Braithwaite (@raganwald) June 17, 2020
JenniferPlusPlus agrees:
Yeah, I agree. In fact I like “every Nth” counting problem better than the factorization problem it’s usually treated as. So I was disappointed at all the solutions that didn’t just count, like so
Int n, x
Next(){
If (x == 0) x=n
Return –x
}— Jenniferplusplus⚧🏳️🌈👩🏻💻 (@jennplusplus) June 17, 2020
They both make a good point. If you’re playing the FizzBuzz game as the original children’s game and not as an exercise to prove that you can actually write a program, you’d do it like this:
- Players sit in a circle, not unlike “the circle” in That ’70s Show.(Players don’t have to be high, unless it helps.)
- The player designated to go first says the number 1, and each player afterwards counts one number in turn. The next player in the circle says 2, and so on.
- However, for every third number, instead of calling out the number, the player whose turn it is should say “Fizz”.
- …and for every fifth number, instead of calling out the number, the player whose turn it is should say “Buzz”.
- The “Fizz” and “Buzz” rules, as the kids would say, stack. In other words, for every number that is both the third and fifth, the player needs to say “Fizz” followed by “Buzz”, or “FizzBuzz”.
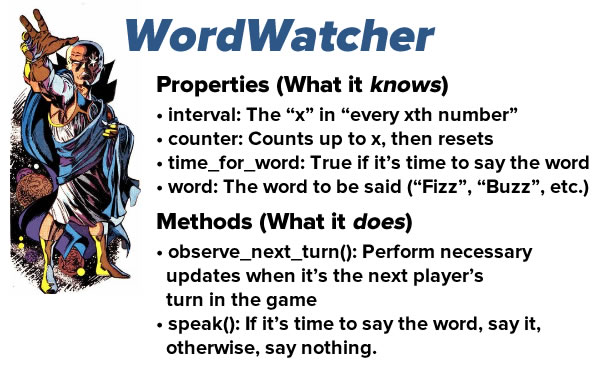
So in the spirit of the original game, I’ve put together a FizzBuzz solution that uses “watchers” to keep track of “every xth number”, with one watcher to keep track of when it’s time to say “Fizz”, and another for when it’s time to say “Buzz”. When it’s time to say “FizzBuzz”, they’ll work in tandem.
I created a class called WordWatcher, which can be summarized as shown below:
Here’s its code:
class WordWatcher:

  def __init__(self, interval, word):
    self.counter = 0
    self.time_for_word = False
    self.interval = interval
    self.word = word

  def observe_next_turn(self):
    self.counter += 1
    if self.counter == self.interval:
      self.counter = 0
      self.time_for_word = True
    else:
      self.time_for_word = False

  def speak(self):
    if self.time_for_word:
      return self.word
    else:
      return ""
Some notes about this code:
-
- For those of you who aren’t familiar with Python’s approach to class methods, the first parameter for every method in a class is
self. It’s the one parameter you don’t fill when calling a method, because Python calls it implicitly (seemingly in violation of Python’s general guideline that explicit is better than implicit). There’s a reason behind this, and it’s explained in this article: Understanding self in Python. - Also note that instance variables are declared and defined in the initializer method,
__init__(), and any reference to them is always preceded byself. - The
observe_next_turn()method is meant to be called as the fizzBuzz method proceeds to each new number. It updates the watcher’s internal counter and sets thetime_for_wordflag accordingly. - The
speak()method outputs the watcher’s word if it’s time to say the word, or an empty string otherwise.
- For those of you who aren’t familiar with Python’s approach to class methods, the first parameter for every method in a class is
For FizzBuzz, we’ll need to create two watchers:
- One to keep watch for every third turn, at which point it should say “Fizz”, and
- one to keep watch for every third turn, at which point it should say “Buzz”.
With the WordWatcher class defined, we can create these two watchers like so:
fizz_watcher = WordWatcher(3, "Fizz")
buzz_watcher = WordWatcher(5, "Buzz")
It will become handy to have these two watchers in the same place. Since the “ha ha only serious” joke about Python is that everything is a list, let’s put them into a list:
word_watchers = [fizz_watcher, buzz_watcher]
Let’s define a fizzBuzz() function that makes use of this list of word watchers:
def fizzBuzz(word_watchers = [], first = 1, last = 100):
  final_result = ""

  for number in range(1, 101):
    current_result = ""

    if len(word_watchers) > 0:
      # This part might need some explaining
      _ = [word_watcher.observe_next_turn() for word_watcher in word_watchers]
      words = map(lambda word_watcher : word_watcher.speak(), word_watchers)
      current_result += functools.reduce(lambda total, next_element : total + next_element, list(words))

    if current_result == "":
      current_result = str(number)

    final_result += current_result

    if number < last:
      final_result += ", "
    else:
      final_result += "."

  return final_result
If you’ve been following the FizzBuzz series of articles, most of this code will be familiar. The part that might need explaining is the part with the comment “This part might need some explaining”.
Explaining the part that needs explaining
Let’s look at the first of the three lines of code in that part:
_ = [word_watcher.observe_next_turn() for word_watcher in word_watchers]
- The
_on the left side of the=sign is a throwaway variable. It says “I don’t care about what you do on the other side of the=sign; only that you do something on the other side of the=sign”. - On the right side of the
=sign is a list comprehension, which is Python’s “show, don’t tell” way of building lists. This list comprehension simply says “call theobserve_next_turn()method of every object in the list”.
Let’s look at the next line:
words = map(lambda word_watcher : word_watcher.speak(), word_watchers)
- This line creates a map that converts the watchers in the list into the words they should say for this turn. If the current turn means that it’s time for any one of them to speak, the watcher will be mapped to the word it’s supposed to say. Otherwise, it will be mapped to an empty string.
And now, the final line:
current_result += functools.reduce(lambda total, next_element : total + next_element, list(words))
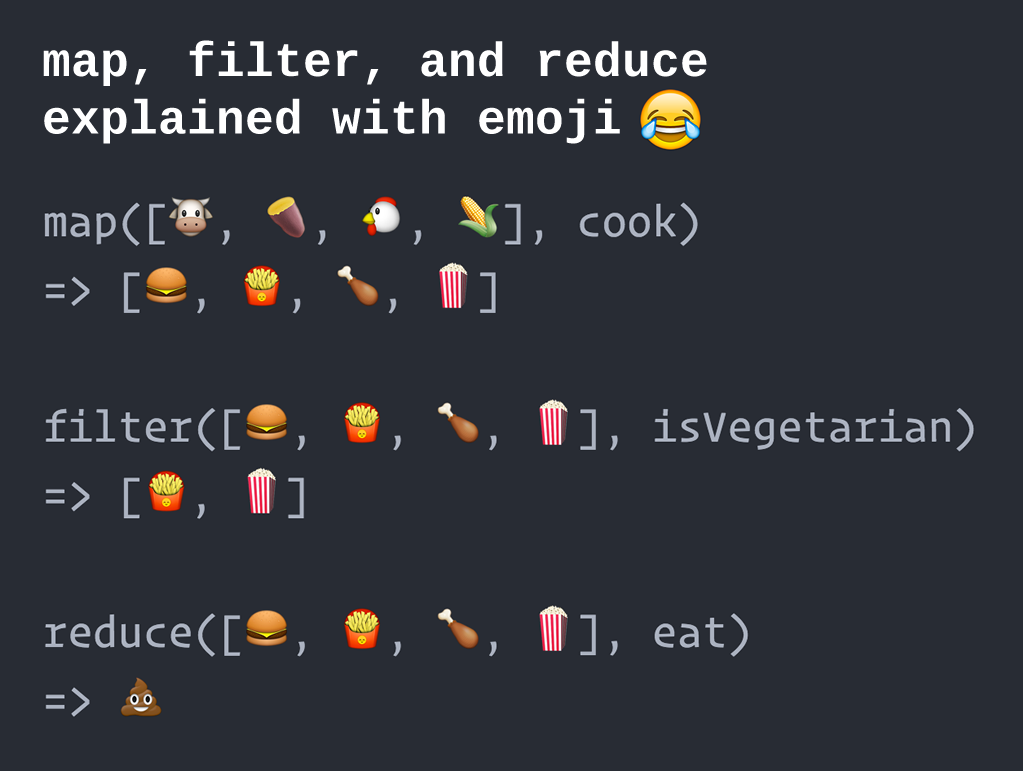
- For some reason,
map()comes built into Python, but you have to import thefunctoolslibrary in order to usemap()’s partner in crime,reduce(). Rememberreduce()is a functional programming thingy that takes a collection of items, performs some kind of calculation on that collection, and returns a single value (which you might call a reduction of the collection). - The first argument that I’ve provided to
reduce()is a lambda — a small function that isn’t given a name — that simply takes the current item in the list and adds it to the previous collected items. Applied over the entire list, it builds a “total”, which in this case is all the words output by the watchers’speak()methods concatenated together. - The second argument is the words map converted into a list. This is the list that the
reduce()method will operate on.
At the end of those three lines, current_result will contain one of the following:
- The empty string
- Fizz
- Buzz
- FizzBuzz
If current_result is still empty at this point, it means that it’s not time for any of the watchers’ words. If this is the case, the string version of the current number is concatenated to current_result:
if current_result == "":
      current_result += str(number)
Here’s the code in its entirety:
import functools

class WordWatcher:

  def __init__(self, interval, word):
    self.counter = 0
    self.time_for_word = False
    self.interval = interval
    self.word = word

  def observe_next_turn(self):
    self.counter += 1
    if self.counter == self.interval:
      self.counter = 0
      self.time_for_word = True
    else:
      self.time_for_word = False

  def speak(self):
    if self.time_for_word:
      return self.word
    else:
      return ""


def fizzBuzz(word_watchers = [], first = 1, last = 100):
  final_result = ""

  for number in range(1, 101):
    current_result = ""

    if len(word_watchers) > 0:
      _ = [word_watcher.observe_next_turn() for word_watcher in word_watchers]
      words = map(lambda word_watcher : word_watcher.speak(), word_watchers)
      current_result += functools.reduce(lambda total, next_element : total + next_element, list(words))

    if current_result == "":
      current_result += str(number)

    final_result += current_result

    if number < last:
      final_result += ", "
    else:
      final_result += "."

  return final_result

fizz_watcher = WordWatcher(3, "Fizz")
buzz_watcher = WordWatcher(5, "Buzz")
word_watchers = [fizz_watcher, buzz_watcher]
print(fizzBuzz(word_watchers))
And for completeness’ sake, here’s the test file:
import pytest
from fizzbuzz_with_watchers import fizzBuzz, WordWatcher

plain_1_to_100_result = "1, 2, 3, 4, 5, 6, 7, 8, 9, 10, 11, 12, 13, 14, 15, 16, 17, 18, 19, 20, 21, 22, 23, 24, 25, 26, 27, 28, 29, 30, 31, 32, 33, 34, 35, 36, 37, 38, 39, 40, 41, 42, 43, 44, 45, 46, 47, 48, 49, 50, 51, 52, 53, 54, 55, 56, 57, 58, 59, 60, 61, 62, 63, 64, 65, 66, 67, 68, 69, 70, 71, 72, 73, 74, 75, 76, 77, 78, 79, 80, 81, 82, 83, 84, 85, 86, 87, 88, 89, 90, 91, 92, 93, 94, 95, 96, 97, 98, 99, 100."
fizzBuzz_1_to_100_result = "1, 2, Fizz, 4, Buzz, Fizz, 7, 8, Fizz, Buzz, 11, Fizz, 13, 14, FizzBuzz, 16, 17, Fizz, 19, Buzz, Fizz, 22, 23, Fizz, Buzz, 26, Fizz, 28, 29, FizzBuzz, 31, 32, Fizz, 34, Buzz, Fizz, 37, 38, Fizz, Buzz, 41, Fizz, 43, 44, FizzBuzz, 46, 47, Fizz, 49, Buzz, Fizz, 52, 53, Fizz, Buzz, 56, Fizz, 58, 59, FizzBuzz, 61, 62, Fizz, 64, Buzz, Fizz, 67, 68, Fizz, Buzz, 71, Fizz, 73, 74, FizzBuzz, 76, 77, Fizz, 79, Buzz, Fizz, 82, 83, Fizz, Buzz, 86, Fizz, 88, 89, FizzBuzz, 91, 92, Fizz, 94, Buzz, Fizz, 97, 98, Fizz, Buzz."

def test_fizzBuzz_null():
  result = fizzBuzz()
  assert result == plain_1_to_100_result, f"The watcher solution returned the wrong result:\nExpected: {plain_1_to_100_result}\nActual: {result}."

def test_fizzBuzz_fizz_and_buzz():
  fizz_watcher = WordWatcher(3, "Fizz")
  buzz_watcher = WordWatcher(5, "Buzz")
  word_watchers = [fizz_watcher, buzz_watcher]
  result = fizzBuzz([fizz_watcher, buzz_watcher])
  assert result == fizzBuzz_1_to_100_result, f"The watcher solution returned the wrong result:\nExpected: {fizzBuzz1To100Result}\nActual: {result}."
You can download fizzbuzz_with_watchers.py and test_fizzbuzz_with_watchers.py here (2KB, zipped folder with 2 Python files).
That’s a lot of fuss for Fizzbuzz. Why did you do all that?
- Reginald asked me to, and I’ve known and respected him for ages, and JenniferPlusPlus seconded the request.
- Wait until you see what customers ask you to do.
Did any of this stuff fly over your head?
- Don’t feel bad. I had the same trouble when I first learned functional programming, and that was back in 1991, when the computers that ran functional language interpreters were in labs. I spent a lot of time in Queen’s University’s DEClab, which was full of machines that were cutting edge at the time made by a vendor that no longer exists. Computer time, as well as info on any kind of programming, never mind functional programming, was a lot harder to come by. (In case you were wondering, the language we learned was Miranda.)
- If you’ve never worked in Python, some of it can be quite weird. It does eventually make sense.
- Let me know, either via email or in the comments, if there’s anything you’d like me to cover in greater detail.
Do you have an alternate solution?
I’ve love to hear about it and present it here! Again, let me know via email or in the comments.
What’s next
An elegant JavaScript implementation.
Previously, in the “Programmer interview challenge” series
- Programmer interview challenge 1: Anagram
- Programmer interview challenge 1, revisited: Revising “Anagram” in Python and implementing it in JavaScript
- Programmer interview challenge 1, revisited again: “Anagram” in Swift, the easy and hardcore way
- Programmer interview challenge 1, revisited once more: “Anagram” in Ruby and C#
- Programmer interview challenge 2: The dreaded FizzBuzz, in Python
- Programmer interview challenge 2, part 2: Functional FizzBuzz
- Programmer interview challenge 2, part 3: FizzBuzz, minus the modulo operator, plus grit