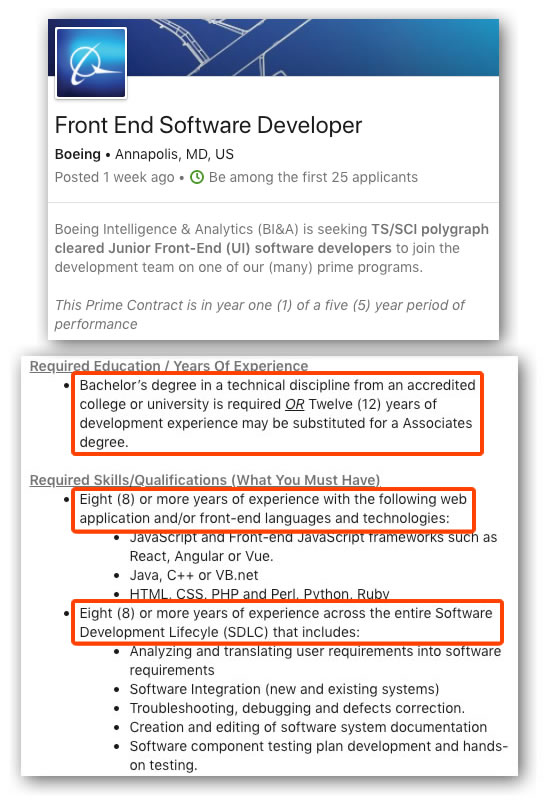
Take a look at the snippets above, which come from the job description on LinkedIn for a junior front-end developer at Boeing. I’ve highlighted key parts in red.
Note those requirements:
- Either a bachelor’s degree in a technical field or 12 years’ development experience? They’re seriously overestimating what you learn in a computer science undergrad program and seriously underestimating what you learn in 12 years of development and what changes in that time frame. 12 years ago, IE was the dominant browser, Chrome hadn’t yet been released, the smartphone as we know it was new, and Node wouldn’t exist for another year.
- Eight years’ experience for a junior developer position? Only one of the JavaScript frameworks they list has been around longer than 8 years: Angular dates back to October 2010, making it 9 years old, React will turn 7 at the end of this month, and Vue is 6.
Those are some pretty demanding requirements, especially for a company whose reputation is trash right now.

Tap the image to see it at full size.
The amount of experience that Boeing wants its junior front-end developers — remember, that’s 8 years — is almost half a year longer than the period between the launch of Boeing 737 MAX project (the one whose software gave it a tendency to nose-dive) and the plane being grounded worldwide (August 2011 to March 2019).
Half of all programmers have less than five years’ experience

Robert C. Martin — he’s known as “Uncle Bob”, who’s known for being one of the guys who co-wrote and signed the Agile Manifesto, among other things — came up with a reasonably good estimate of how quickly the number of programmers grew between 1974 and 2014:
- He estimates that there were maybe 100,000 programmers in the world in 1974. He says he might be off by an order of magnitude, and he’s probably overestimating. Remember, in 1974, there were maybe one or two computers that you could get for personal use in kit form; computers like the Apple ][ and Radio Shack TRS-80 were three years away.
- He estimates that there were 22 million programmers in the world in 2014. His estimate is based on this 2014 IDC study.
Based on these estimates, the number of programmers grew 220 times over 40 years. “That’s a growth rate of 14.5% per year, or a doubling rate of five years,” he writes.
There’s a very important corollary to all this, and Martin has said it in just about every “Future of Programming” talk he’s given over the past decade: If the number of all programmers doubles every five years, then half of all programmers have less than five years experience. It’s basic geometric math.
If you’ve been working in a field longer than half the people in it, you’re not a junior.
Job requirements and gatekeeping

This kind of nonsense isn’t limited to Boeing. In March 2018, TalentWorks published their findings from looking at nearly 100,000 job “entry-level” listings: 61% of them required 3 or more years of experience.
They also shared these observations:
- The amount of experience required in posted jobs seems to be growing 2.8% per year. They write: “That means your younger sister (or brother) will need ~4 years of work experience just to get their first job.”
- 3, 5, and 8 seem to be the “magic numbers.” Most “entry-level” jobs require 3 years’ experience, while mid-level ones require 5 years, and 8 years will put you in the running for a senior position. Keep in mind that these number inflate by almost three percent per annum!
- Even for senior roles, most companies (presumably not Boeing) don’t ask for 10 or more years’ experience. This isn’t surprising, given the fact bomb I’m about to drop on you…
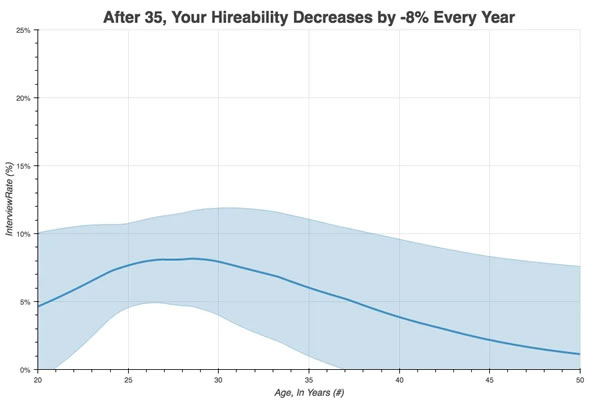
Graph by Talentworks. Tap the graph to see the source.
TalentWorks has observed that for every year after the age of 35, your chances of being hired drop by 8%. The “sweet spot,” according to their data, is between the ages of 28 and 35, a golden age when you get a hireability boost of 25%.
In other words, by the time you accumulate enough experience to be a senior, age discrimination starts coming into play.
What to do when facing “experience inflation”
- Apply anyway. TalentWorks have observed that if you’re within 2 years of the experience they’re asking for, hiring managers will consider you “close enough”. You’ll probably be assisted by the fact that the inflated requirements may scare off other people who don’t meet them, and people who meet or exceed the requirements will find the job “too junior” for them.
- Use the power of the side hustle. If you’ve got the time, energy, and bandwidth, freelance work may be the best way for you to build up the experience that people are asking for.
- Do things that set you apart from the crowd. What those things are will vary from person to person. In my case, I go with having co-written a book on iOS development and a video course on iOS augmented reality programming, a couple of iPhone apps and an Apple Watch app in the App Store, running a couple of meetups, and managing Tampa Bay’s weekly listing of tech events. These sorts of things can help make up for missing experience requirements, especially if those requirements are bogus anyway.
Thanks to Liz Tiller for the find!