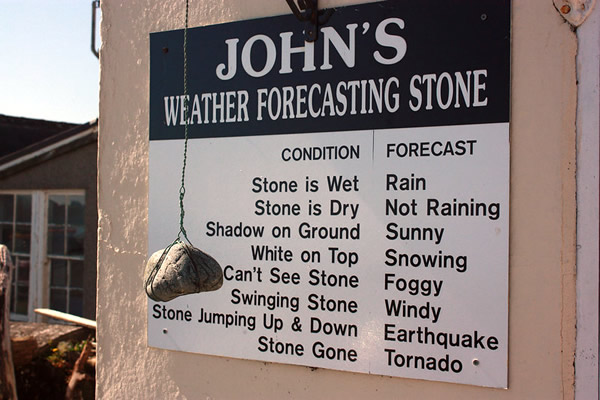
Creative Commons photo by Tim Rogers. Click to see the source.
Whenever a picturesque small town located by a body of water gets popular with tourists, someone eventually sets up a “weather forecasting stone” like the one pictured above. It’s not all that different from a lot of what a lot of programs do: For a given input, provide corresponding output.
Prior to becoming a senior developer at Lilypad/Fintech, I took a consulting gig where my mission was to bring an application to a more workable condition. During that time. I saw a lot of “weather forecasting stone” code, and in this article, I’ll show you what I did with it.
The most common approach: if / else if
Most of the “weather forecasting stone” code took the form of good ol’ if / else if. Here’s the JavaScript implementation:
let forecast;
if (stoneCondition == 'wet') {
  forecast = 'Rain';
} else if (stoneCondition == 'dry') {
  forecast = 'Not raining';
} else if (stoneCondition == 'shadow') {
  forecast = 'Sunny';
} else if (stoneCondition == 'white') {
  forecast = 'Snowing';
} else if (stoneCondition == 'unseen') {
  forecast = 'Foggy';
} else if (stoneCondition == 'swinging') {
  forecast = 'Windy';
} else if (stoneCondition == 'jumping') {
  forecast = 'Earthquake';
} else if (stoneCondition == 'gone') {
  forecast = 'Tornado';
}
Aside from not handling the case where stoneCondition doesn’t match any of the expected values, this code works just fine. It’s reasonably readable, but it doesn’t have the conciseness of the the sign in the photo. It reads more like this:
- Is the stone wet?
- Otherwise, is the stone dry?
- The forecast is “Not raining”.
- Otherwise, is the stone casting a shadow?
- Otherwise, is the stone casting a shadow?
- Otherwise, is the stone white on top?
- The forecast is “Snowing”.
- Otherwise, is the stone unseen?
- Otherwise, is the stone swinging?
- Otherwise, is the stone jumping?
- The forecast is “Earthquake”.
- Otherwise, is the stone gone?
- The forecast is “Tornado”.
Another approach: switch
In the same application, I saw more “weather forecasting stone” code, and from all appearances, it appeared that it was written by another programmer. This one preferred to keep variable names as short as possible, often condensing them to remove as many vowels as possible. They also were deeply in love with the switch statement. Their code, as implemented in JavaScript, looked like this:
let frcst;
switch (stnCndtn) {
  case 'wet':
    frcst = 'Rain';
    break;
  case 'dry':
    frcst = 'Not raining';
    break;
  case 'shadow':
    frcst = 'Sunny';
    break;
  case 'white':
    frcst = 'Snowing';
    break;
  case 'unseen':
    frcst = 'Foggy';
    break;
  case 'swinging':
    frcst = 'Windy';
    break;
  case 'jumping':
    frcst = 'Earthquake';
    break;
  case 'gone':
    frcst = 'Tornado';
    break;
  default:
    frcst = 'Unknown';
}
The switch statement in JavaScript is modeled after the one in C. This means that a break statement has to be added to the end of each case to prevent fall-through. You should think of it as more of a goto statement in disguise rather than a structured branching statement.
Note that switch requires a default clause to handle the case when none of the other cases apply. In the code above, I’ve set it so that any case we haven’t accounted for causes the forecast to be “Unknown”. In the circumstance where the code should never have to deal with an unexpected case, I’d have the default throw an exception or similar red flag that we should catch during development.
It works, but it’s even wordier than the if / else if example, thanks to the required break statement on every clause except the default one. Once again, it’s not as concise as the sign, because it reads like this:
- Is the stone wet?
- The forecast is “Rain”.
- Stop here.
- Is the stone dry?
- The forecast is “Not raining”.
- Stop here.
- Is the stone casting a shadow?
- The forecast is “Sunny”.
- Stop here.
- Is the stone casting a shadow?
- The forecast is “Sunny”.
- Stop here.
- Is the stone white on top?
- The forecast is “Snowing”.
- Stop here.
- Is the stone unseen?
- The forecast is “Foggy”.
- Stop here.
- Is the stone swinging?
- The forecast is “Windy”.
- Stop here.
- Is the stone jumping?
- The forecast is “Earthquake”.
- Stop here.
- Is the stone gone?
- The forecast is “Tornado”.
- Stop here.
- And if you’ve made it this far:
- The forecast is “Unknown”.
My preferred approach: Lookup tables
While both approaches work, I was still looking to make the code as simple to read as the sign (and in the process, also make it simple to maintain and modify). I wanted code that looked like this table:
| If the stone’s condition is… |
…then the forecast is: |
| Wet |
Rain |
| Dry |
Not raining |
| Casting a shadow |
Sunny |
| White on top |
Snowing |
| Unseen |
Foggy |
| Swinging |
Windy |
| Jumping |
Earthquake |
| Gone |
Tornado |
| None of the above |
Unknown |
Here’s my lookup-table based implementation of the “weather forecasting stone” sign, in JavaScript
const FORECAST_LOOKUP_TABLE = {
  'wet'      : 'Rain',
  'dry'      : 'Not raining',
  'shadow'   : 'Sunny',
  'white'    : 'Snowing',
  'unseen'   : 'Foggy',
  'swinging' : 'Windy',
  'jumping'  : 'Earthquake',
  'gone'     : 'Tornado',
  'default'  : 'Unknown'
}
const forecastLookup = (stoneCondition) =>
  FORECAST_LOOKUP_TABLE[stoneCondition] || FORECAST_LOOKUP_TABLE['default']
This code gives you a couple of things:
FORECAST_LOOKUP_TABLE, an object that acts as a lookup table. Its property keys are the set of strings for all the possible stone conditions, and its values are the forecasts that correspond to each condition.forecastLookup, a function that makes it easier to use the lookup table.
With this code, you can get the forecast using the lookup table…
let forecast = FORECAST_LOOKUP_TABLE['wet'];
…or to handle unexpected stone conditions, get it using the forecastLookup() function:
let forecast1 = forecastLookup('wet'); // results in "Rain"
let forecast2 = forecastLookup('covered in gravy'); // results in "Unknown"
The table-based solution is easier to read and maintain than the if / else and switch methods. It also requires fewer lines, which is important if you follow Corbató’s Law:
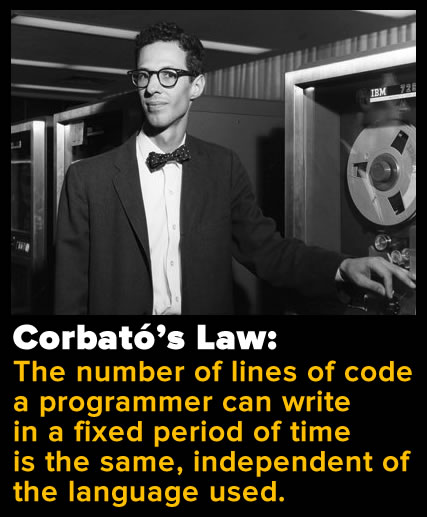
Simply put, what Corbató is saying is that every day, you only have so many lines of code in you on any given day. The corollary to Corbató’s Law is that for maximum productivity, you should code in such a way that uses as few lines as possible while maintaining readability and maintainability. I think my solution does just that!