You’ve probably heard of Microsoft’s Web Platform Installer, a free-as-in-beer tool that makes it a snap to install a variety of Microsoft and Open Source web applications and development tools, ranging from “The Usual Suspects”, such as Visual Web Developer, IIS and SQL Server 2008 Express to stuff you might not expect, such as PHP and WordPress. It makes installing these goodies a simple of matter of checking the items you want and clicking the Install button. (While the old way of installing PHP on Windows wasn’t rocket science, it involved enough steps and configuration changes to justify my writing a whole article on the topic in an old developer blog of mine.)
One necessary thing that the Web Platform Installer doesn’t do for you – and I assume it’s because of licensing restrictions of one kind or another – is install MySQL, which many PHP apps, including a number that the Web Platform Installer installs, use. You’ll be told that you need to install MySQL, but it leaves installing it up to you.
Hence this article, where I walk through the steps of installing MySQL Server 5.1 on Windows for a developer machine. Whether you just need PHP and MySQL so that you can experiment with WordPress template designs or are the “I build on Windows, but deploy on Linux” type or are developing for a server setup where IIS is serving both ASP.NET and PHP apps (and yes, IIS does that!), you’re going to want MySQL on your dev box.
Get the Installer
The version we’re interested in is the free-as-in-both-speech-and-beer Community Edition, which is available at the MySQL site. Here are the links to the installers:
- Here are the links for the Windows 32-bit installers
- Here are the links for the Windows 64-bit installers
Both these options provide you with three different installers. I recommend getting the .msi (Windows Installer) as it’s the lowest-headache option. It’s also the version I use in this walkthrough.
By the way, the screenshots provided in this walkthrough are from my actual installation process on my laptop, which runs the 64-bit edition of Windows 7 Beta, Build 7000 (I’m not installing the Release Candidate until later this week). I’m installing the 64-bit version of MySQL Server 5.1 Community Edition, but whether you’re installing the 32- or 64-bit version on Windows XP, Vista or 7, your experience should be roughly the same.
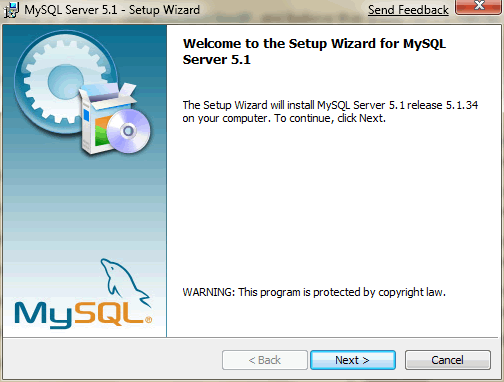
Here’s what you should see when you launch the installer:
Which Setup Type?
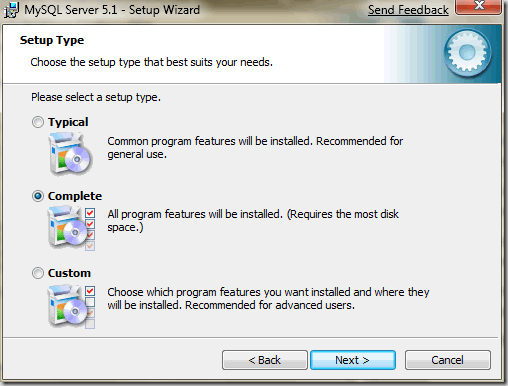
The first choice you have to make is the type of setup you want:
The three choices offered are:
-
Typical: Installs the basic components for MySQL to the default installation path,
C:\Program Files\MySQL\MySQL Server 5.1\, including:-
The MySQL server
-
The mysql command-line client
-
Other command-line utilities like mysqldump, myisamchk and more.
-
-
Complete: Installs all the MySQL components to the default installation path,
C:\Program Files\MySQL\MySQL Server 5.1\, including those listed in the Typical setup, plus:-
Documentation
-
The embedded server library
-
The benchmark suite
-
Support scripts
-
-
Custom: Gives you complete control over the components installed and the installation path.
Although the components in the Typical setup will work fine for most web development purposes, I like having the docs handy, so I went with the Complete setup.
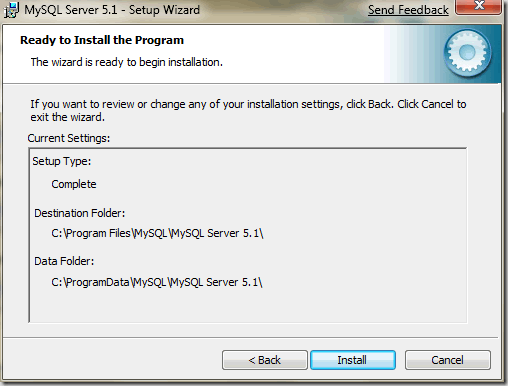
Once you’ve selected the setup, you’ll be shown a confirmation window like the one below:
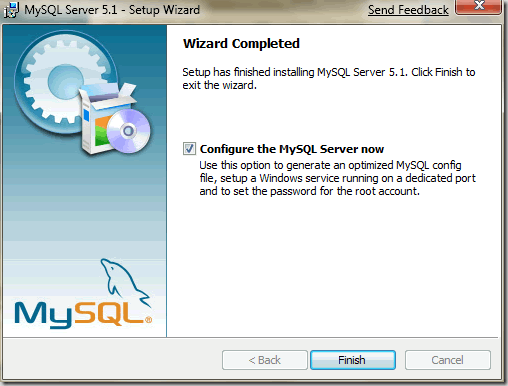
Once MySQL has been installed, you’ll see the window below:
You’ll be given the choice to configure MySQL server, which I recommend. You can do so by leaving the Configure the MySQL Server now checkbox checked and then clicking Finish.
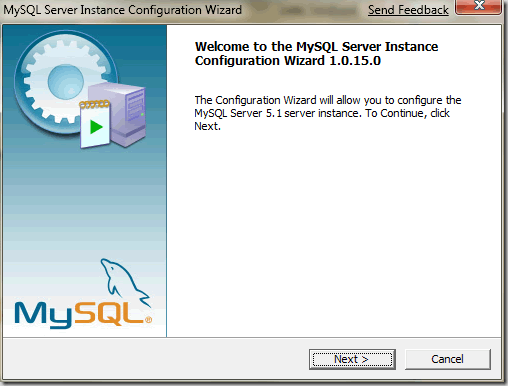
The Configuration Wizard
Here’s the first window of the Configuration Wizard:
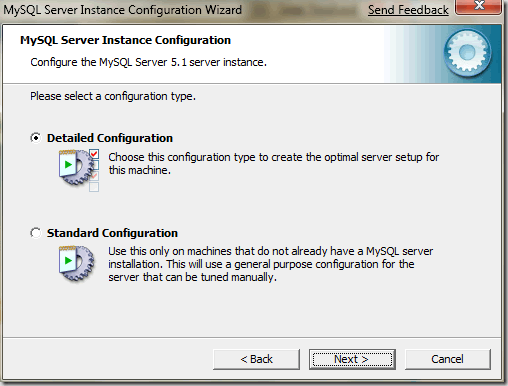
Which Configuration?
You’ll be asked which configuration type to use:
The two choices offered are:
-
Detailed Configuration: Gives you fine-grained control over the configuration process. I’m familiar with the options being offered, so this is the option I chose. If you choose this option, you will have to make some additional choices in the windows that follow.
-
Standard Configuration: If you’re new to MySQL and need a server configured as a single-user developer machine, this configuration should suit your needs. If you choose this option, you’ll skip the next few steps and go directly to the Root Password window.
Detailed Configuration Options
If you chose to use the Detailed Configuration, you will see the following windows.
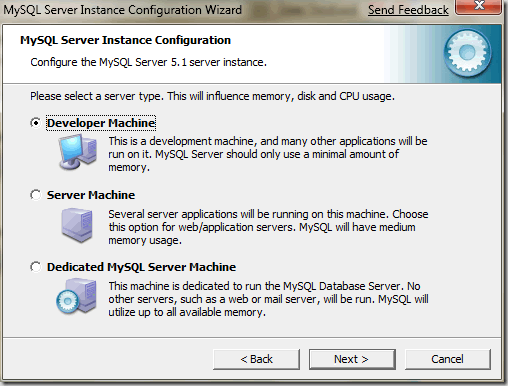
Server Type
The first choice in the Detailed Configuration is Server Type:
The three options are:
- Developer Machine: This setup assumes that MySQL will be running on a machine used to write applications, where the database will be used for basic developer proofs of concept and simple testing. MySQL will be configured to use minimal system resources. This is the option I selected.
- Server Machine: This setup is for server systems where MySQL will be running along with other server applications such as a web server, mail server, FTP server and so on. MySQL will be configured to use a moderate portion of the system resources.
- Dedicated MySQL Server Machine: This is for machines that will be running only MySQL. in this configuration, MySQL will be configured to use all available system resources.
Storage Engines
The next choice to make is selecting the storage engines to be used: MyISAM or InnoDB. If you’re not familiar with MySQL, you’re probably asking “What’s the difference between InnoDB and MyISAM?”
Of the two engines, MyISAM is the older of the two, and the default engine. The general consensus is that in most cases, it’s faster than InnoDB for typical CRUD operations. It supports up to around 4 billion rows of data and 64 indexed fields per table. MyISAM uses table-level locking, which means than when a row is being updated, the table is locked and no other operations can update any other rows until the first row is updated and the lock on the table is released.
InnoDB is the newer (and some would say sexier) engine. It’s called “the transactional one”, and it’s built with data integrity in mind. It supports foreign key constraints, meaning that changes to a table (say, “Actors”) that references another table (say, “Movies”) are allowed only if those changes leave both in a valid state. For example, you wouldn’t be able to delete a row from the “Actors” table if it referenced any rows in the “Movies” table (that is, you can’t remove an actor from the database if s/he’s listed as starring in any movies). It also supports row-level locking, which means that so that more than one row can be updated at the same time.
The general guidelines for choosing between MyISAM and InnoDB are as follows:
-
Will your use of the database be mostly reading? That is, will you be doing mostly select operations and few insert, update and delete operations? Then you want MyISAM.
-
Will your use of the database involve at least as many writes as reads, if not more? That is, will you be doing as many insert, update and delete operations as select operations? Then you want InnoDB.
-
Do you need full-text search? You want MyISAM.
-
Do you need to conserve disk space and RAM? You want MyISAM.
-
Does the idea of using a non-SQL Server database irk you? You might feel better going with InnoDB, since it has the row-level locking, transaction safety and generally more “relational” feel.
Keep in mind that when adding a table to a MySQL database, you can specify which engine it uses. Lately, I’ve been in the habit of specifying InnoDB for most tables except those on which I want to provide full-text search; for those, I’ve specified MyISAM. (For more on specifying engines when creating tables, see MySQL’s page on the create table command.)
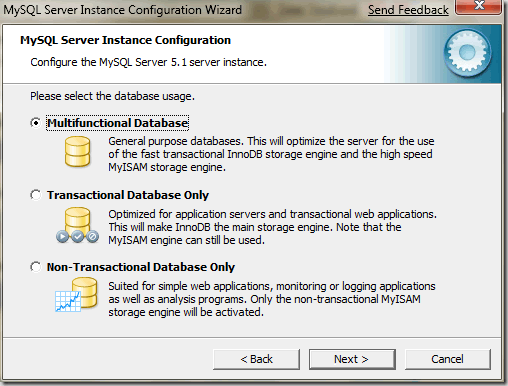
Now that I’ve done a quick review of MyISAM and InnoDB, let’s look at the storage engine choices that the Configuration Wizard offers.
The three choices are:
-
Multifunctional Database: This enables both InnoDB and MyISAM storage engines and divides resources evenly between the two. This is the recommended option for developers who use both storage engines on a regular basis. It’s the option I chose, since it yields the most flexibility.
-
Transactional Database Only: This enables both InnoDB and MyISAM storage engines, but dedicates more resources to the InnoDB engine.
-
Non-Transactional Database Only: This option completely disables InnoDB; all resources are dedicated to the MyISAM storage engine.
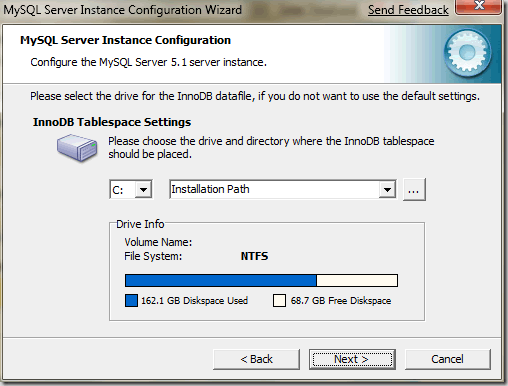
If you chose Multifunctional Database or Transactional Database Only, you’ll be presented a windows asking you where to put the InnoDB tablespace:
I went with the default, which puts the tablespace in the MySQL installation directory.
Concurrent Connection Settings
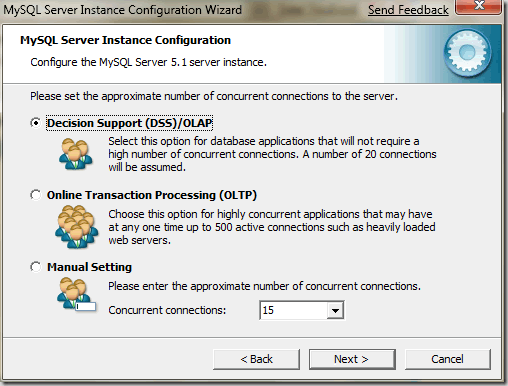
The next window is all about the number of concurrent connections supported:
The three choices offered are:
-
Decision Support (DSS)/OLAP: This assumes an average of around 20 concurrent connections, with a maximum of 100 concurrent connections supports. I chose this option, as it works for most development scenarios.
-
Online Transaction Processing: This supports up to 500 concurrent connections and is generally for production use.
-
Manual Setting: This lets you specify a specific number of connections. I’ve seen it used mostly for testing.
Networking Options
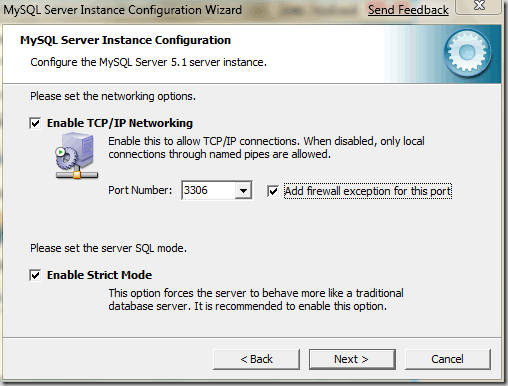
The next window concerns itself with networking options:
Port 3306 is the default MySQL port, so that’s what I went with; I also checked the Add firewall exception for this port checkbox. I also left the Enable Strict Mode checkbox checked.
Default Character Encoding
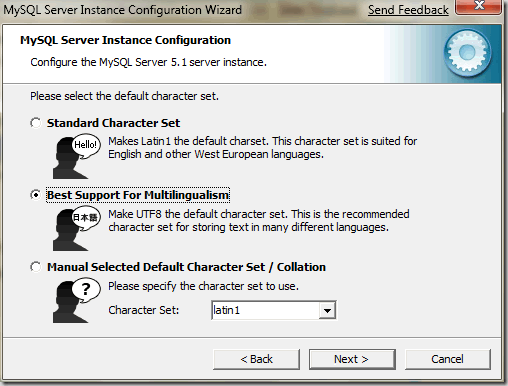
Now it’s time to select the default character encoding:
You’re given a number of options, but I suggest you go with my choice. I chose UTF-8 because it’s the encoding of the Web.
Service Options
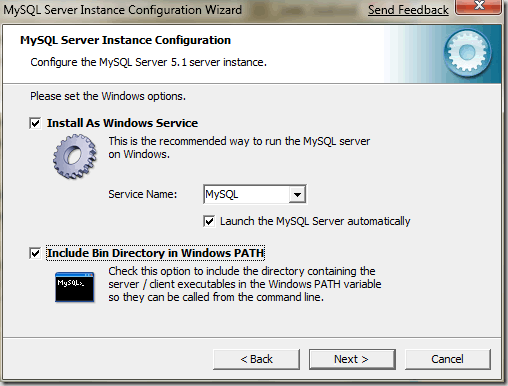
Here’s the next window:
I strongly recommend:
-
Checking the Install As Windows Service checkbox. When installed as a Windows service, MySQL can be started automatically at system startup and restarted in the event of a service failure.
-
Going with the default service name of MySQL unless there’s already an instance of MySQL installed, in which case you’ll want to provide a different name. Note that service names should be 255 characters or less and can have any legal character except for the forward-slash (/) or backslash (/).
-
Checking the Launch the MySQL Server automatically checkbox.
-
Checking the Include Bin Directory in Windows PATH checkbox. You’ll save yourself a lot of typing if you do this.
Security Options
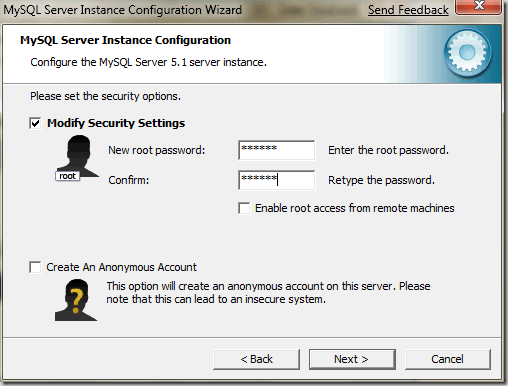
And now, the Security Options window…
You’ll be asked to provide a password for the root user twice.
You can also choose to:
-
Enable root access from remote machines. I don’t really need this on my development machine, so I didn’t check this checkbox.
-
Create an anonymous account. I don’t need this either, so I didn’t check this checkbox.
Go!
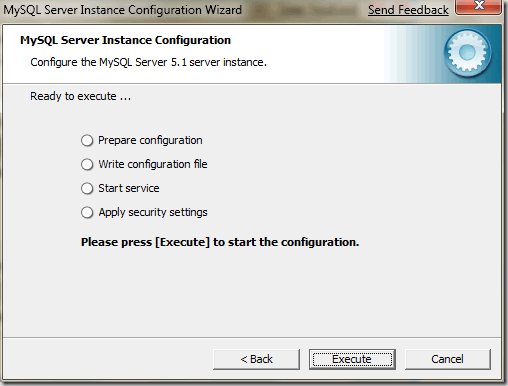
That’s it for all the option setting. You’ll now be presented with this window:
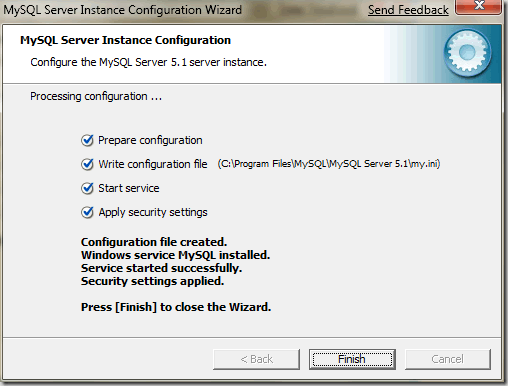
If you’re satisfied with your configuration choices in the previous windows, click the Execute button. You’ll be presented with this window as your reward:
…and you’re done!
Taking it for a Quick Spin
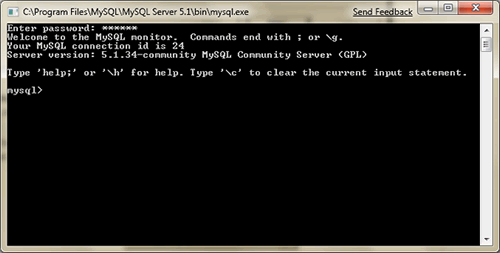
Let’s take MySQL for a quick spin to confirm it’s working. We’ll do this using the mysql command-line client and logging in as root. There are a couple of ways to do this. One is by firing up the MySQL Command Line Client from your Windows menu (or Start Menu on XP):
A command-line window will pop up, where you’ll be prompted to enter the root password. Enter it, and you’ll be in the command-line client!
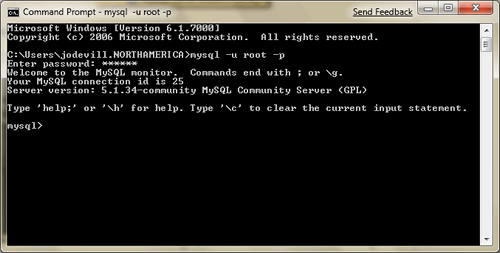
The other way is to fire up the Command Prompt and (if you specified that you wanted MySQL’s bin directory included in Windows’ PATH, which you should have), enter mysql –u root –p. The -u switch is for specifying a username, and the -p switch is for specifying that you will be providing a password for the specified username.
You’ll be prompted to enter a password. Enter the root password and you’ll be in the command-line client:
And MySQL is ready to use! You can now use the Web Platform Installer to install PHP-based apps that require MySQL.
I can’t give you a walkthrough of MySQL’s command line – that’ll have to wait for another article, or you might want to check out this article – but here’s a quick one: the show databases; command (don’t forget the semicolon at the end!) will return a list of all the databases currently in the system.
Happy MySQLing!
