Categories
Meetups Mobile Programming What I’m Up To

This Monday: Build a “Magic 8-Ball” app at the Tampa Bay Apple Coders Meetup!

This Monday — Monday, July 31st — I’ll hold another Tampa Bay Apple Coding Meetup at Computer Coach, where we’ll continue our exploration of building iOS apps by building an app that mimics the classic toy, the Magic 8-Ball.

Join us at Computer Coach on Monday, July 31st at 6:00 p.m. and learn how to build simple but interesting iOS apps! Register here — it’s free, and we’ll provide food as well!

A little practice exercise before the meetup

Don’t worry, this isn’t mandatory, but if you’re new to Xcode (or new-ish), you might want to try out this simple app exercise beforehand, just to get comfortable with the tools.

In order to do the exercise below — as well as the exercises at the meetup — you’ll need Xcode, the development tool for building applications for all things Apple. The simplest way to get it is to the Mac App Store. Follow this link, and you’ll be on your way to downloading and installing Xcode.

Once you’ve installed Xcode, launch it and follow the steps below. The app you’ll make is simple, but the exercise will get you used to working with the tools.

Create a new project
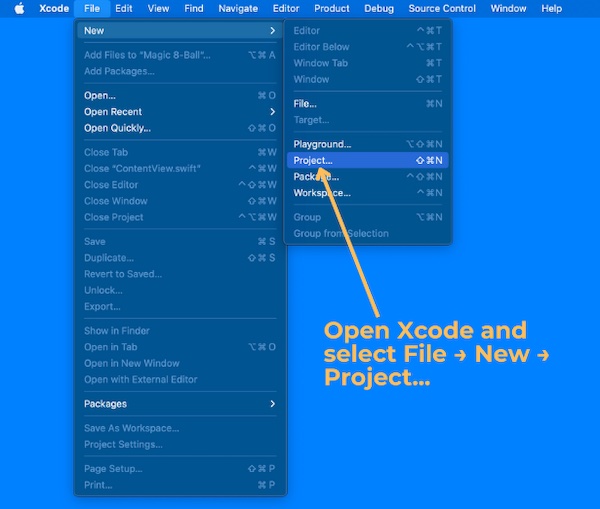
Open Xcode. From the File menu, select New, then Project.

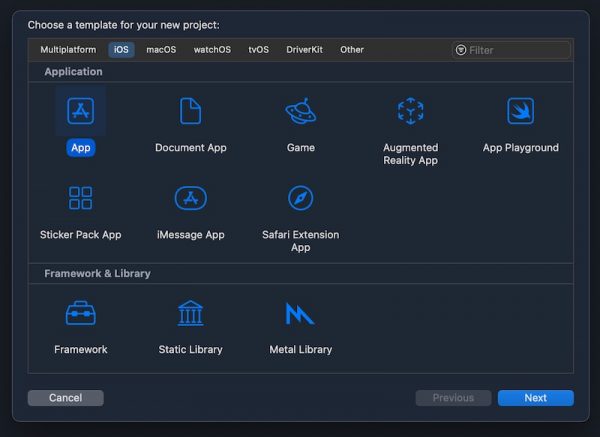
You’ll see this window pop up:

The “Choose a new template” window in Xcode. The “iOS” tab and “App” icon are selected.

This window lists templates for the different kinds of projects that you can build using Xcode. Templates are starting points for projects that contain just enough code to actually work, but they do little more than display a blank (or mostly blank) screen.

Make sure that the selected template category near the top of the window is iOS and that App is the selected template. Then click the Next button.

The contents of the window will change to this:

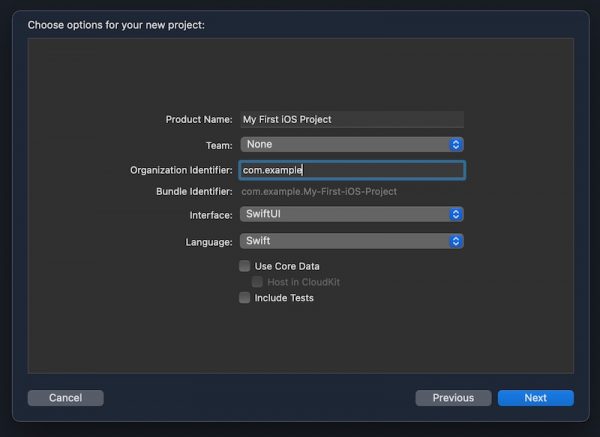
The “Choose options for your new project” window in Xcode. The “Product Name” text field contains “My First iOS Project”, the selected Team is “None”, and the “Organization Identifier” text field contains “com.example”.

This window lets you choose options for the project you’re creating. For simplicity’s sake, we’ll take the approach you might take if you’d just installed Xcode and don’t have an Apple Developer account. Here’s how you should fill out this screen:

  • Product Name: My First iOS Project
  • Team: Select None.
  • Organization Identifier: Use com.example (or, if you own your own domain, use it, but in reverse — for example, if you own the domain abcde.net, you’d enter net.abcde into this field).
  • Interface: Go with the default SwiftUI.
  • Language: Go with the default Swift.
  • Leave the Use Core Data and Include Tests checkboxes unchecked.

Click the Next button, and you’ll see this:

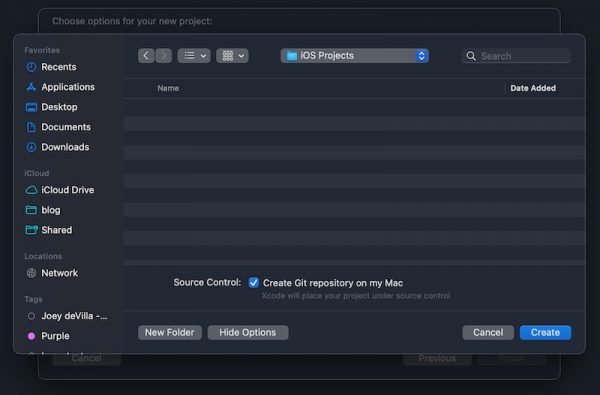
The file dialog box.

Select a place to save the project, then click Create.

Xcode now has all the information it needs to build a basic iOS app project. It will build this project and then present the full Xcode interface, as shown below:

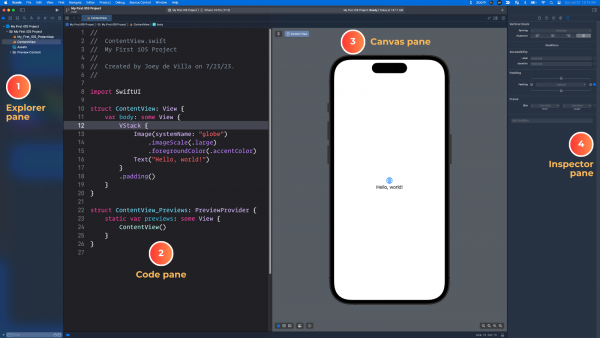
The Xcode window has four general areas, which I’ve numbered in the screenshot above:

  1. The Explorer pane. The leftmost pane of the Xcode window contains a set of Explorers, which is a set of menus that let you look at different aspects of your project. The one you’ll probably use most is the Project Explorer, which lists the project’s files and allows you to select the file you want to view or edit.
  2. The Code pane. This is where you’ll read, enter, and edit code. You’ll use this pane a lot.
  3. The Canvas pane. This pane lets you preview what the user interface will look like in real time, as you enter code that defines the it.
  4. The Inspector pane. The rightmost pane lets you get details about any code or user interface element that you currently have selected.

As I said earlier, when you create a new Xcode project, Xcode builds in enough code for a very bare-bones application.

Run the project

Take a look at that application in action — click the Run button (located near the top of the screen; it looks like a ▶️ or “play” button)…
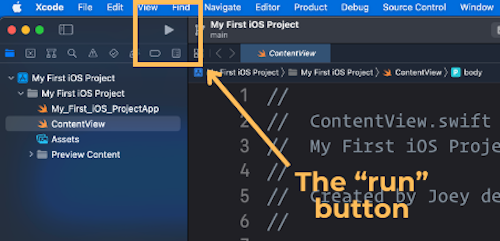
…and Xcode will launch the iOS simulator, which imitates an iOS device. Give it a few seconds to launch, and then you’ll see this:
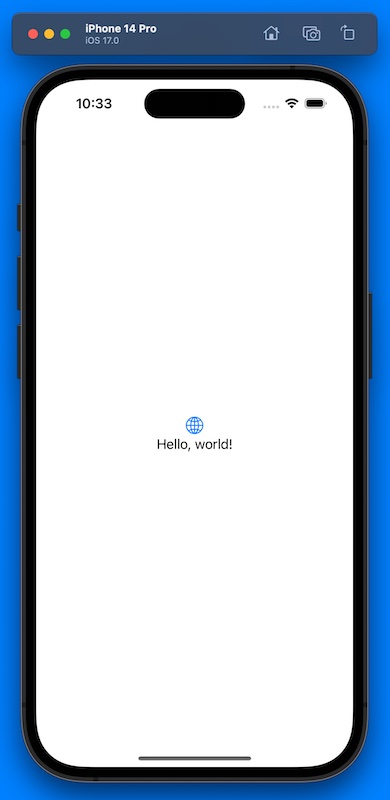
The app doesn’t do anything other than display a 🌐 icon and the text “Hello, world!” In this exercise, we’ll take this starter app and make it do a little more, adding user interface elements along the way.

The ContentView file

Let’s take a closer look at the code. First, look at the Explorer pane and make sure that ContentView is selected:
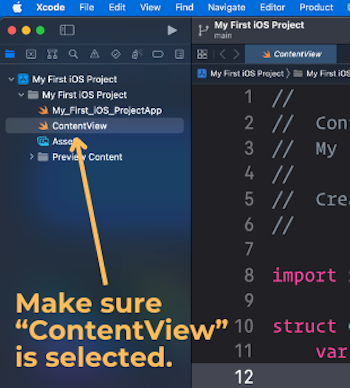
ContentView is a file, and the code inside it defines the app’s one and only screen looks and works.

Here’s the code inside ContentView:

struct ContentView: View {
    var body: some View {
        VStack {
            Image(systemName: "globe")
                .imageScale(.large)
                .foregroundColor(.accentColor)
            Text("Hello, world!")
        }
        .padding()
    }
}

struct ContentView_Previews: PreviewProvider {
    static var previews: some View {
        ContentView()
    }
}

Structs

You’ll see that the code is divided into two blocks, each beginning with a keyword: struct, which is short for “structure.” If you’re familiar with object-oriented programming languages like Python or JavaScript, you should think of Swift’s structs as being like classes: they’re “blueprints” for objects, and can have properties and methods.

There are two structs in the ContentView file:

  1. ContentView, which defines what appears on the screen when you run the app.
  2. ContentView_Previews, which displays ContentView in the Canvas pane, allows you to see what ContentView will look like while you’re coding the app.

For now, let’s just look at ContentView.

The ContentView struct

When you create a new iOS app project in Xcode, Xcode creates a “starter” project for an app with a single screen. Xcode gives this screen a default name: ContentView.

The name ContentView is arbitrary. You could rename it MainScreen or HelloWorldDisplay, and it would still work. Many developers change the name of ContentView immediately after they start a new iOS app project, but for this exercise, we’ll just stick with the name.

Let’s take a look at the first line of ContentView:

struct ContentView: View {
  • The struct ContentView part of the line declares ContentView as a struct.
  • The : View part says that ContentView adopts or conforms to the View protocol:
    • If you’ve programmed in C#, Go, Java, PHP, or Python 3.8 and later, think of a Swift protocol as being similar to an interface.
    • If you’re not familiar with interfaces but have programmed in an object-oriented programming language like JavaScript or Python prior to version 3.8, think of protocols as a loose form of inheritance.

You can think of the line struct ContentView: View { as saying “This is a struct named ContentView, which includes the properties and methods of a View object.”

Now let’s look at what’s inside ContentView:

var body: some View {
    VStack {
        Image(systemName: "globe")
            .imageScale(.large)
            .foregroundColor(.accentColor)
        Text("Welcome to the app!")
    }
    .padding()
}

Pay particular attention to that first line:

var body: some View {

ContentView contains just one thing: a variable. That’s it!

  • The var body part of the line declares body as a variable.
  • The : some View part says that body contains some kind of object that adopts the View protocol.

You can think of the line var body: some View { as saying “This is a var named body, which contains some kind of View object.”

The View protocol

The term “view” has a specific meaning in non-web GUI programming. It’s used to refer to any of the following:

  • A user interface element such as static text, a text field, a button, a switch, an image, and so on, or
  • A container for other user interface elements.

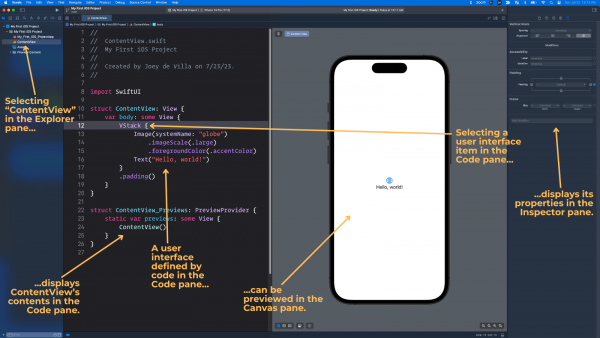
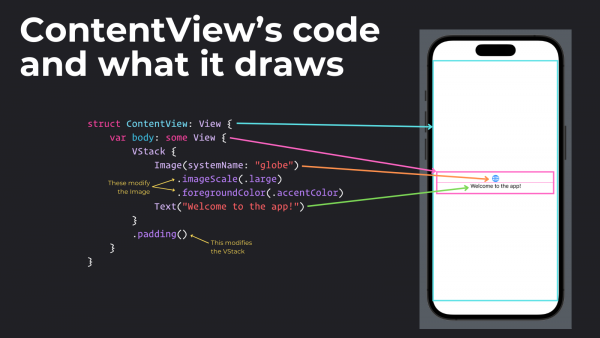
Here’s the code for ContentView and the resulting screen that shows the connections between the code and the views it creates:
Tap to view at full size.
  • ContentView is a plain View. It functions as the app’s one and only screen, and it contains that screen’s views.
  • Inside the ContentView is a VStack, which is a kind of View whose name is short for “vertical stack.” Like ContentView, VStack is a view that contains other views, but the views it contains are arranged in…you guessed it: a vertical stack or column.
  • Inside the VStack are two other views whose purposes you can get from their names:
    • Image: This view displays images.
    • Text: This view displays static text — the kind that the user can’t edit.

All of these things listed above adopt the View protocol, which means:

  • They are either a user interface element or a container for user interface elements, and
  • They include the properties and methods of a View object.

Let’s talk about that second point: that in order to adopt the View protocol (or more loosely, to be a kind of View), a struct includes the properties and methods of a View object.

There’s only one required property an object needs to adopt the View protocol: it just needs to have a variable named body, whose type is some View. body is a property that contains some kind of user interface element or a container for user interface elements.

In the case of ContentView, which adopts the View protocol, its body property contains a VStack. That VStack contains an Image view and a Text view.

The Text view

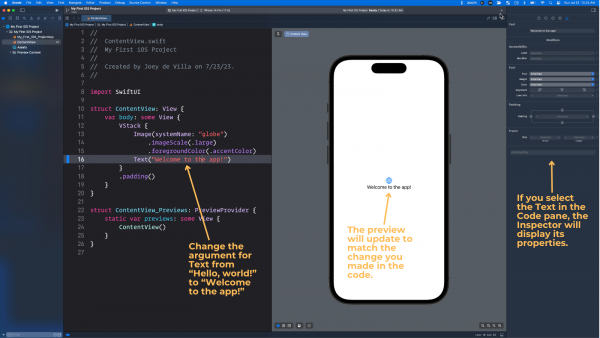
Let’s play around with the Text view first. Find the line inside ContentView that looks like this:

Text("Hello, world!")

And change it to this:

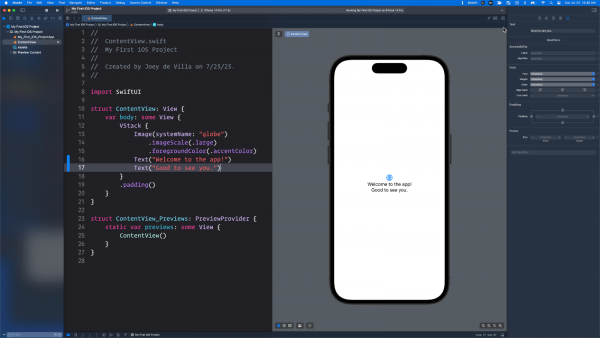
Text("Welcome to the app!")

You should see the preview in the Canvas pane update to match the change you made:
Tap to view at full size.

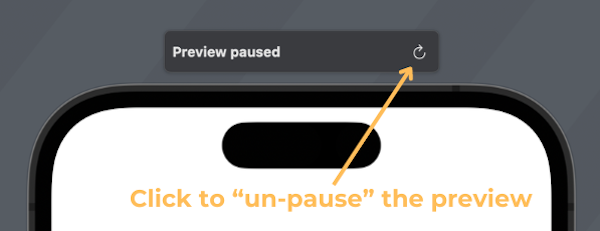
If for some reason the preview didn’t update, look for the text “Preview paused” at the top of the preview and click the “refresh” icon to “un-pause” it:
Add a new line after the Text:

Text("Good to see you.")

This should add a new Text view to ContentView, and Xcode’s preview should update to reflect the change:

Tap to view at full size.

Run the app. The preview will pause and the Simulator will start up and launch the app, which will look like this:
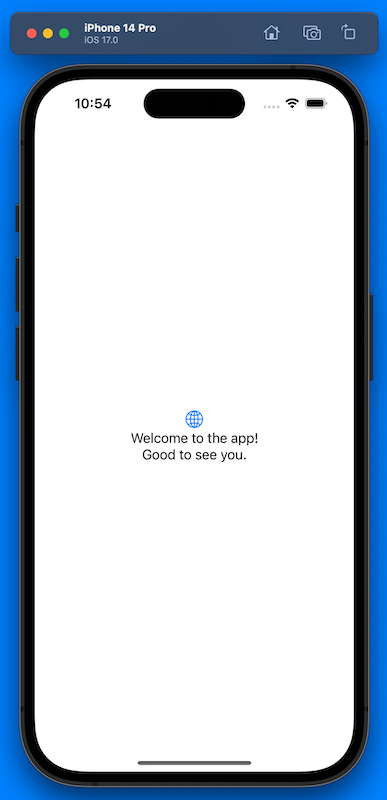
Notice that running the app in the Simulator pauses the preview. Running the app in the Simulator or making big changes to the code causes the preview to pause, but you can always restart it by either:

  • Clicking on the “refresh” icon at the top of the preview, or
  • Using the keyboard shortcut command + option + p

Text view modifiers

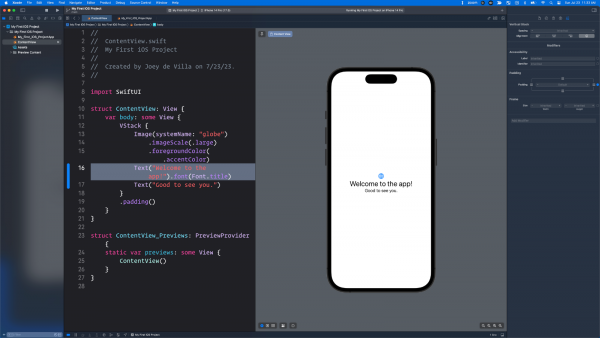
Let’s make the “Welcome to the app!” message on the screen larger — it should be the size of a title. Do this by changing the line that creates that Text view to the following:

Text("Welcome to the app!").font(Font.title)

Run the app or restart the preview — it should look like this:

I’ll cover more in Monday’s session, but feel free to experiment!
Categories
Mobile Programming

My “Working with dates and times in Swift” articles on the Auth0 blog

Swift (or more accurately, the Foundation framework from which Swift gets its date and time classes) gets a bad rap for complex date and time programming, but that’s because date and time programming is complex, and many programmers have erroneous ideas on the topic.

This blog used to be home to a four-part series on date and time programming in Swift. I’ve recently updated that series and moved it to the Auth0 Developer Blog (the one that has much greater reach and also pays my mortgage). It’s also a four-parter:

  1. Introduction to Date and Time Programming in Swift, Part 1: Learn how to create dates and times using Swift’s powerful date and time objects.
  2. Introduction to Date and Time Programming in Swift, Part 2: Now that you can create dates and times in Swift, learn how to display date and time values to your users.
  3. Date and Time Calculations in Swift, Part 1: Learn how to perform date and time calculations with Swift’s powerful date and time objects.
  4. Date and Time Calculations in Swift, Part 2: Improve your Swift date and time calculations with syntactic magic.

With these articles, you’ll be able to answer questions like:

  • What will the day and time be 10,000 hours into 2023?
  • What date is the first Friday of 2024?
  • What date is the first National Donut Day of 2023?
  • What date is the Thursday of the 33rd week of the year?
  • What is the actual date of September 50, 2023?
  • What day of the week and week of the year will April Fools’ Day 2023 fall on?
  • What’s 3:30 p.m. Pacific on the 3rd Thursday of July in the Coptic Calendar system in Melbourne, Australia’s time zone?
  • When does a 90-day warranty that starts today expire?
  • What is the date of the next Sunday? Or the previous Sunday?
  • When is the next Friday the 13th? How many Friday the 13ths will there be in 2024?
  • Can you write code like this:
let futureDate = (2.months + 3.days + 4.hours + 5.minutes + 6.seconds).fromNow

I answer all of these questions in this series, so check these articles out!

Categories
Mobile Programming

Convert a number into words in a couple of lines of Swift

https://giphy.com/gifs/whoa-hd-tim-and-eric-xT0xeJpnrWC4XWblEk

Converting a number into its word form — for example, converting 1,234,456 into one million, two hundred and thirty-four thousand, four hundred and fifty-six — used to be a really painful exercise in programming. These days, there are libraries that save you from having to do this, and in the case of Swift, this functionality is built into its standard library in the form of the NumberFormatter class. Not only will it convert numbers into words, but it will also do so for many languages!

Open a Swift playground in Xcode and enter the following code:

// Swift

let formatter = NumberFormatter()
formatter.numberStyle = .spellOut
let number = 87654
let spelledOutNumber = formatter.string(for: number)!
print("\(number) spelled out is \(spelledOutNumber).")

Run the playground code, and you’ll see this:

87654 spelled out is eighty-seven thousand six hundred fifty-four.

Having come from the world of C, where you format strings using printf() and formatting strings, and later from other languages where you use whatever formatting method its string class provides, I’ve ignored most of Swift’s classes that derive from Formatter — with one notable exception: DateFormatter, which is indispensable when working with dates and times.

I’m now looking for an excuse to use this capability.

As I typed “DateFormatter” a couple of paragraphs above, I remembered that DateFormatter had a locale property. It’s for ensuring that any dates you present are in the correct form for the locale:

I wondered:

  • Does NumberFormatter have a locale property?
  • What happens if I changed it to something other than my system’s default of US English?

So I changed the code in my playground to the following:

// Swift

let formatter = NumberFormatter()
formatter.numberStyle = .spellOut
formatter.locale = Locale(identifier: "fil_PH")
let number = 87654
let spelledOutNumber = formatter.string(for: number)!
print("\(number) spelled out in Filipino is \(spelledOutNumber).")

I ran the code and saw this…

87654 spelled out in Filipino is walóng pû’t pitóng libó’t anim na daán at limáng pû’t ápat.

…and my response was “Ay nako!” (translation: OMG!)

How about Korean?

// Swift

let formatter = NumberFormatter()
formatter.numberStyle = .spellOut
formatter.locale = Locale(identifier: "ko_KR")
let number = 87654
let spelledOutNumber = formatter.string(for: number)!
print("\(number) spelled out in Korean is \(spelledOutNumber).")

The output:

87654 spelled out in Korean is 팔만 칠천육백오십사.

My response: 세상에 (“Sesange!”, which is pretty much Korean for OMG!)

Try it out!  You might find this list of iOS locale string identifiers useful.

Tampa Bay Apple Coding Meetup (Tampa, FL) | Meetup

Speaking of Swift development, I’m restarting the Tampa Bay Apple Coding Meetup in the next few weeks. Watch this space, and if you’re interested, join the meetup group!

Categories
Mobile Programming Video What I’m Up To

How to add Auth0 authentication to a SwiftUI app

Joey deVilla in his home office, holding an “Einstein” rubber duck up to the camera.
C’mon, how many programming tutorial videos have a scene like this?

If you’re making an iOS app, the odds are pretty good that sooner or later, you’re going to have to integrate authentication — login and logout — into it. I show you how to do that with Auth0 in both a video

…as well as a matching two-part article series that walks you through the process:

Both the video and article present how the final app will look and work:

Tap to view at full size.

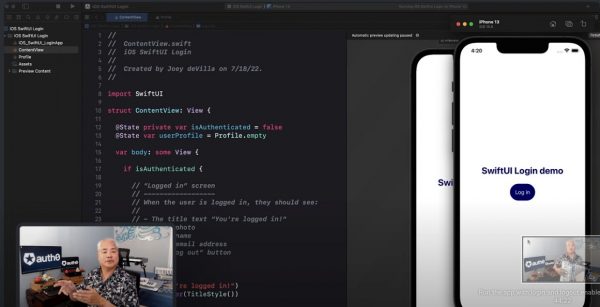
And then they’ll get you started with a starter project:

Joey deVilla appears in the corner of the screen showing the starter project of Auth0’s iOS/SwiftUI authentication video.
Tap to view at full size.

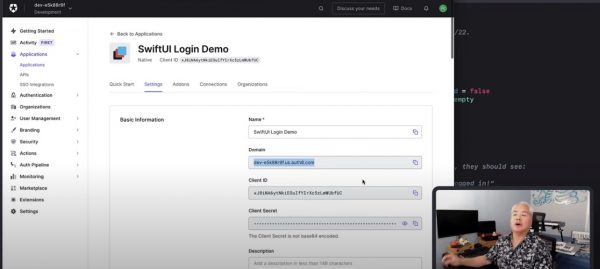
I’ll walk you through the processes of getting Auth0 set up to recognize your app and creating a user with which to log in:

Joey deVilla appears in the corner of the screen showing the Auth0 dashboard in Auth0’s iOS/SwiftUI authentication video.
Tap to view at full size.

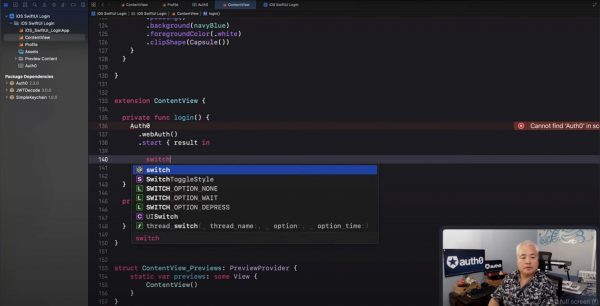
And then, I’ll show you how to add login and logout to the project’s app:

Joey deVilla appears in the corner of the screen, while adding login and logout to the starter project of Auth0’s iOS/SwiftUI authentication video.
Tap to view at full size.

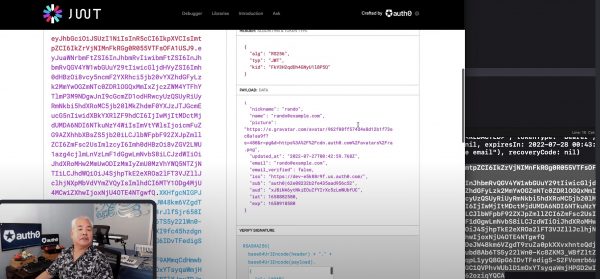
And along the way, I’ll provide a brief intro to ID tokens, JWTs, and JWT.io:

Joey deVilla appears in the corner of the screen showing the JWT.io site in  Auth0’s iOS/SwiftUI authentication video.
Tap to view at full size.

Of course the video ends with an accordion number!

Joey deVilla plays accordion at the end of an Auth0 tutorial video.
Again, I ask: how many programming tutorial videos have a scene like this?

Once again, the here’s the video, How to Integrate Auth0 in a SwiftUI App, and here are the articles:

Whether you prefer to learn by watching video, reading, or a little bit of both, I hope you find these useful!

Categories
Programming Reading Material

My tutorial on iOS authentication using SwiftUI and Auth0

Banner: Get Started with iOS Authentication using SwiftUI

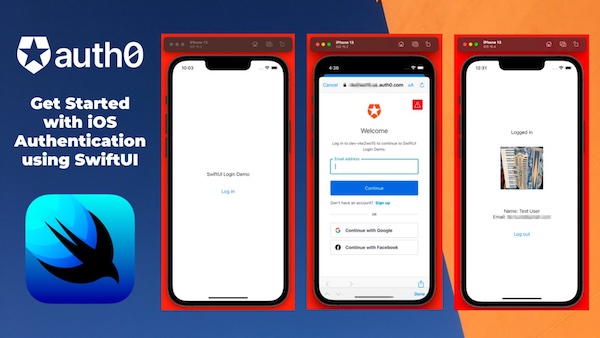
Hey, iOS developers! My latest tutorial article on the Auth0 blog shows you how to easily add authentication (that is, login and logout) to SwiftUI apps and display information from their user profile.

The article demonstrates the most basic use of the Auth0.swift SDK, the Auth0 SDK for all Apple platforms — not just iOS, but macOS, iPadOS, watchOS, and tvOS. It’s Auth0’s third most-used SDKs, accounting for more than one in ten API requests to Auth0 systems!

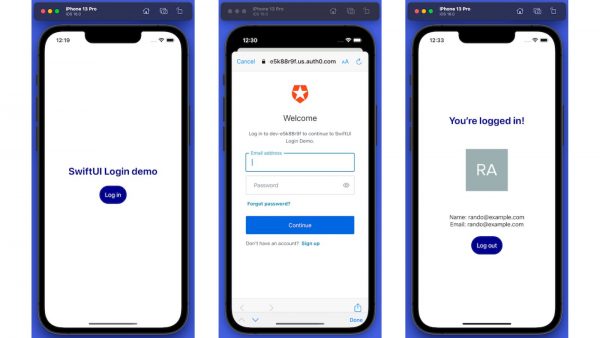
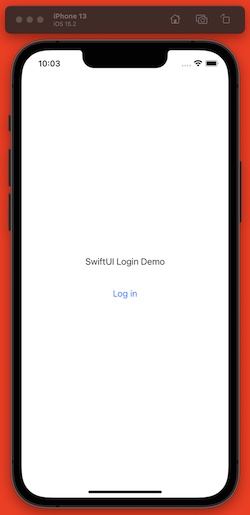
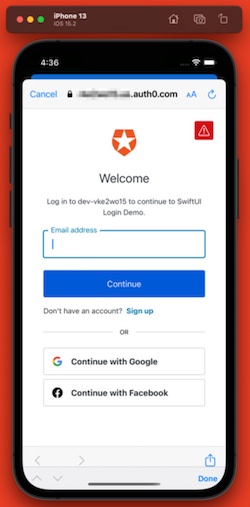
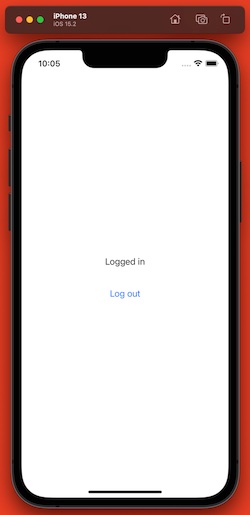
It’s a two-part tutorial. Part 1 of the tutorial starts with File → New Project…, adds some basic interactivity, adds the Auth0.swift package, walks you through setup on the Auth0 side, and finally enables login and logout:

iOS Simulator screen shot: Screen with title “SwiftUI Login Demo” and “Log in” button.
The app’s “logged out” screen.
iOS Simulator screen shot: Auth0 Universal Login screen.
Auth0’s Universal Login.
iOS Simulator screen shot: Screen with title “Logged in” and “Log out” button.
The app’s “logged in” screen.

Part 2 of the tutorial takes your basic login/logout app and gives it the ability to read user information from the user profile and display it onscreen:

iOS Simulator screen shot: Screen with title “Logged in”, photo of user, user]s name and email address, and “Log out” button.
The revised “logged in” screen.
Categories
Programming

Xcode 13 beta is available now!

Tap to view at full size.

The first day of WWDC ’21 has come and gone, which means that the beta for the upcoming version of Xcode is available now!

If you’ve been itching to try out the new Xcode (and especially the new SwiftUI), you can get it at Apple’s Developer site’s Downloads page. It’s currently installing on my machine as I write this.

Let’s do this.

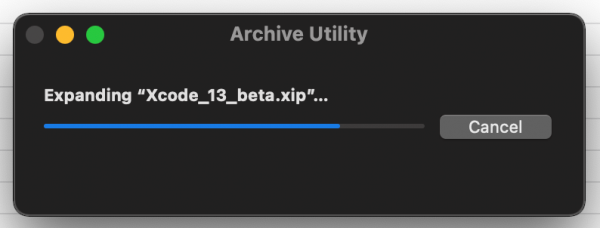
Just a quick warning if this is your first time working with Xcode: the installation process can take a while. On my Auth0-issued 2019 MacBook Pro (2.6 GHz 6-core i7, 16 GB RAM), it took about a half hour or so to unzip itself into a functioning application.

Categories
Programming

Once more, in Swift (or: A solution to day one of Advent of Code 2019)

As I wrote in the previous post, the Advent of Code is happening soon — it start on Tuesday, December 1st and runs all the way to December 25th. If you want to give your programming skills a good workout or test, you’ll want to try out Advent of Code’s challenges!

The previous post featured Python solutions to the day one challenges from the 2019 edition of Advent of Code. In this post, I’ll present solutions written in Swift.

Day one challenge, part one

Here’s the first part of day one’s challenge:

The Elves quickly load you into a spacecraft and prepare to launch.

At the first Go / No Go poll, every Elf is Go until the Fuel Counter-Upper. They haven’t determined the amount of fuel required yet.

Fuel required to launch a given module is based on its mass. Specifically, to find the fuel required for a module, take its mass, divide by three, round down, and subtract 2.

For example:

  • For a mass of 12, divide by 3 and round down to get 4, then subtract 2 to get 2.
  • For a mass of 14, dividing by 3 and rounding down still yields 4, so the fuel required is also 2.
  • For a mass of 1969, the fuel required is 654.
  • For a mass of 100756, the fuel required is 33583.

The Fuel Counter-Upper needs to know the total fuel requirement. To find it, individually calculate the fuel needed for the mass of each module (your puzzle input), then add together all the fuel values.

What is the sum of the fuel requirements for all of the modules on your spacecraft?

While the problems in the Advent of Code are the same for every participant, the data for each participant is different (there’s a sign-up process, which gives you an account, your own progress tracker, and your own data). This prevents participants from simply sharing the solution.

Here are the module masses that were provided for my account:

134492
88713
84405
148193
95951
63545
137840
65558
124836
95431
77622
91864
108677
116871
119496
97172
86115
105704
68613
77114
114013
52766
57048
80814
73888
58253
135934
97409
112439
98262
116047
57456
124261
83006
101495
133449
111372
56146
87818
92209
149259
124559
141838
147988
65703
125566
59650
139564
92430
126307
120406
147383
84362
51529
146366
131840
53270
71886
118767
104311
126181
76964
129430
95489
91098
54133
110057
107276
118226
96104
135382
85152
61697
143417
148879
126846
130205
111170
86687
113729
123330
56976
148470
66028
129715
75686
74964
148258
72669
88809
78173
92699
124806
67217
139066
136002
135730
145708
142054
135772

I used the Python REPL for my Python-based solution. For my Swift-based solution, I used the closest analogue: an Xcode Playground.

Swift, like Python uses the three quotes to denote multiline strings. I used them to define a multiline string constant, rawInput, into which I pasted the data:

let rawInput = """
134492
88713
84405
148193
95951
63545
137840
65558
124836
95431
77622
91864
108677
116871
119496
97172
86115
105704
68613
77114
114013
52766
57048
80814
73888
58253
135934
97409
112439
98262
116047
57456
124261
83006
101495
133449
111372
56146
87818
92209
149259
124559
141838
147988
65703
125566
59650
139564
92430
126307
120406
147383
84362
51529
146366
131840
53270
71886
118767
104311
126181
76964
129430
95489
91098
54133
110057
107276
118226
96104
135382
85152
61697
143417
148879
126846
130205
111170
86687
113729
123330
56976
148470
66028
129715
75686
74964
148258
72669
88809
78173
92699
124806
67217
139066
136002
135730
145708
142054
135772
"""

With rawInput defined, it’s time to convert it from a multiline string into an array of strings, with each line getting turned into its own array element. The String class’ split method does this quite easily, and the result was the splitInput string array:

let splitInput = rawInput.split(separator: "\n")

The next step was to convert splitInput’s numbers-in-string-form into actual numbers. This process would involve applying the same function — the Int struct’s “init from string” method — to all the elements in an array, which is exactly what the map method is for:

let masses = splitInput.map {Int($0)!}

Swift’s map method takes a closure containing a function as its argument and applies that function to every item in the given array, creating a new array as its result.

In this case, the function in question is:

Int($0)!

Parameters passed into the closure begin with the $ character, which is then followed by a number specifying which parameter it is. The first parameter is $0, followed by the second parameter, $1, followed by the third parameter, $2, and so on.

Only one parameter is passed to the closure: $0, which represents the current element of the splitInput array. It’s fed into the init method of Int that takes a string and attempt to produce an integer. Since it’s possible that this method will be given a string that can’t be converted into an integer, the method’s return type is the optional type Int?.

Since I’m quite certain that all the strings in the splitInput array convert to integers, I used the ! operator to force unwrap the resulting Int? values.

The end result is masses, an array of integers. Each element in the array represents the mass of a component in the ship, and we need to calculate the fuel necessary to propel each component to the final destination.

This calculation involves applying a function to every element in masses, and that function is:

  • Divide the mass by 3, rounding down.
  • Subtracting 2 from the result above.

Once again, I used map:

let fuelRequirements = masses.map { mass in
    mass / 3 - 2
}

In the function above, mass and 3 are both integers, so mass / 3 is an integer division, which automatically rounds down.

The result of this mapping is fuelRequirements, an array of integers containing the fuel requirements for each module.

The result is the sum of all the values in fuelRequirements. Unfortunately, Swift doesn’t have a built in method for getting the sum of an array, so we’ll need to roll our own:

let totalFuel = fuelRequirements.reduce(0, +)

For my data, the result was 3454942. This turned out to be correct, so it was time to tackle part two.

Day one challenge, part two

Part two involved recalculating the fuel requirements when also taking into account the mass of the added fuel:

During the second Go / No Go poll, the Elf in charge of the Rocket Equation Double-Checker stops the launch sequence. Apparently, you forgot to include additional fuel for the fuel you just added.

Fuel itself requires fuel just like a module – take its mass, divide by three, round down, and subtract 2. However, that fuel also requires fuel, and that fuel requires fuel, and so on. Any mass that would require negative fuel should instead be treated as if it requires zero fuel; the remaining mass, if any, is instead handled by wishing really hard, which has no mass and is outside the scope of this calculation.

So, for each module mass, calculate its fuel and add it to the total. Then, treat the fuel amount you just calculated as the input mass and repeat the process, continuing until a fuel requirement is zero or negative. For example:

  • A module of mass 14 requires 2 fuel. This fuel requires no further fuel (2 divided by 3 and rounded down is 0, which would call for a negative fuel), so the total fuel required is still just 2.
  • At first, a module of mass 1969 requires 654 fuel. Then, this fuel requires 216 more fuel (654 / 3 - 2). 216 then requires 70 more fuel, which requires 21 fuel, which requires 5 fuel, which requires no further fuel. So, the total fuel required for a module of mass 1969 is 654 + 216 + 70 + 21 + 5 = 966.
  • The fuel required by a module of mass 100756 and its fuel is: 33583 + 11192 + 3728 + 1240 + 411 + 135 + 43 + 12 + 2 = 50346.

What is the sum of the fuel requirements for all of the modules on your spacecraft when also taking into account the mass of the added fuel? (Calculate the fuel requirements for each module separately, then add them all up at the end.)

This called for a recursive function, the Swift code for which is below:

func fuelRequired(mass: Int) -> Int {
    let result = mass / 3 - 2
    
    if result <= 0 {
        return 0
    } else {
        return result + fuelRequired(mass: result)
    }
}

I used this function to map the values in the masses array from part one onto a new array, updatedFuelRequirements

let updatedFuelRequirements = masses.map { fuelRequired(mass: $0) }

…and the sum of its the elements was the answer for part two:

let updatedTotalFuel = updatedFuelRequirements.reduce(0, +)

For my data, the answer was 5179544.