In my previous article in Upwardly Mobile, the ongoing article series in which I look as various aspects of Windows Mobile 6 development, I showed you a simple application that made use of a couple of user interface controls. In this article, we’ll take a closer look at some of the user interface controls by way of the steak-and-cocktails lifestyle of the characters on the TV series Mad Men.
(In case you’re not familiar with Mad Men, it’s a dramatic TV series set in the early 1960s whos emain characters are advertising executives working at an agency in New York. It was the age of three-martini steak lunches, which serves as the inspiration for the example application in this article.)
Introducing Beef ‘N’ Booze
The application that we’ll build is called Beef ‘N’ Booze. It has no real function other than to demonstrate the use of some of the controls that come with Windows Mobile 6, and do so in a more entertaining way that you’d normally find in a book.
Here’s what the app will look like on startup:
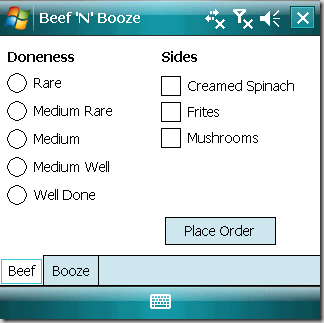
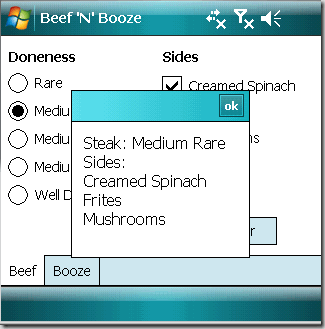
The app has a single form and that form is filled completely with a tab control with two tab pages: Beef and Booze. The Beef page lets you choose the “doneness” of your steak as well as a selection of side dishes. Once you’ve made your choices, you click the Place Order button to see a message box containing a summary of your order:
Clicking on the Booze tab takes you to the Booze page, where you can place an order from a selection of cocoktails. You can also specify the number of cocktails you want to order and how strong you want the bartender to make them:
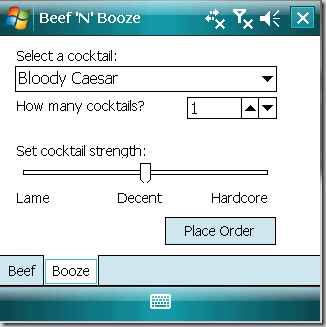
When you’ve made your drink choices, you click on the Place Order button to see a message box summarizing your drink order:
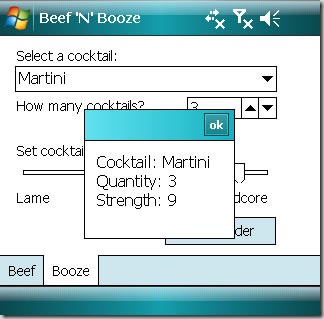
That’s the app in a nutshell. Remember that the idea behind Beef ‘N’ Booze isn’t to make something useful; it’s to demonstrate Windows Mobile’s built-in user controls and give you a chance to explore them. With that knowledge and a little practice, you can eventually build apps that actually do something.
TabControl and TabPages
One of the tricks to compensate for the limited screen “real estate” on a mobile device is to break up an application into pages. The simplest “out of the box” way to do this with Windows Mobile is to use a TabControl, which is a container that holds one or more TabPage controls. Each TabPage is itself a container that can hold other controls.
In Beef ‘N’ Booze, I created a TabControl named tabMain, which holds two TabPages:
tpgBeef, whose Text property is set to Beef. It will contain the controls for placing and order for a steak and side dishes. tpgBooze, whose Text property is set to Booze. It will contain the controls for ordering cocktails.
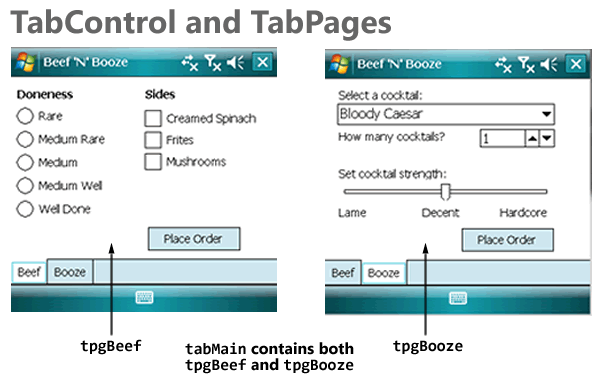
One convenient thing about using TabControls is that the tabbed pages work inside Visual Studio’s form editor. To view and edit a given TabPage, you click on its tab; it becomes the topmost page and you can add, move and remove controls from it.
Buttons
The Beef page has a single button, btnBeef, that when clicked, causes a message box to display the user’s order for steak and side dishes. The Booze page has a similar button, btnBooze, except that it causes a message box to display the user’s cocktail order.
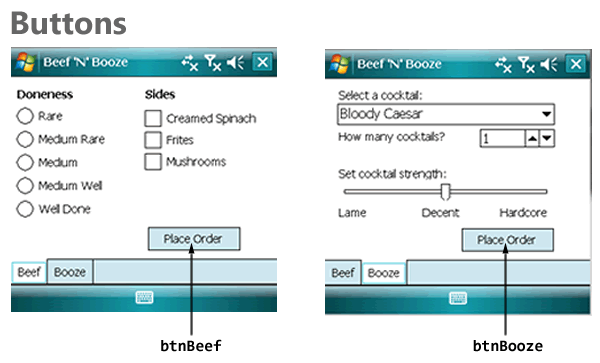
We’ll draw btnBeef on the tpgBeef page and btnBooze on the tpgBooze page. The next step is to create event handlers for both buttons. The easiest way to do this is to select each button and then use the Events view in the Properties window, and double-clicking on the Click event for each button. Here’s a screenshot of me doing that for btnBeef – Visual Studio responds by auto-magically creating a handler named btnBeef_Click:
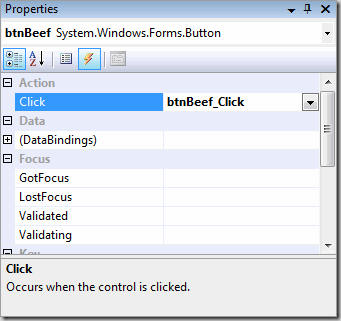
Creating event handlers for btnBeef and btnBooze creates these empty methods in the code for the form:
private void btnBeef_Click(object sender, EventArgs e)
{
}

private void btnBooze_Click(object sender, EventArgs e)
{
}
While I do like the “magic” provided by Visual Studio, I also feel that you should know what’s going on behind the scenes. How are the btnBeef_Click() and btnBoozeClick() methods attached to the btnBeef and btnBooze controls? It’s taken care of in the Designer code for the form, in which the layout and events for controls on the form is defined. Here’s the chunk of code that concerns with btnBeef’s properties and events:
this.btnBeef.Font = new System.Drawing.Font("Tahoma", 8F, System.Drawing.FontStyle.Regular);
this.btnBeef.Location = new System.Drawing.Point(165, 181);
this.btnBeef.Name = "btnBeef";
this.btnBeef.Size = new System.Drawing.Size(111, 28);
this.btnBeef.TabIndex = 8;
this.btnBeef.Text = "Place Order";
this.btnBeef.Click += new System.EventHandler(this.btnBeef_Click);
When I added a Click event to btnBeef through the Properties window, Visual Studio generated the name btnBeef_Click for the event handler, added a blank btnBeef_Click() method to the form’s code and connected the event to the handler in the form’s Designer code with this line:
this.btnBeef.Click += new System.EventHandler(this.btnBeef_Click);
When the user clicks btnBeef, we want to call a method named OrderBeef(), which will collect the data from the controls on tpgBeef, format it into something human-readable and then display the results in a message box. When the user clicks btnBooze, we want to call a method name OrderBooze(), which will do something similar, but for the user’s cocktail order. Here’s what the resulting event handler code should look like:
private void btnBeef_Click(object sender, EventArgs e)
{
    OrderBeef();
}

private void btnBooze_Click(object sender, EventArgs e)
{
    OrderBooze();
}
We’ll define OrderBeef() and OrderBooze() over the next couple of sections, as we explore the controls.
Radio Buttons
Radio buttons are controls you use when:
- You want the user to choose one (and only one) item from a selection of items
- You want the user to be able to see the complete selection of items immediately
The name “radio buttons” comes from the radio buttons from older radios, such as those in older cars, which let you choose from a number of pre-set radio stations. Selecting one button would change the tuning to the corresponding radio station and de-select the currently selected button:
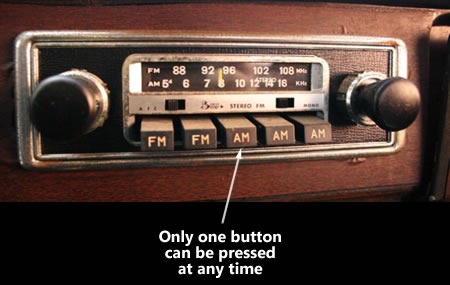
Radio buttons are grouped together by putting them inside the same container control, such as a panel, or in the case of this particular application, a TabPage. Selecting a radio button de-selects all the other radio buttons occupying the same container control.
The diagram below shows the radio buttons on tpgBeef and the names I assigned to them:
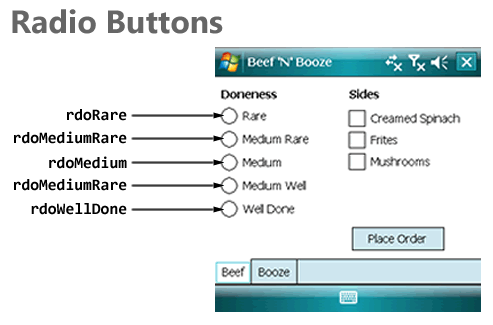
Here’s my first iteration of OrderBeef(), which shows you how to determine which radio button is selected by checking each one’s Checked property. Once that’s done, it displays the resulting choice in a message box:
private void OrderBeef()
{
    StringBuilder order = new StringBuilder("Steak: ");

    if (rdoRare.Checked)
    {
        order.AppendLine("Rare");
    }
    else if (rdoMediumRare.Checked)
    {
        order.AppendLine("Medium Rare");
    }
    else if (rdoMedium.Checked)
    {
        order.AppendLine("Medium");
    }
    else if (rdoMediumWell.Checked)
    {
        order.AppendLine("Medium Well");
    }
    else if (rdoWellDone.Checked)
    {
        order.AppendLine("Well Done");
    }
    else
    {
        order.AppendLine("Chef's choice");
    }

    MessageBox.Show(order.ToString());
}
Checkboxes
Checkboxes are useful when:
- You want the user to select zero, one or more items
- You want the user to be able to see the complete selection of items immediately
The diagram below shows the checkboxes on tpgBeef and the names I assigned to them:
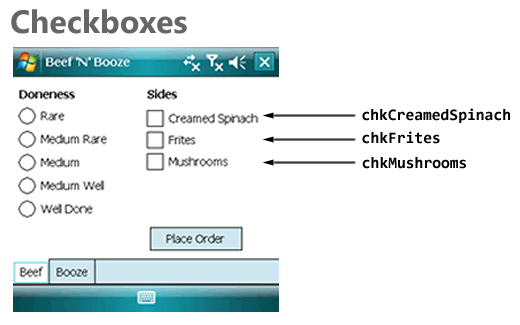
Here’s my second iteration of OrderBeef(), which adds some code to check to see which side dishes the user ordered. As with radio buttons, we’re using the Checked properties, but for the checkboxes:
private void OrderBeef()
{
    StringBuilder order = new StringBuilder("Steak: ");
    int numSides = 0;

    if (rdoRare.Checked)
    {
        order.AppendLine("Rare");
    }
    else if (rdoMediumRare.Checked)
    {
        order.AppendLine("Medium Rare");
    }
    else if (rdoMedium.Checked)
    {
        order.AppendLine("Medium");
    }
    else if (rdoMediumWell.Checked)
    {
        order.AppendLine("Medium Well");
    }
    else if (rdoWellDone.Checked)
    {
        order.AppendLine("Well Done");
    }
    else
    {
        order.AppendLine("Chef's choice");
    }

    order.AppendLine("Sides:");

    if (chkCreamedSpinach.Checked)
    {
        order.AppendLine("Creamed Spinach");
        ++numSides;
    }

    if (chkFrites.Checked)
    {
        order.AppendLine("Frites");
        ++numSides;
    }

    if (chkMushrooms.Checked)
    {
        order.AppendLine("Mushrooms");
        ++numSides;
    }

    if (numSides == 0)
    {
        order.AppendLine("None");
    }

    MessageBox.Show(order.ToString());
}
Comboboxes
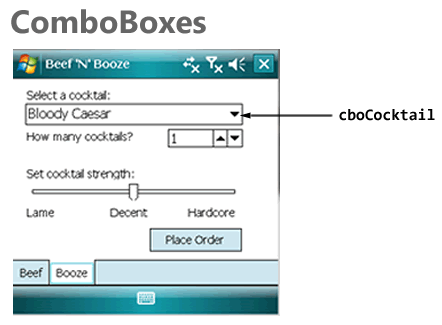
For the Booze page, I thought I’d use a different way to let the user select one item from a selection of many: a Combobox with its DropDownStyle property set to DropDownList and containing a number of cocktail names. The method below does the following:
- Sets the Combobox’s
DropDownStyle property to DropDownList, which means that the user cannot just type in any value into the list’s text portion, but can only select from items in the list.
- Adds a number of cocktail names to the list.
- Sets the list so that the first item is selected.
public void InitializeCocktailControls()
{
    cboCocktail.DropDownStyle = ComboBoxStyle.DropDownList;
    cboCocktail.Items.Add("Bloody Caesar");
    cboCocktail.Items.Add("Bloody Mary");
    cboCocktail.Items.Add("Martini");
    cboCocktail.Items.Add("Rye and Ginger");
    cboCocktail.Items.Add("Vodka Tonic");
    cboCocktail.SelectedIndex = 0;
}
If I wanted to, I could’ve set the DropDownStyle and the collection of items in the ComboBox in the Properties window.
I placed a call to InitializeCocktailControls() inside the form’s constructor:
public frmMain()
{
    InitializeComponent();
    InitializeCocktailControls();
}
And here’s my first iteration of OrderBooze(), which displays a message box showing which cocktail the user ordered. It makes use of the ComboBox’s SelectedItem property:
private void OrderBooze()
{
    StringBuilder order = new StringBuilder("Cocktail: " +
                            cboCocktail.SelectedItem.ToString() +
                            "\n");

    MessageBox.Show(order.ToString());
}
Numeric Up/Downs
Numeric Up/Downs are useful when:
- You want to restrict user input to numeric values only
- You want to restrict those numeric values to a specific range
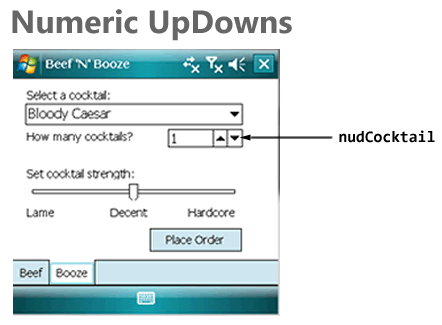
Here’s the second iteration of InitializeCocktailControls(), which adds code to initialize the numeric up/down nudCocktail in the following ways:
- Restricting the possible values to the range of 1 through 10
- Setting the up/down increment to 1 – if the user clicks the “up” button, the value contained within goes up by 1, if the user clicks the “down” button, the value contained within goes down by 1.
- Setting the initial value to 1
public void InitializeCocktailControls()
{
    cboCocktail.DropDownStyle = ComboBoxStyle.DropDownList;
    cboCocktail.Items.Add("Bloody Caesar");
    cboCocktail.Items.Add("Bloody Mary");
    cboCocktail.Items.Add("Martini");
    cboCocktail.Items.Add("Rye and Ginger");
    cboCocktail.Items.Add("Vodka Tonic");
    cboCocktail.SelectedIndex = 0;

    nudCocktail.Minimum = 1;
    nudCocktail.Maximum = 10;
    nudCocktail.Increment = 1;
    nudCocktail.Value = 1;
}
Here’s the OrderBooze() method, featuring an additional line of code to display the number of drinks the user ordered. The value contained within nudCocktail is taken from its Value property:
private void OrderBooze()
{
    StringBuilder order = new StringBuilder("Cocktail: " +
                            cboCocktail.SelectedItem.ToString() +
                            "\n");
    order.AppendLine("Quantity: " + nudCocktail.Value.ToString());

    MessageBox.Show(order.ToString());
}
Trackbars
Another way to get numeric value input from the user is to use a Trackbar control. While Trackbars don’t display their corresponding numeric values like Numeric Up/Downs, they have a couple of advantages:
- They’re larger and more “finger-friendly” than Numeric Up/Downs
- They give the user a visual cue of where the current value is in relation to the minimum and maximum values
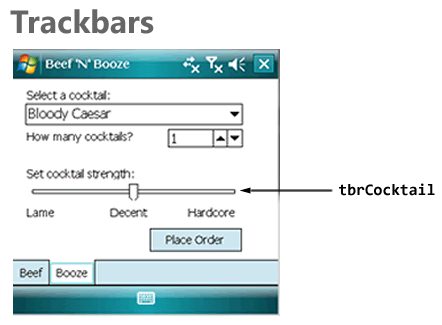
In the screenshot above, you can see that I’ve augmented the Trackbar with by putting a couple of label controls just below it: Lame, Decent, and Hardcore.
Here’s another iteration of InitializeCocktailControls(), with code to initialize the Trackbar with the following properties:
- The leftmost position on the Trackbar corresponds to the value 0
- The rightmost position on the Trackbar corresponds to the value 10
- The smallest step you can make in either direction, up or down, is 1
- Large steps, which you get by clicking to the right or left of the current slider position, change the value in steps of 5
- The initial value of the Trackbar is 5
public void InitializeCocktailControls()
{
    cboCocktail.DropDownStyle = ComboBoxStyle.d;
    cboCocktail.Items.Add("Bloody Caesar");
    cboCocktail.Items.Add("Bloody Mary");
    cboCocktail.Items.Add("Martini");
    cboCocktail.Items.Add("Rye and Ginger");
    cboCocktail.Items.Add("Vodka Tonic");
    cboCocktail.SelectedIndex = 0;

    nudCocktail.Minimum = 1;
    nudCocktail.Maximum = 10;
    nudCocktail.Increment = 1;
    nudCocktail.Value = 1;

    tbrCocktail.Minimum = 0;
    tbrCocktail.Maximum = 10;
    tbrCocktail.SmallChange = 1;
    tbrCocktail.LargeChange = 5;
    tbrCocktail.Value = 5;
}
Here’s OrderBooze(), with an additional line to display the user’s preferred drink strength, which is derived from the Trackbar’s Value property:
private void OrderBooze()
{
    StringBuilder order = new StringBuilder("Cocktail: " +
                            cboCocktail.SelectedItem.ToString() +
                            "\n");
    order.AppendLine("Quantity: " + nudCocktail.Value.ToString());
    order.AppendLine("Strength: " + tbrCocktail.Value.ToString());

    MessageBox.Show(order.ToString());
}
Putting It All Together
Here’s the complete code behind the single form in Beef ‘N’ Booze:
using System;
using System.ComponentModel;
using System.Text;
using System.Windows.Forms;

namespace BeefNBooze
{
    public partial class frmMain : Form
    {
        public frmMain()
        {
            InitializeComponent();
            InitializeCocktailControls();
        }

        public void InitializeCocktailControls()
        {
            cboCocktail.DropDownStyle = ComboBoxStyle.DropDownList;
            cboCocktail.Items.Add("Bloody Caesar");
            cboCocktail.Items.Add("Bloody Mary");
            cboCocktail.Items.Add("Martini");
            cboCocktail.Items.Add("Rye and Ginger");
            cboCocktail.Items.Add("Vodka Tonic");
            cboCocktail.SelectedIndex = 0;

            nudCocktail.Minimum = 1;
            nudCocktail.Maximum = 10;
            nudCocktail.Increment = 1;
            nudCocktail.Value = 1;

            tbrCocktail.Minimum = 0;
            tbrCocktail.Maximum = 10;
            tbrCocktail.SmallChange = 1;
            tbrCocktail.LargeChange = 5;
            tbrCocktail.Value = 5;
        }

        private void btnBeef_Click(object sender, EventArgs e)
        {
            OrderBeef();
        }

        private void btnBooze_Click(object sender, EventArgs e)
        {
            OrderBooze();
        }

        private void OrderBeef()
        {
            StringBuilder order = new StringBuilder("Steak: ");
            int numSides = 0;

            if (rdoRare.Checked)
            {
                order.AppendLine("Rare");
            }
            else if (rdoMediumRare.Checked)
            {
                order.AppendLine("Medium Rare");
            }
            else if (rdoMedium.Checked)
            {
                order.AppendLine("Medium");
            }
            else if (rdoMediumWell.Checked)
            {
                order.AppendLine("Medium Well");
            }
            else if (rdoWellDone.Checked)
            {
                order.AppendLine("Well Done");
            }
            else
            {
                order.AppendLine("Chef's choice");
            }

            order.AppendLine("Sides:");

            if (chkCreamedSpinach.Checked)
            {
                order.AppendLine("Creamed Spinach");
                ++numSides;
            }

            if (chkFrites.Checked)
            {
                order.AppendLine("Frites");
                ++numSides;
            }

            if (chkMushrooms.Checked)
            {
                order.AppendLine("Mushrooms");
                ++numSides;
            }

            if (numSides == 0)
            {
                order.AppendLine("None");
            }

            MessageBox.Show(order.ToString());
        }

        private void OrderBooze()
        {
            StringBuilder order = new StringBuilder("Cocktail: " +
                                    cboCocktail.SelectedItem.ToString() +
                                    "\n");
            order.AppendLine("Quantity: " + nudCocktail.Value.ToString());
            order.AppendLine("Strength: " + tbrCocktail.Value.ToString());

            MessageBox.Show(order.ToString());
        }

    }
}
Download, Go Forth and Noodle!
It’s one thing to read about Windows Mobile 6’s built-in user interface controls, but something else entirely to make use of them. If you’re feeling ambitious, start a new project and rebuild Beef ‘N’ Booze (or a similar app that lets you explore the controls) yourself. Or, if you’d like, download my project files by clicking the link below, play with the app, make changes and learn. No matter which route you take, the best way to learn to is fire up Visual Studio and get coding!
 Download the Beef ‘N’ Booze project (Visual Studio 2008 SP1, 15K .zip file)


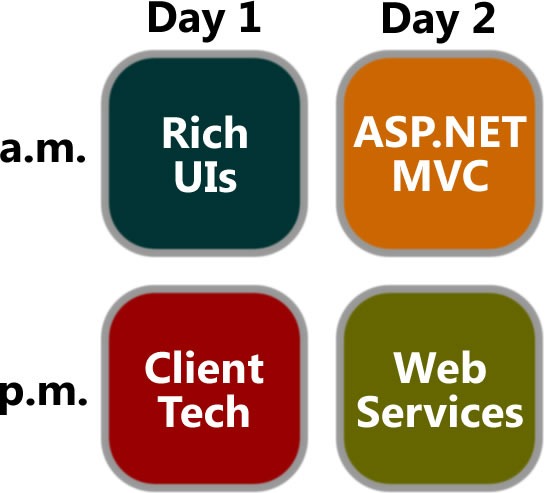
 Rich internet applications just got richer! Silverlight 3 is packed with new features and improvements that your users will notice, from pixel shaders to perspective 3D to animation enhancements to bitmap APIs to HD video. We think you’ll also be impressed by the features for developers, such as the updated style model, data binding improvements, better resource handling, and a tuned-up Web services stack. In this session, we’ll explore new features of Silverlight 3 as we build a Silverlight-based application using Expression Blend 3 and Visual Studio.
  Not a designer? Overwhelmed by Expression Blend? Not a problem! We’ll show you how to use Expression Blend to create advanced and polished user interfaces for business applications, consumer applications, multimedia projects, games or anything in between. We’ll cover features of Expression Blend from a developer’s perspective and show how it works in tandem with Visual Studio throughout the development process. You’ll learn how to create professional-looking user interfaces and visual elements – even if you don’t think of yourself as an interface designer.
 How do you build extensible and maintainable line-of-business applications in Silverlight and Windows Presentation Foundation (WPF)? How do you design and code to handle real-world complexity? Composite Application Guidance (a.k.a. "PRISM") offers guidance, libraries and examples – in small, free-standing, digestible chunks – that you can use to build applications with rich user interfaces that are also easier to maintain and extend. You’ll learn how to compose complex UIs from simpler views, integrate loosely coupled components with "EventAggregator" and "Commands", develop independent modules that can be loaded dynamically, and share code between Silverlight and WPF clients.
 This session will show you the Windows 7 APIs that will let your applications – and your users – get the full Windows 7 experience. Learn about new extensibility methods to surface your application’s key tasks. Discover how enhancements to the taskbar, Start Menu, thumbnails, desktop elements, the Scenic Ribbon, Federated Search and Internet Explorer 8 provide new ways for you to delight your users and help make them more productive. If you want to give your users the best Windows 7 experience, this session is for you!
 As a developer of .NET-based applications, you can extend your desktop software to the Windows Mobile-based platform using the tools available within Visual Studio®, the Windows Mobile SDK and the .NET Compact Framework. This session will give you an overview of how Windows Mobile lets you use your existing infrastructure, business logic, and desktop code on a mobile device to innovate and help solve business problems. We’ll show you how to use the familiar Microsoft .NET Framework and .NET-based programming languages like Visual C#® development tool. You will also learn about new features in Windows Mobile 6.5 such as the Gesture APIs and the Widget Framework and how to use them appropriately. With the launch of Windows Marketplace for Mobile upon us, this session will help you take the next step for application testing and submission.
 You’ve probably heard the buzz about Model-View-Controller (MVC) web frameworks. They’re all the rage because they combine speed, simplicity, control…and fun. ASP.NET MVC is Microsoft’s MVC web framework, and in this session, we’ll talk about the MVC pattern, explain the ideas behind ASP.NET MVC and walk through the process of building an application using this new web framework. We’ll also cover several techniques to get the most out of ASP.NET MVC and deliver web applications quickly and with style.
  Object-oriented programming makes it easier to manage complexity, but only if you do it right. The five SOLID principles of class design (one for each letter) help ensure that you’re writing applications that are flexible, comprehensible and maintainable, and we’ll explain and explore them in this session. We’ll start with a brittle ASP.NET MVC application that’s badly in need of refactoring and fix it by applying the SOLID principles. This session is a good follow-up for Introducing ASP.NET MVC, but it’s also good for developers of ASP.NET MVC looking to improve their code – or even if you’re not planning to use ASP.NET MVC. The SOLID principles apply to programming in any object-oriented language or framework.
  The world gets more service-oriented every day, and with that comes the demand to integrate all kinds of services, including those from SharePoint. This session introduces SharePoint as a developer platform and provides an overview of how you can build and deploy custom services with it. The focus will be on developing ASP.NET and Windows Communication Foundation services for SharePoint as well as building a Silverlight client to consume them.